
CBIL:Collective Behavior Imitation Learning for Fish from Real Videos
SIGGRAPH ASIA 2024 TOG

The project is still under patent review and acquring permission from SoftBank to release, however, we release core part of the simulator to perform basic pipepline training and inference.
You can download the core part of the simulator via Simulator. The repo is still updating.
- 2025-03: 🔥Demo code released.
- 2024-12: 🔥The code is coming soon.
- 2024-12: We present our work at SIGGRAPH ASIA 2024 in Tokyo.
- 2024-07: CBIL is accepted as SIGGRAPH ASIA 2024 Journal Track (TOG).
- Release the core code of CBIL (Fish Simulator Unity).
- Release the python server implementation.
- Demo code with example fish asset and texture.
- Keep updating
- Add more features
1.Download 'Simulator' Folder
2.Create a conda environment via conda create -n CBIL python=3.9 and
install dependent pip packages via pip install -r requirements.txt.
-
For the preprocessing of reference video segmentation, refers to state-of-the-art method, which is: SAM2
-
For the MVAE training, refers to the code in
basic_server.py(3D Conv Based VAE, refers to MVAE folder)

The Unity version we use is 2020.2.2f1
- Agents' states, action space and also reward functions are all written in
Simulator\Assets\Scripts\DeepFoids\FishAgent\FishAgentMulti.cs - For example, the circling reward,
bool clockwiseto control directions
private float CalculateCirclingReward(bool clockwise)
{
    Vector3 centerPoint = new Vector3(2.5f, 2.5f, 2.5f);
    Vector3 fishPosition = transform.localPosition;
    Vector3 toCenter = centerPoint - fishPosition;

    Vector3 desiredDirection;
    if (clockwise)
    {
        desiredDirection = Vector3.Cross(Vector3.up, toCenter).normalized;
        goal_direction = desiredDirection;
    }
    else
    {
        desiredDirection = Vector3.Cross(toCenter, Vector3.up).normalized;
        goal_direction = desiredDirection;
    }

    float dot_vel = Vector3.Dot(desiredDirection, transform.forward);
    float target_velocity = 1.0f;

    return high_level_weight * Scale_Reward(10.0f * (dot_vel / transform.forward.magnitude) - 10.0f * (rBody.velocity.magnitude - target_velocity) * (rBody.velocity.magnitude - target_velocity));
}
- For each trained policy, we predefine the dimension of observation space, and should correspond to definition in
FishAgentMulti.csin Simulator
// States needed for different high level task:
        // Circling:

        // Goal
        sensor.AddObservation(goal_direction);
        sensor.AddObservation(new Vector3(2.5f,2.5f,2.5f)-transform.localPosition);
        sensor.AddObservation(Vector3.Distance(transform.localPosition, new Vector3(2.5f,2.5f,2.5f)));

        // Fish States
        sensor.AddObservation(rBody.velocity);
        sensor.AddObservation(transform.localPosition);
        sensor.AddObservation(transform.forward);
- For circling, we place a virtual camera named
agentCameraRTat the bottom of fish tank (you can manually set different location), this is used to collect frames during runtime for pretrain MVAE and also policy training with imitation learning.
void SendImageToPython()
    {
        lock (sendImageLock)  // safe
        {
            VRcount++;
            // Capture the images from the virtual camera
            RenderTexture renderTexture = agentCamera.targetTexture;
            Texture2D texture2D = new Texture2D(renderTexture.width, renderTexture.height, TextureFormat.RGB24, false);
            RenderTexture.active = renderTexture;
            texture2D.ReadPixels(new Rect(0, 0, renderTexture.width, renderTexture.height), 0, 0);
            texture2D.Apply();

            // convert images to byte
            byte[] imageBytes = texture2D.EncodeToPNG();

            // Clean up the Texture2D after use to free memory
            UnityEngine.Object.Destroy(texture2D);

            string lengthStr = imageBytes.Length.ToString("D10"); // Converts length to a 10-digit string
            byte[] lengthBytes = System.Text.Encoding.UTF8.GetBytes(lengthStr);
            stream.Write(lengthBytes, 0, lengthBytes.Length); // Send the length of the image first
            stream.Write(imageBytes, 0, imageBytes.Length); // Then send the actual image bytes

            if (VRcount == 10)
            {
                VRcount = 0;
                // start to receiving rewards from python
                byte[] buffer = new byte[4]; // assume that the reward is a 4 byte float
                stream.Read(buffer, 0, buffer.Length);

                float probability = System.BitConverter.ToSingle(buffer, 0);

                // compute style reward
                float reward = rewardFunction.ComputeReward(probability);
                // add reward
                AddReward(style_weight * Scale_Style_Reward(reward));

            }
        }
Offical ML-Agent Documentation
We use ML-Agent PPO framework for reinforcement learning
ExampleTrainingConfig
behaviors:
  FishAgent:
    trainer_type: ppo
    hyperparameters:
      batch_size: 10                    # 10, 1000, 1024
      buffer_size: 100000               # 100, 100000, 10240
      learning_rate: 0.0001              # 0.0003, 0.0001, 0.0006, 0.001
      beta: 0.0005
      epsilon: 0.2                      # 0.2, 0.1
      lambd: 0.99
      num_epoch: 3                      # 3
      learning_rate_schedule: linear
    network_settings:
      normalize: false
      hidden_units: 128
      num_layers: 4                     # 2
      vis_encode_type: simple
    reward_signals:
      extrinsic:
        gamma: 0.99
        strength: 1.0
    keep_checkpoints: 50
    checkpoint_interval: 200000
    max_steps: 4000000                  # 1000000, 2000000
    time_horizon: 64
    summary_freq: 10000

- first make sure
ConnectToServer()inFishAgentMulti.csis NOT commanded out - run
basic_server.py

- specify a fish prefab used for training in
TrainingManager - select the fish number for training
- choose behavior type in
Prefab_Ginjake_veryLow_DeepFoidsasdefault
For each fish prefab, for example, Prefab_Ginjake_veryLow_DeepFoids,it has multiple components.
use the default setting for a quick start.
- Simply run
mlagents-learn fishagents.yaml --run-id=circling_demoto begin training
- run python server first (make sure
ConnectToServer()inFishAgentMulti.csis NOT commanded out) - then run
mlagents-learn fishagents.yaml --run-id=circling_demoto begin training - the discriminator will also be trained at the same time
- Load scene
TagajoSmall_Ocean - select fish prefabs
Prefab_Ginjake_veryLow_DeepFoidsinTrainingManager - choose fish number in
TrainingManagerandfish count - Load trained policy and select
inference only - Run the simulation
Optional: inference device: cpu or gpu
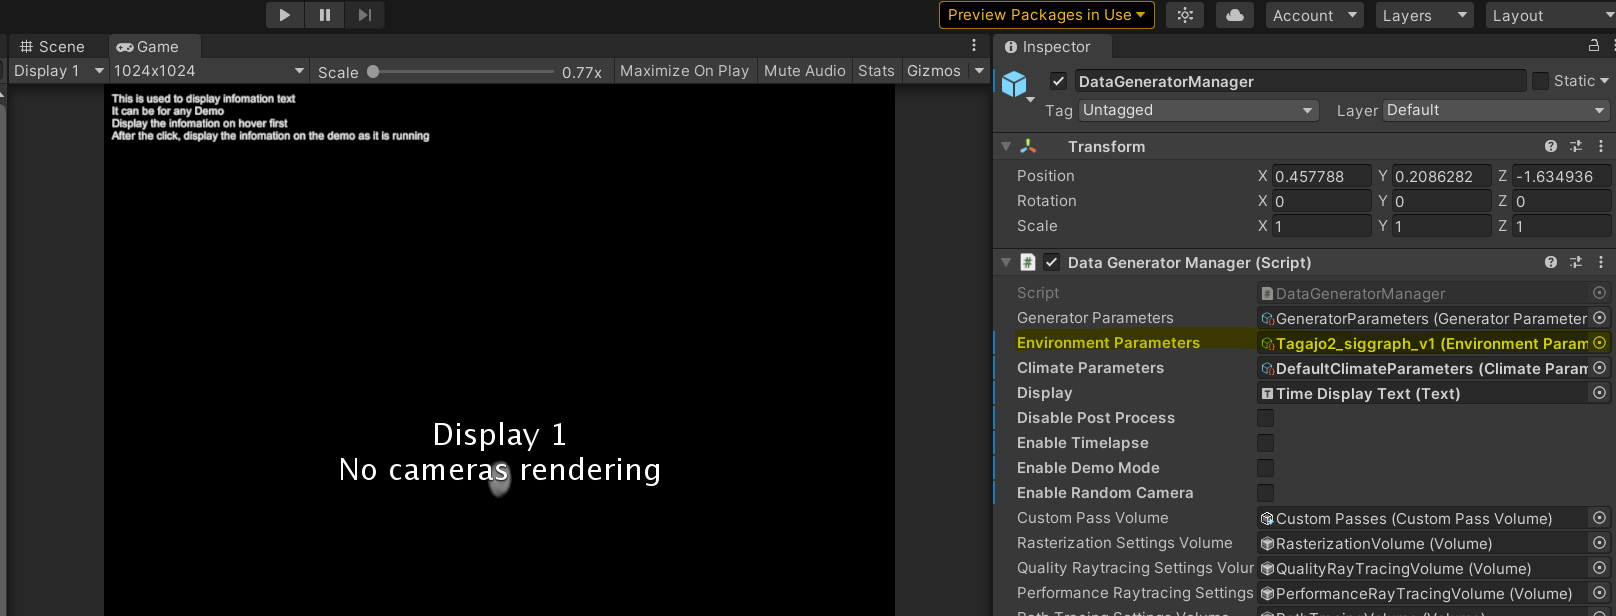
Before run the simulation, first make sure DataGeneratorManager has the following preference:
- MDE Mode
- Disable UI
If our work assists your research, feel free to give us a star ⭐ or cite us using:
@article{10.1145/3687904,
author = {Wu, Yifan and Dou, Zhiyang and Ishiwaka, Yuko and Ogawa, Shun and Lou, Yuke and Wang, Wenping and Liu, Lingjie and Komura, Taku},
title = {CBIL: Collective Behavior Imitation Learning for Fish from Real Videos},
year = {2024},
issue_date = {December 2024},
publisher = {Association for Computing Machinery},
address = {New York, NY, USA},
volume = {43},
number = {6},
issn = {0730-0301},
url = {https://doi.org/10.1145/3687904},
doi = {10.1145/3687904},
abstract = {Reproducing realistic collective behaviors presents a captivating yet formidable challenge. Traditional rule-based methods rely on hand-crafted principles, limiting motion diversity and realism in generated collective behaviors. Recent imitation learning methods learn from data but often require ground-truth motion trajectories and struggle with authenticity, especially in high-density groups with erratic movements. In this paper, we present a scalable approach, Collective Behavior Imitation Learning (CBIL), for learning fish schooling behavior directly from videos, without relying on captured motion trajectories. Our method first leverages Video Representation Learning, in which a Masked Video AutoEncoder (MVAE) extracts implicit states from video inputs in a self-supervised manner. The MVAE effectively maps 2D observations to implicit states that are compact and expressive for following the imitation learning stage. Then, we propose a novel adversarial imitation learning method to effectively capture complex movements of the schools of fish, enabling efficient imitation of the distribution of motion patterns measured in the latent space. It also incorporates bio-inspired rewards alongside priors to regularize and stabilize training. Once trained, CBIL can be used for various animation tasks with the learned collective motion priors. We further show its effectiveness across different species. Finally, we demonstrate the application of our system in detecting abnormal fish behavior from in-the-wild videos.},
Please make sure to specify your own output directory for the synthesized dataset. It can be quite large, so I suggest you specify D drive or somewhere you can find good amount of space. You can do this from UI in GeneraterParameter. (Assets/GeneratorParameter -> go to inspector and set Output Path)
If you do not set it, the app crash in runtime.
We plan to make it relative path or optional to make everyone life easeier soon.
- Disable Post Process: Disables all post process effects when running the simulation
- Enable Timelapse: Enable timelapse mode to create timelapses of the simulation
- MDE mode: turns off animation for Depth map generation
- Disable UI: Turns off UI used for the Interactive Demo
- Enable Interactive Mode: Setups up enviroment to be condusive to interaction with the fish
- Enable Demo Mode: Enables the running of demos for different parts of the simulation
- Enable Random Camera: Will randomize which camera to use between the selected cameras
- Additional Data: adds Time of day, temperature in Celesus, and Light Intensity in Lux to the global_id csv
- The default aquarium is set using the
Prism Settingsfrom Aquarium in hierarchy list. The shape, size and position of fish cage can be controlled by the side count, apothem, height, center and thickenss for the prism. For example, 8 sides can make the cage an octagon, and 4 sides can make it a cuboid.- A double-layer structure is used for fish cage to prevent fish from penetrating cage walls. Both layers have the same shape, but the outer layer is larger. The size of outer layer is controlled by the parameter
Scale Multiplier Of Outer Boundthat scales it uniformly.
- A double-layer structure is used for fish cage to prevent fish from penetrating cage walls. Both layers have the same shape, but the outer layer is larger. The size of outer layer is controlled by the parameter
- The content under
Deprecated Settings(fromUse Old AquariumtoWater Surface) is used to set the old aquarium, which only creates a cubic cage. It will only work ifUse Old Aquariumbox is checked and is kept in case we need it. It can be disregarded if we use the default (prism) aquarium setting.
-
Please follow the ml-agents install guide to install the required Python packages for ml-agents toolkit. Note that the current framework has only be tested on Python 3.6.10. When install the
mlagentsPython package, please installmlagents==0.25.0(instead of0.27.0) because it's from the same release as the ml-agents Unity package version1.9.0-preview.1that we are using and can avoid possible compatibility issues.This a mandatory step before training! We have installed the required Unity packages for ml-agents (version
1.9.0-preview.1) to this project, so there is no need to re-install them in the Unity editor. However, it is still recommended to clone the ml-agents repository to access example environemnts and better understand their workflow.Also note that currently DeepFoids can only be run in the TagajoSmall_Ocean scene.
-
Once the Python packages are installed, set number of fish agents and size scale in
DeepFoidsTrainingManagerobject. Make sure thePrefab_Ginjake_verLow_DeepFoidsis selected as an element of Fish Prefabs. We don't need to care about the prefab selected for FishSpecies script because it won't be called in the DeepFoids mode. -
In the
Prefab_Ginjake_verLow_DeepFoidsinstance (no need to activate), at Behavior Parameters > Behavior Type, make sure “Default” is selected. Please don't select "Heuristic Only", otherwise you will control the fish movement using mouse and keyboard, which is only useful when we test the action setting of fish.Also check the Salmon Animation Controller > Deep Foids Controller checkbox in the
Prefab_Ginjake_verLow_DeepFoidsinstance. -
(Optional) In the
Prefab_Ginjake_verLow_DeepFoidsinstance, we can modify training parameters including min/max speed and acceleration limit at Fish Agent Multi. For more information about other parameters in ml-agents and grid sensor scripts, please refer to ml-agents tutorial and grid sensor project page. -
In
DataGeneratorManager, check the Enable Deep Foids checkbox, and make sure theDeepFoidsTrainingManageris selected as the Train Manager. This step will switch the Foids mode to DeepFoids mode in current scene. -
Run ml-agents Python training script (see “Training the environment” section in ml-agents tutorial for details). It should be in the form of
mlagents-learn <training config file path> --run-id=<custom run-id>and you can run it from any directory if you follow the default installation of Python packages in ml-agents install guide. The trained policy should be stored inresults/<run-id>under the same directory where you run the training script. -
Once you run the Python training script, you will see a line saying something like
Listening on port 5004. Start training by pressing the Play button in the Unity Editorin the command prompt, then you can click Play button to start training! -
Please note: It is recommended that output in the DataGeneratorParameters set to None when training or using deep foids. While it is possible to generate output when deep foids is enabled, it will be much slower than using normal foids. Therefore, it is recommended that you make sure to disable deep foids when generating datasets.
-
At
Prefab_Ginjake_verLow_DeepFoids> Behavior Parameters > Model, select a trained policy file (.onnx) under the project directory.If your trained policy file is not within the unity_fish_sim directory, you need to firstly copy it into the project. Then all trained policy files under the project directory should be automatically listed in the model selection window.
Please make sure the ml-agents parameters such as space size of observation and continuous actions in the current ml-agents scripts are the same as those used for training the selected policy. Otherwise a warning message saying “… Size of the model does not match” and/or error messages will pop out.
-
At
Prefab_Ginjake_verLow_DeepFoids> Behavior Parameters > Inference Device, select "CPU". This tells Unity to use CPU to run the trained policy. Although we can choose "Burst" too, it does not seem to improve the simulation speed and has not been widely tested. Choosing "GPU" will result in error messages related to Unity's Barracuda pacakge. -
At
Prefab_Ginjake_verLow_DeepFoids> Behavior Parameters > Behavior Type, make sure "Default" is selected. -
Click the Play button in Unity editor to run trained policy.
-
To enable the social rank system in TagajoSmall_Ocean scene, please select
Prefab_Yellowtail_verylow_DeepFoids_SocialRankas the fish prefab to run inDeepFoidsTrainingManager. Then make sure in this prefab the Fish Agent Multi script > Enable Social Rank System box is checked. -
When running social rank system demo, you may see aggressive behaviors (ie. a dominant fish may chase and/or attack its subordinate neighbor) happen sometime. The dominant fish has a red trail and the subordinate being chased has a yellow trail. The chasing behavior will end either: 1) when the dominant hit the subordiante, 2) when the subordiante fall behind the dominant or 3) when the chasing continues over a time threshold (10 seconds by default). This time threshold and the frequency of aggressive behaviors can be tuned in fish agent control script.
-
A large cage (eg. a 5 x 4.6 x 5 cubic cage or similar sized octagon cage) and a small number of fish (eg. 10 or 20) are recommended for social rank system demo. It's because the social rank system policy was trained using a large cage and actually with red seabream, but runs well on yellowtail. Besides that less fish makes the trails clearer to see.
- To switch back from DeepFoids mode to Foids mode, we just need to uncheck the Enable Deep Foids box in
DataGeneratorManager. Then when we click Play button the original Foids model will run.
- Using Fisheye mode when trying to generate data will not only return incorrect outputs but will also crash the simulation when using 3D Bounding Box and Visibility passes together. Use standard mode when generating data instead!
- Also do not have multiple cameras enabled when trying to generate output. It will result in all ouput images being white.
Quick Explanation of Attenuation Coefficients
- Attenuation Coefficients: These are values which determine how much light is absorbed by the medium (in this case waters). These will always be stored as a 3D vector, with X = absorption of red, Y = absorption of green, and Z = absorption of blue. The higher the value, the more that color is absorbed by the medium and the less visible it is.
Quick Explanation of Scattering System
- The Scattering system determines how much light should be scattered back toward the camera using whats called a phase function. The phase function takes the angle between the camera and the light coming from the sun to calculate how much of it is being scattered in the direction of the viewer. To determine the phase function, a script called "ScatteringCalculator" was used to first create two tables called volume scattering functions which are then used to create the phase function. This then used by the shader to determine how the light will be scattered. This is no longer nessary as the shader now uses functions that are close enough to provide good results. Now everything is entirely done in the shader.
Shader Settings Explanation
-
Light Attenuation Coefficients: The base attenuation coefficients, which represent the light absorption contributed by the water itself (along with with dissolved organic matter in the water)
-
Chlorophyll Attenuation Coefficients: The light absorption contributed by the concentration of of chlorophyll from phytoplankton in the water
-
TSS (Total Suspended Sediments) Attenuation Coefficients: The light absorption contributed by the concentration of TSS in the water.
-
Chlorophyll concentration: The amount of Chlorophyll in the water, measured in µg/L
-
TSS concentration: The amount of the total sediments (or TSS) in the water, measured in mg/L. Also controls the turbidity of the water. Higher concentrations of sediments make the water more cloudy in an exponential fashion.
- Currently calculated by combining the small and large particle concentrations together
-
Small particle concentration: Controls the amount of small particles in the sim
- defined as particles smaller than 1 micrometer
- Scatters more light than larger particles
- keep values between 0 and 1 (example values were around 0.1)
-
Large particle concentration: Controls amount of large particles in the sim
- defined as particles greater than 1 micrometer
- Scatter less light than smaller particles
- keep values between 0 and 1 (example values were around 0.1)
-
Cloudy weather reduction factor: how much light is reduced on a cloudy day
-
Is there cloudy weather? Bool: Pretty self explanatory. True activates the weather reduction factor and false turns it off.
-
NOTE: Having 'SecretLab.PostProcessing.RadicalWarpAndGhosts' in the 'Before post Process' in Custom Post PRocess Orders under HDRP Default Settings Under Project Settings interfers with the underwater shader and will prevent the PhysicallyBasedShader's large particle concentration setting from working properly How to create water specific settings
-
Ocean: Keep rand Chlorophyll and TSS at lower random amounts to produce more oceanic settings
-
Coast: Use chlorophyll and TSS at higher random amounts to produce more coastal settings
-
Setting the particle concentrations higher than 1 will start to darken everything but the sun. This is why they should be kept below 1. (Will darken the scene generally speaking, but below .1 is fairly managable)
-
Increasing the compensation in the exposure compotent of the global volume (in the scene its called "volume" and its under "Volumes" in the "enviroment" object will help bright white light at the surface of the water. It will help cover a wider section of the water that the shader doesn't currently cover very well
- i.e areas that aren't near the sun
-
References from Oceanographic Literature that are useful in creating realistic enviroments:
-
Visual References for what each of the Jarlov Water Types should look like in terms of color:
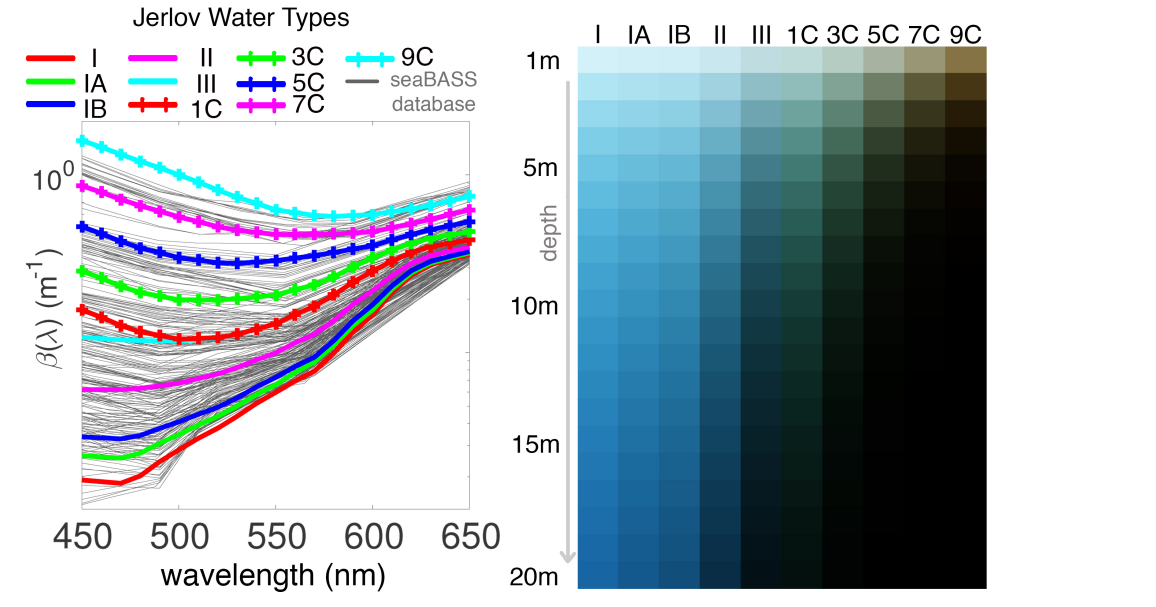
- Types I - III refer to Oceanic waters while types 1C - 9C refer to coastal waters
- Graph on the left is useful in determine the overall attenuation coefficents for each water type
-
Table of concentrations of various properties that are typically found in Jarlov Water types:
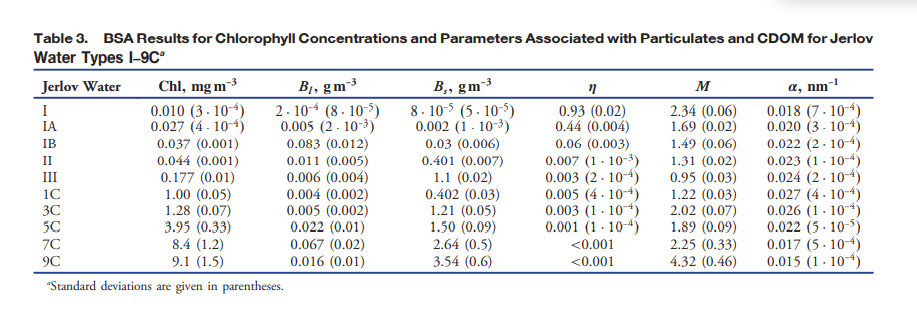
- Types I - III refer to Oceanic waters while types 1C - 9C refer to coastal waters
- Coastal waters tend to have more chlorophyll than oceanic
- Coastals usually have more chlrophyll than suspended sediments
-
Chlorophyll concentration tends to be from 0 - 9 mg/m^3. Total Suspended Sediment (TSS) concentration tends to be from 0 - 5 g/m^3
-
-
Camera models in the scene wiggle
- To control how fast it wiggles, go to the asset and look at the camera wiggle script. There you can change the wiggle speed.
- Where the asset is:
- The script to look for:

- Wiggle speed is how long before the model will change direction in seconds


Demo Manager Explanation
-
To make a demo, you add Demo Events to the event queue by pressing the plus in the top right hand corner of the event queue
- To control how long the overall demo is going to be, put the point in time the demo will end in seconds into the "End Time" paramter
- The demo will end once the End Time is reached, even if there are still demo events queued up
-
Each Demo Event has a start and end time, which determines when the event is active and when it ends
- To edit the start and end times, put your start time in "Start time" and put your end time in "End Time" inside the demo event
- These should be written in seconds
-
Event type determines the kind of event that takes place for the duration
- To change the demo event type, go to the dropdown under "Event Type" and click the dropdown to change the event type
-
The demo events go as follows:
- Changing base attenuation (Name: Base Att)
- Changes the attenuation of the water alone from the starting attenuation to ending attenuation given in the demo event over the course of the event
- The vector correspondings for the attenuation coefficents for R G B in that order
- If you want the coefficents to be close to the real world counter parts, look at the picture of the coefficents in the Dataset Generation section below
- Changing Chlorophyll and TSS concentration + setting attenuation (Names: Chlorophyll and Sediments)
- This is done the same way as 1. but with the concentration instead of attenuation
- Can also set attenuation coefficients of TSS and CHlorophyll depending on the event picked
- The vector correspondings for the attenuation coefficents for R G B in that order
- If you want the coefficents to be close to the real world counter parts, look at the picture of the coefficents in the Dataset Generation section below
- Changing Particle Concentration
- First two line control the start and end concentration of small particles
- The last two lines control the start and end concentration of large particles
- Keep values between 0 and .1, otherwise the scene will start to get too dark
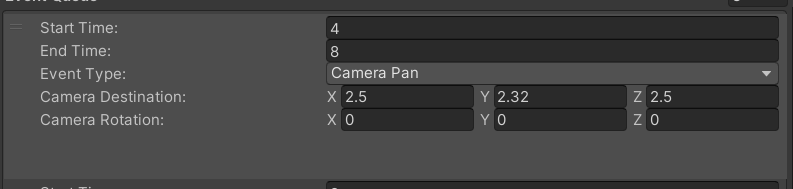
- Camera panning (Name: Camera Pan)
- Can move the camera from its current position to the given position over the course of the event
- When using a Camera Panning event, set the location in the scene where you want the camera to end up at in the "Camera Location" parameter. For orientation, you should put in the origentation in Euler angles
- This means that (90,45, 15) would be 90 degrees around the x-axis, 45 degrees around the y-axis, and 15 degrees around the z - axis
- When gizmos are enabled, you can see where the camera is and where it is facing based on the red spheres that appear in the distination of the panning event
- like this:
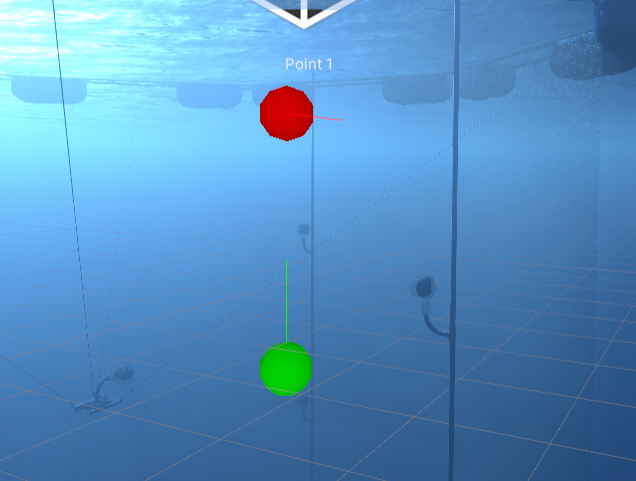
- the green sphere is the starting position of the camera, and the green line is the forward facing direction of the camera
- the red sphere is the position the camera is going to end up, and the red line is the forward facing direction the camera will be at
- spheres are label "Point x" based on the order they appear in the event queue NOT BASED ON CHRONOLOGICAL ORDER!
- Toggling cloudy weather (Name: Weather)
- Toggles on cloudy weather for the duration of the event
- Will switch back to how it was before the event once the weather event is over
- Ocean Selection of Jerlov water types (Name: Ocean Select)
- Recreates a selected jerlov water type from water type dropdown
- To change the water type, click the "Water Type" dropdown in the demo event
- Jerlov water type classfication is a system that classifies bodies of water based on their inheirant optical properties, such as turbidity and attenuation.
- Water types are classified based on how much chlorophyll particles (like plant matter) and sediment particles are found in the water
- For some more details on this system and what each type is, go to end of the "Underwater Shader" section and look for "References to Oceanographic literature"
- Changing longitude and latitude (Name: Location Change)
- Interpolates from the current long/lat to the given long/lat over the course of the event
- Changing base attenuation (Name: Base Att)
-
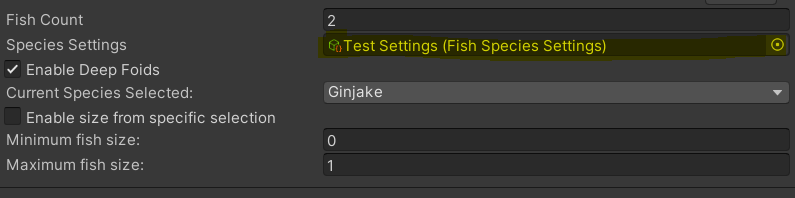
Deep foid settings:
-
To enable the use of deepfoid based fish, select the 'enable deepfoids' option in demo manager
-
The fish count will determine the number of fish generated
-
By default you will be able to set a minimum and maximum size of fish, which the fish size will be selected randomly between the min and max
-
If 'enable specfic selection' option is selected, size will be randomly selected from an array of specfic sizes rather than a range
- Change what is on the list to determine what sizes are selected
-
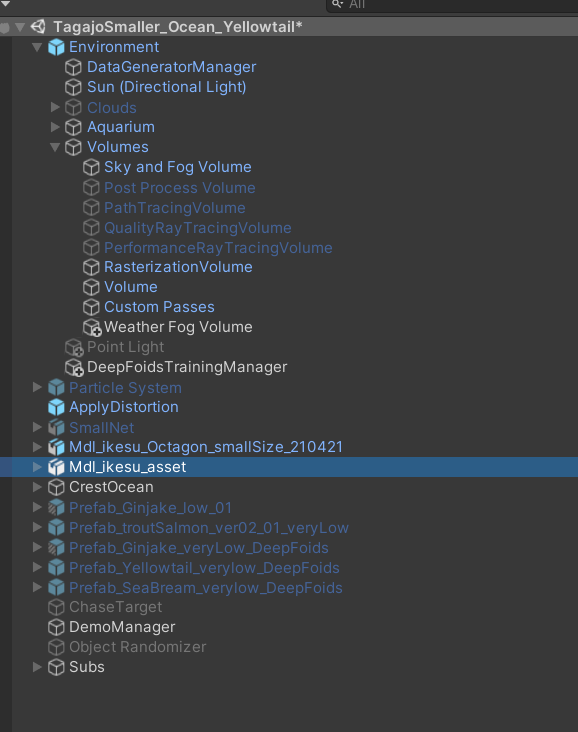
Species settings are stored in a scriptible object called 'SpeciesSettings', and controls the avaiblie options for species selection along with which prefabs are selected
-
To change what species are avalible to be selected, double click the current object in 'Species Settings' to make changes
- Picture for Reference:
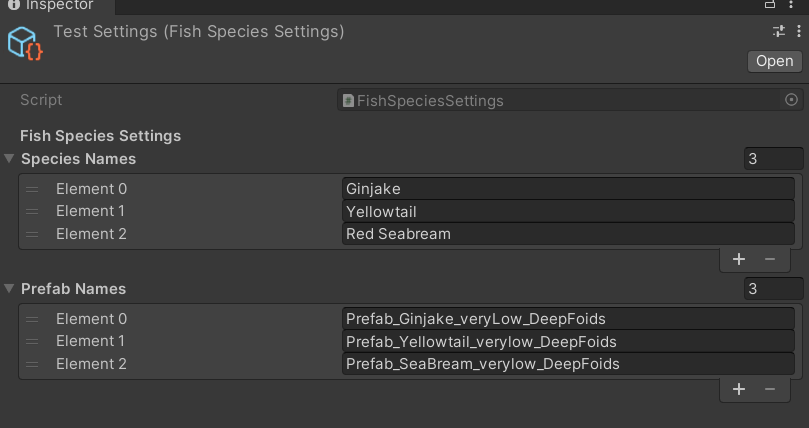
- If you double clicked the SpeciesSettings object, you should get this screen:
- Picture for Reference:
-
The SpeciesSettings object requries the user to first add the name of the fish prefabs to the 'Prefab Name' array, and then for the name of each species to be written in the 'species names' array
- The names must be in the same order as the species prefab names appear in the 'Prefab Name' array. Otherwise it will select the wrong species (like in the previous picture)
-
The species used to create the deepfoid fish can then be selected in 'Current Species' from a drop down, which will be used to have all the fish generated as the selected species
-
There are not settings currently for multiple different species to appear at once.
-
-
Any event that isn't listed here but appears in the event type list doesn't have any fucntionality
- Put the destination longitude and the "longitude" section and the destination latidude into the "latidude" section
-
Any event that isn't listed here but appears in the event type list doesn't have any functionality
-
Example Demo Event:
-
NOTE: Make sure to have the generator parameters setting "Frames per cycle" set to a very high value. The Demo manager system doesn't completely overwrite the generator parameters time system at the moment.
-
NOTE 2: Don't have the enviroment randomizer enabled when demo manager is on! It will mess with the system


- The UI can be found under the Canvas gameobject in the scene heirarchy
- The Event System is used to detect mouse clicks on buttons, so DO NOT DELETE IT
- Disabling the UI is very easy, all you need to do is uncheck the box next to the Canvas name in the inspector when canvas is selected
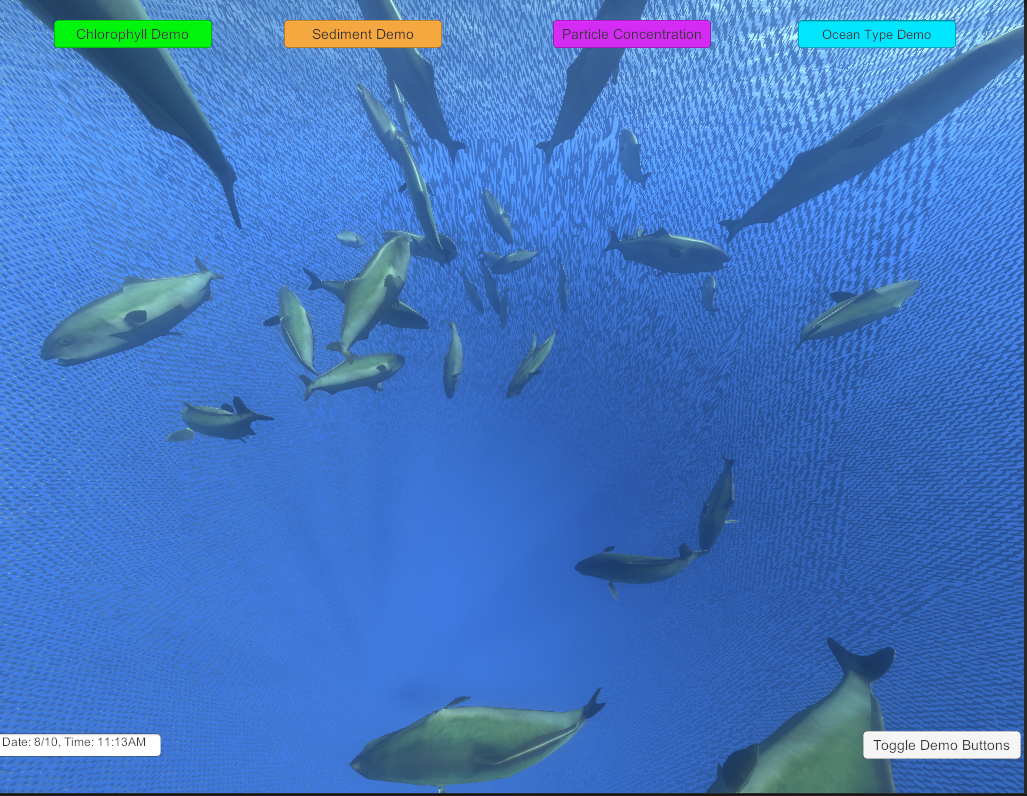
- The top 4 buttons runs various demos found in the Demo Manager
- The lower left corner displays the date and time in the simulation
- the lower right button turns off all buttons except the time display
- Example of UI:

Interactive Demo Explaination
- Go to Scenes > Enviroments > Tagajo Small_Ocean and double click it to open scene with interactive demo
- When you run it for the first time, you may see a pop-up window asking if you want to repair some of the FMOD libraries, click Repair. This will prevent the message from popping up again
- The Interactive demo allows the user to tap the screen (aka right click with mouse) to scare away fish, as well as press the I key to place a rock in the scene
- to "tap" the screen, simply right click on the screen. Fish close to the camera will be scared away
- The fish will avoid the rock as it floats down from the point it was placed
- Example of interactive Demo UI
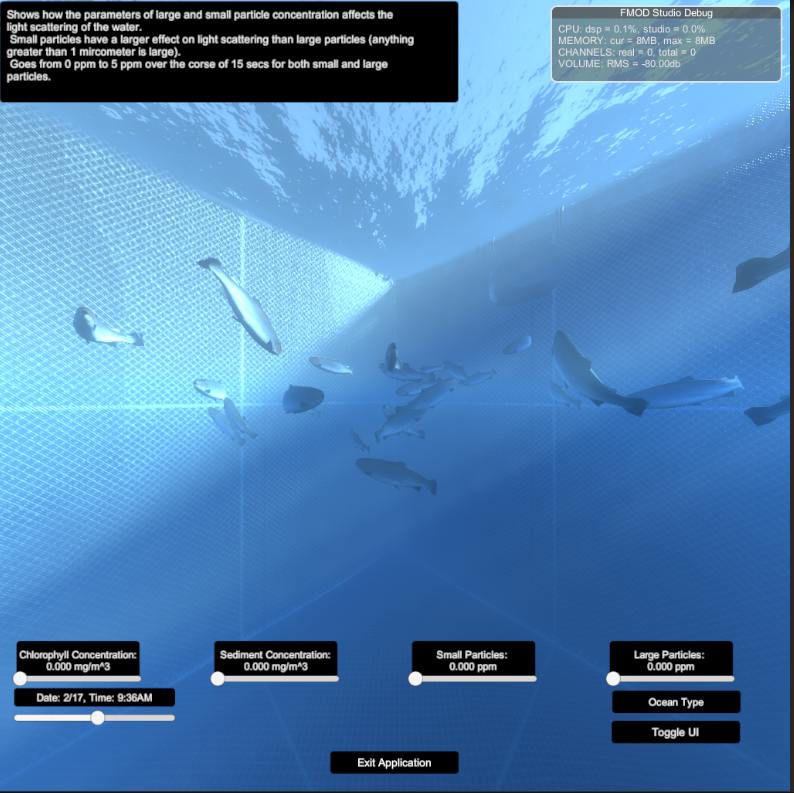
- The sliders at the bottom control the physical parameters of the water as described previously in "Shader Settings Explanation"
- Hovering over the displays for the sliders will have an explaintion of the slider in the top left of the screen
- Also true with the OceanType button
- The OceanType changes the physical properties of the water to match a specific body of water
- Bodies of water based on Jarlov water types (see Demo Manager for explaination)
- The displays above the slidrs will reflect the current properties of the water, but the sliders themselves will not move to reflect the changes
- Time slider below the datetime display controls the time of day in hours
- Toggle UI turns off all other UI except Toggle UI button
- Exit Application will exit play mode or exit the application if using a build version
- FMOD Debug scene in picture only shows up in Unity Editor How to build the Interactive Demo
- The sliders at the bottom control the physical parameters of the water as described previously in "Shader Settings Explanation"
- Go to Scenes > Enviroments > Tagajo Small_Ocean and double click it if not done already
- Go to File > Build Settings...
- Should pull a tab like this:
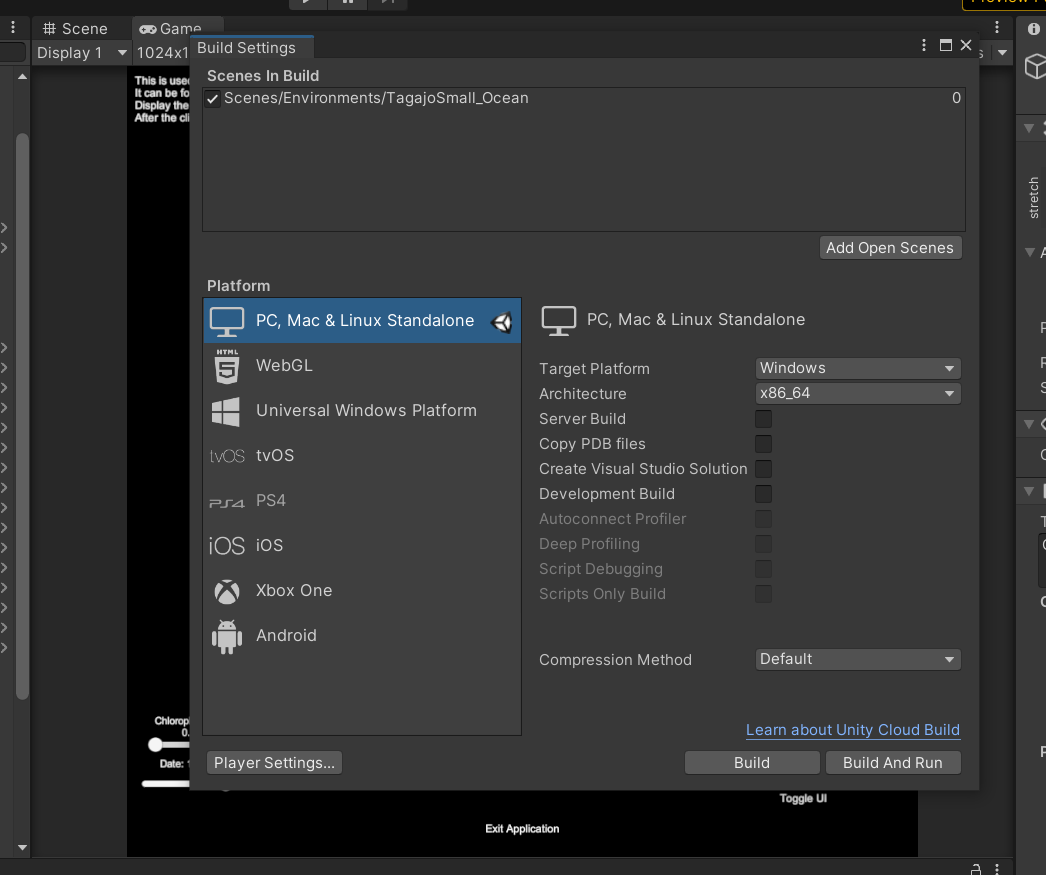
- Should pull a tab like this:
- Change the Target Platform to determine if you want to build for windows or mac
- Once this is done and unity is finished switching over to whatever platform you picked, click the build button
- Chose the folder you want the build to be and and press ok
- Wait for it to build, and once its done you will have your build!
- If there are errors, the build will not build and will list the errors in the unity console
- You should be able to head to the build location to run the build version


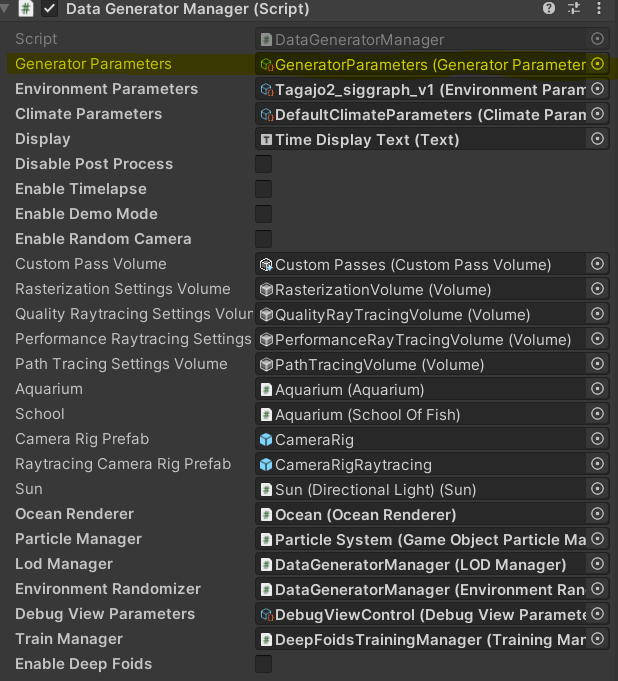
- To change anything about dataset generation, go to the "DataGeneratorManager" gameobject under Enviroment
- Explaination of each setting in the DataGeneratorManager script inside DataGeneratorManager:
- Generator Parameters: Controls how many cycles a dataset will go through, how long each cycle is, and what is outputted each cycle
- Double click the object set in the Parameters to change Generator settings
- Cycle count determines how many cycles there will be for the sim
- frame count determines the total about of frames in a cycle
- fps determines how many frames equal a second
- Output path is the path to the folder that the files are going to be outputted to
- The output path will be editing by the script to automate the system. If interupted the path will still be edited. Check it frequently to make sure its correct
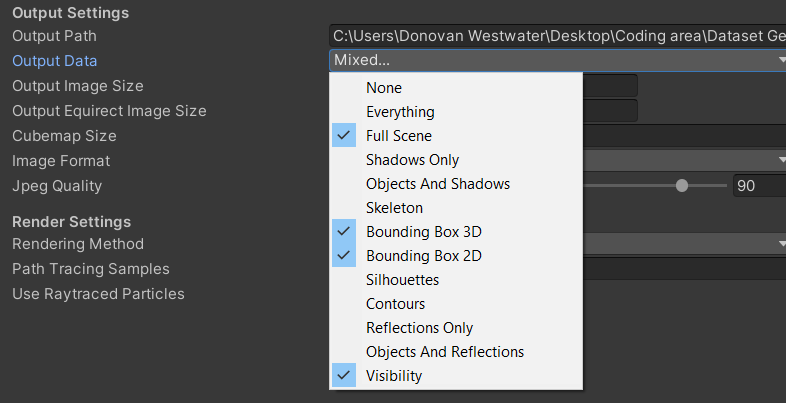
- Output data is what will actually be outputted.
- Output data is a bitflag, and to turn on a given output type, you need to go to the drop down and click it
- You can have multiple types on at the same time. This can be done by selecting the dropdown again and turning on the options
- The types are:
- None: no options enabled
- Everything: all options enabled
- Shadows only: output image with only shadows
- Objects and Shadows: output iage with only shadows and objects
- Skeleton: only shows mesh skeletons
- Bounding Box 3D: output image shows 3D bounding box around the fish
- Bounding Box 2D: output image shows 2D bounding box around the fish
- Silhouette: Fish are shown as mono-colored silhouettes
- Contours: Only shows the contours of the fish
- Reflections Only: Shows the reflections
- Reflections and Objects: Shows the reflections and their objects
- Visibility: Outputs data on the visibility of the fish
- Depth Map: Outputs depth map for all the fish in the scene
- quite exspensive at higher resolutions. Keep the resolution low when using this
- Oriented Box 2D: Uses the 3D bounding box to calculate an oriented 2D bounding box around the fish
- Here is what an average dataset should look like:
- Enviroment Parameters: Controls what fish are used in the sim, which camera(s) will be used, and contains Enviroment Randomization Parameters
- Double click the object set in the Parameters to change Enviroment Parameter settings
- Have only 1 camera selected at a time (Unless Enable Random Camera is set to true. See the setting below for details). Don't have Fisheye on for any camera used for dataset geneartion
- Double click the Random Enviroment Parameters setting to change how the simulation randomizes the enviroment each cycle. Too many parameters to list here. Use references in the previous shader settings explainations to help in creating good settings
- Try to Keep attenuation values as they are in the Randomizer. If they are changed, here are the values they should be closer to:

- Try to Keep attenuation values as they are in the Randomizer. If they are changed, here are the values they should be closer to:
- Disable Post Process: Disables all post processing effects (including the underwater rendering shader) when set to true
- Enable Timelapse Mode: When set to true, the sim will create a timelapse between the the start and end times found in Random Enviroment Parameters
- The speed is also determined by the Random Enviroment parameters under Timelapse speed. Measured in hours per frame
- Enable Demo Mode: When set to true, the sim will go through all the events set in Demo Manager and will use the Demo Manager time system instead the usual set frame system found in Generator Settings
- Enable Random Camera: When set to true, the sim will randomly pick between all the cameras enabled in Enviroment Parameters for a given cycle.
- Enable Deep Foids: When set to true, the sim will generate fish that use Deep Foids behavoir instead of the usual foids.
- Generator Parameters: Controls how many cycles a dataset will go through, how long each cycle is, and what is outputted each cycle
- To turn off and on randomization, go to the Enviroment Randomizer compotent under the "DataGeneratorManager" gameobject and go to the "Enable Randomization setting"


Depth Map Explainer and the 2 Types of Dataset
- The Depth Map or Depth Map Pass is a the pass that uses the code from the visiblity pass to generate a depth map for the fish. The depth currently only works well for dataset generation when the animation for the fish is turned off. Becauese of this and because certian datasets don't require a depth map at all, Its important to know how to use the depth map and when not to use it.
- The if you are using the depth map then make sure to:
- Turn off the Animator, Salmon animation Controller compotents in the fish prefab being used to generate the fish. This will turn off animation for the fish
- Keep the output image diamensions at 256 x 256 (found in DatasetGeneratorParameters), this will make the dataset genearte much faster.
- If you want a dataset for 3D tracking purposes, do not leave the depth map pass on
- Make sure that the animation compoents are turned on and that the image diamensions are 1024 by 1024 (found in DatasetGeneratorParameters).
- Make sure the flowing force script in the CameraRig prefab (found in DatasetGenManager object) is disabled (check mark in top left corner of script unchecked)
- It messes with the training at the moment as the object will rotate in both the y - axis and the z -axis (both have same effect because gimple lock)
Here is a quick step by step explainer to for how to make a dataset
- go to Scenes > Enviroments > Tagajo Small_Ocean and double click it
-
- Click on DataGeneratorManager

- Click on DataGeneratorManager
-
- Double click on the Enviroment Parameters in the inspector
- Double click on the Enviroment Parameters in the inspector
-
- Check the box next to "Use This Camera" for the cameras you want data generated for
- The dataset for the camera will be put in a folder named after the camera
- If the dataset is interupted the Output File Path will have been edited to reflect which camera the sim was working on before interuption. Check Output path before generating the dataset
- When enabled, you should see a green sphere showing where the camera will face and be postioned
-
- Double click Random Parameters to edit enviromental settings the and the amount of fish
-
- The main settings to worry about are under Underwater Shader. Edit the Concentrations in order to control the variance of what bodies of water show up
- Use the "Underwater Shader Settings" explaination to help find the bodies of water you want to create
-
- Once you edited the settings click back on DataGeneratorManager and click on "Generator Settings"
- Once you edited the settings click back on DataGeneratorManager and click on "Generator Settings"
-
- Edit these settings to control the cycles per camera, the frames per cycle, the fps, and the passes you want run for each camera
- Make sure your output path is correct
- Once this is all done, press the play button and wait for the dataset to be generated.


If the Visibility output type is enabled, then for each frame a file (named cycle_{cn}_frame_{fn}_{camera}_visibility.csv) is output containing the rendered pixels per fish as well as an estimate of how visible those pixels are. The Visibility output type requires a raytracing-capable GPU.
- id
- The id of the fish.
- pct_screen_covered
- non_occluded_pixels / (screenWidth * screenHeight)
- non_occluded_pixels
- The number of pixels of the fish that are actually rendered on screen (i.e., the number of pixels not occluded by other fish)
- visibility_estimate
- Ranges from [-1, 1]. Values closer to 0 mean the fish is very likely invisible, while values farther from 0 mean the fish is likely visible. Values very close to 1 or -1 are unlikely.
- The estimate is constructed from two components.
- The standard deviation of the pixel values of the contents of the fish's bounding box (after post processing). This is used to estimate the information content of the bounding box. A value close to 0 implies there is not a lot of variation. For instance, the fish may be a similar color to the ocean, or the whole area may be covered by solid fog.
- The correlation coefficient of the non-occluded pixels before post-processing and the non-occluded pixels after post-processing. This is used to estimate the degree to which post-processing has changed (and potentially obscured) the fish. Values close to 0 mean the fish has been very affected by post-processing, while values close to 1 mean it hasn't changed much at all. Values close to -1 imply a negative correlation between the pre- and post-processing fish. For instance, the colors may be inverted.
- These two components are multiplied together to get the final estimate.