tuns
Host public web services on localhost using SSH
NOTICE: This is a premium pico+ service
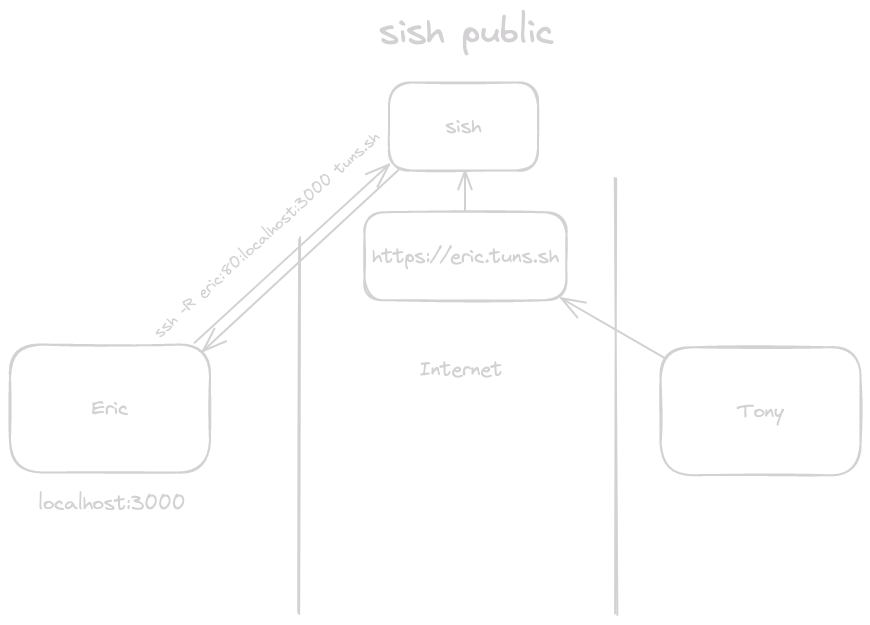
Share your localhost with the world in one ssh command.
1ssh -R dev:80:localhost:3000 tuns.sh
2# Your local server is now live at https://{user}-dev.tuns.sh
No installs. No configuration. No cloud deployment. Just SSH.
Why tuns? #
Skip the deployment dance. You're building something locally and need to share it -- with a client, a teammate, or a webhook. Normally you'd have to deploy to staging, configure DNS, set up TLS, and wait. With tuns, you run one command and you're live.
Zero infrastructure overhead. No nginx configs. No Let's Encrypt certificates. No cloud VMs. Your laptop is the server; tuns handles the rest.
Works everywhere SSH works. If you can SSH, you can use tuns. No CLI to install, no daemon to run, no firewall rules to configure.
What can you do with it? #
- Demo a prototype to a client without deploying to production
- Test webhooks from services like Stripe, GitHub, or Twilio against your local server
- Collaborate in real-time by sharing your dev environment with a teammate
- Host services from home without exposing your network or configuring port forwarding
- Debug mobile apps against your local API
- Run integration tests against external services that need to call back to you
Features #
| Feature | What it means for you |
|---|---|
| Zero install | Uses ssh, which you already have |
| Automatic HTTPS | TLS certificates handled for you |
| Custom domains | Use your own domain with simple DNS setup |
| HTTP, WSS, and TCP tunnels | Not just web traffic |
| Multi-region support | Global edge locations for low latency |
| Per-site analytics | See who's accessing your tunnels |
| Connection alerts | Get notified via RSS when tunnels connect or disconnect |
| Private sharing | Share your local server with specific users only |
Quick start #
1# Expose a local web server on port 8000
2ssh -R dev:80:localhost:8000 tuns.sh
3# → https://{user}-dev.tuns.sh
4
5# Expose a TCP service (e.g., database, game server)
6ssh -R 0:5432:localhost:5432 tuns.sh
7# → tuns.sh:{assigned-port}
How is tuns different? #
| tuns | ngrok | Cloudflare Tunnels | |
|---|---|---|---|
| Install | None (uses ssh) | Requires CLI | Requires CLI |
| Auth | SSH keys you already have | Separate account + token | Cloudflare account + token |
| Pricing | Included with pico+ | Free tier + paid plans | Free (with Cloudflare DNS) |
| TCP tunnels | Yes | Paid only | Yes |
| Custom domains | Yes (via DNS) | Paid only | Cloudflare DNS only |
| Connection alerts | Yes (via RSS) | Paid only | No |
| Site analytics | Yes | Paid only | Requires Cloudflare dashboard |
| Open source | Yes (sish) | No | No |
For deeper configuration and advanced usage:
Read the sish docsTUI #
We have a TUI viewer to you can see all your active tunnels for monitoring.
1ssh pico.sh
2# -> tuns

Alerts #
We provide notifications for connect and disconnect events using our pico+ RSS feed.
You can also see the alerts into our tuns TUI.
Regions #
tuns.sh is a global service!
See our regions page to learn more about our geographical service coverage.
User namespace #
When creating a tunnel to tuns we always prefix the name with your username:
{user}-{name}.tuns.sh
This includes when a client is using tuns as a ProxyJump:
1ssh -R foobar:22:localhost:22 tuns.sh
2# On the client side
3ssh -J tuns.sh {user}-foobar
Custom Domains #
We require you to set up CNAME and TXT records for the domain/subdomain you would like to use for your forwarded connection. The CNAME record must point to tuns.sh. The TXT record name must be _sish.customdomain and contain the SSH key fingerprint used for creating the tunnel. This key must also be linked to your pico+ account.
You can retrieve your key fingerprint by running:
ssh-keygen -lf ~/.ssh/id_rsa | awk '{print $2}'
Example:
customdomain.example.com.          300     IN      CNAME   tuns.sh.
_sish.customdomain.example.com     300     IN      TXT     "SHA256:mVPwvezndPv/ARoIadVY98vAC0g+P/5633yTC4d/wXE"
Once set up, you can then create tunnels via your custom domain like this:
ssh -R customdomain.example.com:80:localhost:8000 tuns.sh
Make sure to select the correct (closest) tuns instance. You can find the instance you're connected to from the connection output from tuns:
You are connected to tuns.sh. The following tunnels are only accessible on this instance.
In this case, my CNAME would use tuns.sh
You may want to pre-select the region you connect to. Try pinging ash.tuns.sh or nue.tuns.sh to find the instance closest to you (lowest latency), and use that for both your SSH connection and CNAME.
Debug custom domains #
First check the main record:
1dig customdomain.example.com
2
3; <<>> DiG 9.18.36 <<>> customdomain.example.com
4;; QUESTION SECTION:
5;customdomain.example.com.               IN      A
6
7;; ANSWER SECTION:
8customdomain.example.com.        60      IN      A       141.148.85.124
Then check the TXT record:
1dig -t txt +short _sish.customdomain.example.com
2
3SHA256:mVPwvezndPv/ARoIadVY98vAC0g+P/5633yTC4d/wXE
tunmgr #
A tunnel manager for docker services.
tunmgr automatically set's up tunnels for docker services. It utilizes Expose ports as well as DNSNames (and the container name/id) to setup different permutations of tunnels.
 1services:
 2  tunmgr:
 3    image: ghcr.io/picosh/tunmgr:latest
 4    restart: always
 5    volumes:
 6      - /var/run/docker.sock:/var/run/docker.sock:ro
 7      - $HOME/.ssh/id_ed25519:/key:ro
 8    healthcheck:
 9      test: ["CMD", "curl", "-f", "http://localhost:8080/health"]
10      interval: 2s
11      timeout: 5s
12      retries: 5
13      start_period: 1s
14  httpbin:
15    image: kennethreitz/httpbin
16    depends_on:
17      tunmgr:
18        condition: service_healthy
19    # labels: # or provide tunnel names and ports explicitly
20    #   tunmgr.names: httpbin # Comma separated list of names. Can be an empty
21    #   tunmgr.ports: 80:80 $ Comma separated list of port maps. (remote:local)
22    command: gunicorn -b 0.0.0.0:80 httpbin:app -k gevent --access-logfile -
With that docker compose file httpbin will be exposed as a public service on tuns.
How do I keep a tunnel open? #
If you don't want to use tunmgr then we highly recommend using a tool like autossh to automatically restart a SSH tunnel if it exits.
1autossh -M 0 -R dev:80:localhost:8000 tuns.sh
Bash script #
Here's a helper script that should make it easier to create tunnels.
 1tunnel() {
 2    TUNNEL_TYPE=""
 3    TUNNEL_ENDPOINT=""
 4    TUNNEL_ARGS=""
 5
 6    case $1 in
 7        http|https)
 8            TUNNEL_TYPE="-R"
 9            TUNNEL_ENDPOINT="$([[ $1 == "http" ]] && echo "80" || echo "443"):"
10
11            if [ -z $2 ]; then
12                echo "Tunnel provided incorrect port. Usage: tunnel $1 <port>"
13                return
14            fi
15
16            if [ ! -z $3 ]; then
17                TUNNEL_ENDPOINT="$3:${TUNNEL_ENDPOINT}"
18            fi
19
20            LOCAL_PORT=$2
21            if [[ $LOCAL_PORT != *":"* ]]; then
22                LOCAL_PORT="localhost:$2"
23            fi
24
25            TUNNEL_ENDPOINT+="$LOCAL_PORT"
26            echo "Starting ${1^^} tunnel to $LOCAL_PORT"
27            ;;
28        tcp)
29            TUNNEL_TYPE="-R"
30            TUNNEL_ENDPOINT="${3:-0}:"
31
32            if [ -z $2 ]; then
33                echo "Tunnel provided incorrect port. Usage: tunnel $1 <port>"
34                return
35            fi
36
37            LOCAL_PORT=$2
38            if [[ $LOCAL_PORT != *":"* ]]; then
39                LOCAL_PORT="localhost:$2"
40            fi
41
42            TUNNEL_ENDPOINT+="$LOCAL_PORT"
43            echo "Starting ${1^^} tunnel to $LOCAL_PORT"
44            ;;
45        *)
46            echo "unknown tunnel"
47            return
48            ;;
49    esac
50
51    ssh $TUNNEL_TYPE $TUNNEL_ENDPOINT tuns.sh $TUNNEL_ARGS
52}
Example usage:
1./tunnel.sh https 3000
2./tunnel.sh tcp 1337
UDP Tunneling #
Easy (-o Tunnel=point-to-point) #
Using tuns, you have the ability to tunnel UDP traffic without any external binary, meaning all using SSH. This makes use of the SSH tunneling functionality and a tun interface. To get started, you need to follow a few steps:
-
Start some UDP service that you want to forward. For example, a simple socat echo server:
1socat -v PIPE udp-recvfrom:5553,fork -
SSH into tuns requesting a
tuninterface with the information of where the service is running. This needs to be done as root. Replacelocal-ip-of-machines-main-interfacewith the ip address of the main interface for proper routing.1sudo ssh -w 0:0 tuns.sh \ 2 udp-forward=10000:local-ip-of-machines-main-interface:5553 -
Bring the tunnel interface up and assign an ip that is link local (also as root):
1ip link set tun0 up; ip r a 10.1.0.1 dev tun0 -
Start a udp client to tuns.sh:10000. Here's one with netcat:
1nc -u tuns.sh 10000
Hard (-o Tunnel=ethernet) #
You can also use an ethernet tunnel for UDP forwarding. This makes a tap interface. This is considered "hard mode" since you'll also need to handle ARP. We don't process ARP packets, but we expect you to be an expert to be able to make this work! The SRC interface MAC is 00:00:00:00:00:01, while the DST interface MAC is 00:00:00:00:00:02
-
Start some UDP service that you want to forward. For example, a simple socat echo server:
1socat -v PIPE udp-recvfrom:5553,fork -
SSH into tuns requesting a
tapinterface with the information of where the service is running. This needs to be done as root. Replacelocal-ip-of-machines-main-interfacewith the ip address of the main interface for proper routing.1sudo ssh -o Tunnel=ethernet -w 0:0 tuns.sh \ 2 udp-forward=10000:local-ip-of-machines-main-interface:5553 -
Bring the tunnel interface up and assign an ip that is link local (also as root). You need to set the ARP entry and interface
MACas well:1ip link set dev tap0 address 00:00:00:00:00:02 2ip link set tap0 up 3ip r a 10.1.0.1 dev tap0 4ip neigh add 10.1.0.1 lladdr 00:00:00:00:00:01 dev tap0 nud permanent -
Start a udp client to tuns.sh:10000. Here's one with netcat:
1nc -u tuns.sh 10000
Create an account using only your SSH key.
Get Started