
To better appreciate running a KVM on your Ubuntu VPS at your web hosting provider, a fundamental comprehension of virtualization is necessary. Essentially, virtualization is the method of creating a software-based instance of a specific tool that is typically physical. Remember to contact Liquid Web if you get stuck with your virtualization initiatives. That caveat communicated, let’s get started.
The kinds of tools one can virtualize are:
- Software
- Operating system (OS), the most common example of virtualization
- Storage device
- Platform
- Computer network
Virtualization enables the creation of a virtual machine (VM) that is different from a physical machine but where its physical resources are assigned. It is a great way of reducing the amount of needed physical servers or resources and enables the separation of certain applications on several different machines. This separation helps to troubleshoot specific issues that arise.
Besides popular third-party virtualization applications like Oracle’s VirtualBox or VMware, the Linux kernel’s built-in module called kernel-based virtual machine (KVM) enables the Linux kernel to function as a hypervisor. KVM merged into the Linux kernel in 2007 and has seen rapid expansion in popularity. It was adopted on various operating systems and supported on most CPU platforms (x86, PowerPC, ARM, etc.).
Main takeaways in this post
We’ve built a quick list of the main points to carry away from reading this article:
- Virtualization defined
- How virtualization works
- Using a Kernel-based virtual machines (KVMs) to turn your Linux server into a hypervisor
- More about Type-1 (Bare Metal) and Type-2 (Hosted) hypervisors
- Understanding a KVM’s superior performance features as Type-1 hypervisor
- Setting up KVM on Ubuntu
Discover the benefits
A dedicated server not shared with any other customers, services, or applications.
What is virtualization as defined?
The What is virtualization? Definition, types, and top benefits blog post written by Jake Wright, Training Department Manager of Liquid Web defines virtualization as follows.
Virtualization refers to a set of techniques and tools to create a virtual (i.e., software-based) solution for processes that would typically require a physical platform. It is a very broad discipline that spreads into many different computing branches, including servers, personal workstations, and everything in between. Virtualization allows the same host/computer/server to run multiple guest operating systems (OSs) using virtualization software known as a hypervisor and easily move virtual machines (VMs) between hosts.
Virtualization, generically defined, is a method that enables an operating system, such as Ubuntu, to allow multiple isolated user-space instances. Essentially, one or more full guest operating systems can operate on a single server. The hardware virtualization given to guest systems can either be emulated by software or controlled by a hypervisor, which is a management layer between natural and virtual hardware resources.
How does virtualization work?
For all intents and purposes, a virtualized environment looks and feels just like a physical server. In practical terms, imagine that you have three physical servers, each with an individual dedicated purpose.
One is a mail server, the second is a web server, and the third server runs legacy applications. Each server typically only uses approximately 30-35% capacity, which is a mere fraction of its potential.
Traditionally, it was easier and more reliable to run individual tasks on individual servers because it was not possible to assign a server multiple brains. But with virtualization, the mail server can now be split into three unique servers that can handle tasks independently. It’s the same hardware, you’re just using it a lot more efficiently.
Liquid Web also has extensive guides on how server virtualization works and how to use KVM as a CentOS 8 OS virtualization server.
Understanding a KVM on Ubuntu
A kernel-based virtual machine (KVM) turns your Linux server into a hypervisor, which enables the operating system to host multiple virtual machines and isolated virtual environments. You may already be familiar with the concept currently referred to as containerization, virtualization engines (VE). Various tech companies have coined them as boxes or jails, but regardless of the appropriately buzzword appellation, they all mean the same thing.
The KVM made its official debut in 2006 and was incorporated into mainstream Linux a year later. And like most OS innovations, naturally, KVM is open source. If you’re running Linux 2.6.20 or newer, then you’ve already got KVM.
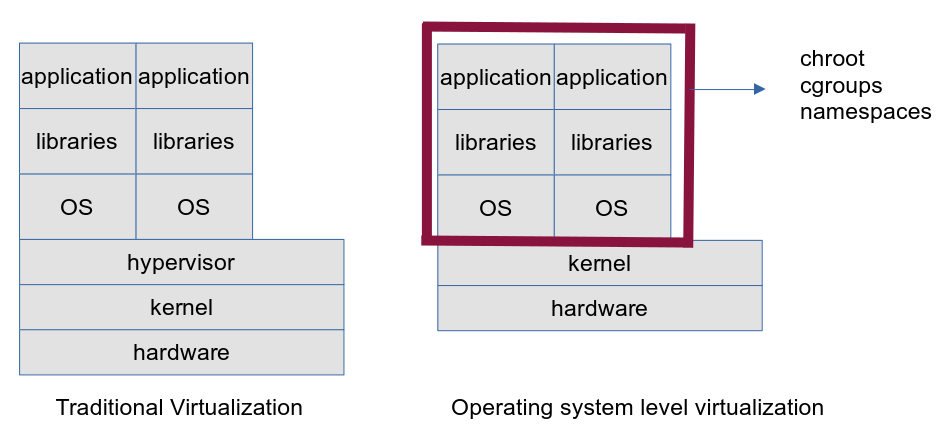
KVM provides a marked improvement over traditional virtual machines in that it uses network namespaces and control groups (cgroups) to restrict the application’s capabilities, including resource usage. KVM lets you run multiple, isolated virtual environments called guests or virtual machines (VM), each with its own individual access to the host’s resources. And while it is possible to talk extensively about namespaces and cgroups, such a discussion is beyond the scope of this article. Refer, instead, to Wikipedia’s definitions for both.
“Namespaces are a feature of the Linux kernel that partitions kernel resources such that one set of processes sees one set of resources while another set of processes sees a different set of resources.”
Meanwhile, a cgroup, or control group, is a Linux kernel feature that limits accounts for, and isolates resource usage for a collection of processes, such as CPU, memory, disk I/O, and so forth. Basically, you use a cgroup to control how much of a given vital resource can be accessed by a process or set of processes.
In the illustration referenced below, you can see that the hypervisor in KVM resides within the OS kernel itself rather than riding on top of it, as is the case with traditional virtualization solutions.
Hypervisors
When it comes to virtualization structure and methodologies, every VM (also known as a guest) gets created and run by software or hardware-based hypervisor. The hypervisor virtualization runs on physical hardware, also known as a host.
The hypervisor is the management or translation layer between real and virtual resources. The type of virtualization in use necessitates distinguishing between two types. There are two distinct hypervisors: Type-1 and Type-2.
Hypervisor Type-1 (Bare Metal)
Type-1 hypervisors are directly installed on physical hardware, without an operating system or other software in between. This type is called a bare-metal hypervisor. Therefore, Type-1 runs directly on the hardware and is not included in the operating system.
KVM converts Linux into this type of hypervisor and, in turn, facilitates handling of memory, processes, I/O stack, device drivers, security, and networking, to name a few system-level components of KVM management.
VMWare vSphere with ESX/ESXi, KVM, and Microsoft Hyper-V are common bare-metal Type-1 hypervisors.
Hypervisor Type-2 (Hosted)
Type-2 hypervisors run on operating systems, which separates the hypervisor from the physical server. The software or OS enables running VMs on the host system.
The distinction between the two types is often blurred, as KVM can be categorized as either Type-1 or Type-2. By nature, the KVM module turns the Linux kernel into a Type-1 bare-metal hypervisor. However, it is viewed as Type-2 since the host OS is fully functional, and all running VMs are seen by it as standard Linux processes.
As stated, Type-2 runs inside the physical host’s operating system. Whereas Type-1 runs directly on hardware, the hosted hypervisor has one software layer between the hardware and the hypervisor, which spawns performance issues. These issues for Type-1 could be less flexibility with regard to resource management and VM latency issues and security vulnerabilities that may enable bad actors to gain unauthorized access to virtual machines.
Oracle VirtualBox and VMware Workstation Pro are examples of a hosted Type-2 hypervisor. In this post’s Ubuntu server virtualization tutorial, KVM is installed on top of Ubuntu, classifying it as a Type-2 hypervisor.
KVM’s superior performance features as Hypervisor Type-1 and why it’s preferable
Because the hypervisor in KVM is Type-1, which is integrated at the kernel level rather than running on top of it, as is the case with Type-2, the benefits to overall server performance are many and varied. Those benefits as described in the next sections.
1. Scalability
- KVM performs scaling to match the load demand of the guest OS and requests as they are increased, thereby allowing the highest demanding applications’ workloads to be virtualized.
- And given that KVM is a Type-1 hypervisor, it ensures a near metal-like approach that expedites VM fast booting.
2. Security
- KVM utilizes a two-pronged security offensive by combining Security-Enhanced Linux (SELinux) and Secure Virtualization (sVirt).
- SELinux establishes a security perimeter around the VM while sVirt extends those abilities by allowing Mandatory Access Control (MAC) to be applied to guest VM’s, thereby avoiding manual labeling errors.
3. Storage
- Any storage Linux provides is supported by KVM, including local disks, Multipath I/O, and Network Attached Storage (NAS), providing redundancy so that VM images may be shared by multiple hosts.
- Disk images support thin provisioning so that storage allocation is dynamic rather than static.
4. Hardware support
- KVM supports various certified Linux-supported hardware platforms.
- Continuous kernel development innovations made by hardware vendors augment kernel based virtual machines.
5. Memory management
- KVM inherits non-uniform memory access and kernel-paging, facilitating VM memory swapping, which can be backed up with large volumes for better performance.
6. Live migration
- KVM supports the ability to move a running VM between physical hosts with zero downtime or service interruptions. The VM remains powered on with active networking and functional applications while the VM is relocated.
- KVM is able to save a VM’s current state for storage or future use.
7. Scheduling and resource control
- Virtual Machines are part of a Linux box’s running processes and are managed by the kernel within KVM. This allows for exceptional handling and granular control of the allocated resources, guaranteeing high quality within the process.
- As previously mentioned, KVM includes a control group and network namespaces in addition to a fair scheduler and real-time extensions.
8. Lower latency and higher prioritization
- Real-time extensions allow for VM-based applications to run with lower latency with better prioritization compared to embedded hosting seen in a Type-2 hypervisor.
- The kernel divides processes requiring longer computing periods into smaller units of time, which are then scheduled and processed accordingly.
Setting up KVM on Ubuntu
Now that you have a better understanding of virtualization and have seen why KVM is the superior choice, dive into a three-step, hands-on exercise to set it up on Ubuntu. Like many other Linux distributions, Ubuntu virtualization supports various technologies and applications. However, the majority of commands run in the terminal require root access or sudo privileges.
Step #1. Confirm virtualization
First off, you want to check whether your version of Ubuntu supports virtualization. An output greater than zero (0) means that virtualization is supported:
$ egrep -c '(vmx|svm)' /proc/cpuinfo
4
The vmx or svm portion of the command depends on your CPU, where vmx is used for Intel machines, and svm is used for AMD machines.
How to enable virtualization if your output is zero (0) meaning that virtualization is not currently supported
If your output is 0:
- Reboot your system.
- Access the BIOS settings.
- Select CPU:
- Intel Processors: Intel Virtualization Technology (Intel VT).
- AMD: AMD-V.
Virtualization is disabled by default and must be enabled to utilize various virtualization technologies like KVM. Depending on your CPU manufacturer, it may or may not provide an option to enable virtualization.
Once enabling virtualization in the BIOS settings, recheck it using the below command. The lscpu command works for both Intel and AMD processors and yields the same information in a different way:
root@ubuntu:~# lscpu | grep 'Virtualization\|Hypervisor'
Virtualization:              	AMD-V
Hypervisor vendor:           	KVM
Virtualization type:         	full
CPU — Intel processors
To verify virtualization is enabled on an Intel processor, use the following command. If the output shows vmx flags, it means your CPU supports hardware virtualization:
grep --color vmx /proc/cpuinfoCPU — AMD processors
Use the below command to verify virtualization is enabled on AMD CPUs:
grep --color svm /proc/cpuinfoKVM acceleration
Review if your computer supports KVM acceleration after confirming virtualization is enabled on your CPU. In general, KVM acceleration improves the performance of the VM, enabling it to run applications at almost native speeds. This contributes to KVM being faster than any other industry hypervisor.
Next, you want to confirm whether your system supports KVM virtualization:
$ sudo kvm-ok
INFO:  /dev/kvm exists
KVM acceleration can be used
If the kvm-ok utility is not installed, then you can run the following command:
$ sudo apt install cpu-checkerOutput is indicative of giving you the green light to go. You are now ready to proceed with the installation of KVM on Ubuntu.
Step #2. Install the KVM on Ubuntu
Remember to update your OS repositories via the apt update command. Then, to install KVM, virt-manager, bridge-utils, and its dependencies, invoke the following command:
$ sudo apt install -y qemu qemu-kvm libvirt-daemon libvirt-clients bridge-utils virt-managerHere is an explanation of the tools (packages):
- qemu (quick emulator) — tool that runs OS emulation.
- qemu-kvm — the main KVM package.
- libvirt-daemon — the virtualization daemon
- libvirt-clients — a package that contains virsh and various client tools.
- bridge-utils — tool that allows enabling users to access the VM.
- virt-manager — manages virtual machines through a graphical user interface (GUI)
Now confirm that the virtualization daemon libvirtd is running:
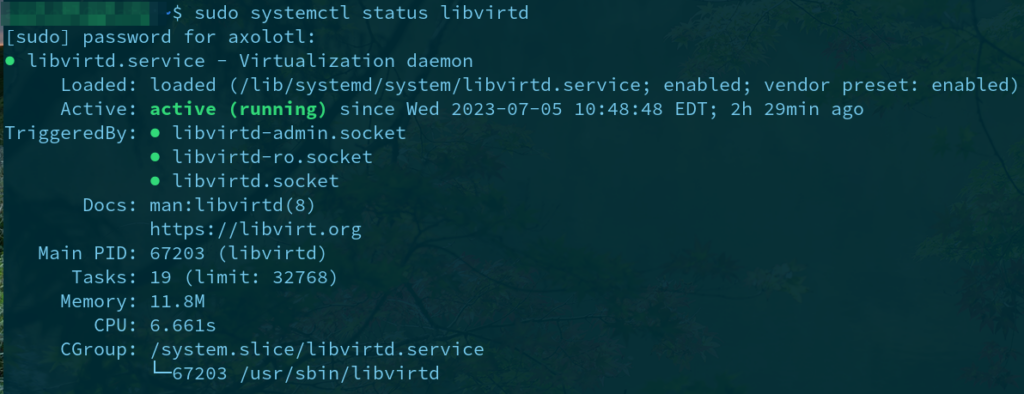
If the daemon is not running, start it with the systemctl command:
root@ubuntu:~# systemctl enable --now libvirtdThe libvirtd daemon can be enabled on boot by invoking the following command:
$ sudo systemctl enable -now libvirtdCheck if the KVM modules are loaded. Use the lsmod command to check if they are loaded. Here you will see the kvm_amd module. For Intel processors, you would see kvm_intel instead:

If multiple users exist on Ubuntu, add them to each of the groups shown below, enabling them to create and start virtual machines. Add the users to libvirt with the following command:
root@ubuntu:~# adduser 'Tom' libvirt
Adding user `Tom' to group `libvirt' ...
Adding user Tom to group libvirt
Done.
Add the users to the kvm group with this command:
root@ubuntu:~# adduser 'Tom' kvm
Adding user `Tom' to group `kvm' ...
Adding user Tom to group kvm
Done.
Step #3. Create a virtual machine (VM) using a KVM
Note that the steps provided assume that you have previously downloaded the operating system ISO of your choice, which is necessary in the creation of the virtual machine (VM).
In this tutorial, Rocky Linux 9.2 functions as the guest OS on our Ubuntu virtualization host. You can create VMs with the command line interface (CLI) or KVM’s virt-manager GUI. Although in our example the steps given are for creating VM for Rocky Linux 9.2, you can just as easily create the VM for other flavors of Linux.
There are two ways to create a VM for Rocky Linux 9.2 for PowerPC (ppc64le), which the osinfo-query os command confirmed Ubuntu supports as a KVM.
Step #3 – Option A — via the Virt Manager GUI
1. Start virt-manager
Start the virt-manager with the below command:
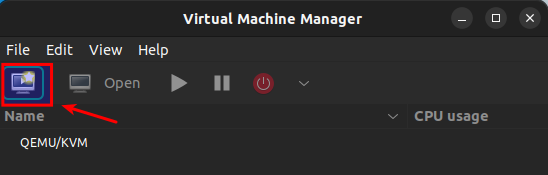
$ sudo virt-manager2. Find the creation option in the Virtual Machine Manager user interface
Click the computer icon:
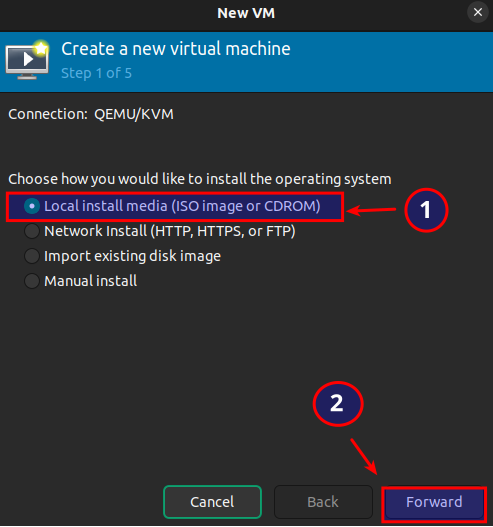
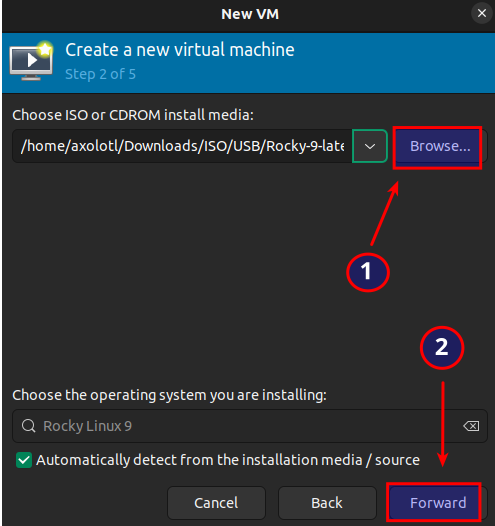
3. Install the VM using an ISO image
Select the option to install the VM using an ISO image. Then click the Forward button:
4. Navigate to where you stored the ISO image
Click the Browse option and navigate to where you stored the ISO image you want to install. Then, click the Forward button:
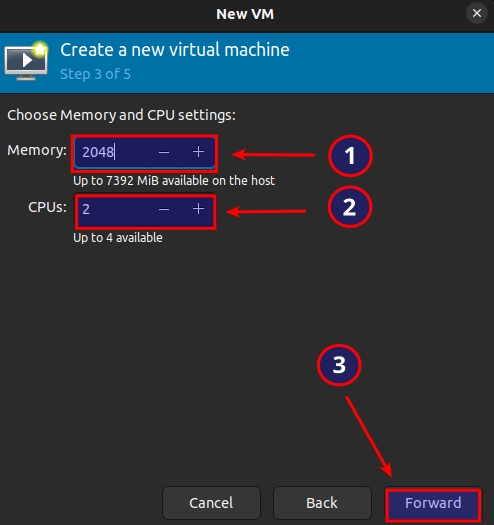
5. Configure the RAM and CPUs
Enter the amount of RAM and the number of CPUs using the plus and minus symbols. Then, click the Forward button:
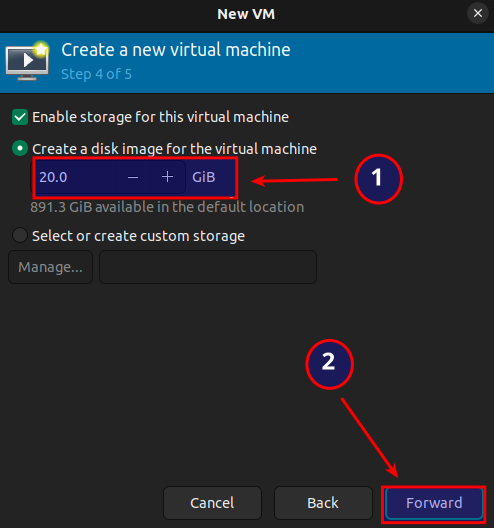
6. Appropriate the local disk space for the VM
Appropriate local drive space to the VM. Then, click the Forward button to proceed to the last step:
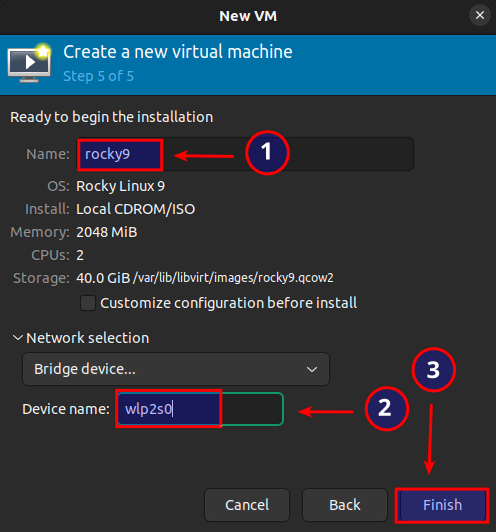
7. Name the VM
Establish a name for the VM, specify the device name interface, and then click the Finish button to complete the setup:
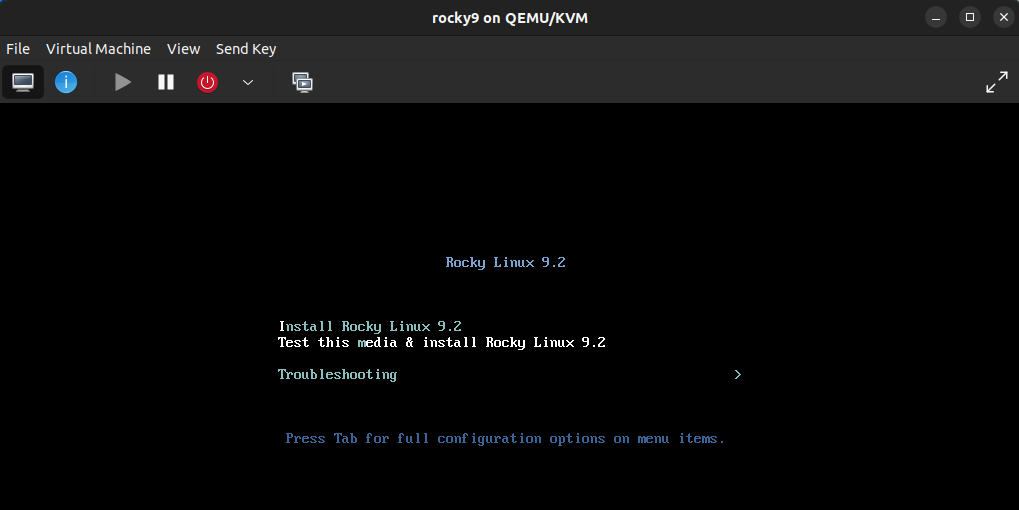
8. Let the VM start
The VM will automatically start with a prompt to install the OS:
Step #3 – Option B — via Command-Line Interface (CLI)
1. Use virt-install command
Use virt-install command to create the VM. The syntax is as follows:
virt-install --option1=value --option2=value2. Note the operating system used
In this example, virt-install will be used to install Rocky 9.2. Note that if you specify a qcow2 disk file that does not exist yet, it will automatically be created:
$ sudo virt-install --name=Rocky9 \
> --description='Rocky9.2' \
> --ram=2048 \
> --vcpus=2 \
> --disk path=~/var/lib/libvirt/images/rocky9.qcow2,size=15 \
> --cdrom ~/Downloads/ISO/Rocky9-latest-x86_64-dvd.iso \
> --graphics vnc

Starting install...
Allocating 'Rocky9-latest-x86_64-dvd.iso'		| 15 GB 00.00
Review the man page of the virt-install tool for VM deployment options.
3. Consider typing a backslash character (\) after each option
For a tidier appearance of commands, type a backslash (\) after each option. This will prevent execution of the command until you have entered more options for the specs of the VM.
Table of Options
| Option | Description |
| –name | VM name |
| –description | Short description (usually OS name/version) |
| –ram | Amount of RAM |
| –vcpus | Number of virtual CPUs |
| –disk | The location of the VM |
| –cdrom | Location of the ISO file |
| –graphics | Specifies the display type |
Bottom line on Ubuntu KVM virtualization
Virtualization using KVM Ubuntu is an efficient and cost-effective way to test out a new operating system without the commitment of installing it to its own separate hardware.
This tutorial covered Ubuntu virtualization concepts, Type-1 and Type-2 hypervisors, and the use of KVM to set up an Ubuntu VM host using CLI and GUI.
Liquid Web’s dedicated hosting, VPS hosting, and managed private cloud hosting provide Ubuntu server options for your next project. Our sales staff is available 24/7 for any assistance you might need getting set up. Contact them today.
Note on the original publish date: This blog was originally published in October 2021. It has since been updated for accuracy and comprehensiveness.