-
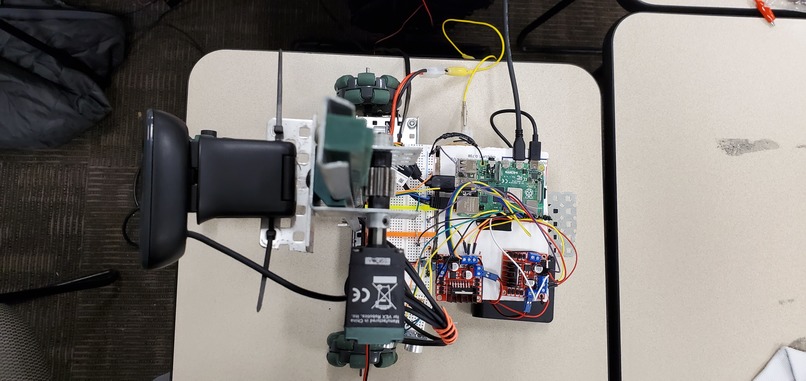
Top down view of the AutoCharge Robot
-
-
-


Inspiration
As a team of CPE Majors, we knew we wanted to work with hardware.
Matthew was looking at cat videos one stressful night and saw a video of a cat riding a roomba. What a cute cat and a cute little roomba. But what an incredibly inefficient roomba. For every time that the roomba began to run low on battery, the human user would have to hit the "go home" button, and the roomba would have to pathfind to it's home base, taking a significant amount of time to travel, and wasting energy by resweeping already clean areas. This inefficiency was the main inspiration for AutoCharge. What if the roomba, or any robot, was able to pathfind to the nearest outlet instead of having a home base?
This ability would be incredibly useful in a number of aspects. By removing the necessity to have a home base, any robot with a rechargeable battery is now capable of complete free roam of any building, regardless of it's battery capacity. This also reduces the need for human interaction with the robots to perform an action necessary to recharge, such as manually plugging it in, or hitting the "go home" button. Additionally it would help maximize energy efficiency by being able to utilize more energy toward the task at hand rather than having a cutoff to go and recharge at a fixed location. It would also increase the range of the robot's state space by eliminating the tether of a home base to return to.
What it does
The AutoCharge would tackle this through the use of digital image processing as well as machine learning. Through the use of digital image processing and machine, we are able to train the robot on the recognition of what an outlet is as well as its relation to the camera's location. AutoCharge tackles this problem by heading to the wall, stopping right before it and then strafing along it only stopping when it recognizes that an outlet is in front of it. AutoCharge would then position itself in order to place the plug straight into the outlet until it is adequately charged.
How we built it
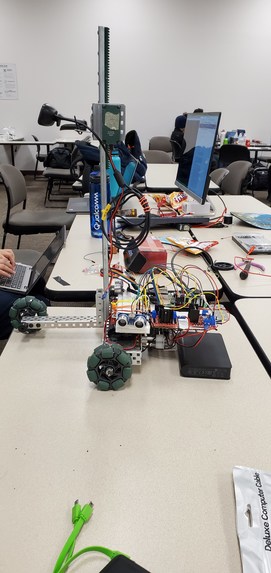
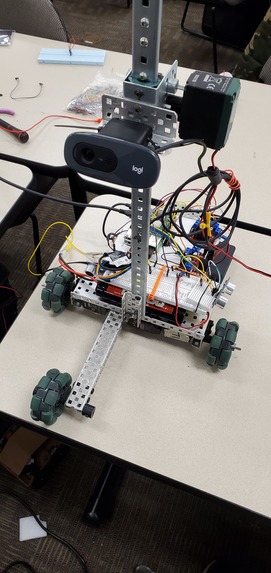
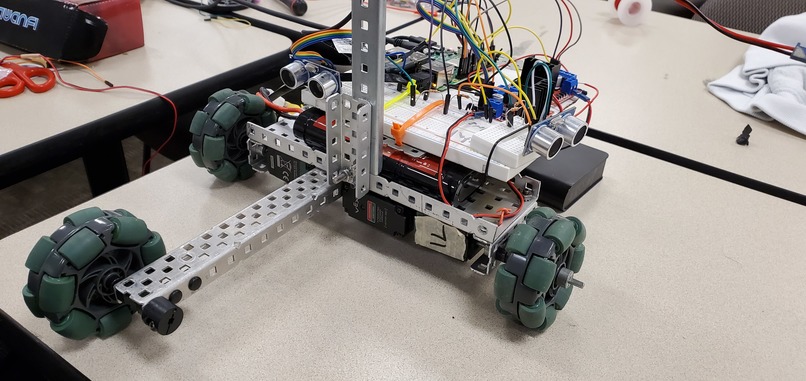
AutoCharge was built using a Raspberry Pi 4 as the brains. We used the Raspberry Pi to run every other component on the robot. We initially connected the motors to the Raspberry Pi and came up with the code and logic to make the robot move forward, backwards, and be able to turn. The next step was to complete the digital and software logic for ultrasonic sensors to make sure the robot does not slam straight into a wall. By this point, we began to work on the body of the robot, using sheet metal and replacing normal wheels with omni-wheels and added a few more wheels for increased mobility and stability. We were then able to get the robot to add the option of strafing to the right and left by attaching a third motor to a horizontal omni-wheel that doubled as a stabilizer. We then built a mount for the camera to go on, as well as a linear slide in order to change the camera's height to allow for more versatility. Finally, we put it all together on the board, making sure to be careful and manage the wiring as best as we can to ensure that the robot does not wear down its own wires. Thus, the robot is complete.
Challenges we ran into
-Camera Lag -data set training (length in time as well as it working as intended) -different hardware specification (motors turning at different rates and having to mess with pwm) -opencv on Raspberry Pi -Lack of memory on the Raspberry PI
Accomplishments that we're proud of
This was a very interesting and fun project for all of us, the structure and the mobility it has is something we are very proud of. Through the use of omni-wheels, versatile coding structure and knowledge about GPIO configurations on the Raspberry Pi 4 has allowed us to efficiently allow for the robot to move horizontally, forwards, backwards without compromising any of the components.
Our ability to make it as portable as possible was also quite successful as we figured out ways to be able to make the power source more localized to the robot, as well as using MobaXterm to display the Raspberry Pi's screen without having a hooked up monitor. We were able to reduce tethering down to a single Ethernet cable to connect to the Pi for the sole purpose of mitigating the camera lag to the laptop.
What we learned
Through this project, we learned how all the different components and the Raspberry Pi 4 all tie together in quite a bit of depth, as we had to go through a lot of documentation in order to figure out all the configurations needed to achieve the results we wanted. Our skills in Python, Vim, as well as being able to ssh into the Raspberry Pi through ethernet and wifi have also got quite significantly better throughout the hackathon. Last but certainly not least, we learned a lot about how the opencv and digital image processing works and how we could use the different methods available to achieve our goals in an efficient matter.
What's next for AutoCharge
We will implement the linear slide that plugs in and the voltage converter to charge the batteries.
Built With
- arduino
- camera
- opencv
- python
- raspberry-pi
- rpi
- ssh
- tmux
- vim


Log in or sign up for Devpost to join the conversation.