Blitzkrieg V3 Project 1940 – 20 mm scale

Since few people should now, Blitzkrieg is a French language WW2 ruleset, best played in 15 or 20 mm scale. It is – very loosely – based on the old Advanced Squad Leader system, and has a following in France proper. V3 since it is the third iteration of the rules and, as the saying goes, “Three is the charm”. I can only hope that for English speaking players a translation will be made as the correction of the V2 glitches makes V3 a very coherent and efficient system IMO. For those who want to know more, here is a link to the French site :

Link to the Blitzkrieg site


Fact is, I followed the discussionb relating to the design of the new version on their forum, and liked what I read so much I decided to give V3 a try and paint a set of brand new armies in 20 mm (the club’s favorite scale) for the 1940 campaign (everyone is used to play late esatern or western fronts, or the Pacific, so early war should be a change)

So, here is swhat I have painted so far, starting with the Germans :

Panzer IVs


Panzer IIIs

img_0693_zpsaw0illbt

Panzer IIs

img_0717_zpsijvgi0lc

a Company of Schützen

img_0711_zpssngsigf6

some sort of limber

img_0715_zpsfhtojmvu

an Opel Blitz

img_0694_zpsyl0hrgle

and the French side, just a platoon of S35 Somuas painted for now

img_0727_zpsia1ak7yd

img_0730_zpsrskbpue2

I will add 2 more Pz III, 2 more Pz II, a Pz I,  another German Schützen Company, 2 Half tracks, 2 Pak 36, a  SiG 33, and a recce unit with 2 side-cars and a Sdkfz 250 which should make for a respectable German force. Of course, the French side will need to grow too, and will get a 4 tanks strong H 39 platoon, 2 infantry companies, 2 25 mm AT guns, and some recce with an AMR and a side-car. This will keep me busy for some time, but meanwhile I will be enjoying other gamers’ late war armies for a good game of Blitzkrieg V3.

Russo-Japanese War fleets

More precisely, for the battles of the Yellow Sea and Ulsan. All miniatures are War Times Journal products, meaning they are “rapid prototyped plastic” and not metal.


First the Japanese side, starting with the whole force

Image

First Battleship Division

Image

Mikasa

Image
Shikishima
Image
Asahi

Image

Fuji

The Armored Cruisers

Image

Iwate

Image

Tokiwa

Image

Azuma

Image

Kasagi

Now, I’ll follow with the Russian Pacific Fleet and the Vladivostock squadron. I am not sure the Vladivostok cruisers wore the same olive grey livery as the Port-Arthur ships, but well anyways…

Image

Battleships

Image

Tsessarevitch

Image

Revitzan

Image

Sevastopol (I have another two of the same class, Poltava and Petropavlovsk)

Image

Pobieda (I also have its sister ship Peresvets)


Protected Cruisers from Port-Arthur

Image

Pallada (same as her sister ship Diana)

Image

Askold

Image

Novik

Armored Cruisers from Vladivostok

Image

Rurik

Image

Gromoboi

Image

Rossia

 Masts have been scratch built, using Evergreen 0.20″ rods and tiny plastic beads (most commonly used by 5 years old little girls to make armrings and necklaces *grins*)


Ships for Coronel

So, I painted a few GHQ WW1 ships mainly for the battle of Coronel, which saw, in November 1914, Von Spee’s Asiatic Squadron annihilate a British squadron under Admiral Craddock. As a side note, I don’t like the thick Litko bases, but I made a mistake when ordering…

Spee’s Sflagship, Scharnhorst

Image

Gneisenau

Image

Dresden

Image

Leipzig

Image

And Bremen, that was not there, but GHQ makes no Königsberg class mini yet

Image


Now, their British opponents, starting with Craddock’s flagship, Good Hope

Image

Monmouth

Image

Glasgow

Image

And Defence, that was not there but could have been (and no Otranto as well, since I found no mini)

Image


And just for fun, Vergniaud, a French pre dreadnought that can also proxy for Otranto if I need eh eh

Image

Now to set up an appointment for a game.


Battles in the Atlantic

Image

We had a Naval Thunder game at the club this week end. Actually we had time enough to play 2 games, the Rio de la Plata affair and the battle of the Straight of Denmark.

Image

First game was fairly quick, we set up the scenario as depicted in the Naval Thunder Bitter Rivals extension. I was playing Harwood, and Fred was playing Langsdorf. His task was to break through my squadron, mine was to prevent him, this was a very straightforward battle.

Image

Image

Image

Unlike Langsdorf, after some hesitations, he opted for a very direct approach, and tried to blast his way through the British squadron. I’d always wondered, also, what would have happened had Harwood elected to first gather his ships in order to give the Spee a stronger opposition. Here is what happened in the actual battle, with Exeter attacking on the port side, and Harwood and the light cruisers harassing the starboard side of the Graf Spee.

Movements in the 1st phase show this, the Spee making a broad zigzag in order to keep all his turrents in arc, and the cruisers electing to converge into a single force. During this time, Exeter copped a 280mm shell that destroyed a secondary 4.1″ turret, and Ajax another one that started a fire that was immediately put down. As far as I can tell, the Spee was not hit. Gunnery was fairly por, assuredly, as the range (extreme for the Brits) and the small number of guns (6 on the Spee) meant, in NT, poor odds of hitting something. On the other hand, the awesome penetration capacity of the german big shells meant that each hit went though any cruiser’s armour.

Image
Eventually, both British forces were merged into a single formation, Exeter leading, followed by Achilles and Ajax, more or less perpendicular to the line of escape of the German pocket battleship. The Graf Spee elected then to try to run the gauntlet and make good its escape, getting into effective range of all British guns and getting its T crossed a first time. Exeter was hit once more, taking some flooding damage (quickly mended too), while the Spee lost a few secondary turrets and took a hit in the engine room that cut her speed.

Image

Seering it was coming on the losing side of the exchange, the Graf Spee veered to port once more, to keep all his 280mm guns firing. By a spate of bad luck, all missed Exeter, the only damage being a 105 mm hit tat failed to penetrate. Not so for the Brits, who kept knocking things down on the Spee, not least of which  another hit to the boiler that reduced speed even further to a crawl.

Image

Gallantly, the doomed raider turned into the ennemy, who had reversed course to keep crossing her T. Once more, the big 280mm missed altogether, while a 6″ shell from Achilles destroyed the the forward triple turret. Aty that time however, we had come into torpedo range, so the Spee veered to port, and let loose fishes at Achilles. The 280mm turret fired a last time, kocking another 4.1″ turret on Exeter. While the German torpedoes sailed harmlessly past Achilles, return fire was devastating, and sent the German ship to Davy Jones’ locker.

Image

Second game was the Battle of Denmark Straight, with me taking the part of Admiral Holland and Fred that of Admiral Lütjens. This AAR will be shorter, as to my great shame, I must admit I did not bother to take a lot of pics.

Image

Actually, all my joss left me out for this one. It started with the loss of a turret Caesar on the Bismack, from which I never recovered. I tried to distract the opposition with the Prinz Eugen (and that worked, as for three turns she was the target of both British ships before sinking, but I never managed to inflict significant damage on the Hood). Then Bismarck got once more all the attention of the ennemy. In the end, the Hood was sunk, but so was Bismarck after a heck of a fight at 2 to 1.

Image

Image

Battle of the Atlantic Ships

They were painted some time ago, but never photographed. Since they are to be used for the 1st time this week end, I grabbed my brand new Canon AOS to try my hand at shooting a few pics of them. They are picked from the Rio de la Plata and Straight of Denmark battles.  ‘and yes, I made a mistake, it should be the Dorsetsgire, not the Devonshiere, but I’ll beg for forgiveness…

Without further ado, the Kriegsmarine contenders

Image

Image

Image
Bismarck

Image
Prinz Eugen

Image
Graf Spee

And their Royal Navy opponents

Image
Hood

Image
Prince of Wales

Image
Rodney

Image
Devonshire

Image
Exeter

Image
Achilles

Moghilev 1944

I had another BKC II game at the club last saturday, in order to introduce Fred, who is already practicing CWC, to the joys of its WW2 sister rule. Stef was there, and requested to take part, so I gave him the Ruskies, and sided with Fred with the Germans.

This is june 1944, and operation Bagration is in full swing. The Soviets have managed to capture bridges and cross the Dniepr at Moghilev, they’ve started to entranch themselves and brought some armour. The situation is very serious… but chance has it that some German armored reserves are immediately available for a hasty counterattack. Germans have 10 turns to send the Russians packing across the Dniepr and seal the leak. Objectives are both Sovkhozes, and the main bridge across the Dniepr.

Here is what the terrain looked like (sorry, cam batteries were the first casualties in this game… c’est la guerre!)

Image


Terrain from the East :

Image

And from the West :

Image

And here are the forces :

Image

Taking advantage of his forces’ flexible doctrine, Fred reorganized them into 4 Kampfgruppen :

* KG1 CO & 3 Panthers

*KG 2 HQ & 4 Pz IVs

* KG 3 HQ, 5 Schitzen in HT, 2 Pz IV

* KG 4 5 Schitzen in HT, 2 Grille SPG

Image

Russains entrenched on Hill 308 and in front of Moghilev (notice the SU 85 behind the hill)

Image

Image

Here was the plan. Hill 308 was obviously the key to the position, taking it fast would ruin the coherence of the Russian defence. So, Artillery would target Sovkhoz Marx on turn 5, then Hill 308 on turns 6 & 7. KG 1 & 2 would attack eastwards and take on Hill 308 frontally, KG 3 & 4 would take advantage of the road to take Sovkhoz Enghels and flank Hill 308.

Kampfgruppen 1 & 2 :

Image

and KG 3 & 4:

Image

PHASE 1

As the commander of KG 3 & 4, I was unhappy with the artillery allocation : I was eager to bypass Sovkhoz Marx (in my opinion too far forward of the main soviet position) and grab Sovkhoz Enghels which had been left unoccupied. In BKC terms, make good use of the road bonus. So I’d opted for a “mad charge” along the road, well conscious however that this might well be another Balaclava. My partner started to move his Panzers forward, all the more since the top of hill 308 was unoccupied. Essentially, we could hope to avoid mortar fire for some time… But I statred, as usual, with a command failure for KG 3, wasting some precious time, and that would have dire consequences. All went well however for KG 4, that could reach the lee of the low hill in front of 308.

Image

PHASE 2

At that stage, however, things looked bad for the german side : we were but 2 units short of having to test for break point, while the Soviets had lost but 2 tanks and were nearly intact on all objectives. Once more, German Panzers engaged the SU85, suppressing one, return fire doing the same to a Panther. Then it was the infantry’s turn to activate. This started, well, uneasily, as KG 3 rolled 12, and that was command blunder. Fortunately, that was but 3 attacks against a unit, 2 missed, so, well, no loss but for losing the possiblity to move that command. KG 4, on the other hand… they rolled 2, and that was incredibly welcome. Everyone could drive madly into Enghels Sovkhoz, resulting in a flanking of the Russian position on 308.

The Russians tried to counter by repositionning their SUs to face KG4 (now in their blind arc, and minimum distance of the mortars). German OPfire killed another 2, and suppressedf one, leaving the Russians but 2 AFVs, and likely to be destroyed by OPfire at their next activation. The Russian player conceded the game (it was turn 5) as with the demise of their tanks, coming artillery fire, and envelipment by tanks, SPGs and mechanized infantry, the forces on 308 were facing a hopeless battle. Their loss would have put the Russians way over Break Point too.

Image

Fun game, that could have gone either way. Once more in BKC, as much as your plan, making good use of your luck will win, or lose you, the game, mimicking with a simple & elegant evice the vagaries of the battlefield. Thanks to Stef and Fred. Next occasion to play will be our big Cold War Commander da, and things are proceding soundly on it.


Battle for Stonne, 1940


Image

A new game at the club, this time Blitzkrieg Commander. Also, an attempt to simulate what was perhaps the most fascinating battle of the campaign of France, the battle for Stonne. Perched atop a high hill, Stonne was overlooking the west bound roads that were supporting Guderian’s drive to the Channel. Had it fallen to the French, the fate of the battle would probably have been very different. Since it changed hands no less than 17 times in a few days, let’s just say it was a very close thing. Especially as French reserve troops were facing no less than the Wehrmacht’s crème de la crème, the Infanterie Regiment Grossdeutschland. Allow me to express my thankfulness for their sacrifice, and my admiration for their courage, as well as for all the humble grognards of 1940 who tried to perform their duty in the face of overwhelming adversity.

Image

Image


Image

The French are attacking North towards Stonne, the Germans are trying to defend against the might of the Char B. To better reflect the ability of the Frnch side during that battle, the penny packet rule is dispensed with. Furthermore, the Char B HQ, Major Malagutti, starts with a command value of 9, dropping by one for each failed activation attempt to a minimum of 7. Orders of battle are below :

Image


Image


Image

The German plan was straightforward : 2 infantry companies and MMG on the first line, with Pak support, to slow down the onslaught as much as possible. A third company in reserve on the second line, ready to plug any hole. And a STUG company further back on the road, ready to exploit any opportunity. I discarded placing the FAC in the abbey’s spire, as it seemed obvious it would be plastered by the French 75 mm. I could do without my Paks, but not without my Stukas… consequently, I opted for the next best place, the top of the Mont Dieu.

My opponent’s plan was more complex. He wished to overwhelm the defense with various axes of attack, in a double envelopment. His artillery (and unfortunately I won’t comment further about it ) plastered the empty buildings around the crossroad. As the fates would have it, the unprotected trucks would be rushing downroad under the eyes of the Luftwaffe air controller…

Image

Phase 1

Everyone activated at least once on the French side, moving towards their objectives. Malagutti, however, failed on his third attempt, downgrading to CV 8. Then it was the German turn, and all hell broke lose! Stukas arrived, and divebombed the column of Dragons Portés in their trucks, taking out  3 platoons, and suppressing one in the middle of the road. STUGs were immediately committed and started to go around the Mont Dieu. Decision would take place on the French right flank.

Image

Image

Image

Image

Phase 2

The French infantry took shelter under the lee of a little hill, and dismounted, leaving only the Chars B as a viable target for the Stukas. The problem was that they were much better protected by AA fire, but dice favored te Luftwaffe, and one of the steel beast was taken out. The little Hotchkiss failed to activate (no wonder with aa HQ at 7), as did the STUGs (despite a CV of 9…). When they eventually did, they took out a last truck that had been kept pinned by MMG fire from Stonne. Chars B, and Paks, traded ineffectual fire. Malagutti however failed an activation for the second time and downgraded to 7.

Image

Image


Image

Phase 3

Everything rested on the Chars’ shoulders. They concentrated on Stonne, neglecting the STUGs on their right flanks. Everything seemed to improve, as a Stuka was downed, removing the most serious threat. Better yet, a German command blunder caused the Pak guns to advance under fire, which eventually resulted in the loss of one unit. But the STUGs sealed the day, cresting the Mont Dieu, and opening fire on the flank of the Chars below. One tank platoon was destroyed, bringing my opponent’s army to its braek point, and a failed roll ended the game.

Image

Image

Image


The 2eme DB in the Cold War, Siegelsyadt 1964


Image

This is a little report on the game Jean-Jacques and I had on Saturday 5th January at the club. Time is set in the early sixties. Jean Jacques elected to play Soviet, and attack, leaving me with the French (Some people will notice they are portraying the 2ème DB, better known as “Division Leclerc”), and defence. After all, why not, and Vive de Gaulle! (who was our president at the time, he’s sorely missed!) Since I have but little stuff in 15mm, and that everything had to be on the table, balance was achieved with other means. Game length was set to 12 turns, flank marches were allowed, and terrain was built so that it favoured the attacker. The Walderberg overlooking Siegelstadt is indeed very daunting, and nothing could prevent the Soviets from being there in force first. Lastly, a French depleted battalion was stranded in Siegelstadt, and all other French forces had to start from their base line.

Image

Image


Image

As you can see, I’m still short on 15mm terrain. All links to some more free paper terrain PDFs welcome!

French forces have flexible doctrine, so any HQ can command any unit, but have a lower break Point. Soviets have a higher one, but rigid doctrine restricts each HQ to command the troops it started with.

Image

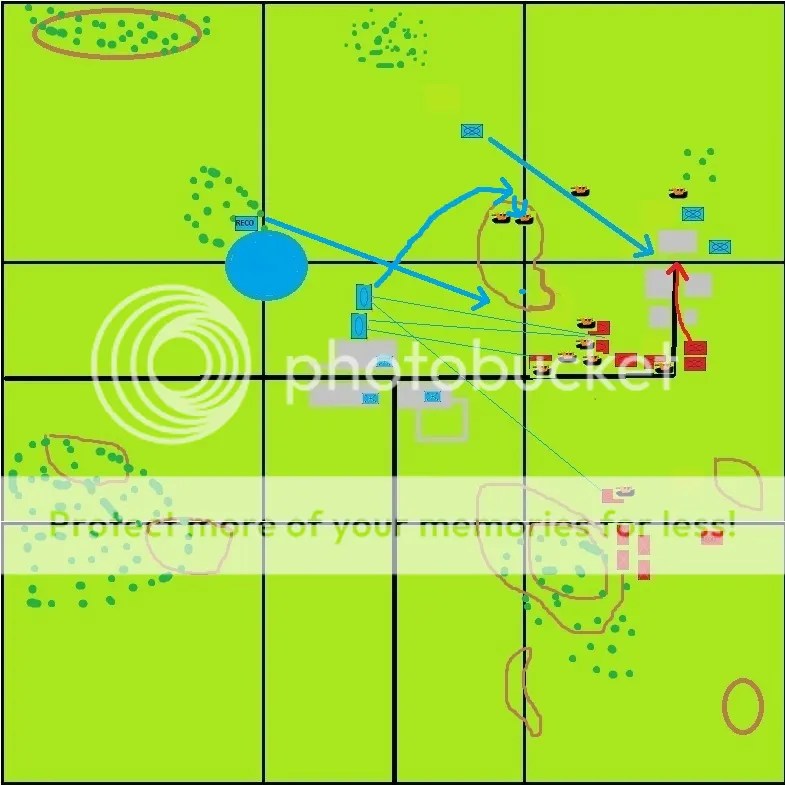
Russians need to take control of Siegelstadt and Hill 203 before the end of turn 12 for a decisive win, French need to break the ennemy battlegroup to do so. Russians occupying Siegelstadt only is a minor win. Consequently, the Russain plan is to first take Baudorf with the Motor rifles and the Tanks, then pivot left ands take Siegelstadt in a pincer movement with the Foot Rifles attacking from the Walderberg. The French intend to rush their Mechanised Infantry to Baudorf as well, and pepper all incoming soviets with gun fire from the AMX 13s on Ridge 201. Meanwhile, the heavies would swing left from hill 203 and per chance slam into the ennemy left flank.

Image

Image

Image

Image


Phase 1

Image

While the Soviet Foot begin their slow crawl towards the Walderberg (I will not speak a lot of them after this, let’s just say they played but an insignificant part in the drama), the Motor foot and tanks rush headlong towards their first objective! The charge is so scary that the commander on the French Mech Inf Battalion on the left flank loses his nerves, unable to coordinate his troops as they reach Baudorf. Worse yet, he manages to secure an artillery strike that falls among his forces, suppressing a whole company and destroying a mounted platoon. The AMX 13s manage to crest ridge 201, and start to take out Soviet APCs, but they have lost some time on the way, and the T55 are in range too. The gallant light tanks vanish in a thunderstorm of 100 mm shells. All hope now lies in the M47s, who are plodding around the pond and about to swing left…

In game terms, this translates into a command blunder by the French Mech Inf HQ, followed next turn by a failure to activate. On the other side, the Soviets rolled no less than 2 command bonuses, and kept activating their T55 till the needed score was down to 4. Did I forget to say they also rolled terrifically for shooting? Weird as it may sound, this is precisely why I love the BKC/CWC ommand system. You draw plans, which are fine and dandy on paper… but when implemented, that’s another story. The system truly captures the feeling of the old military dictum “No plan survives contact with the ennemy”. It’s then up to you to react and take advantage of every single bit of good luck that comes your way.

Image

Image

Phase 2

Image

While everything seemed to go swimmingly for the red horde, what is this rumbling noise sounding from the left? You got it, those are the French Pattons, dashing to the rescue of their about to be mercilessly butchered brothers in arms! The T55s are focused on killing AMX APCs crossing the gap between Baudorf and ridge 201 to take shelter and do not take notice before 90 mm shells slam into their flanks. As French playwright Pierre Corneille put it in “El Cid”, hope switched side, the fight switched mood…

A full soviet tank company erupts in flames, the remainder stay behind the shelter of their burning brothers, unsure what to do. The Pattons keep pressing, move forward, take out a Motor Company that was getting into position to support the Foot battalion attack on Siegelberg. Some PT 76 light tanks gallantly try to interfere (both sides’ light armour did not lack moral fibre in that battle apparently) and lose a platoon to the big guns. The remaining T 55s decide to face the Pattons after all, but fall back further behind the screen of the burning wrecks. After all, Siegelstadt’s still in ennemy hands, so they start shelling the infantry there. The French foot battalion also did very little in the game, but managed to stay put in their positions for the duration. Meanwhile, a desultory firefight takes place between French and soviet riflemen in Baudorf, the French losing 2 platoons. Once more, the commander there was worse than useless (2 command blunders more under his belt, and never more than an activation per turn). Seeing this, the M47s elected to get behind Ridge 201 and crest it to engage the T55s.

In game terms, the Fench Pattons rolled awesomely, managing 2 command bonuses in a row at the decisive moment, and still rolling quite well after ward. In CWC, nothing is lost till you have some fighting spirit left!

Image

Image

Image

Phase 3

Image

It all hinged on what the Soviet T55s would do : swing right, face ridge 201, and hope they’d inflict enough damage on the Pattons… or ignore them and bet they could cause havoc with long range gun fire in Siegelstadt? They elected the latter. It was a very tough time in Siegelstadt, but eventually, the Soviets managed to cause no significant damage (in CWC, infantry in buildings can be extremely tough! I’ll just grab the chance to pimp my house rule here : when rolling to suppress, you succeed on 4+, not 6+, which in my opinion makes infantry in town a tad too strong). Then the Pattons crested the hill, and what did they see?

Image

Image

They killed 2 T55s outright, the last one moving around to engage the French tanks. Its fire was ineffectual, and it was stopped in its tracks (if I may say so!) by reaction fire from the little EBR that had tagged along the armour. Needless to say, the following turn, it died, as well as the alst PT76 that had moved to engage as well. All that was left to do was a headlong tank charge, M47s rushing through the field of wrecks to emerge and destroy the last BTR60s – and the recce BTR 40 as well – on the other side. With that, Soviet morale collapsed, just as the Foot Battalion had at last made it to its start line on the Walderberg. In game terms, Jean Jacques passed 2 Break Point rolls, getting down to needing to roll 5 or less before failing one. At that point, I’d lost 9 units -2AMX 13, 2 AMX APCs and 5 Infantry platoons- , and was a bare 4 units from needing to roll too.

Image

Image

Image


All in all, a terrific game for both players, that got quite some attention in the club. My crusade to get the club to swap its current WW2 rules for the BKC/CWC rules system moves along.

Achtung Tiger!!!

We held a BKC gaming session at the club on November 3rd. Wanting to try something new, we brought the 20mm figures we usually have for another set of rules and borrowed the club’s for the afternoon. Since I’d forgotten to bring along my camera, pics were taken by another member , so I had them but last week, ansince d other issues delayed this report, blurring my memories, I’m begging your pardon for its sketchiness. IIRC, setting was the spring of 1944. Russians try to take by surprise a moderately defended town before alerted German armour can prevent them. Unfortunately for them, it appeared that the defenders were elite Paras with a wittmanesque Tiger in support.

Image


Image

Here is the Terrain. We’d decided to simply double every distance, so at 2.40m x 1.80m, the table felt somewhat cramped. The German Paras are alreday occupying the town, supported by the Tiger and the entranched PaK 40. The Russians are arriving from the east, and must take the westernmost building before turn 12 to win, or break the german battlegroup. On turn 4, some German armour will enter from the west (under the CO).

Image

The Germans score 1 victory point for each turn the are sole occupiers of this building, both sides score 2 points for each killed AFV, 1 point for each other unit killed. Here are the opposing sides rosters :

Both German HQs can command any troop, but for the reinforcements. Soviet HQs are restricted to the troops under them, except the CO who can command everyone.

Image


Image

Tiger in the woods! Actually, an already painted Altaya model.

The Russians opted for two infantry wings and an armoured center. While the Regulars would advance on the northern hill through the woods, the mounted conscripts would gallop down teh road as fast as possible (the russian player had bet I’d leave the eastern borders empty…) while the tanks would advance and engage the Tiger, under the lee of the little hill at the crosroads that would shelter them from the PaK 40. The German plan was simple : shoot them, slow them down and hold till the cavalry arrived (hopefully in time).

Phase 1

Things started swimmingly for the Soviets, the Regulars getting a command bonus that allowed them to cross the woods. They decided not to move the border of teh forest though, somewhat daunted by the sight of the steel monster majestically sitting on top of the opposing wooded hill. Then stuff started to go south : the mounted conscripts rode down the road, coming into range of the Pak 40 and of the yet unseen MG42. These opened up, killing some and pinning the remainderr, mounted, on the road and in the open…

Image


1 Russian Regulars advance in the woods

2 T34s advance and duel with the Tiger

3 Shermans stay behind

4 Conscripts get slaughtered on the road

While the Shermans failed their command roll, the T34 rumbled forward, engaged the Tiger and failed to do anything. Then it was the German phase… The PaK 40 and MG 42 kept murdering soviet conscripts on the road, and the Tiger took out its first T34.

Image

Russians then started a spectacular series of failed command rolls, while their planned first mission struck into thin air. The Tiger ahd a field day, killing tanks, while the soviet conscripts kept being butchered (being mounted under fire really sucks…)

Image


Russian conscripts shot up on the road

Phase 2

The Russians conscripts eventually dismounted and moved down the road, as at last rockets pummelled the Pak 40 (and doing nothing, too…). But that was too little, too late, and as some paras had moved to occupy the eastermost buildings, combined fire finished off the whole unit..

Image


1 Conscripts move to the woods edge, take losses

2 Tiger wins its battle vs Russian armour

3 German paras open up fire

4 Conscripts wiped out!

5 Paras move into edgetown houses

6 Reinforcements saty idle

The regulars moved to the edge of the woods on the other flanks, but came underr the fire of two platoons hidden in the nearest building. The Shermans moved at last forward, only to be butchered by the Tiger who took out 3 of them. This left 4 Russian tanks alive, and still, they nearly managed to destroy the big cat, inflicting 5 unsaved hits in a single turn, and pinning it. But stellar fire from the paras took out another 2 platoons of Soviets in the woods, and that was that, as this was one above break point, and the Russians failed their roll. Meanwhile, the German reinforcements had duly arrived on turn 4, only to fail every command roll afterwards, and remained idle on the road west of the town till the end. As though they knew they were not needed!


Image

Russians engage in a tank battle…


Image

Reinforcements go sightseeing….


Centre European WW3 armies, 1960s style

I have completed the centre Europe 1960ish armies I’d intended for Blitzkrieg Moderne & Cold War Commander, and eventually taken pics of the whole stuff. It’s a scale change for me (I’m mostly a 6mm player), but I wanted a bigger scale to do a few M47 Pattons… the best part is that whether French or Soviet, I’ll get to use vehicles I used to play with a s a child. If I may say so, the whole project was but an occasion for enjoying a Proustian madeleine…

Let’s start with the French!

The whole army : 12 infantry stands, 4 M47s, 2 AMX 13/75, 8 AMX 13 VTT, 1 EBR 75 and the command stands.

laughing

The infantry (mostly Eureka Games)

Image

The APCs : AMX 13 VCI by QRF

ImageImage


The EBR 75 by QRF (with the typical all metal cross country wheels)

Image

The AMX 13/75 by QRF

Image

The M47 Pattons by QRF

ImageImage

The command stands (for CWC) included for completeness but frankly I’ll have to redo them some time.

Image

And some more scenic close ups of a few vehicles.

Image

Image

Image

Image

Image

Image

Image

And the Russians

The whole army : 16 infantry stands, 6 T 55, 2 PT 76, 8 BTR 60, 1 reco BTR 40, the command stands for CWC (the CO will ride in a BTR 50, yay!)

Image

The infantry (QRF)

Image

Their APCs, by Skytrex

Image

T 55, by Skytrex

Image

PT 76, QRF

Image

BTR 40, QRF

Image

Command (the BTR 50 is from QRF)

ImageImage

And some more scenic close ups of a few vehicles.

Image

ImageImage

Image

Image

Image

Image