week 11: QR code, CV Online
Assalamualaikum dan salam sejahtera.
kali ni, sya cakap pasal kedua-dua tajuk di atas iaitu Kod QR dan cv Online. Kod QR (singkatan frasa Inggeris quick response) adalah sejenis kod bar generasi kedua. Ia merupakan sejenis penyimbolan dua dimensi yang telah dibangunkan oleh sebuah syarikat Jepun iaitu Denso Wave dan telah dikeluarkan pada tahun 1994.[1] Kod QR dapat menyimpan maklumat lebih banyak daripada kod bar UPC biasa kerana ia mengandungi maklumat secara menegak serta mendatar. Kod ini terdiri daripada modul hitam (titik segi empat) disusun dalam pola segi empat pada latar putih. Penggunaan kod QR membolehkan maklumat dihantar dari dunia fizikal ke alat mudah alih.

manakala, CV online pula adalah….. For many years paper CV´s were the way to present your skills and other characteristics to a potential new employer. Slowly but surely this is changing, however. A lot of important communication now takes place digitally: why should this be any different with the curriculum vitae? That’s why some applicants are switching over to a digital CV: a contemporary variant that is definitely appreciated by certain employers.
What kinds of online CV´s are there?
If you are planning to develop an online CV, you should know that several forms exist. In any case, we distinguish between the following variants:
- The digital CV on a specific website
- The digital CV as profile on a website
- The digital CV on your own website
- The digital CV in .pdf format
The digital CV on a specific website
Some organisations or bodies have the means with which you can easily upload your CV via a platform specially set up for this purpose. Moreover, other possibilities are also often present, such as making a link to your LinkedIn profile and uploading various photos. In this way you develop an online document that the recruiter can access at any time.
The digital CV as profile on a website
In some cases – on this very website, for example – customers get the possibility to develop not a CV but a secure profile containing all the information necessary for an employer. Here you can think of a Facebook-like environment in which you answer a number of questions about yourself.
The digital CV on your own website
This somewhat more advanced option is also called a “digital portfolio”. Here you develop your own website on which the potential employer can find all the information that he or she needs.
The digital CV in .pdf format
When you send a digital CV by e-mail, this is often done in .pdf format. Another common extension is .doc, indicating a Microsoft Word document.
What are the parts of an online CV?
A digital CV contains the same information as a regular version. The difference is that here they are subdivided over different pages or page sections. These four parts thus also appear in the digital version:
- Personal details
- Education
- Work experiences
- Skills
The advantages of an online CV
As mentioned, more and more people are switching over to creating a digital CV. There are several reasons for this. One is that your curriculum vitae isn’t available to just a single other person: instead, any potentially interested party can take a look at your information as well. In addition, it often makes a big impression when you run your own well-maintained website with your qualities on it. A digital version also offers a number of practical advantages: you don´t have to send a CV by post, and the employer can look at the document from any location, whenever he wants.
What is the difference between a resume, a CV and an online profile? … Resumes are for getting yourself an interview and then perhaps a job later on, onlineprofiles are for showing your connections or onlineportfolios if you’re on the creative field, and CVs are more for licensed professionals or academicians.
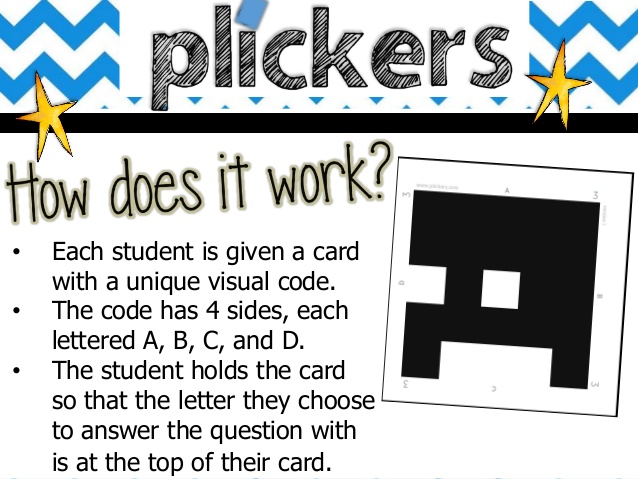
week 10: Rubistar, Plickers
assalamualaikum wbt dan salam sejahtera.
kali ini, saya nak share apa itu rubistar dan apa pula itu plickers.
RubiStar is a free tool to help teachers create quality rubrics


rubric sangat mudah untuk digunakan oleh guru untuk membuat penilaian markah terhadap pelajar.
PLICKERS
Plickers is an assessment tool made by a teacher who was looking for a quick and simple way to check student understanding. This assessment tool allows teachers to collect on-the-spot formative assessment data without the need to have students use devices or paper and pencil. Teachers can use this tool with previous planning or on the go as needed. This tool provides teachers with the data needed to inform their instruction. “It provides students with the opportunity to participate and engage in learning without feeling self-conscious.” (Plickers.com) It’s a data collection tool that’s helpful for teachers and fun for the students.

week 9: Taxonomy Bloom
assalamualaikum wbt, dan salam sejahtera.
taxonomy bloom merupakan salah satu aktiviti dalam kelas secara berkumpulan. ia terdiri daripada REMEMBERING, UNDERSTANDING, APPLYING, ANALYZING, EVALUATING DAN CREATING. tujuan taxonomy bloom ini dibuat adalah untuk merangka projek akhir bagi kursus ini.
REMEMBERING:
fasa pertama adalah remembering yang bererti mengingati. Hal ini bermaksud, kami telah diarah untuk befikir secara critical thinking segala yang telah kami pelajari selama 11 minggu dan diaplikasikan dalam proses projek akhir kami.
UNDERSTANDING:
fasa kedua pula menunjukkan bahawa kami memahami segala yang telah diajar semasa waktu kuliah. apabila kami berjaya fasa remembering, barulah dapat memahami.
APPLYING:
fasa ketiga adalah applying di mana sekiranya kami mampu mengingat dan memahami segala yang telah dipelajari, barulah boleh diaplikasikan. sebagai contoh, kami apply menggunakan camera telefon untuk menangkap gambar di pantai. selepas itu kami membuat teknik cetakan pada papan.
ANALYZING:
fasa keempat adalah analyzing yang bermaksud menganalisis. kami dikehendaki untuk menganalisis semua yang telah dirancang pada tahap remembering, understanding dan applying, sama ada perancangan tersebut berjaya ataupun tidak.
EVALUATING:
fasa kelima pula adalah evaluating atau kata lain penilaian. penilaian ini adalah bertujuan untuk menilai tahap kefahaman dan kepuasan individu dalam memahami sesuatu. oleh itu, aplikasi yang kami gunakan adalah rubistar.
CREATING:
creating merupakan fasa terakhir iaitu mencipta. setelah fasa pertama hingga kelima dibuat, creating perlu dilaksanakan untuk membuat pasaran dan promosi produk yang dihasilkan.
kumpulan saya telah mendapat tajuk SEA SCAPE, oleh itu kami telah pergi ke TELUK BATIK, PERAK untuk mengambil gambar yang menarik. selepas itu, kami telah print di kertas dan tekap pada papan untuk membuat teknik cetakan.

week 8: SCRATCH ONLINE


week 7: no class
week 6: SCRATCH
assalamualaikum wbt dan salam sejahtera.

hari ini saya akan berkongsi mengenai tajuk di atas, iaitu “SCRATCH”.
scratch adalah salah satu aplikasi untuk membuat ‘simple game’ sama ada dari segi pengaturcaraan, coding, reka bentuk, imej dan animasi.
langkah pertama:
search la ‘Scratch 3.0’ dekat google. pastu nanti adalah keluar. and then you should make an account for scratch sama ada link dengan facebook, sign in from google account or just sign up there. for me, sign in from google account lagi mudah heehehhe.
langkah kedua:
first view untuk scratch adalah mempunyai 3 bahagian di atas sebelah kiri iaitu code, costumes dan sound.

code: terdapat 9 perincian yang boleh diguna pakai. iaitu motion, looks, sounds, events, control, sensing, operators, variables, my blocks. di sini lah tempat untuk kita membuat reka bentuk game tersebut.
costumes: di sini pula untuk membuat imej dan latar belakang (background)

sounds: untuk memasukkan bunyi

seterusnya, bahagian backdrop kita boleh masukkan upload backdrop, surprise, paint, choose a backdrop.

selanjutnya, part ‘choose a sprite’ untuk buat imej.


siap pun saya punya scratch 3.0 !!!
week 5: Blended Learning
Week 4: Photoshop
Assalamualaikum dan salam sejahtera. Pada 12 March 2019 bersamaan hari Selasa jam 11:00 hingga 13:00pm seperti biasa kelas Pendidikan Seni dan Teknologi dibuat di E-learning 12, aku dan rakan-rakanku masuk ke kelas seawal 10:55 kerana kami akan bersiap sedia untuk switch on our laptop supaya bila Dr Wani masuk kelas, kitorang boleh terus start belajar. well, minggu ni kitorang belajar benda yang sememangnya susah walaupun dah biasa dengan IT. lagi-lagi yang baru nak kenal macam aku ni hahahaha!
Pada hari itu, aku dan rakan-rakanku belajar how to make an animation of typography by using this application. so, the first thing first is:
1. Create a new document.
Specify the size and background contents. Make sure the pixel aspect ratio and dimensions are appropriate for the output of your animation. The color mode should be RGB. Unless you have special reasons for making changes, leave the resolution at 72 pixels/inch, the bit depth at 8 bpc, and the pixel aspect ratio at square.
Make sure the Timeline panel is open. If necessary, click the downpointing arrow in the middle of the panel, choose Create Video Timeline from the menu, and then, click the button to the left of the arrow. If the Timeline panel is in frame animation mode, click the Convert To Video Timeline icon in the lower-left corner of the panel.
2. Specify the Set Timeline Frame Rate in the panel menu.
Specify the duration and frame rate. See Specify timeline duration and frame rate.
3. Add a layer.
Background layers cannot be animated. If you want to animate content, either convert the background layer to a normal layer or add any of the following:
- A new layer for adding content.
- A new video layer for adding video content.
- A new blank video layer for cloning content to or creating hand-drawn animations.
4. Add content to the layer.
5. (Optional) Add a layer mask.
A layer mask can be used to reveal a portion of the layer’s content. You can animate the layer mask to reveal different portions of the layer’s content over time. See Add layer masks.
6. Move the current time indicator to the time or frame where you want to set the first keyframe.
See Use keyframes to animate layer properties.
7. Turn on keyframing for a layer property.
Click the triangle next to the layer name. A down-pointing triangle displays the layer’s properties. Then, click the stopwatch to set the first keyframe for the layer property you want to animate. You can set keyframes for more than one layer property at a time.
8. Move the current time indicator and change a layer property.
Move the current-time indicator to the time or frame where the layer’s property changes. You can do one or more of the following:
- Change the position of the layer to make layer content move.
- Change layer opacity to make content fade in or out.
- Change the position of a layer mask to reveal different parts of the layer.
- Turn a layer mask on or off.
For some types of animation, such as changing the color of an object, or completely changing the content in a frame, you need additional layers with the new content.
9. Add additional layers with content and edit their layer properties as needed.
10. Move or trim the layer duration bar to specify when a layer appears in an animation.
See Set the timeline area to preview.
11. Preview the animation.
Use the controls in the Timeline panel to play the animation as you create it. Then preview the animation in your web browser. You can also preview the animation in the Save For Web dialog box. See Previewing video or timeline animations.
12. Save the animation.
You can save the animation as an animated GIF using the Save for Web command, or as an image sequence or video using the Render Video command. You can also save it in PSD format, which can be imported into Adobe After Effects.
Use keyframes to animate layer properties
You can animate different layer properties, such as Position, Opacity, and Style. Each change can occur independently of, or simultaneously with, other changes. If you want to animate different objects independently, it’s best to create them on separate layers.
Here are some examples of how you can animate layer properties:
- You can animate position by adding a keyframe to the Position property, then moving the current time indicator and dragging the layer in the document window.
- You can animate a layer’s opacity by adding a keyframe to the Opacity property, then moving the current time indicator and changing the layer’s opacity in the Layers panel.
- You can animate 3D properties, such as object and camera position. (For more information, see Create 3D animations.)
To animate a property using keyframes, you must set at least two keyframes for that property. Otherwise, changes that you make to the layer property remain in effect for the duration of the layer.
Each layer property has a Time‑Vary stopwatch icon that you click to begin animating. When the stopwatch is active for a specific property, Photoshop automatically sets new keyframes whenever you change the current time and the property value. When the stopwatch is inactive for a property, the property has no keyframes. If you type a value for a layer property while the stopwatch is inactive, the value remains in effect for the duration of the layer. If you deselect the stopwatch, you will permanently delete all of the keyframes for that property.
Choose interpolation method
Interpolation (sometimes called tweening) describes the process of filling in unknown values between two known values. In digital video and film, interpolation usually means generating new values between two keyframes. For example, to move a graphic element 50 pixels to the left in 15 frames, you’d set the position of the graphic in the first and 15th frames, and mark them both as keyframes. Photoshop interpolates the frames between the two keyframes. Interpolation between keyframes can be used to animate movement, opacity, styles, and global lighting.
In the Timeline panel, the appearance of a keyframe depends on the interpolation method you choose for the interval between keyframes.
Linear keyframe
Evenly changes the animated property from one keyframe to another. (The one exception is the Layer Mask Position property which switches between enabled and disabled states abruptly.)
Hold keyframe
Maintains the current property setting. This interpolation method is useful for strobe effects, or when you want layers to appear or disappear suddenly.
To choose the interpolation method for a keyframe, do the following:
- In the Timeline panel, select one or more keyframes.
- Do one of the following:
- Right-click a selected keyframe and choose either Linear Interpolation or Hold Interpolation from the Context menu.
- Open the panel menu and choose either Keyframe Interpolation > Linear or Keyframe Interpolation > Hold.
Move the current-time indicator to a keyframe
After you set the initial keyframe for a property, Photoshop displays the keyframe navigator, which you can use to move from keyframe to keyframe or to set or remove keyframes. When the keyframe navigator diamond is active (yellow), the current-time indicator lies precisely at a keyframe for that layer property. When the keyframe navigator diamond is inactive (gray), the current-time indicator lies between keyframes. When arrows appear on each side of the keyframe navigator box, other keyframes for that property exist on both sides of the current time.
- In the Timeline panel, click a keyframe navigator arrow. The arrow to the left moves the current-time indicator to the previous keyframe. The arrow to the right moves the current-time indicator to the next keyframe.
Select keyframes
- In the Timeline panel, do any of the following:
- To select a keyframe, click the keyframe icon.
- To select multiple keyframes, Shift-click the keyframes or drag a selection marquee around the keyframes.
- To select all keyframes for a layer property, click the layer property name next to the stopwatch icon.
Move keyframes
- In the Timeline panel, select one or more keyframes.
- Drag any of the selected keyframe icons to the desired time. (If you selected multiple keyframes, they move as a group and maintain the same time spacing.)
Copy and paste keyframes
You can copy keyframes for a property (such as Position) to the same property in any layer. When you paste keyframes, they reflect the copied offset from the current-time indicator.
You can copy keyframes from only one layer at a time. When you paste keyframes into another layer, they appear in the corresponding property in the destination layer. The earliest keyframe appears at the current time, and the other keyframes follow in relative order. The keyframes remain selected after pasting, so you can immediately move them in the timeline.
- In the Timeline panel, display the layer property containing the keyframes you want to copy.
- Select one or more keyframes.
- Right-click a selected keyframe, and choose Copy Keyframes.
- In the Timeline panel containing the destination layer, move the current-time indicator to the point in time where you want the keyframes to appear.
- Select the destination layer.
- Open the panel menu and choose Paste Keyframes.
Delete keyframes
- In the Timeline panel, select one or more keyframes and do one of the following:
- Right-click (Windows) or Control-click (Mac OS) a selected keyframe, and choose Delete Keyframes from the context menu.
- From the panel menu, choose Delete Keyframes.
Create hand-drawn animations
You can add a blank video layer to your document when you want to create frame-by-frame hand-drawn animations. Adding a blank video layer above a video layer and then adjusting the opacity of the blank video layer allows you to see the contents of the video layer below. You can then rotoscope the video layer content by painting or drawing on the blank video layer. See also Paint frames in video layers.

WEEK 3: QUICK DRAW, AUTODRAW & GOOGLE DRAWING
Assalamualaikum wbt, salam sejahtera guys! hahaha. harini aku nak cerita pasal apa yang kitorang buat minggu lepas dengan Dr Wani. seperti biasa, aku akan belajar sesuatu yang aku tidak minat pada mulanya. mungkin sebab aku tak pernah cuba untuk mengenal seni menggunakan teknologi masa kini. well said, tak kenal maka tak cinta kan? hahahaah! setiap kali bermulanya kuliah, aku berasa sangat takut, risau dan bimbang kerana aku bukan budak IT. at least kawan-kawanku walaupun bukan budak IT, tapi masih ‘follow up’ dengan teknologi dalam bidang seni.
Walau bagaimanapun, aku kena sentiasa bersedia untuk belajar ilmu baru. kerana aku juga yakin, bukan aku saja yang baru mahu mengenal 3 benda ni iaitu ‘Quick Draw’, ‘Autodraw’ dan ‘Google Drawing’. kosongkan minda, tenangkan jiwa agar mudah untuk menerima ilmu tersebut. seperti biasa, Dr Wani yang manis akan bermula dengan jenakanya. memberi tahu tentang markah kami 100% akan ditolak sedikit demi sedikit sekiranya tidak membuat kerja yang beliau berikan. setelah itu, we started from Quick, Draw!
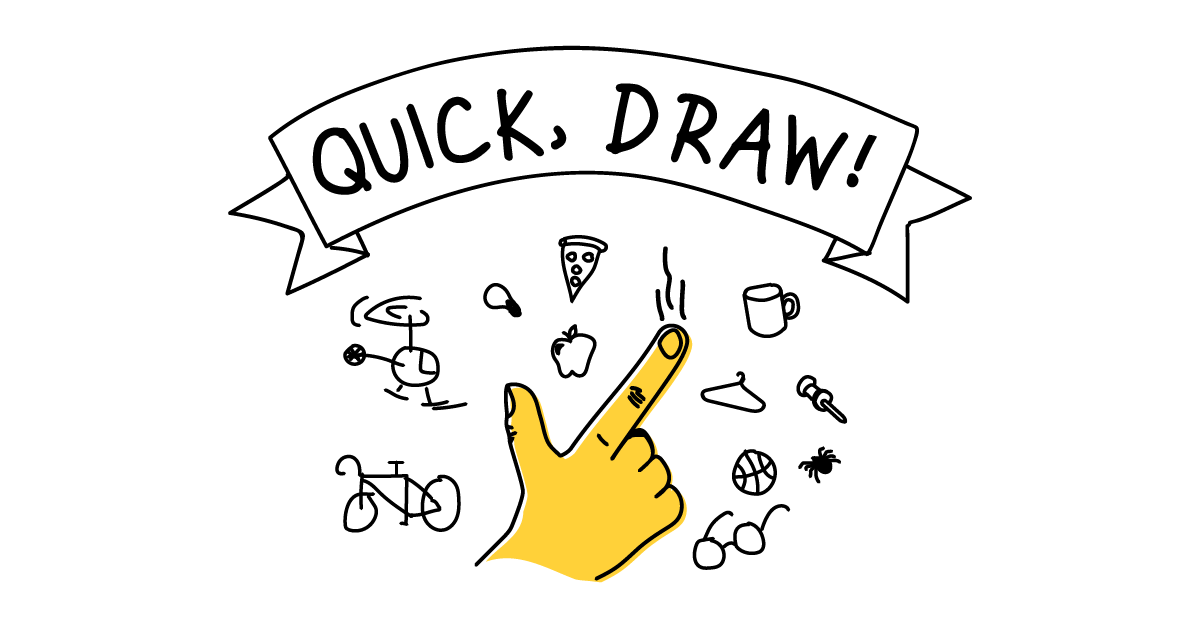
Quick, Draw! merupakan 1 aplikasi atas talian yang sangat menyeronokkan dan mencabar. hal ini kerana, ia akan memberikan arahan apakah yang perlu dilukis dalam tempoh 20 saat. oleh itu, kita hendaklah bijak untuk membuat rupa bentuk objek yang diminta supaya ia dapat ‘detect’ dan mendapat markah diakhir contest tersebut. seronok bukan? hahaha. aku terfikir sejenak, aku nak bawa benda ni ke sekolah masa PPG2 nanti. tapi masalahnya, student perlu ada pc atau laptop dan internet yang laju. hmm. in shaa Allah, one day aku cuba dedahkan dengan student aku. sebab benda ni menyeronokkan sekaligus meningkatkan imaginasi seseorang dalam masa yang pantas.

Autodraw pula, merupakan aplikasi yang sangat mudah digunakan. sesuai untuk kanak-kanak but still, memerlukan kreativiti dan imaginasi yang tinggi. kita hanya perlu melukis shape objek yang kita nak, and then akan keluar suggestion image dekat atas. so, kita boleh pilih imej yang kita nak. sebagai contoh, aku nak lukis bas tu, aku just lukis bentuk segi empat. automatically keluar suggestion image, aku pilih la kenderaan apa aku nak. simple kan? heheheeh. drag la imej-imej tersebut, letak komposisi yang menarik, lastly aku fill colour. menarik kan aku buat? hahahaha.

lastly! aku buat google drawing muka aku sendiri hhaahaha. sorry lah tak lawa, nampak macam cartoon je. for me, yang ni lah susah nak buat. sekecil-kecil biji mata aku kena lukis semula. begitu juga dengan fabrik aku yang lembut. huhhhh. walaupun susah, tapi benda ni buat aku ketagih taw! aku siapkan muka aku ni daripada pukul 14:00pm until 20:00pm!!! haahaha. sampai berpinar biji mata aku tak lari dari hadap laptop. macam yang aku cakap tadi, benda ni seronok bila kau dah tahu teknik nak buat. just draw the line, drag, kena aplikasi enlargement supaya mudah nak potong area yang kita nak drag and finally put the shadow there. so, bolehlah nampak tone sikit, bagi bayang sikit. comel lah sikit kan hahaha. thats all from me, thanks for reading! ❤
