
Admin Help Docs
Adding a New Help Doc
In the admin area of your site, navigate to Help Docs > Manage Docs. Then click on the “+ Add New” button. It’s just like adding a new post.
- Add a title for the doc. This is the topic, subject or question for the help doc.
- In the main body, include whatever you want that will be helpful for your admin area users. Note — not all types of content will show up in the various locations, so you’ll have to give it a try and see if it works or not. If for whatever reason specific content does not show in a certain area that you would like it to, you can make a request for us to add support for it.
- At the bottom of the page there should be a box entitled “Location”:
- Site Location: This is where the help doc will appear in your admin area.
- Main Documentation Page: This is where you would find all of the docs when you click on the Help Docs menu item, or by going to Help Docs > Documentation.
- Admin Bar Menu: If you have enabled the admin bar icon from Settings (see below), you can add the help doc to it as a submenu item. The submenu item will display as “Document Title — Document Content” with all html tags stripped out. If you just want to link the menu item to a page, paste only the URL in the content box without anything else. You can also remove the content from Settings by disabling the “Include Doc Content in Admin Bar” option.
- Updates Pages: Adds a doc to the Dashboard > Updates page, which is useful if you need to tell people not to update certain things.
- WordPress Dashboard: This will replace your main dashboard in the admin area completely with the current doc. This is very useful if you want to customize what goes on there without getting bombarded with widgets from every plugin you have. You must enable “Replace WordPress Dashboard with a Help Doc” in Settings for this to show up. Warning: Replacing the WordPress dashboard entirely may affect other plugins and functionality. No other widgets or dashboard elements will be displayed.
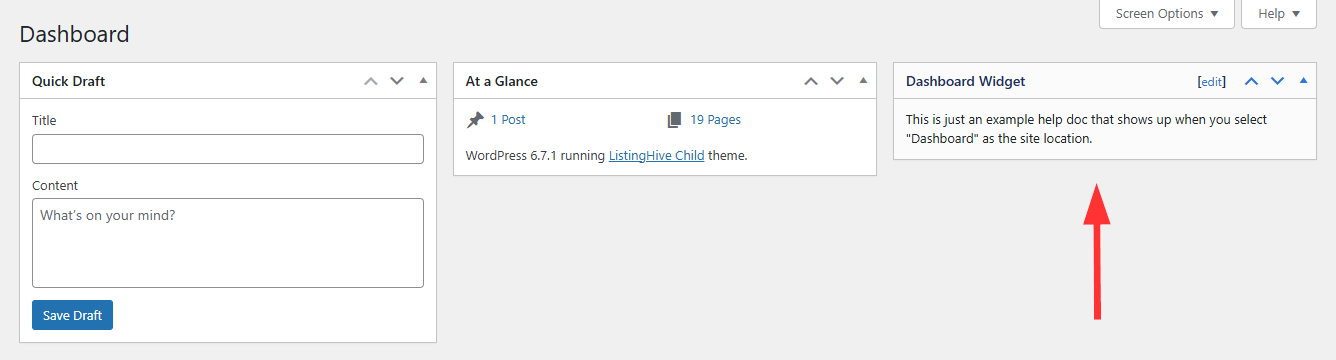
- WordPress Dashboard Widget: Adds the help doc as its own widget to your WordPress dashboard (assuming you haven’t replaced the dashboard with another doc).
- Function: admin_help_doc(id): Developers can use this function to display a specific help document by its ID:
admin_help_doc(#); - Post/Page Edit Screen: The screen where you edit posts, pages, and other custom post types. When selecting this, you will see a list of post types to apply the help doc to. This will work on both the Gutenberg editor and the Classic editor.
- Post/Page Admin List Screen: The screen that lists all of your posts, pages, and other custom post types. When selecting this, you will see a list of post types to apply the help doc to.
- Other items from your admin menu: You can add help docs to most pages in your admin area. Note — some pages added by plugins or themes will not work as expected due to how they are set up by their authors.
- Other/Custom Page: If a help doc isn’t showing up on the page you want it to from the list above and you have already checked that this help doc is published, you can also try just plugging in the URL instead. This only works in the admin area, so front-end pages will not work.
- Menu Order (only available when Main Documentation Page or Admin Bar Menu are selected): The position of the item in the menu. You can also change this order on the Main Documentation Page by simply dragging and dropping the items in the file tree on the left panel.
- Add to Dashboard Table of Contents (only available when Main Documentation Page is selected): If you have enabled the Dashboard TOC in Settings (see below), selecting this will add a link to the doc in the Table of Contents dashboard widget.
- Page Location (not available on Main Documentation Page, Admin Bar, Dashboard, or Function): Options are Contextual Help Tab, Top, Bottom, Side (if on a post/page edit screen) or Next to Specific Element.
- Contextual Help Tab: The Contextual Help Tab appears at the very top right corner of the page if any help is available. Contextual help tabs don’t actually exist on the post/page edit screen when editing in Gutenberg, so a “Help” button will be added in the top bar at the right with the help docs. Note — when adding to Contextual Help Tabs, formatting is limited to simple text.
- Top: This will show up on the top of the page. On most pages (with the exception of the post/page edit screen), by default the top location exists just above the page title and under the screen options/help tabs. You can change the location of the top placement in Settings to the very top of the page above the tabs as well. Which works best for you will depend on your site and the plugins and theme you have installed.
- Bottom: This will show up on the bottom of the page.
- Side: Only works on the post/page edit screen. Prior to version 2.0, you had an option for priority. This has been removed as users would then move them out of the way or close them. Now they default to the top and cannot be moved or closed, so priority has been removed.
- Next to Specific Element (Beta): This is a new placement option as of version 2.0. When selected, a field for Element CSS Selector will appear. You must add the exact id or class of the element you want the doc to appear after. For this option, you’ll need to know a little about CSS and/or JavaScript. Typically, you can just right-click where you want the doc to show up and click on “Inspect” for your developer console to appear in your browser. Then you would find the exact selector there.
- Allow Public: Allowing this document to be public adds it to a publicly accessible custom rest API end-point, which can then be pulled in from other sites you manage using the Import feature (see below). If enabled, make sure no sensitive information is included in your content, or protect it by generating an API key in Settings.
- Viewable by Roles: Also added in 2.0, you can now select the roles that should have access to this document. All admins can see the doc regardless. If nothing is selected, it will use the default roles selected for viewing in your Settings.
- Site Location: This is where the help doc will appear in your admin area.
- You can also add the help doc to a folder, which is only used when the site location is set to Main Documentation Page.
Main Documentation Page
In the admin area of your site, navigate to Help Docs > Documentation, or simply click on the Help Docs parent menu item. If you have the admin bar icon enabled from Settings (see below), you can also click on that to get there.
- You can add a new doc by clicking on the “+ Add New” button at the top. Be sure to set the Site Location on your doc(s) to “Main Documentation Page” for it to show up here.
- When help docs are added to the Main Documentation Page, you will see a file tree on the left panel and the doc viewer on the right panel. The top-most positioned doc in the file tree will always load by default unless you set a specific one in the Settings (see below).
- You can drag and drop the position of the files in the file tree to reposition them.
- To add files to folders for better organization, navigate to Help Docs > Folders and create a new folder. Then return to the Main Documentation Page and drag the file into the folder.
How do I display a shortcode without executing it?
- Primary Method: Wrap your shortcode within the enclosing tags. This is the most reliable way to handle complex shortcodes.
Usage:[dont_do_shortcode][your_shortcode_here][/dont_do_shortcode] - Legacy Method: You may also pass the content as an attribute. When using this method, replace the square brackets of your target shortcode with curly braces
{ }.
Usage:[dont_do_shortcode content='{shortcode_name param="value"}'] - Important: Do NOT mix these two methods. Use either the enclosing tags or the
contentattribute. Combining them will cause the shortcode to break. - Note: When using the legacy attribute method, ensure you use single quotes (
') for thecontentparameter so you can safely use double quotes (") inside the shortcode attributes. - Disable click-to-copy functionality with
click_to_copy='false'parameter. - You may use the optional
code='false'parameter.
How do I add custom CSS to documents?
- As of version 2.0, the old
[helpdocs_css]shortcode is now deprecated. - You can now add your CSS to the Settings tab instead under Main Docs Page CSS.
Imports
In order to import a help doc from another website, you have to make it publicly available on the original website, which you can do by editing the help doc and choosing Yes under the “Allow Public” option in the Location section. Or you can choose to change the default to Yes in Settings for all of them to become publicly available. It is recommended to protect it by generating an API key in Settings as well, which is new as of version 2.0. This requires the receiver to use that key to see them.
Once it is publicly available, go to the site in which you want to import it into and navigate to Help Docs > Imports.
- Click the “+ Add New” button.
- Add a name for your import (mostly for reference; this is not the title of the help doc).
- Enter Website URL of the website it’s coming from. If you generated an API key on the remote site, you’ll put that API key here as well.
- Click on Fetch Docs to have the docs populate in a table below.
- You will see all of the available docs that are publicly available on the site you entered. You can choose to remotely feed documents from the other website, which will update automatically if they are changed on the other site. This is useful if you manage several sites and want to control them in one spot. Just keep in mind that they are cached locally for 12 hours unless you clear the cache from your Settings page. This prevents the site from remotely fetching on every page load. You may also use the “Copy to Local” action, which will clone individual docs and add them to this website. The benefit of doing that is that you won’t lose them if they get taken down on the other site.
- You can select “Feed All Documents Automatically” to automatically add all docs from this site, giving the remote site control over what shows up. Otherwise you will need to select which ones to feed.
- The “TOC” option allows you to add the doc to the Dashboard Table of Contents, provided that you have enabled Dashboard TOC in your settings and the feed’s site location is set to “Main Documentation Page.”
- Be sure to select “Active” at the top and Save your Import Settings.
Settings
In the admin area of your site, navigate to Help Docs > Settings.
Interface
- Menu Title: This is what shows up in the left admin menu.
- Menu Position (Deprecated): As of version 2.0, this option was replaced with the Admin Menu tab where you can position all menu items, not just the Admin Help Docs.
- Menu Icon: You may change the default menu icon to any other Dashicon. Doing so will change the icon in the admin menu on the left as well as the icon in the admin bar if you have enabled it. This item has live preview so you can see what it looks like before you save the settings.
- Page Title: This is the name of the plugin pages, which by default is “Admin Help Docs.”
- Page Logo: You can change the logo on all of the plugin pages so your client knows the help docs came from you. The preferred size of the image is 100×100 pixels. Accepted formats: jpg | jpeg | png | webp
- Help Doc Logo: You can also change the logo on all of the help docs, which may differ from the page logo if the background is contrasted. For example a light logo on dark background at the top of the page, and a dark logo on a light background on the help docs themselves. You can also disable the help doc logo from the Content & Output settings on the right. The preferred size of the image is 100×100 pixels. Accepted formats: jpg | jpeg | png | webp
- Color Theme and Colors: Updated for version 2.0. Previously you could only change 5 colors; now you have 12 to choose from. Pick a theme to use or choose your own colors for a custom theme. You can also download and upload color themes from the Advanced settings to share with other websites.
- Enable Support Contact Form: When enabled, a Contact Support tab will appear in the Admin Help Docs. See more info below.
- Enable Admin Bar Menu: Adds an icon to the admin toolbar at the top of the page. There are two options in version 2.0 for backend and frontend. This makes it easy for people to quickly bounce to the Main Documentation Page located under Help Docs > Documentation. You may also add docs to it by selecting “Admin Bar Menu” as the Site Location when setting up a help doc.
- Replace WordPress Dashboard with a Help Doc: Replace the default WordPress dashboard with a custom help docs page. To add docs, set their locations to “WordPress Dashboard (Replaces Dashboard Entirely)”. Warning: Replacing the WordPress dashboard entirely may affect other plugins and functionality. No other widgets or dashboard elements will be displayed.
- Enable Dashboard Table of Contents Widget: Adds a dashboard widget with a table of contents for the docs on the Main Documentation Page. When enabled, choose “Add to Dashboard Table of Contents” in the Location section of the help doc. This will still appear at the top of the page if you replace the WordPress dashboard above.
- Use Gutenberg Editor: By default, creating and editing docs will use the Classic editor; however, some people might want to use Gutenberg instead, so this option gives you that capability.
Content & Output
- Include Doc Content in Admin Bar: Includes a snippet of the document content in the admin bar when you add docs to it. Otherwise it will just show the title.
- Default Document on Main Docs Page: You can select a default document to load on the Main Documentation Page. Otherwise it will load the first doc on the list.
- Hide Document Meta on Main Docs Page: Hides the “created” and “last modified” dates and authors on the Main Documentation Page docs.
- Auto-Generate Table of Contents on Main Docs Page: Automatically generate a table of contents from headings (H2–H6) at the top of each documentation page.
- Disable Curly Quotes: WordPress automatically converts straight quotes (
") to curly quotes (”) on posts, which makes sharing code difficult. Disable them if your help docs include code snippets so that people don’t copy the wrong quote type. - Use Frontend Stylesheets on Main Docs Page: Adds support for your frontend styles in the backend by enqueueing them while on the Main Docs Page. This will not load them in other areas of the website affecting all docs; just the Main Docs Page. This is helpful if you want to make it look more like the front of your website; however, it also means you are loading several stylesheets which could potentially cause slower page loads. You can also style it separately with CSS below.
- Main Docs Page CSS: Add CSS here to style the Main Documentation Page specifically. You must use CSS selectors.
- Include Logo on Help Docs: Includes the help doc logo on individual help docs that are not on the Main Docs Page.
- Top Location Placement: Options are “Just Above Page Title” and “Very Top of Page”.
- Just Above Page Title: Adds the doc just above the page title and below the screen option and help tabs. Appears as a floating box.
- Very Top of Page: Adds the doc above the screen option and help tabs flush with the top and sides of the page like a header.
- Left Footer Text: This allows you to change the text on the bottom left of every admin page. By default the text shows “Thank you for creating with WordPress.” You can change this to anything you want, such as adding your contact information or a link to the Main Documentation Page. To add a link, you will need to use HTML. For example:
<span class="footer-thankyou">For help, go to <a href="/wp-admin/admin.php?page=admin-help-docs&tab=documentation">Help Docs</a> or call 555-555-5555.</span>
Note — if you use another plugin to customize your admin area, it may conflict with this feature. - Right Footer Text: Similar to the left footer text, this shows up on the bottom right of all admin pages. By default it shows the WordPress version. You can change this or add to it if you want. It is recommended to keep the version number and simply add to it so that it is still easily referenced when they contact plugin and theme developers for support. Use the tag
{version}to display the version number.
Access Control
- Allow Public by Default: Allowing documents to be public adds them to a publicly accessible custom rest API end-point, which can then be pulled in from other sites you manage. You can also set this on individual help docs as well. If you have documents that are sensitive, it is not recommended to make them public.
- Public Access API Key: If you enable “Allow Public” above or on individual docs, you can optionally require an API key for access (recommended). This adds a layer of security by ensuring that only users with the key can import your documentation. To use, generate a key here and enter it into the import on your other site where you are importing the docs. Leave empty to allow public access without a key.
- Requirement Type to View Docs: Choose “Role” or “Capability”. This changes the method in which we control viewing permissions. If you are not familiar with capabilities, choose Role.
- Additional Default Roles Required to View Docs: This allows you to restrict viewing help docs to users with a certain role. Admins can view all docs regardless of this setting. You can also override this setting on a per-document basis.
- Capability Required to View Docs: This allows you to restrict viewing help docs to users with a certain capability. For instance, if you only want admins to see them, use
manage_optionsas the capability value. Or if you want to include help docs for all users that have access to the back area, including subscribers that can edit their profiles back there, you can usereadas the value. View a list of capabilities.
- Requirement Type to Edit Docs: Choose “Role” or “Capability”. This changes the method in which we control editing permissions. If you are not familiar with capabilities, choose Role.
- Additional Roles Required to Edit Docs: This allows you to restrict editing of help docs to users with a certain role. Admins can edit all docs regardless of this setting. You CANNOT override this setting on a per-document basis.
- Capability Required to View Docs: This allows you to restrict editing of help docs to users with a certain capability. For instance, if you only want admins to edit them, use
manage_optionsas the capability value. View a list of capabilities.
Advanced
- Enable User Preferences (Deprecated): Removed in version 2.0 since docs in the post/page edit screen docs no longer use meta boxes that can be moved around.
- Remove All Plugin Data on Uninstall: Deletes all plugin settings and documentation permanently when the plugin is deleted.
- System Cache Management: Local docs and imports are cached using transients for 12 hours. This cache is automatically cleared when any doc is updated or sorted on the Main Docs Page. Alternatively, you can also clear the cache here if docs are not updating for whatever reason.
- Upload/Download Colors: Export your current color settings as a JSON file for backup or transfer to another site. You can also import color settings from a JSON file exported from this plugin. Note: Importing settings will overwrite your current color settings. When uploading, you will be able to see the colors updated, but it will not save until you hit the Save button.
- Upload/Download Settings: Export your current settings as a JSON file for backup or transfer to another site. You can also import settings from a JSON file exported from this plugin. Note: Importing settings will overwrite your current settings. When uploading, you will be able to see the colors updated, but it will not save until you hit the Save button. This replaces the previous method of importing from an API endpoint.
- Reset Settings: This will not delete any documentation, but it will reset all settings to their defaults.
Admin Menu
In the admin area of your site, navigate to Help Docs > Admin Menu.
- Parent Menu Items: Simply drag and drop the menu items to the positions you want them in. We have also added 3 extra separators for better organization. If you don’t need the separators, simply move them to the bottom.
- Enable Admin Menu Sorting: This enables the drag-and-drop functionality for the admin menu.
- Show Menu Item Slugs: Displays the slugs of menu items in the sorter.
- Colorize Separators: Adds color to the separator bars in the admin menu.
- Separator Color: Change the color of the separators.
Contact Support Form
As of version 2.0, you now have the option to add a contact form that will email you directly. You’ll need to enable this in the Settings first. Once enabled, you’ll be able to add a support contact name, contact emails, and a contact phone number. Then navigate to Help Docs > Contact Support.
The form appears on the left side. Developers can change the fields and other options using developer hooks.
A Support Log section is located on the right side. Editors can clear the outgoing logs, but it will only store the most recent 20 messages.
