Image

A Solar Powered Plant Monitor That Almost Works

Keeping plants alive is easy if you’re diligent and never forget to check on your green friends. However, a little electronic help never hurts. To that end, [Narrow Studios] built a simple solar powered monitor to assist in plant maintenance, and it mostly does the job.

An ESP32-C3 development board serves as the brains of the operation. It’s set up with a capacitive soil moisture sensor, a great choice because they tend to last longer than other types. Power is courtesy of a small lithium-polymer battery and a solar panel, which keeps everything running off the juice from interior lighting alone. SK6812 addressable LEDs are used to show current soil moisture status. To avoid excessively draining the batteries with the limited power available, a HCSR505 PIR motion sensor is used to only light the status LEDs if the device detects someone in the vicinity.

There were some issues in the build. The voltage regulator doesn’t supply enough current to enable the ESP32 to jump on WiFi, so soil dryness indication is via LED only. The solar setup is a little weak, too. Still, the project was a great learning experience and with a few mods, would be even more capable.

We’ve featured some great plant monitors over the years, like this Hackaday Prize entry from 2023.

Continue reading “A Solar Powered Plant Monitor That Almost Works”

Image

Making A Bronze Mirror From Scratch

Image
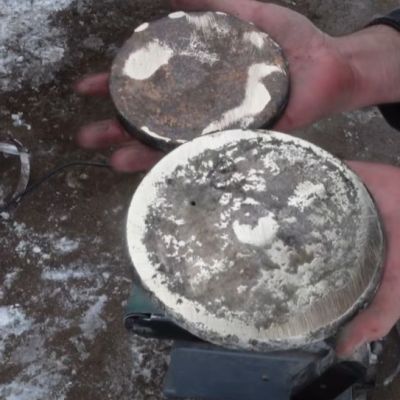
Although modern-day silvered glass mirrors have pretty much destroyed the market for bronze mirrors, these highly polished pieces of metal once were the pinnacle of mirror technology. Due to the laborious process required these mirrors saw use essentially only by the affluent. That said, how hard would it be to make a bronze mirror today with all of the modern technologies that even a hobbyist can acquire for their shed? Cue [Lundgren Bronze Studios] giving it a shot, starting by casting something flat-ish to start polishing.

Just getting that initial shape to start polishing is a chore, with hammering out the shape possibly being also a viable method. When casting metal it’s tricky to avoid having air bubbles and other defects forming, though using a sand mold seems to help a lot.

After you have the rough shape, polishing using power tools seems like cheating, but as you can see in the video even going from 50 to 8000 grit with a rotating disc left countless scratches. Amusingly, hand sanding did a much better job of removing the worst scratches, following which a polishing compound helped to bring out that literal mirror finish.

A quick glance at the Wikipedia entry for bronze mirrors shows that a tin-bronze alloy like speculum metal was used for thousands of years as it was much easier to polish to a good mirror finish. The metallurgy of what may seem like just a vanity item clearly goes deeper than just polishing up a metal surface.

Continue reading “Making A Bronze Mirror From Scratch”

Image

Hacking Fermentation For Infinite Pickles From Pass-thru Bioreactor

Home-fermented foods are great– they’re healthier, more flavourful, and cheaper than store-bought alternatives. What they aren’t is convenient: you need to prep a big batch of veggies, let it sit, and then you have to store the excess pickles. If you’re not careful, you end up with ancient, over-fermented pickles at the bottom of the crock, or worse– run out of pickles! Surely a fate worse than death. [Cody] at Cody’s Lab has a solution: a continous-flow fermentation process that keeps just the right supply of pickles coming at all times. Our grandmothers who kept a crock for months in the cold room or root cellar might be confused, but this hack brings pickles into the Just-In-Time framework of the 21st century.

Specifically this is for lactic acid fermentation, the type that gets you kosher dills, saurkraut and kimchi along with a whole mess of other tangy, tasty vegetable treats. Vinegar pickles are a whole other thing. It’s done in a brine, as the lactic acid bacteria are salt tolerant in a way that most things that would rot your food and/or make you sick would not. You can reuse the brine over and over, which is what [Cody] is doing: he crafts a U-shaped crock out of old glass bottles and a couple of pickle jars. He cuts the jars into angled pipe segments that are held together with aquarium sealant, which is apparently food safe. It holds water and looks surprisingly good, in that it isn’t hideous.

The bioreactor gets loaded up with veggies on one end, plus lots of salt and spices to taste, plus some cultured brine from an old batch to kickstart everything. The starter isn’t necessary; it just gets things going faster. The initial packing is the hardest: after filling it the first time, one needs only press new veggies in at one end, while removing tasty treats at the other. A special packing tool [Cody]makes helps with that, but he plans on adding a larger feed side. Thanks to that kickstart, the pickles were ready to try after about a week– which means his tube is a bit long, for his desired dwell time. If you like more fermentation to your pickles, then you might like this size.

May be the first time pickles have been featured on Hackaday without turning them into LEDs. We’ve featured plenty of fermentation projects, with automation to help make the best brew or a build for better tempeh, but not a lot of vegetables.

Thanks to [cam72cam] for the tip!

Continue reading “Hacking Fermentation For Infinite Pickles From Pass-thru Bioreactor”

A model submarine is shown on a dock. The body of the submarine is made out of a series of acrylic tubes, with other parts made out of grey plastic.

3D-Printed Parts Nearly Sink RC Submarine

Of all the remote-control vehicles one can build, a submarine is possibly the hardest: if something goes wrong with almost any other vehicle, it’s easy to recover and repair, but a submarine is a very different affair. This nearly lost [James] of [ProjectAir] his latest project, a 2.7-meter long RC submarine, but it survived to make a few test sails.

Before building the full version, [James] made a test prototype. These submarines use large syringes as ballast tanks, pulling water in and out of the submarine body. The plungers are driven by a lead screw, and have a linear potentiometer for feedback. This can be wired in the same way as a servo motor, making it compatible with the RC controller. The controller receives its signal from an antenna in a buoy tethered to the submarine. Since initial tests worked well, [James] moved on to the full-scale model.

This was made out of radially-arranged acrylic tubes, with all but the top tube left open to the water. At the back of the submarine there were servo-actuated fins and a propeller, which would allow it to steer, ascend, and descend underwater. To waterproof the servo motors, [James] sealed them as much as possible, then filled them with oil. The other water-exposed electronics were either potted in epoxy or coated with a waterproofing compound. During testing, the submarine descended without issue, but was reluctant to resurface. Most of the external components had been 3D printed, and water infiltrated the infill below a certain depth. [James], however, managed to recover it before it was permanently lost, and managed to make a few other dives at a very limited depth.

On the other end of the spectrum from an RC submarine, we’ve also seen a rubber band-powered submarine. We’ve also seen a smaller, but more dive-ready RC submarine. Continue reading “3D-Printed Parts Nearly Sink RC Submarine”

Image

VGA Output From A PIC18

In the maker world, it’s the Arduino and ESP32 lines that get the lion’s share of attention. However, you can do fantastic things with PIC chips, too, if you put the dev time in—it’s just perhaps less likely another maker has done so before you. A great example is this VGA output project from [grecotron].

A PIC18F47K42 is perhaps not the first part you would reach for to pursue any sort of video-based project. However, with the right techniques, you can get the 8-bit microcontroller pumping out the pixels surprisingly well. [grecotron] was able to get the chip outputting to a VGA monitor at a resolution of 360 x 480 with up to 16 colors. It took some careful coding to ensure the chip could reliably meet the timing requirements for the standard and to get HSYNC, VSYNC, and the color signals all dancing in harmony. Aiding in this regard was that the chip was clocked with a 14.3182 MHz crystal to make it easy to divide down from all the internal timers as needed. Supporting hardware is light, too—primarily consisting of a VGA connector, a couple of multiplexers, and resistor ladder DACs for the color signals. Files are on Github for those interested in deeper detail on the work.

VGA output is possible to implement on all kinds of microcontrollers—and even a bunch of raw logic if you know what you’re doing. If you’re pursuing your own video output wizardry, be sure to let us know on the tipsline.

Image

Designing A Pen Clip That Never Bends Out Of Shape

If you’ve ever used a ballpoint pen with a clip on the top, you’ve probably noticed they bend pretty easily. The clip relies on you only bending it a small amount to clip it on to things; bend it too far, and it ends up permanently deformed. [Craighill] decided to develop a pen clip that didn’t suffer this ugly malady. 

Image
The wire clip design easily opens wide because the spring wire is not actually deforming much at all. Credit: YouTube video, via screenshot

The problem with regular pen clips comes down to simple materials science. Bend the steel clip a little bit, and the stress in the material remains below the elastic limit—so it springs back to its original shape. Push it too far, though, and you’ll end up getting into the plastic deformation region, where you’ve applied so much stress that the material is permanently deformed.

[Craighill] noted this problem, and contemplated whether a better type of clip was possible. An exploration of carabiner clips served to highlight possible solutions. Some carabiners using elastically-deformed closures that faced the same problem, while others used more complicated spring closures or a nifty bent-wire design. This latter solution seemed perfect for building a non-deforming pen clip. The bent wire is effectively a small spring, which allows it to act as a clip to hold the pen on to something. However, it’s also able to freely rotate out from the pen body, limiting the amount of actual stress put on the material itself, which stops it entering the plastic deformation region that would ruin it.

It’s some neat materials science combined with a pleasant bit of inventing, which we love to see. Sometimes there is joy to be had in contemplating and improving even the simplest of things. Video after the break.

Continue reading “Designing A Pen Clip That Never Bends Out Of Shape”

Image

Color Mixing Spray Paint On The Fly

One of the problems with being a graffiti artist is that you have to carry around a different spray can for each color you intend to use. [Sandesh Manik] decided to solve this problem by building a rig that can produce a wider range of colors by mixing the paint from several cans at once. Check it out in the video below.

The project is called Spectrum. It uses four off-the-shelf spray paint cans—colored red, blue, yellow, and white—and mixes them to create a wider range of colors. All four cans are hooked up to a single output nozzle via a nest of tubing and a four-to-one tube manifold.  Key to controlling the flow of paint is a custom device which [Sandesh] calls the “rotary pinch valve,” with one fitted to the feed line coming from each spray can. These valves use a motor-driven lever to pinch a plastic tube shut, allowing them to control the paint flow. This design keeps the mechanism and paint completely separate, which was important to stop paint from fouling the valves in short order. It also prevents backflow, which keeps the paint going towards the outlet and prevents ugly messes. By quickly actuating the valve, the paint flow from each can is modulated to mix various colors as desired.

Continue reading “Color Mixing Spray Paint On The Fly”