An upside down laptop with its cover removed on a grey surface. The inside of the laptop is a series of black modules connected to the frame with glorious amounts of screws and not glue!

Apple’s Most Repairable Laptop Is Thanks To Right-to-Repair

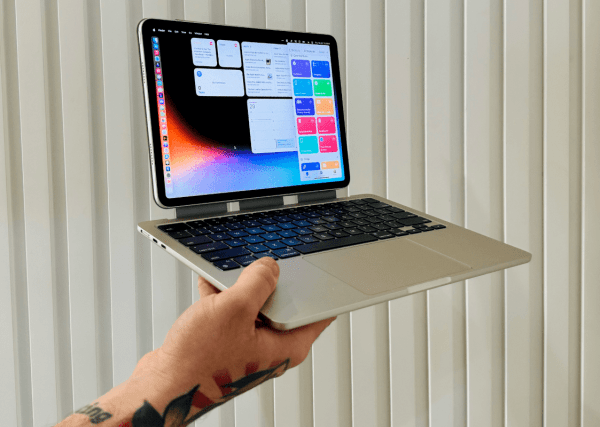
The common narrative around device design is that you can have repairability or a low price, but that they are inversely proportional to each other. Apple’s new budget MacBook Neo seems to attempt a bit of both.

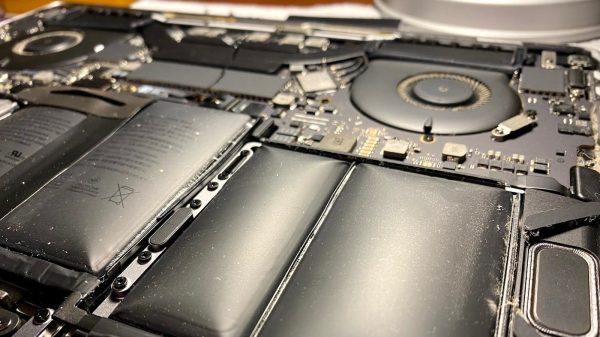
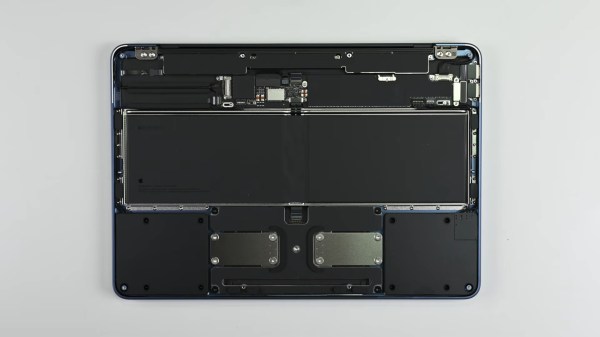
Brittle snap-fit enclosures or glue can make a device pop together quickly during manufacture, but are a headache when it comes time to repair or hack it. Our friends at iFixit tore down the Neo and found it to be the most repairable MacBook since the 2012 unibody model. A screwed in battery, and modules for many of the individual components including the USB ports and headphone jack make it fairly simple to replace individual components. Most of those components are even accessible as soon as you pop the bottom cover instead of requiring major surgery.

As someone who has done a keyboard replacement on a 2010 MacBook, the 41 screws holding the keyboard in brought back (bad) memories. While this is a great improvement over Apple’s notoriously painful repair processes, we’re still only looking at an overall 6/10 score from iFixit versus a 10/10 from Framework or Lenovo.

The real story here is that these improvements from Apple were spurred by Right-to-Repair developments, particularly in the EU, that were the result of pressure from hackers like you.

If you want to push a Neo even further, how about water cooling it? If you’d rather have user-upgradeable RAM and storage too in a Mac, you’ve got to go a bit older.

Continue reading “Apple’s Most Repairable Laptop Is Thanks To Right-to-Repair”

Image

Upgrading An Old Macbook With An Old Processor

The Core Duo processor from Intel may not have been the first multi-core processor available to consumers, but it was arguably the one that brought it to the masses. Unfortunately, the first Core Duo chips were limited to 32-bit at a time when the industry was shifting toward 64-bit. The Core 2 Duo eventually filled this gap, and [dosdude1] recently completed an upgrade to a Macbook Pro that he had always wanted to do by replacing the Core Duo processor it had originally with a Core 2 Duo from a dead motherboard.

The upgrade does require a bit more tooling than many of us may have access too, but the process isn’t completely out of reach, and centers around desoldering the donor processor and making sure the new motherboard gets heated appropriately when removing the old chip and installing the new one. These motherboards had an issue of moisture ingress which adds a pre-heating step that had been the cause of [dosdude1]’s failures in previous attempts. But with the new chip cleaned up, prepared with solder balls, and placed on the new motherboard it was ready to solder into its new home.

Upon booting the upgraded machine, the only hiccup seemed to be that the system isn’t correctly identifying the clock speed. A firmware update solved this problem, though, and the machine is ready for use. For those who may be wondering why one would do something like this given the obsolete hardware, we’d note that beyond the satisfaction of doing it for its own sake these older Macbooks are among the few machines that can run free and open firmware, and also that Macbooks that are a decade or older can easily make excellent Linux machines even given their hardware limitations.

Continue reading “Upgrading An Old Macbook With An Old Processor”

Image

I Installed Gentoo So You Don’t Havtoo

A popular expression in the Linux forums nowadays is noting that someone “uses Arch btw”, signifying that they have the technical chops to install and use Arch Linux, a distribution designed to be cutting edge but that also has a reputation of being for advanced users only. Whether this meme was originally posted seriously or was started as a joke at the expense of some of the more socially unaware Linux users is up for debate. Either way, while it is true that Arch can be harder to install and configure than something like Debian or Fedora, thanks to excellent documentation and modern (but optional) install tools it’s no longer that much harder to run than either of these popular distributions.

For my money, the true mark of a Linux power user is the ability to install and configure Gentoo Linux and use it as a daily driver or as a way to breathe life into aging hardware. Gentoo requires much more configuration than any mainline distribution outside of things like Linux From Scratch, and has been my own technical white whale for nearly two decades now. I was finally able to harpoon this beast recently and hope that my story inspires some to try Gentoo while, at the same time, saving others the hassle.

A Long Process, in More Ways Than One

My first experience with Gentoo was in college at Clemson University in the late ’00s. The computing department there offered an official dual-boot image for any university-supported laptop at the time thanks to major effort from the Clemson Linux User Group, although the image contained the much-more-user-friendly Ubuntu alongside Windows. CLUG was largely responsible for helping me realize that I had options outside of Windows, and eventually I moved completely away from it and began using my own Linux-only installation. Being involved in a Linux community for the first time had me excited to learn about Linux beyond the confines of Ubuntu, though, and I quickly became the type of person featured in this relevant XKCD. So I fired up an old Pentium 4 Dell desktop that I had and attempted my first Gentoo installation.

For the uninitiated, the main thing that separates Gentoo from most other distributions is that it is source-based, meaning that users generally must compile the source code for all the software they want to use on their own machines rather than installing pre-compiled binaries from a repository. So, for a Gentoo installation, everything from the bootloader to the kernel to the desktop to the browser needs to be compiled when it is installed. This can take an extraordinary amount of time especially for underpowered machines, although its ability to customize compile options means that the ability to optimize software for specific computers will allow users to claim that time back when the software is actually used. At least, that’s the theory. Continue reading “I Installed Gentoo So You Don’t Havtoo”

Image

90s PowerBook Runs MacOS Monterey

Even though Apple isn’t known for making the most pro-consumer devices ever (at least not since the Apple II), the trope that Apples aren’t upgradable, customizable, or otherwise hackable doesn’t really hold much weight. It does take more work to modify them or change how Apple wants them to behave, but it’s not completely impossible. Take this example of a ’94 Apple PowerBook which runs macOS Moneterey thanks largely to new internals from a 2015 MacBook Pro.

[Billy] originally intended for a Raspberry Pi to go inside this old PowerBook, but at the time, prices for ARM single-board computer (SBC) were astronomical. For around the same price as the Pi was at the time, he was able to pick up a retina display from an iPad and the internals from a broken MacBook Pro to outfit this retro case. There’s also a Teensy installed to get the trackpad working and a driver board for the display from Adafruit, and a number of case mods were needed to get everything to fit including the screen which was slightly larger than the original 9.5″ display the laptop would have shipped with.

This project took both inspiration and some of the actual code needed to get everything working from another project we featured a while ago where a Mac Mini was installed inside of a PowerBook case from 1993. Unlike projects that use smaller SBCs for retrocomputing, these builds are notable because the hardware on the inside makes them usable as daily driver computers even today, and might even be an upgrade if you’re using the internals from a MacBook Pro that would have originally had a butterfly keyboard.

Continue reading “90s PowerBook Runs MacOS Monterey”

Image

Best Of Both Worlds: The MacPad

Despite a growing demand for laptop-tablet hybrid computers from producers like Lenovo, HP, and Microsoft, Apple has been stubbornly withdrawn this arena despite having arguably the best hardware and user experiences within the separate domains of laptop and tablet. Charitably one could speculate that this is because Apple’s design philosophy mandates keeping the user experiences of each separate, although a more cynical take might be that they can sell more products if they don’t put all the features their users want into a single device. Either way, for now it seems that if you want a touchscreen MacBook you’ll have to build one yourself like the MacPad from [Federico].

This project started as simply providing a high-quality keyboard and mouse for an Apple Vision Pro, whose internal augmented reality keyboard is really only up to the task of occasionally inputting a password or short string. For more regular computing, [Federico] grabbed a headless MacBook which had its screen removed. This worked well enough that it triggered another line of thought that if it worked for the Vision Pro it might just work for an iPad Pro as well. Using Apple tools like Sidecar makes this almost trivially easy from a software perspective, although setting up the iPad as the only screen, rather than an auxiliary screen, on the MacBook did take a little more customization than normal.

The build goes beyond the software side of setting this up, though. It also includes a custom magnetic mount so that the iPad can be removed at will from the MacBook, freeing both the iPad for times when a tablet is the better tool and the MacBook for when it needs to pull keyboard duty for the Vision Pro. Perhaps the only downsides are that this only works seamlessly when both devices are connected to the same wireless network and that setting up a headless MacBook without a built-in screen takes a bit of extra effort. But with everything online and working it’s nearly the perfect Apple 2-in-1 that users keep asking for. If you’re concerned about the cost of paying for an iPad Pro and a Macbook just to get a touchscreen, though, take a look at this device which adds a touchscreen for only about a dollar.

Thanks to [Stuart] for the tip!

Image

Hack Lets Intel MacBook Run Without A Battery

A long time ago, a laptop was a basic thing, and you could pretty much run one just by hooking up a power supply to the battery contacts. A modern MacBook is altogether fussier. However, when [Christophe] was stuck in the midst of a 2020 lockdown with no parts available, he found a way to get his damaged MacBook up and running without a battery.

The problem was brought about by a failing battery in the MacBook Pro 13″ from mid-2018, which swelled up and deformed the laptop’s case. Parts were unavailable, and the MacBook wouldn’t run at full speed without a battery fitted. That’s because with no battery present, the MacBook would send a BD_PROCHOT signal to the Intel CPU, telling it to slow down due to overheating, even when the chip was cool.

To get around the problem, [Christophe] used a tool called CPUTune. It allows fiddling with the various CPU settings of a MacBook. He deactivated the BD_PROCHOT signal, and also the CPU’s Turbo Boost feature. This ended the worst of the thermal throttling, and enabled semi-normal use of the machine.

It’s unclear why Apple would throttle the CPU with the battery disconnected. [Christophe]’s workaround got him back up and working again in the midst of a difficult period, regardless. We’ve seen some other great Macbook hacks before too, like this amazing save from serious water damage!

Thanks to [donaldcuckman] for the tip!]

The bottom half of a MacBook Air on a purple and pink background has severed wires drawn out of its back to indicate its lack of a screen.

Are Slabtops The Future Of Computing?

The most popular computer ever was the Commodore 64 with its computer-in-a-keyboard form factor. If you have a longing for a keyboard computer with more modern internals, one of the easiest solutions today is to pull the screen off a laptop.

[Umar Shakir] wanted to see what the fuss was about regarding a recent Apple patent and took the top lid off of his M1 Macbook Air and turned it into a “slabtop.” The computer works great wired to a monitor but can also be used wirelessly via AirPlay. The approach doesn’t come without its downsides, of course. Newer MacBooks can’t access recovery mode without the built-in screen, and some older models had their WiFi antennas in the top lid, so making one into a slabtop will leave you desk-bound.

While [Shakir] focuses on MacBooks, this approach should work with any laptop. Apparently, it’s a cottage industry in China already. Back in the day, my own daily driver was a Pentium-powered laptop with its broken LCD (and lid) removed. It worked great with whatever CRT was nearby.

If you’re looking for an off-the-shelf keyboard computer of your own, you might want to check out the Raspberry Pi 400.