Complete guide
Last updated:
Editing entries in Gravity Forms: A complete guide
Gravity Forms captures data, but that data rarely stays static. Orders need status updates, user profiles change, errors need fixing, and submissions need approval before going live. This guide covers every method for editing Gravity Forms entries, from quick dashboard edits to front-end self-service, bulk updates, and full approval workflows. Below, you’ll find a brief overview of each editing method along with links to in-depth tutorials so you can jump straight to the approach that fits your workflow
Table of contents
- Quick-reference: Which editing method should you use?
- How to edit entries in the WordPress admin dashboard (built-in method)
- Faster inline editing with GravityEdit
- How to edit Gravity Forms entries on the front end
- How to let users edit entries without a login
- How to bulk edit Gravity Forms entries
- How to track changes to entries and restore prior versions
- How to set up entry approval workflows
- How to restrict who can edit entries
- Editing entries on a Kanban board with GravityBoard
- Real-world examples
- Frequently asked questions
Quick-reference: Which editing method should you use?
| Method | Best for | Where it works | Single or bulk | Paid add-on required? |
|---|---|---|---|---|
| Built-in Gravity Forms editing | Occasional one-off edits | Admin dashboard | Single | No |
| GravityEdit (inline editing) | Fast, frequent edits across many fields | Admin Dashboard and front end (requires GravityView | Single | Yes |
| GravityActions | Bulk field updates and error corrections | Admin dashboard | Bulk | Yes |
| Gravity Forms API | Programmatic updates | Via external script | Bulk | No |
| GravityView (Edit Entry Layout) | User self-service, front-end editing | Front end | Single | Yes |
| GravityImport | Overwriting entries from a CSV file | WordPress dashboard | Bulk | Yes |
| GravityBoard | Visual, drag-and-drop status changes | Front end | Single | Yes |
For a full walkthrough of all the ways to edit Gravity Forms entries, read How to update an existing entry in Gravity Forms.
How to edit entries in the WordPress admin dashboard (built-in method)
Gravity Forms includes a basic entry editor in the WordPress admin area. You open an entry, click into a field, change the value, and save. It works, but it is slow—you have to open each entry individually, and there is no field validation on save.
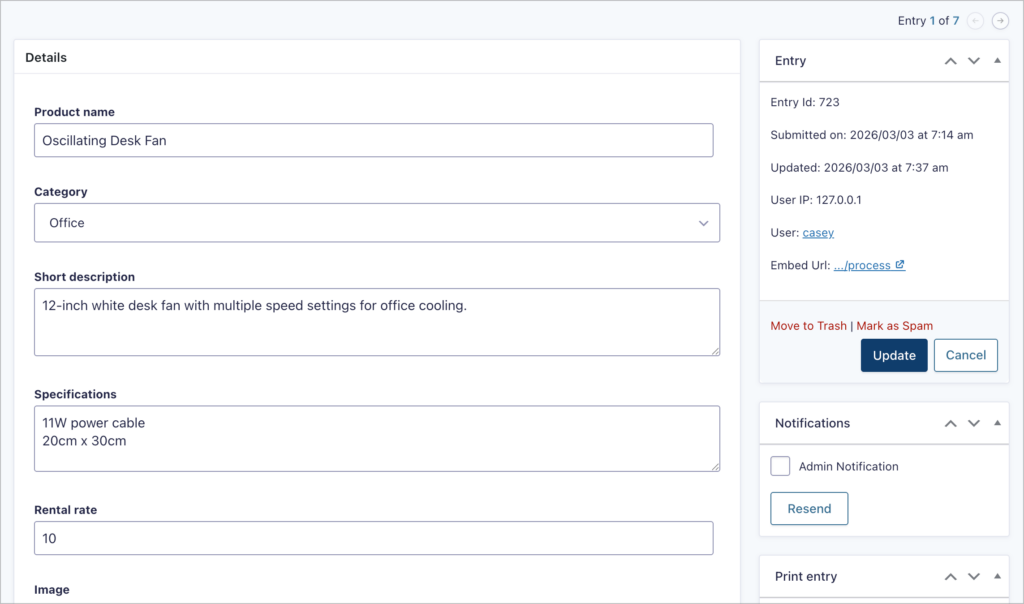
When it is good enough: If you only edit a handful of entries per week, the built-in editor does the job without any extra plugins.
When you need something better: If editing entries is a regular part of your workflow, or if you need validation, bulk updates, or front-end access, the methods below will save you significant time.
Faster inline editing with GravityEdit
GravityEdit adds inline editing to Gravity Forms, letting you click on a field value, change it, and save—right from the entries list. No more opening individual entries one at a time. In testing, inline editing is 340% faster than the built-in method.
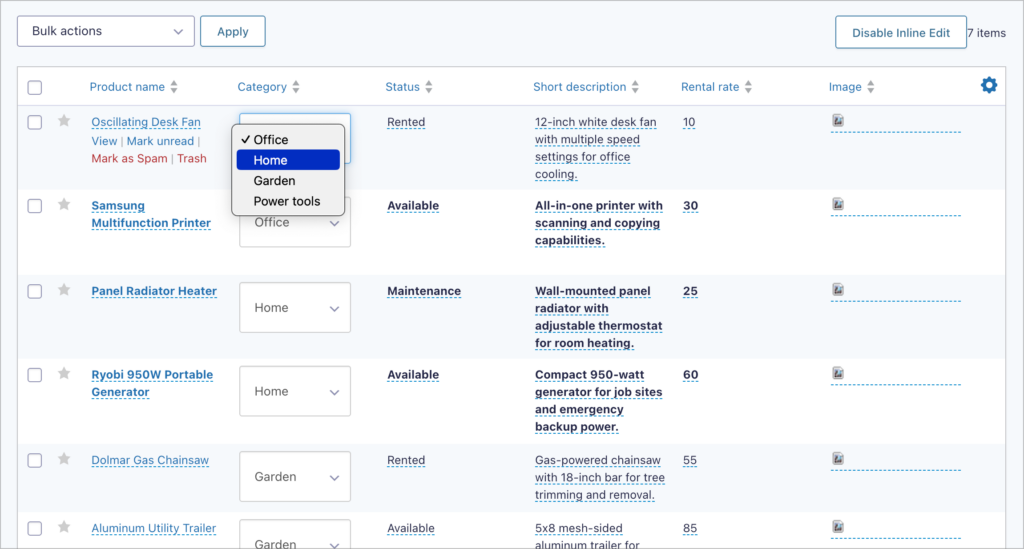
GravityEdit supports most field types, including text fields, dropdowns, checkboxes, dates, file uploads, and even entry meta. It works in the WordPress dashboard and on the front end when paired with GravityView.
For a full tutorial on how to replace uploaded files without opening the full entry editor, read: How to quickly update File Upload fields with inline editing.
How to edit Gravity Forms entries on the front end
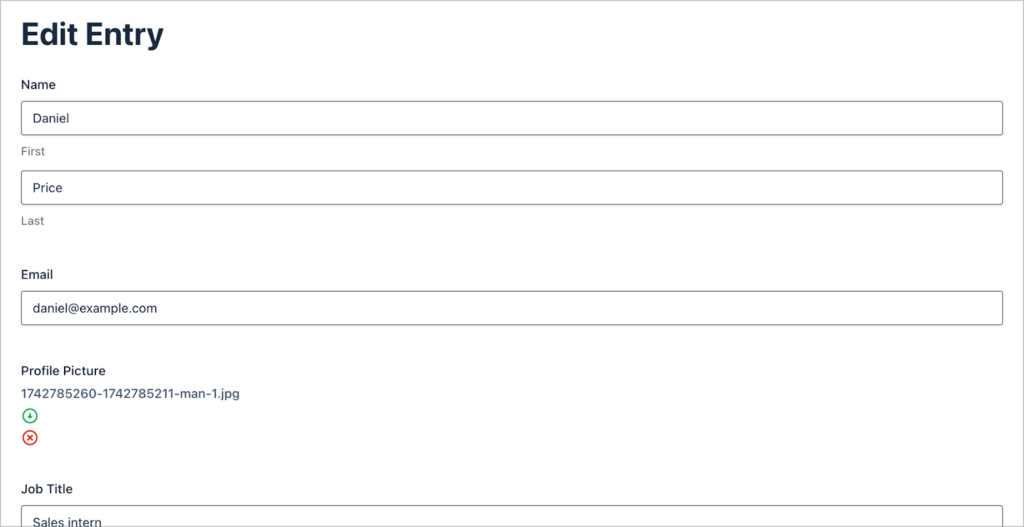
Front-end editing lets users update their own submissions without ever seeing the WordPress dashboard. This is ideal for applications, directories, membership profiles, and any scenario where users need to keep their data current.
GravityView makes this possible by adding an Edit Entry link to each entry displayed in a View. Users click the link, see a form pre-filled with their data, make changes, and save. You control which fields are editable and who has permission to edit.
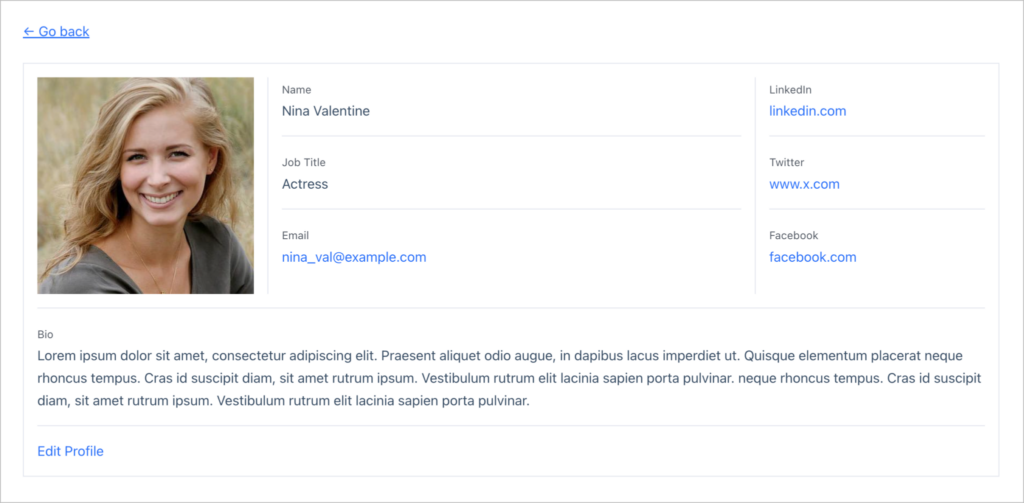
Additionally, with GravityView, users can view and edit entries in a lightbox overlay instead of navigating to a separate page. This keeps users in context and improves the editing experience, especially on pages that display many entries.
Editing user profiles from the front end
One of the most popular uses of front-end editing is self-service user profiles. You can build a profile page with Gravity Forms, display it with GravityView, and let users update their own information, such as name, bio, photo, contact details—without needing admin access.
For a full tutorial on building editable profile pages, read: How to create and edit front-end user profiles using Gravity Forms and GravityView.
Customizing the front end editing experience
GravityView gives you control over the look and behavior of the edit entry screen. You can configure which fields appear, style buttons, and use the [gv_entry_link] shortcode to create edit links anywhere on your site. To learn more, see our helpful resources and guides:
- Gravity Forms front-end entry management: all you need to know – Overview of everything you can do with entries on the front end.
- How to edit Gravity Forms entries on the front end using GravityView – Complete front-end editing tutorial.
- Using the [gv_entry_link] shortcode – Generate view, edit, and delete links for entries.
How to let users edit entries without a login
Not every user who submits a form has (or should need) a WordPress account. The GravityView Magic Links Extension solves this by generating secure, time-limited URLs that let users return to edit their own entries from the front end without needing to log in.
This is especially useful for event registrations, application forms, surveys, and any workflow where you collect data from people who are not WordPress users. Each link is unique to the entry and expires after a configurable period, so access stays secure.
See our guide on Getting Started With Magic Links for setup instructions.
How to bulk edit Gravity Forms entries
When you need to update dozens or hundreds of entries at once, editing them one by one is not practical. GravityKit offers two tools for bulk editing, each suited to different scenarios.
Bulk field updates with GravityActions
GravityActions lets you select a group of entries and update one or more fields across all of them in a single action. This is useful for changing statuses, assigning categories, or applying any uniform update to a batch of entries.
Beyond simple bulk updates, GravityActions can also help you find and fix mistakes across large sets of submissions. If a dropdown option was misspelled, a field was mapped incorrectly, or data was entered inconsistently, you can correct it in bulk rather than fixing entries individually.
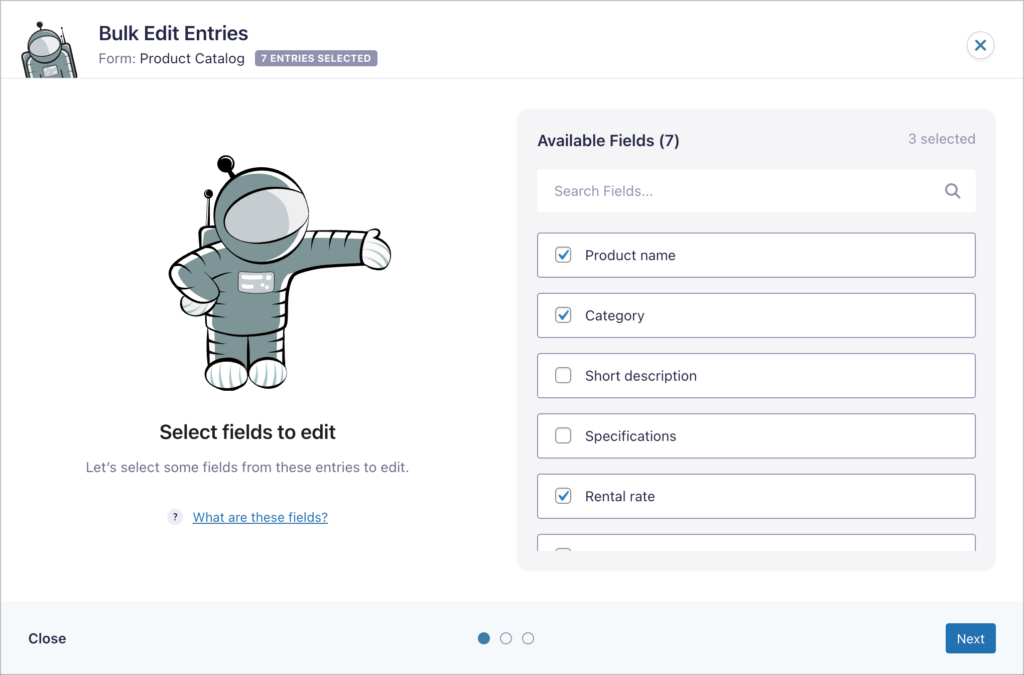
Go deeper: How to bulk correct errors in Gravity Forms submissions using GravityActions.
Overwriting entries from a CSV with GravityImport
If your updated data lives in a spreadsheet, GravityImport can match rows to existing entries and overwrite field values from a CSV file. This is ideal for syncing data from external systems or applying bulk corrections prepared offline.
Go deeper: How to bulk update entries in Gravity Forms and optimize your workflow.
How to track changes to entries and restore prior versions
When multiple people edit entries, you need a way to see what changed, who changed it, and when. GravityRevisions adds revision tracking to Gravity Forms, storing a full history of every change made to an entry.
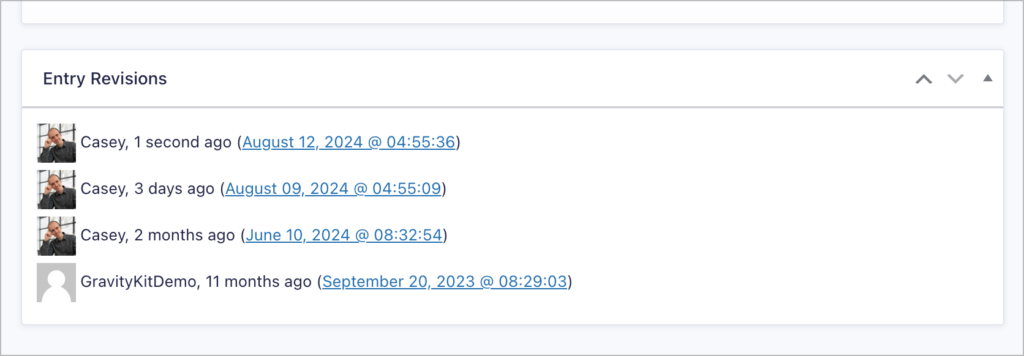
If an edit introduces an error, you can restore a previous version with one click. GravityRevisions also supports email notifications so stakeholders are alerted when entries are updated.
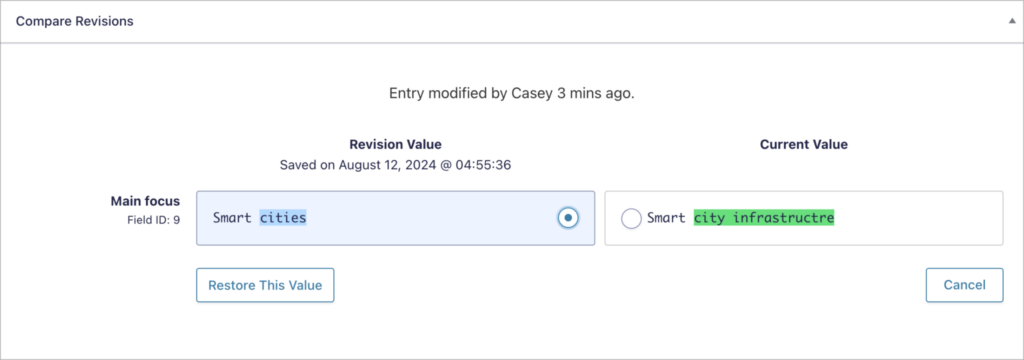
Go deeper: How to save revisions in Gravity Forms and restore prior versions.
How to set up entry approval workflows
Sometimes entries need to be reviewed and approved before they are published or acted on. GravityView includes a built-in approval system that lets you approve, reject, or set entries to “unapproved”. For more advanced workflows, you can pair Gravity Forms with Gravity Flow to create multi-step approval processes with automatic routing, conditional logic, and status tracking.
You can also configure email notifications that fire when an entry’s approval status changes, so reviewers, submitters, and administrators all stay in the loop.
Go deeper:
- How to set up an entry approval workflow in Gravity Forms – Two simple methods for approval workflows.
- How to send email notifications when a form entry is approved or rejected – Configure approval-triggered emails.
- Using Gravity Flow to add a feedback and review loop for directory submissions – Build a multi-step review process with Gravity Flow.
How to restrict who can edit entries
Not everyone should have permission to edit entries. Gravity Forms includes role-based capabilities, and you can fine-tune them using the free Members plugin by MemberPress.
With Members, you can deny or grant the gravityforms_edit_entries capability on a per-role basis. For example, you might allow editors to modify entries while keeping contributors in a view-only role.
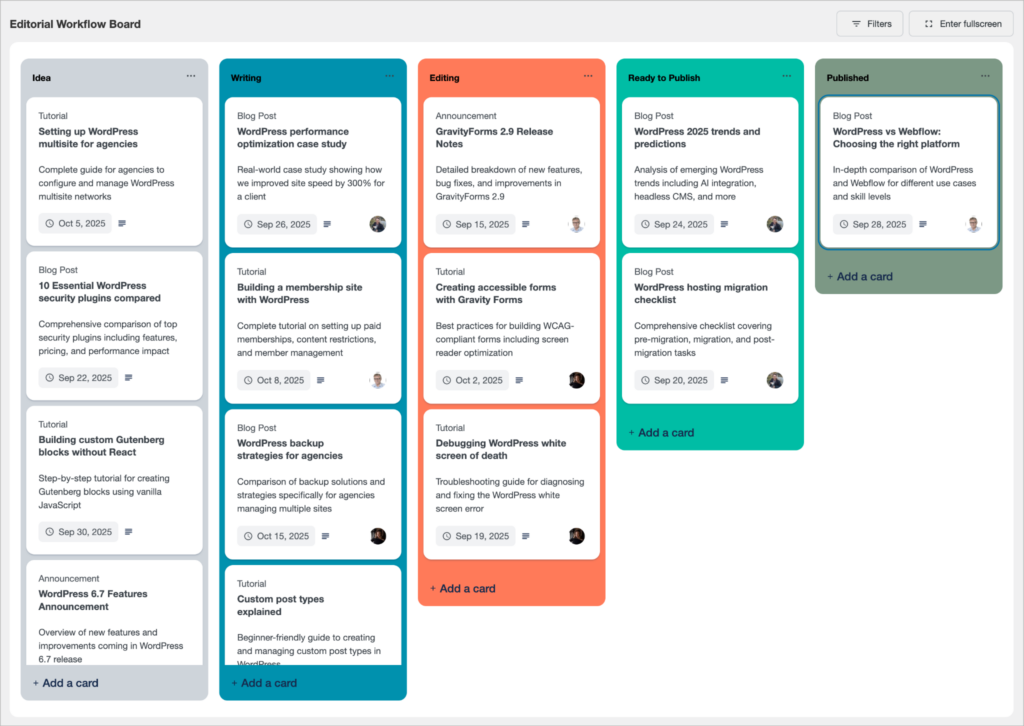
Editing entries on a Kanban board with GravityBoard
For workflow-oriented teams, GravityBoard displays Gravity Forms entries as cards on a drag-and-drop kanban board. Moving a card between columns updates the entry’s status automatically, and you can click into any card to edit its details.
This is a natural fit for project tracking, application processing, support tickets, and any workflow where entries move through stages.
Go deeper: Read our GravityBoard tutorials.
Real-world examples
Organizations across industries use these editing tools to build dynamic systems on top of Gravity Forms:
- Experience Solutions modernized their issue tracking by replacing manual data entry with inline editing and front-end management. Read the case study.
- BrightLeaf Giving uses entry editing for admin workflows and client assignments. Read the case study.
- A citizens’ initiatives platform lets users securely edit their information without admin access. Read the case study.
- Bet Hannon built a full member management system with editable front-end profiles using GravityView. Read the case study.
Related guides
This guide is part of a series covering the most important Gravity Forms topics in depth. Explore the other guides in this set:
- How to use Gravity Forms: A complete guide
- Importing entries to Gravity Forms: A complete guide
- Exporting data from Gravity Forms: A complete guide
- Displaying Gravity Forms entries: A complete guide
- Gravity Forms conditional logic: A complete guide
- Gravity Forms calculations: A complete guide
Frequently asked questions
Yes. If you’re using the WordPress dashboard, Gravity Forms lets you restrict entry editing by user role using the gravityforms_edit_entries capability. For front-end editing, GravityView lets you limit editing to entry creators, specific roles, or admin users. You can also use GravityView’s entry approval system to require moderation after edits are made.
It depends on how you set it up. Gravity Forms’ built-in notifications only fire on initial submission by default, so editing an existing entry in the dashboard won’t re-trigger them. However, GravityView’s front-end Edit Entry feature supports post-update notifications, and you can configure Gravity Forms to send notifications on entry updates using the gform_after_update_entry hook or a workflow plugin like Gravity Flow.
Yes. In the WordPress dashboard, Gravity Forms allows basic field editing from the entry detail screen, but you have to open each entry individually. For faster editing, GravityEdit lets you click on any cell in an entry list and edit it inline, similar to a spreadsheet. For bulk changes across many entries at once, you can also use GravityActions.
Most field types update normally, but some require extra attention. File upload fields may need re-uploading depending on how editing is configured (for example, if you’re editing entries with a third-part plugin like wpDataTables). GravityView’s Edit Entry lets you edit file uploads in place without losing existing files. Calculated fields (like totals from product fields) will recalculate based on the new values. If you’re editing entries that contain leading zeroes (zip codes, ID numbers), be aware that some editing methods may strip them. Test with your specific field types before editing in bulk.
Not natively. Gravity Forms ties entries to the form that created them, so editing always happens through the original form’s fields. However, you can control which fields appear during editing. For example, GravityView’s Edit Entry layout lets you show only a subset of fields, effectively creating a simplified editing experience. If you need to update one form’s entries based on another form’s submission, you’d need custom code using the Gravity Forms API or a tool like Gravity Flow to connect the two.
Gravity Forms’ Save and Continue feature generates a unique link that lets users return to an in-progress submission. However, this only works for entries that haven’t been fully submitted yet. It’s not the same as editing a completed entry. If you need users to come back and update already-submitted entries, you’ll need a front-end editing solution like GravityView or Entry Blocks by GravityWiz. For users without a login, the GravityView Magic Links Extension can email them a secure, time-limited edit link.
Yes. Gravity Forms doesn’t include version history for entries natively, but GravityKit’s GravityRevisions add-on automatically logs every change made to an entry, including who made it and when. If an entry is edited incorrectly or data is lost during an update, you can compare revisions side by side and restore a previous version with one click. This is especially useful for entries edited by multiple users or through front-end editing, where changes are harder to monitor from the dashboard.