CRUD operations are a common task in many applications and JDBC (Java Database Connectivity) is a Java API that allows you to connect to a database and perform these operations. We will guide you through the steps of setting up a simple CRUD (Create, Read, Update, Delete) operation using JDBC.
What are CRUD Operations
CRUD stands for:
- C (Create) -> Insert new records into the database.
- R (Read) -> Retrieve records from the database.
- U (Update) -> Modify existing records.
- D (Delete) -> Remove records from the database.
Prerequisites:
- MySQL Database installed.
- MySQL Connector jar.
CRUD Operations in JDBC with MySQL
Step 1. Database Setup in MySQL
- In this step, we create a database and a table where student records will be stored.
- Run the following commands in MySQL Workbench / CLI:
CREATE DATABASE studentdb;

USE studentdb;

CREATE TABLE students (
    id INT AUTO_INCREMENT PRIMARY KEY,
    name VARCHAR(100) NOT NULL,
    age INT NOT NULL,
    email VARCHAR(150) UNIQUE
);
Step 2. Maven Dependency for MySQL
- We add the MySQL connector dependency in pom.xml so Java can talk to MySQL.
- This downloads the driver automatically from Maven Central.
pom.xml:
<dependency>
    <groupId>mysql</groupId>
    <artifactId>mysql-connector-j</artifactId>
    <version>9.0.0</version>
</dependency>
Step 3. Create JDBC connection
- This utility class sets up a connection with MySQL using JDBC.
- Change username and password as per your local MySQL setup.
import java.sql.Connection;
import java.sql.DriverManager;

public class Geeks{
    private static final String URL = "jdbc:mysql://localhost:3306/studentdb";
    private static final String USER = "root";   // change if different
    private static final String PASSWORD = "yourpassword"; // change to your MySQL password

    public static Connection getConnection() {
        try {
            return DriverManager.getConnection(URL, USER, PASSWORD);
        } catch (Exception e) {
            e.printStackTrace();
            return null;
        }
    }
}
Step 4. Create Operation (Insert Student)
- Use INSERT query to add new student records into the database.
- We use PreparedStatement to prevent SQL Injection.
This will add new student records into the database.
import java.sql.Connection;
import java.sql.PreparedStatement;

public class CreateStudent {
    public static void insertStudent(String name, int age, String email) {
        String sql = "INSERT INTO students (name, age, email) VALUES (?, ?, ?)";

        try (Connection conn = Geeks.getConnection();
             PreparedStatement stmt = conn.prepareStatement(sql)) {

            stmt.setString(1, name);
            stmt.setInt(2, age);
            stmt.setString(3, email);

            int rows = stmt.executeUpdate();
            System.out.println(rows + " student inserted successfully.");

        } catch (Exception e) {
            e.printStackTrace();
        }
    }
}
Step 5 Read Operation (Fetch Students)
- Use SELECT query to retrieve student details from the table.
- Results are stored in a ResultSet which we loop through to display records.
import java.sql.Connection;
import java.sql.ResultSet;
import java.sql.Statement;

public class ReadStudent {
    public static void getAllStudents() {
        String sql = "SELECT * FROM students";

        try (Connection conn = Geeks.getConnection();
             Statement stmt = conn.createStatement();
             ResultSet rs = stmt.executeQuery(sql)) {

            while (rs.next()) {
                System.out.println(rs.getInt("id") + " | " +
                                   rs.getString("name") + " | " +
                                   rs.getInt("age") + " | " +
                                   rs.getString("email"));
            }
        } catch (Exception e) {
            e.printStackTrace();
        }
    }
}
Step 6. Update Operation (Modify Student Email)
- Use UPDATE query to change existing student details.
- Here we update a student’s email by using their id.
import java.sql.Connection;
import java.sql.PreparedStatement;

public class UpdateStudent {
    public static void updateStudent(int id, String newEmail) {
        String sql = "UPDATE students SET email = ? WHERE id = ?";

        try (Connection conn = Geeks.getConnection();
             PreparedStatement stmt = conn.prepareStatement(sql)) {

            stmt.setString(1, newEmail);
            stmt.setInt(2, id);

            int rows = stmt.executeUpdate();
            System.out.println(rows + " student updated successfully.");

        } catch (Exception e) {
            e.printStackTrace();
        }
    }
}
Step 7. Delete Operation (Remove Student)
- Use DELETE query to remove student records by ID.
- Once deleted, the record will no longer appear in the table.
import java.sql.Connection;
import java.sql.PreparedStatement;

public class DeleteStudent {
    public static void deleteStudent(int id) {
        String sql = "DELETE FROM students WHERE id = ?";

        try (Connection conn = Geeks.getConnection();
             PreparedStatement stmt = conn.prepareStatement(sql)) {

            stmt.setInt(1, id);

            int rows = stmt.executeUpdate();
            System.out.println(rows + " student deleted successfully.");

        } catch (Exception e) {
            e.printStackTrace();
        }
    }
}
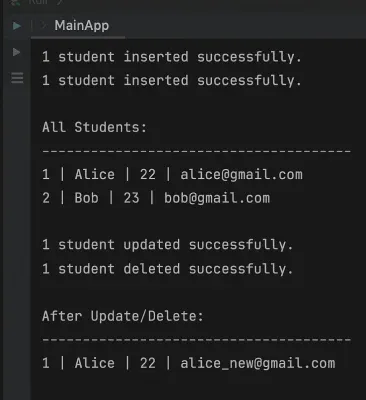
Step 8. Main Class (Testing All CRUD Operations)
- This is the driver class where we test all four operations step by step.
- Insert -> Display -> Update -> Delete -> Display again.
public class MainApp {
    public static void main(String[] args) {
        // CREATE
        CreateStudent.insertStudent("Alice", 22, "alice@gmail.com");
        CreateStudent.insertStudent("Bob", 23, "bob@gmail.com");

        // READ
        System.out.println("\nAll Students:");
        ReadStudent.getAllStudents();

        // UPDATE
        UpdateStudent.updateStudent(1, "alice_new@gmail.com");

        // DELETE
        DeleteStudent.deleteStudent(2);

        // READ again
        System.out.println("\nAfter Update/Delete:");
        ReadStudent.getAllStudents();
    }
}
Step 9. Run Application
- Run the MainApp class and check the output in IntelliJ console.
- You should see the effect of each operation one after the other.
Output: