The post How to Install Home Assistant on Proxmox Step by Step appeared first on TechOpt.
]]>These are the steps I used to install Home Assistant on Proxmox. I chose to install the full Home Assistant Operating System (HAOS) rather than running Home Assistant in a regular Linux VM or LXC container.
Home Assistant provides an official KVM/Proxmox .qcow2 disk image specifically for this type of installation. The process is slightly different from installing a normal operating system from an ISO because we import this prebuilt disk image into Proxmox instead.
I based part of my process on this community guide rather than using one of the automated helper scripts.
Before Installing Home Assistant on Proxmox
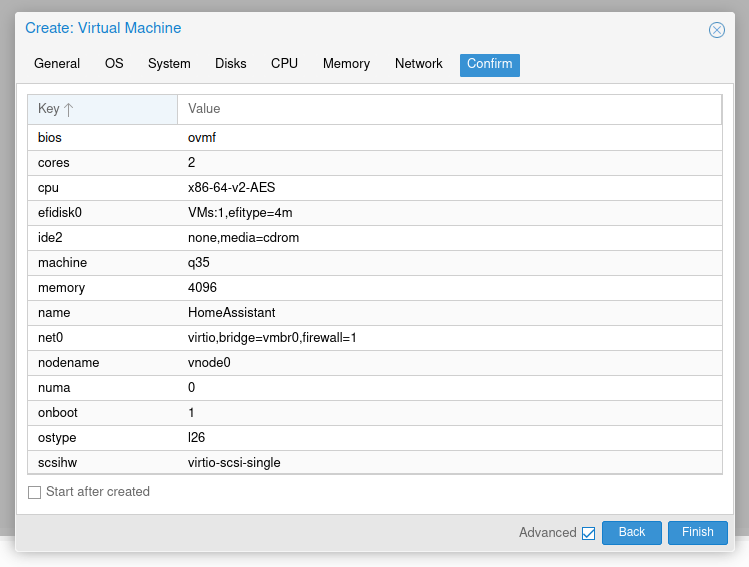
For my Home Assistant VM, I used:
- 2 CPU cores
- 4096 MB (4 GB) RAM
- q35 machine type
- OVMF (UEFI) BIOS
- Home Assistant’s KVM/Proxmox QCOW2 image
- The default Proxmox network interface
Home Assistant’s official documentation currently lists a minimum of 2 vCPUs and 2 GB of RAM for a virtual machine. I decided to give mine 4 GB of RAM instead. You can always increase the resources later if necessary.
You will also need access to the Proxmox web interface and shell (either via web or SSH) for the Proxmox node where you want Home Assistant to run.
Steps to Install Home Assistant on Proxmox
1. Get the Home Assistant KVM/Proxmox Image
First, go to the Home Assistant alternative installation page and find the download for KVM/Proxmox.

Home Assistant provides this image in QCOW2 format, which is exactly what we need for Proxmox.
Instead of downloading the image to my computer and uploading it again to Proxmox, I downloaded it directly from the Proxmox shell.
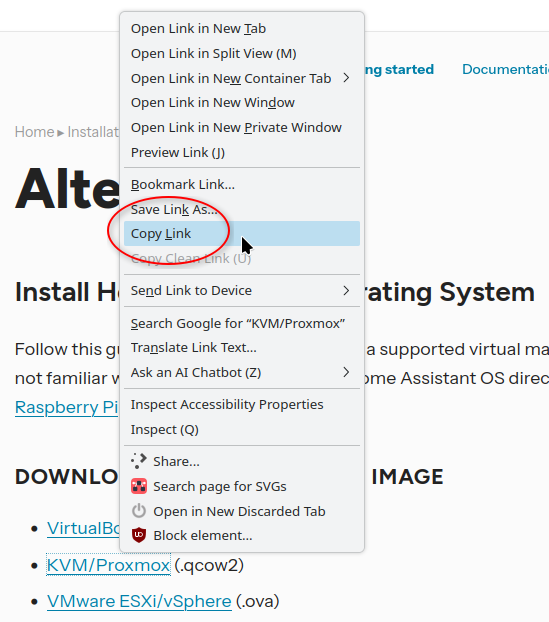
Right-click the KVM/Proxmox download link on the Home Assistant website and copy the link address.
Then, open the Proxmox web interface, select your Proxmox node and open Shell.
Download the file using wget:
wget <HOME-ASSISTANT-QCOW2-UL>
For example, your command will look similar to:
wget https://github.com/home-assistant/operating-system/releases/download/<version>/haos_ova-<version>.qcow2.xz
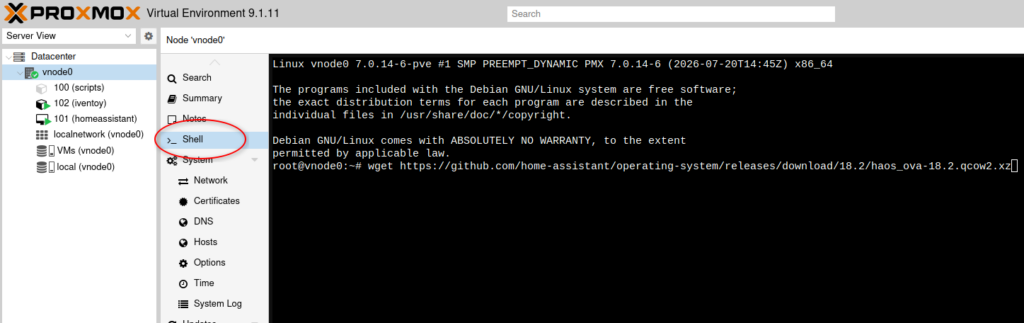
Press Enter after typing the command.
Alternatively, you can SSH into the Proxmox node to run these commands.
I recommend copying the current URL directly from Home Assistant instead of copying an old version number from another guide. That way, you will download the current Home Assistant OS image.
2. Decompress the Home Assistant QCOW2 Image
The downloaded QCOW2 image is compressed using XZ, so we need to decompress it before importing it into Proxmox.
Run:
unxz haos_ova-<version>.qcow2.xz
Replace the filename with the actual filename you downloaded.
For example:
unxz haos_ova-18.2.qcow2.xz
The version above is only an example. Use the filename you actually downloaded.
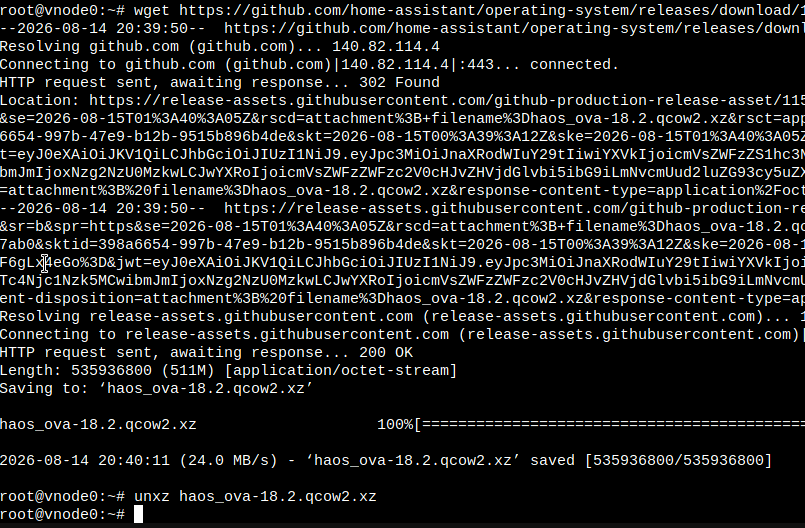
After extraction, you should have a file ending in:
.qcow2
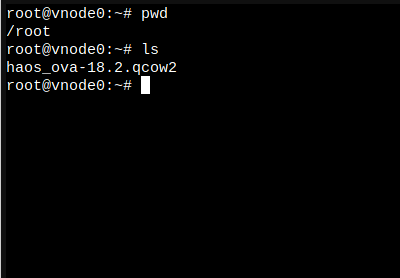
If you aren’t sure which directory you downloaded the file into, run:
pwd
You can also list the files in the current directory with:
ls
If you opened the shell through the Proxmox web interface, you will commonly be working from /root.
The Proxmox forum guide uses the same wget and unxz process to obtain and extract the Home Assistant image.
3. Create a New Home Assistant VM in Proxmox
Next, go back to the Proxmox web interface and click Create VM.
We are going to create the VM without an installation ISO because the Home Assistant QCOW2 file will become the VM’s boot disk.
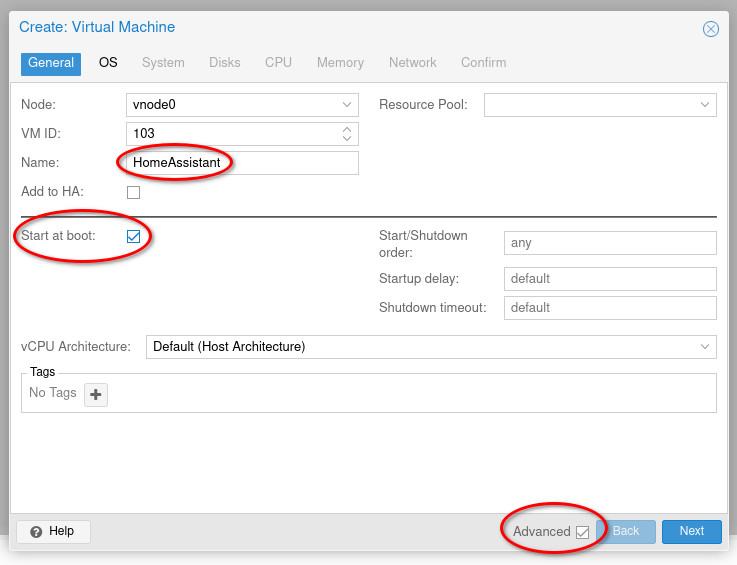
General
Give the VM a name such as:
HomeAssistant
Take note of the VM ID. We will need this number when importing the Home Assistant disk later. In my case, this was 103.
In Advanced settings I also enabled:
Start at boot
This way, Home Assistant will automatically start when my Proxmox server starts.
OS
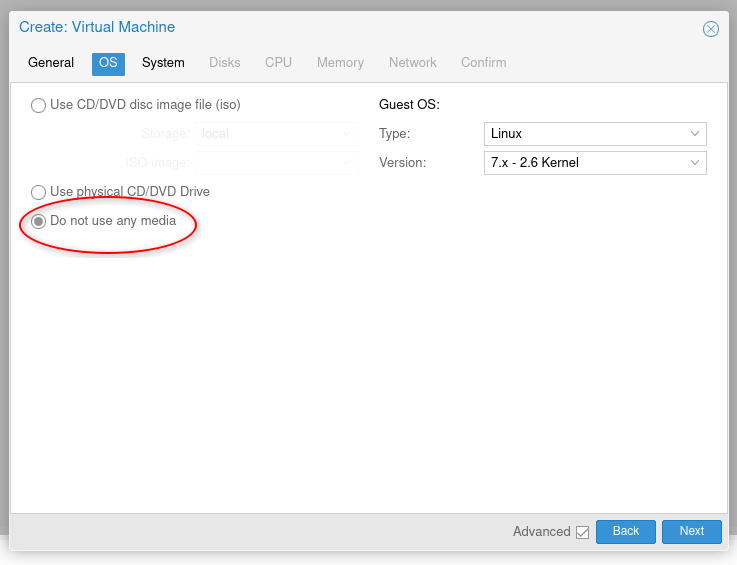
Under the OS tab, select:
Do not use any media
We don’t need an ISO because Home Assistant is already installed inside the QCOW2 image.
System
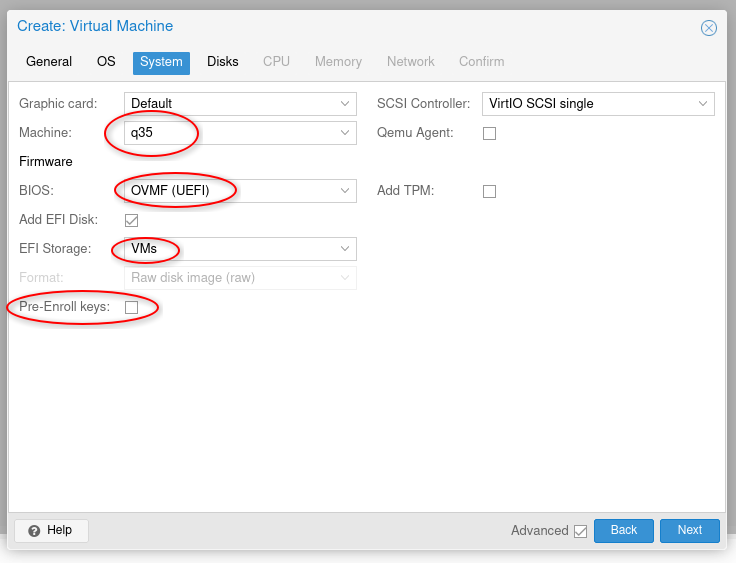
This part is important.
For Machine, select:
q35
For BIOS, select:
OVMF (UEFI)
Select a storage location for the EFI disk. In many installations this will be:
local-lvm
In my case it was actually a storage location called VMs.
I also unchecked:
Pre-Enroll keys
Home Assistant requires UEFI when running as a virtual machine, and the referenced Proxmox configuration uses q35 with OVMF and Secure Boot keys disabled.
Disks
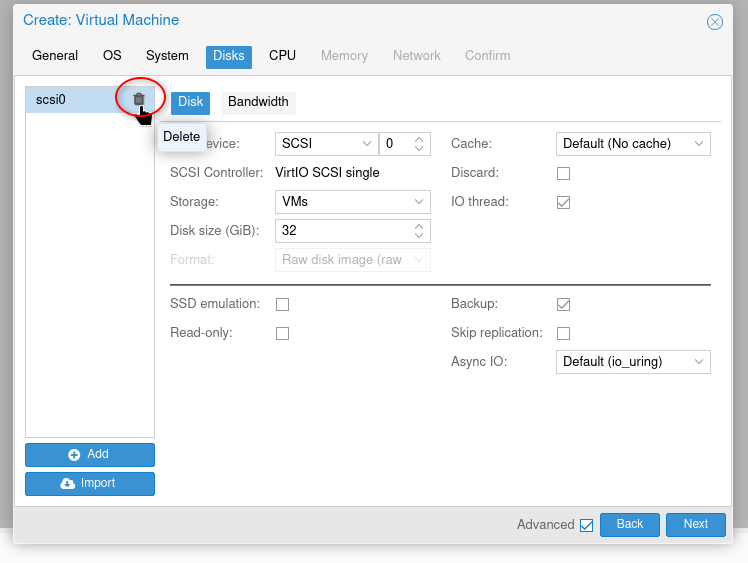
Proxmox normally creates an empty disk when you create a VM.
We don’t need it.
Delete the automatically created SCSI disk from the VM configuration. The Home Assistant QCOW2 image that we downloaded earlier will become our disk instead.
CPU
I assigned:
2 cores
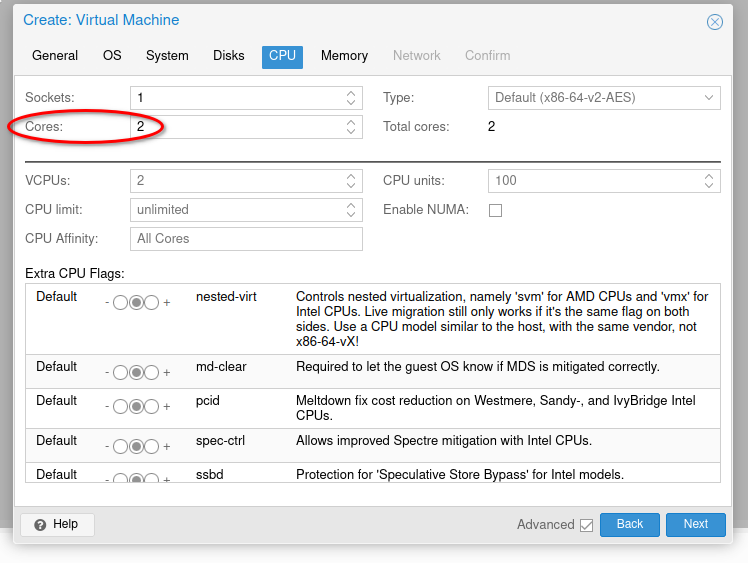
You can give Home Assistant more CPU resources later if your installation grows.
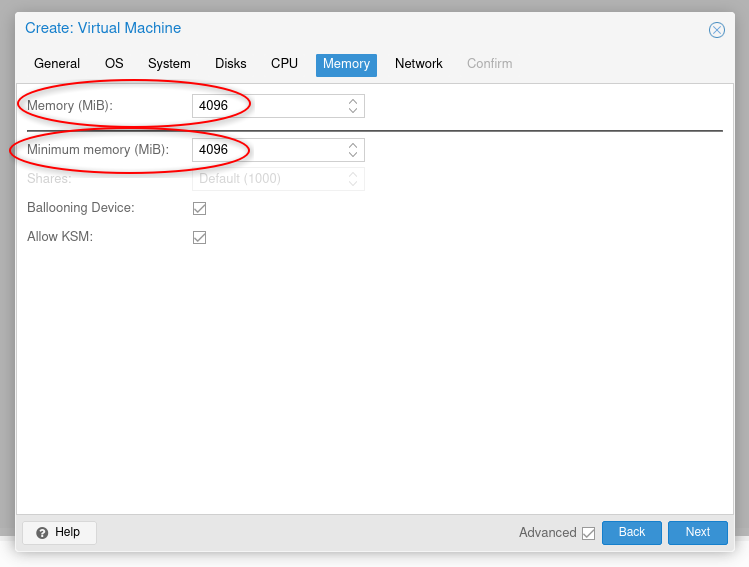
Memory
I assigned:
4096 MB
That gives the VM 4 GB of RAM.
Although Home Assistant currently specifies 2 GB as the minimum for a VM, I preferred giving it 4 GB from the beginning.
Network
I left the network configuration at the Proxmox defaults.
For a typical installation, the VM should be connected to your normal Proxmox bridge so Home Assistant appears as another device on your LAN.
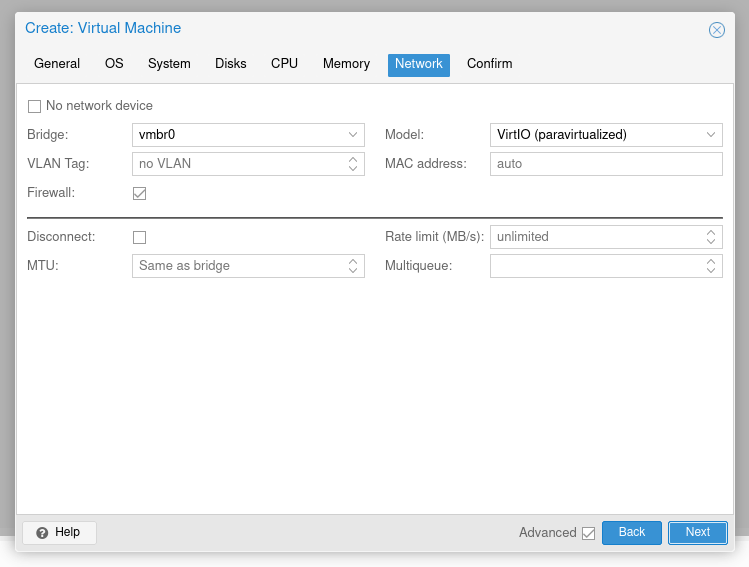
If you’re using VLANs or a more complicated network configuration, adjust this accordingly.
Finish creating the VM.
Do not start it yet.
4. Import the Home Assistant QCOW2 Disk into Proxmox
Now we need to import the Home Assistant disk into the VM we just created.
Go back to the Proxmox node’s Shell.
The general syntax for importing a QCOW2 image is:
qm importdisk <VM-ID> <QCOW2-FILE> <STORAGE>
For example, if:
- Your Home Assistant VM ID is
103 - Your Home Assistant QCOW2 file is in
/root - Your VM storage is
local-lvm
You would run something similar to:
qm importdisk 103 /root/haos_ova-<version>.qcow2 local-lvm
Make sure you replace the VM ID, filename and storage with the values from your own Proxmox installation.
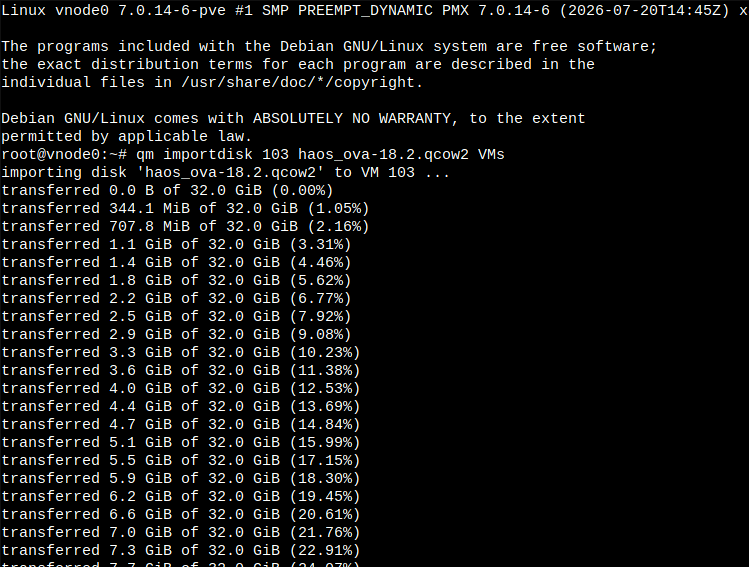
Let the import finish before continuing.
5. Attach the Imported Home Assistant Disk
Once the import completes, return to the Proxmox web interface.
Select your Home Assistant VM and open:
Hardware
You should now see something similar to:
Unused Disk 0
This is the Home Assistant disk we just imported.
Select the unused disk and click Edit.
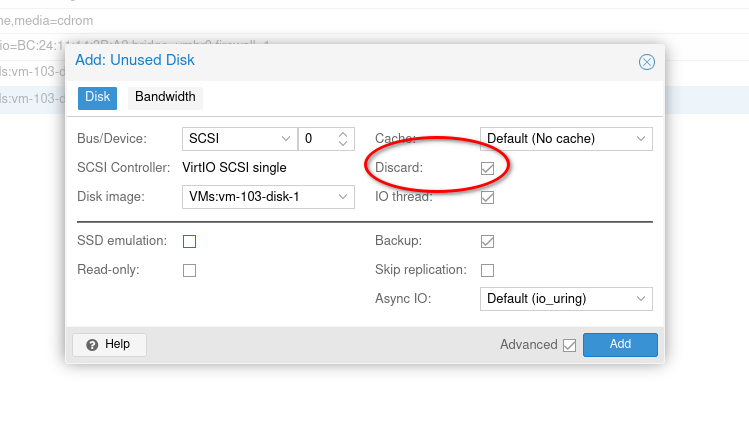
If your Proxmox storage backing this VM is on an SSD, you should enable Discard.
Then, click Add.
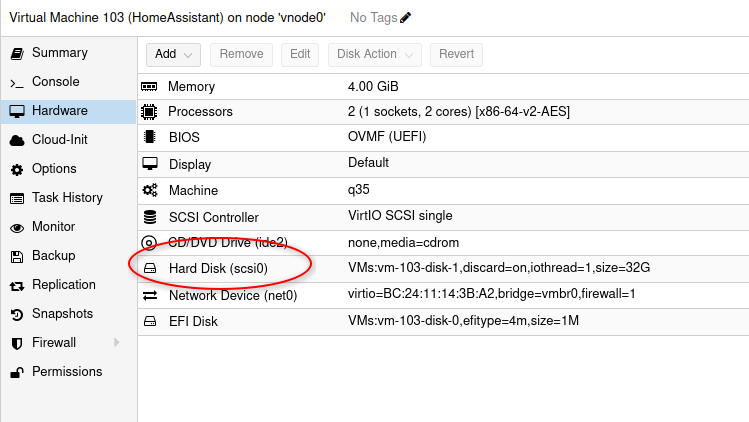
The disk should now be attached to the Home Assistant VM, commonly as something similar to:
scsi0
6. Set the Home Assistant Disk as the Boot Disk
Before starting the VM, we need to make sure Proxmox actually boots from the imported Home Assistant disk.
Select the VM and go to:
Options > Boot Order
Click Edit.
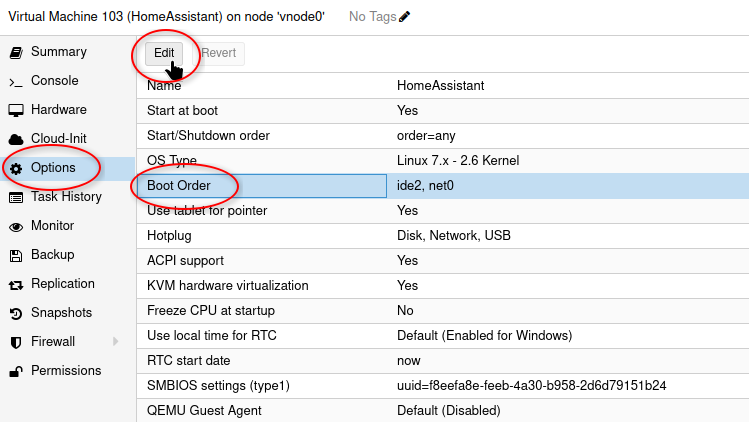
Enable the imported Home Assistant disk. In my case, this was the scsi0 disk.
Disable any unnecessary boot devices so the Home Assistant disk is the VM’s primary boot device.
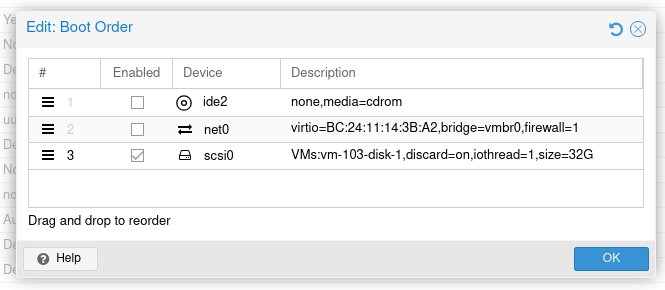
7. Start the Home Assistant VM
We can finally start Home Assistant.
Click Start.
Then, open the VM’s Console.
Home Assistant OS should begin booting!
If everything is configured correctly, Home Assistant will eventually display network information in the console, including the address you can use to access the web interface.
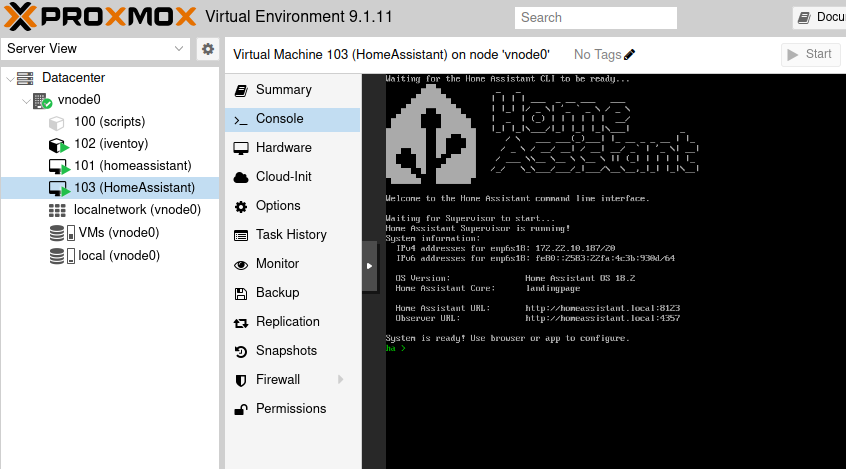
8. Open the Home Assistant Web Interface
Once Home Assistant has booted, open a web browser from another computer on your network.
Home Assistant may be available at:
http://homeassistant.local:8123
Alternatively, you can use the IP address shown in the Home Assistant console:
http://<HOME-ASSISTANT-IP>:8123
For example:
http://192.168.1.100:8123
Home Assistant’s documentation recommends using the IP address directly if hostname discovery doesn’t work on your network.
You should now see the Home Assistant onboarding page.
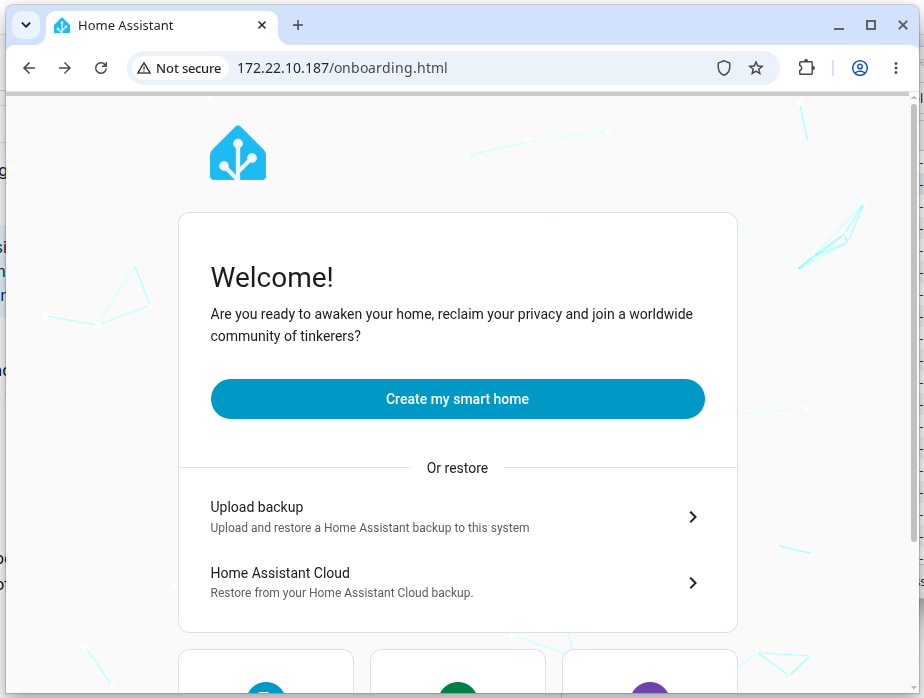
From here, you can create your Home Assistant account and continue with the normal initial setup.
That’s it! Home Assistant OS is now running as a virtual machine in Proxmox.
Troubleshooting Home Assistant on Proxmox
Home Assistant VM Says There Is No Bootable Disk
First, go to:
VM > Options > Boot Order
Make sure the imported Home Assistant disk is enabled.
It will commonly appear as something such as:
scsi0
The imported QCOW2 disk needs to be selected as a bootable device.
Also confirm that you actually attached the Unused Disk after running qm importdisk.
VM Fails to Boot or Shows a UEFI/Secure Boot Error
Check the VM’s system configuration.
I used:
- Machine: q35
- BIOS: OVMF (UEFI)
- Pre-Enroll Keys: Disabled
Home Assistant requires UEFI for the virtual machine, while the Proxmox forum procedure specifically disables the pre-enrolled Secure Boot keys.
There are also reports in the referenced forum thread of Secure Boot preventing the Home Assistant image from booting until it was disabled.
qm importdisk Says the QCOW2 File Does Not Exist
Check your current directory:
pwd
Then list your files:
ls
You can also specify the complete path to the file:
qm importdisk 103 /root/haos_ova-<version>.qcow2 local-lvm
Also double-check the filename. The extension should be:
.qcow2
Make sure you have already decompressed the .qcow2.xz file with unxz.
homeassistant.local:8123 Does Not Work
Try accessing Home Assistant by IP address instead:
http://<HOME-ASSISTANT-IP>:8123
The Home Assistant documentation specifically recommends using the VM’s IP address when local hostname resolution does not work.
You can find the assigned address from the Home Assistant VM console or from your router/DHCP server.
What About Zigbee, Z-Wave and Other USB Devices?
If you use Home Assistant with a Zigbee, Z-Wave or other USB adapter, the physical USB device will need to be made available to the Home Assistant VM.
Home Assistant’s virtualization documentation specifically accounts for passing USB hardware such as Zigbee and Z-Wave controllers through to a VM.
I would get the basic Home Assistant VM installed and working first before configuring any USB passthrough. This makes it much easier to troubleshoot because you know the base Home Assistant installation is working before adding additional hardware.
If you’re planning to use a Zigbee coordinator with Home Assistant, you’ll also need to decide whether to use ZHA or Zigbee2MQTT. I’ve compared both options separately, along with the best Zigbee channels for Home Assistant if you’re trying to avoid Wi-Fi interference.
Why I Installed Home Assistant Manually
There are community scripts available that can automate much of the process of installing Home Assistant on Proxmox.
However, I wanted to install it manually.
Doing it this way makes the VM configuration much more obvious. You know exactly which machine type, BIOS, CPU, memory, storage and boot disk the Home Assistant VM is using.
It also makes troubleshooting easier later because the installation isn’t hidden behind a script.
The process really isn’t complicated once you understand that the Home Assistant download is a preinstalled QCOW2 disk rather than a conventional installation ISO.
The basic process is simply:
- Download the Home Assistant QCOW2 image.
- Decompress it.
- Create an empty Proxmox VM.
- Import the QCOW2 image using
qm importdisk. - Attach the imported disk.
- Make it bootable.
- Start the VM.
- Open Home Assistant on port 8123 at
http://homeassistant.local:8123.
Conclusion
Installing Home Assistant on Proxmox is a little different from creating a typical Linux VM because there isn’t an installer ISO involved. Instead, Home Assistant provides a ready-to-use QCOW2 image that we import directly into the virtual machine.
These are the steps I used to install Home Assistant on Proxmox, and once the VM configuration and disk import were complete, Home Assistant OS booted like any other virtual machine.
For my setup, 2 CPU cores, 4 GB of RAM, q35 and OVMF worked well as a straightforward starting configuration.
Running Home Assistant this way also keeps it nicely contained in its own VM while letting Proxmox handle the underlying virtual hardware and startup of the system.
Remarks
- Home Assistant provides an official KVM/Proxmox QCOW2 image, so make sure you download that image to install Home Assistant on Proxmox rather than one intended for VirtualBox or VMware.
- I used 2 CPU cores and 4 GB of RAM. Home Assistant currently lists 2 vCPUs and 2 GB of RAM as the minimum VM requirements.
- Make sure the VM uses OVMF/UEFI. Home Assistant requires UEFI to boot as a virtual machine.
- If the VM refuses to boot, double-check that Pre-Enroll Keys/Secure Boot is disabled and that the imported Home Assistant disk is selected in the boot order.
- If
homeassistant.localdoesn’t resolve on your network, access Home Assistant directly using its IP address and port8123, such ashttp://192.168.1.100:8123.
The post How to Install Home Assistant on Proxmox Step by Step appeared first on TechOpt.
]]>The post WAV vs FLAC vs ALAC: Best Format for Media Storage appeared first on TechOpt.
]]>At first, the choice can feel more complicated than it really is. WAV is often seen as the “studio quality” option, FLAC is popular with audiophiles and media server users, and ALAC is commonly associated with Apple devices.
The good news is that all three can store lossless audio. However, they are not equally convenient for long-term media storage.
In this blog, I will compare WAV, FLAC and ALAC from a practical storage perspective, including file size, metadata, compatibility, editing, and which format makes the most sense for different types of music libraries.
WAV vs FLAC vs ALAC: Quick Answer
For most people, FLAC is the best format for long-term media storage.
It gives you the same audio quality as WAV, usually uses much less space, supports metadata well, and works nicely with media servers like Plex, Jellyfin, Kodi, and many dedicated music players.
WAV still has its place, especially for recording, editing, sample libraries, and professional audio workflows, but it is usually not the most efficient format for storing a large music collection.
ALAC is also a great choice if you mainly live in the Apple ecosystem.
What Is WAV?
WAV, short for Waveform Audio File Format, is an audio container format originally associated with IBM and Microsoft. It is commonly used to store uncompressed PCM audio, although WAV can technically contain compressed audio too.
In simple terms, a typical WAV file stores raw audio data without trying to make the file smaller.
That makes WAV simple, widely supported, and excellent for editing. However, it also means the files can get very large.
For example, CD-quality audio at 16-bit / 44.1 kHz uses roughly 10 MB per minute in uncompressed stereo WAV format. A full album can easily take hundreds of megabytes.
WAV Pros
WAV is excellent when you want maximum compatibility with audio editors, DAWs, samplers, and professional tools. It is also simple to process because the audio is usually stored in an uncompressed format.
This makes WAV a great format for:
- Recording projects
- Audio editing
- Sample packs
- Temporary production files
- Exporting masters before final encoding
WAV Cons
The biggest problem with WAV is storage efficiency. Since typical WAV files are uncompressed, they take up much more space than FLAC or ALAC.
WAV can also be less pleasant for music library organization. Metadata support exists, but in practice, tagging WAV files is not always as consistent across music players compared to FLAC or ALAC.
If you are storing thousands of songs, this matters. Album art, artist names, track numbers, genres, and release dates are all important when browsing a media library.
What Is FLAC?
FLAC stands for Free Lossless Audio Codec. It compresses audio without losing quality, similar to how ZIP can compress files without changing their contents. Xiph.Org describes FLAC as lossless audio compression designed specifically for audio.
That means a FLAC file can be decoded back into the same audio data you would get from the original WAV source.
In other words, FLAC is not like MP3. MP3 throws away audio data to save space, and FLAC keeps the audio intact while still reducing file size.
FLAC Pros
FLAC is probably the best all-around format for storing a personal lossless music library.
It usually saves a lot of space compared to WAV, supports strong metadata tagging, is open, and is widely supported across many platforms and media players.
FLAC is especially useful for:
- CD rips
- Lossless music libraries
- Plex, Jellyfin, Kodi, and other media servers
- Archiving music without wasting space
- Keeping album art and metadata organized
FLAC files are also easy to verify. Since FLAC supports checksums, it is a very good format for people who care about long-term archival integrity.
FLAC Cons
The main downside is Apple compatibility. FLAC support is much better than it used to be, but ALAC still feels more native if you use Apple Music, iPhones, iPads, and macOS as your main music ecosystem.
FLAC is also compressed, so it takes a small amount of CPU power to decode. However, on any modern computer, phone, or media server, this is usually not a concern at all.
What Is ALAC?
ALAC stands for Apple Lossless Audio Codec. It is Apple’s lossless compression format. Apple says ALAC preserves the original audio data while reducing file size, and Apple Music uses ALAC for its lossless catalog.
ALAC is similar to FLAC in the most important way: it is lossless.
That means ALAC and FLAC can both store the same quality of audio. The main difference is ecosystem support.
ALAC Pros
ALAC is a great option if your music life revolves around Apple devices.
It works well with:
- Apple Music
- iPhone
- iPad
- macOS
- Apple TV
- AirPlay-focused setups
ALAC files are usually stored in .m4a containers, which also have good metadata support. If you want lossless files that feel native in Apple’s ecosystem, ALAC is often the easiest choice.
ALAC Cons
Outside of Apple-focused setups, ALAC is not usually as popular as FLAC.
Many apps and media servers can play ALAC just fine, but FLAC tends to be the more common standard among audiophiles, archivists, home server users, and open-source media tools.
If you are building a media library that you want to keep flexible across many systems, FLAC is usually the safer long-term bet.
WAV vs FLAC vs ALAC File Size
File size is one of the biggest reasons to choose FLAC or ALAC over WAV.
A WAV file usually stores audio without compression. FLAC and ALAC compress the same audio data losslessly, so they can reduce storage use while keeping the same quality.
A rough comparison for CD-quality music:
| Format | Compression | Typical Size | Audio Quality |
|---|---|---|---|
| WAV | None | Largest | Lossless |
| FLAC | Lossless | Slightly smaller than WAV | Lossless |
| ALAC | Lossless | Similar to FLAC | Lossless |
The exact savings depend on the music. Simple acoustic music may compress better than dense electronic or metal tracks. Still, FLAC and ALAC are usually far more storage-friendly than WAV.
For a small collection, WAV may not seem like a big deal. For thousands of albums, the difference can become massive.
Does FLAC or ALAC Sound Worse Than WAV?
No. FLAC and ALAC do not sound worse than WAV when they are created properly from the same source.
They are lossless formats. When decoded, they reproduce the original audio data.
The difference is not sound quality. The difference is storage, tagging, compatibility, and workflow.
If you convert a WAV file to FLAC and then decode that FLAC back to WAV, the audio data should match. The FLAC file is simply a more efficient way of storing it.
However, this only applies if the source is truly lossless. Converting an MP3 to FLAC does not restore lost quality. It just creates a larger file containing already-damaged audio.
I covered that problem in more detail in my guide on identifying fake FLAC files: How to Identify Fake FLAC Files
Metadata and Library Organization
Metadata is where FLAC and ALAC really shine for media storage.
When you are managing a large music library, you usually want:
- Artist
- Album
- Track title
- Track number
- Genre
- Year
- Album art
- Disc number
- Composer
- ReplayGain or loudness tags
FLAC handles this very well. ALAC also handles metadata well, especially in Apple software.
WAV can store metadata, but support is not as consistent across players and tagging tools. This makes WAV less ideal for a neatly organized personal music library.
For media storage, metadata matters almost as much as audio quality. A perfectly preserved WAV collection is annoying if half your album art, track numbers, or artist tags do not show correctly.
Compatibility: Which Format Plays Everywhere?
WAV has the broadest basic compatibility. Almost anything can open a WAV file.
FLAC is extremely well supported across modern media players, servers, and audio tools. It is especially common in open-source and home media server setups.
ALAC is strongest inside the Apple ecosystem. It is also supported by many modern players, but it is not usually the default choice for non-Apple media libraries.
Here is the practical breakdown:
| Use Case | Best Format |
|---|---|
| Professional recording and editing | WAV |
| Long-term music library storage | FLAC |
| Apple-focused lossless library | ALAC |
| Plex or Jellyfin music server | FLAC |
| CD ripping archive | FLAC |
| Sharing with a studio or DAW | WAV |
| iPhone-first local music library | ALAC |
When Should You Use WAV?
Use WAV when you are actively working with audio.
For example, WAV makes sense when recording vocals, editing podcasts, exporting stems, creating samples, or moving files between DAWs.
It is simple, uncompressed, and widely accepted by professional tools.
However, once the project is done, you may want to store the final version as FLAC or ALAC to save space while keeping the audio lossless.
Think of WAV as a production format, not always the best library format.
When Should You Use FLAC?
Use FLAC when you want the best general-purpose format for storing lossless music.
This is what I would choose for a personal archive, a home server, or a large music collection that needs to remain flexible over time. FLAC is what I use for my media server.
FLAC is especially good if you care about open formats, metadata, file integrity, and compatibility with media server software.
For most TechOpt readers who are building a home media setup, FLAC is probably the best default choice.
When Should You Use ALAC?
Use ALAC if you are heavily invested in Apple devices and want lossless audio that fits nicely into that ecosystem.
If your main playback devices are an iPhone, iPad, Mac, Apple TV, or Apple Music app, ALAC can be more convenient than FLAC.
It is also a good choice if you want to sync local lossless files through Apple-friendly workflows.
However, if you are trying to build a more platform-neutral archive, I would still lean toward FLAC.
Should You Convert WAV to FLAC?
Yes, in many cases.
If you have a large WAV music collection that you are using for listening and storage rather than active editing, converting it to FLAC can save a lot of disk space without reducing quality.
Just make sure you keep a backup before doing any large batch conversion.
A common workflow is:
- Keep active recording projects in WAV.
- Export finished masters as WAV.
- Convert final listening copies to FLAC.
- Store the FLAC files in your main media library.
- Keep original project files separately if needed.
This gives you the best of both worlds: production flexibility and efficient storage.
Should You Convert FLAC to ALAC?
Only if you need better Apple compatibility.
Converting FLAC to ALAC should preserve audio quality because both formats are lossless. However, you should still be careful with metadata during conversion.
Some tags may not transfer exactly depending on the software you use.
If your FLAC library already works with your devices, there is no urgent reason to convert it. But if you want everything to feel native in Apple Music or on iOS, ALAC may be worth it.
Should You Convert MP3 to FLAC or ALAC?
No, not for quality reasons.
Converting MP3 to FLAC or ALAC will not restore the audio data that was removed during MP3 compression. It will only create a larger lossless file that contains lossy audio.
This is one of the reasons fake FLAC files exist. Someone can take a lossy MP3, convert it to FLAC, and make it look like a high-quality file. But the missing audio information is still gone.
If you care about lossless quality, start from a true lossless source such as a CD rip, studio master, or legitimate lossless download.
Best Format for Media Servers
For media servers, I would usually choose FLAC.
It is efficient, open, reliable, and well supported by most serious media software. It also keeps your library easy to move between systems in the future.
If you are using Plex, Jellyfin, Kodi, Navidrome, or another self-hosted music setup, FLAC is a very practical choice.
WAV will work, but it wastes space.
ALAC may also work, but unless you specifically need Apple compatibility, FLAC is usually the more natural fit for a server-based library.
Final Recommendation
For most people, the best format for media storage is FLAC.
It gives you lossless quality, smaller files than WAV, strong metadata support, and excellent compatibility across modern media players and servers.
Choose WAV when you are recording, editing, exporting stems, or working in a professional audio environment.
Choose ALAC when you want a lossless library that works smoothly with Apple devices and Apple Music.
The simple rule is:
Use WAV for production, FLAC for archiving, and ALAC for Apple-focused playback.
That keeps your audio quality intact while making your library easier to store, manage, and enjoy.
The post WAV vs FLAC vs ALAC: Best Format for Media Storage appeared first on TechOpt.
]]>The post Raspberry Pi Model B Original (2012) Uses in 2026 appeared first on TechOpt.
]]>The projects in this article are ones that the original Model B actually has adequate power to run without sacrificing usability or performance, not just “will run, but not well” projects.
Similarly, a lot of these should work with the Model A. However, keep in mind that the Model A only has 256 MB of RAM, which limits it further.
1. Raspberry Pi Print Server
Make an old USB printer WiFi and AirPrint compatible using an old Raspberry Pi with Raspbian. By connecting the printer to a USB port on the Pi and installing CUPS, you can share your USB printer with your network to make it wireless.
Additionally, CUPS also now supports broadcasting as AirPrint devices. Once the printer is setup in CUPS, you should be able to print to it from your Apple devices as well.
2. Pi-Based Digital Picture Frame
A digital picture frame is probably one of the lowest resource projects you can do. Therefore, this makes it perfect for the original Raspberry Pi. You’ll simply need an old screen with an HDMI input. You can even use a screen with a composite input, since the original Pi has a composite output!
Choose an OS, put your photos on your SD card or a USB key and install some image slideshow software. Some people even get creative with decorative framing around the screen.

3. Raspberry Pi Web Server
You can run a lightweight web server such as nginx or lighttpd on your older Raspberry Pi to serve static web pages and basic websites. You can also try Apache, but keep in mind that Apache is not as lightweight as nginx or lighttpd, so your performance probably won’t be as good.
The original Pi Model B definitely isn’t powerful enough to serve a website to hundreds of users, however, for a few users it should be more than adequate.
4. Self-Host Bitwarden
This is one of my personal favourites. Bitwarden is an opensource password manager that you can self-host. It has accompanying desktop apps, mobile apps, and browser extensions.
The original Pi may not be powerful enough to host full Bitwarden, but it will easily run Vaultwarden. Vaultwarden is an alternative implementation of the Bitwarden API written in Rust, which makes it super fast and less resource-intensive than full Bitwarden. You can still use it with the official Bitwarden apps and extensions.
Simply install docker and spin up the Vaultwarden container. Again, it might not work great for hundreds of users, but our Pi 1 Vaultwarden instance is working great for our family of 6!
5. Internet Radio, Bluetooth or AirPlay Receiver
This one is also a personal favourite to modernize an old stereo system. All you need is a stereo system or set of speakers with an AUX port. This way you can connect the headphone jack of the Raspberry Pi right into the stereo system. Alternatively, if the stereo is older and has an RCA input, you can use a 3.5 mm to RCA adapter.
Install an OS and run your favourite music apps to play directly to your speakers. Additionally, you can setup Bluetooth pairing to use it as a Bluetooth speaker. You can also install shairport-sync to support AirPlay from Apple devices.
Conclusion
The Pi has come a long way since it was first introduced. Even though at first glance the original Raspberry Pi 1 Model B looks severely under-powered by today’s standards, it still has some great uses for applications where a lot of processing power isn’t needed.
The post Raspberry Pi Model B Original (2012) Uses in 2026 appeared first on TechOpt.
]]>The post Install and Run AppImage Software on Linux (Step-by-Step) appeared first on TechOpt.
]]>In this guide, you’ll learn how to run AppImage files on Linux safely and cleanly: how to organize them, make them executable, launch them, and optionally add a shortcut with icon so the app shows up in your applications menu.
You can follow this guide regardless of the distribution or desktop environment you are using!
What you need
- A downloaded
.AppImagefile (from the app’s official site) - A file manager (Dolphin, Files/Nautilus, etc.) and/or a terminal
Step 1: Put your AppImage somewhere organized
Yes, you can run an AppImage straight from your Downloads folder. But if you download a few of these over time, they get messy fast.
A simple structure I like is:
~/bin/for AppImages (and other portable apps)- One folder per app inside
~/bin/(helps keep icons, config files, and updates tidy)
Example:
mkdir -p ~/bin/<app-name>
Then move your AppImage into that folder using your file manager (drag and drop) or the terminal:
mv ~/Downloads/<app-name>.AppImage ~/bin/<app-name>/
Why one folder per app? Some portable apps want read/write access to their own folder (for example, to download an update). Keeping each AppImage in its own folder avoids weird permission issues and keeps everything clean.
What about multi-user systems?
If multiple users need the same AppImage, putting it in one users home folder might not be ideal. In that case, storing it under /opt/<app-name>/ is common, but you must set permissions properly so users can run (and potentially update) it.
Step 2: Make the AppImage executable (required)
Most downloads are not executable by default (this is normal on Linux). To run an AppImage, you must mark it as executable first.
 This is the critical step. AppImage software will not run without doing this step.
Option A: Do it in your file manager (GUI)
- Right-click the AppImage
- Open Properties
- Go to Permissions
- Enable: Allow executing file as program (or your file manager’s equivalent)

Option B: Do it in the terminal (works everywhere)
Change into the folder where the AppImage lives, then run chmod:
cd ~/bin/<app-name>
chmod +x <app-name>.AppImage
Step 3: Run the AppImage
Now you can run your AppImage file in either of these ways:
- Double-click the file in your file manager, or
- Run it from the terminal:
./<app-name>.AppImage
Step 4 (optional): Add the AppImage application to your application menu
These steps will vary a bit depending on your desktop environment, but you should be able to find equivalent settings.
If you’re on KDE Plasma, you can follow these instructions:
- Right-click your application launcher (start menu)
- Click Edit Applications…
- Choose a category (like Utilities)
- Click New Item
- Set the Program to the full path of your AppImage
- Pick an icon (optional but recommended)
- Save
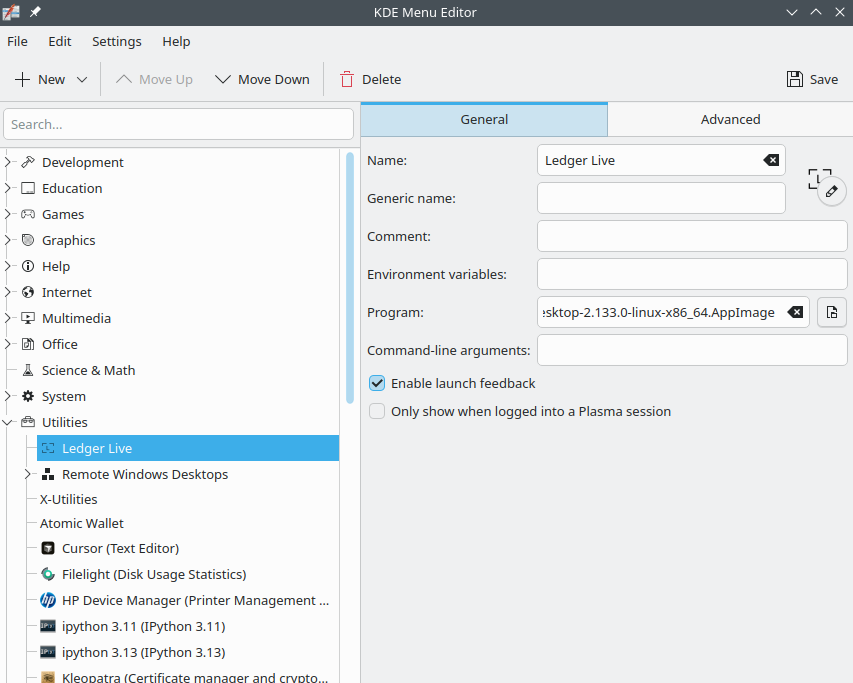
Tip: Download a PNG icon (transparent background looks best) and store it in the same folder as your AppImage so everything stays together.
Step 5 (optional): Use AppImageLauncher to automate menu integration
If you prefer a more automatic approach, AppImageLauncher can integrate AppImages into your menu, move them into a central location, and even provide update/remove entry functionality through your launcher.
It’s not supported on every distro, but if it works on yours, it can save time.
Troubleshooting tips
Nothing happens when you try to run AppImage
Run it from a terminal to see error output:
cd ~/bin/<app-name>
./<app-name>.AppImage
Want to inspect whats inside an AppImage?
You can mount AppImages read-only using:
./<app-name>.AppImage --appimage-mount
Remarks
- AppImages are not installed like traditional packages on Linux: you manage them by keeping the file, updating it (if the app supports it), and deleting it when done.
- A clean folder layout makes it easier to back up, move, or remove apps later.
- If you want the most “native” feel, menu integration is the final piece.
- For those less familiar with Linux,
~is a shorthand placeholder for/home/<user>.
FAQ
Do I have to install anything to run AppImage?
No. You usually just download it, mark it executable, and run it.
Why is my AppImage not executable after downloading?
Because Linux downloads typically remove the executable bit for safety. Therefore, you have to add it back with the GUI permission checkbox or chmod +x.
How do I uninstall an AppImage?
Simply delete the AppImage file (and any shortcuts you created).
The post Install and Run AppImage Software on Linux (Step-by-Step) appeared first on TechOpt.
]]>The post Upgrade openSUSE Leap to 16.0 from 15.6 appeared first on TechOpt.
]]>--releasever flag that I talked about in my 15.5 to 15.6 upgrade guide, you’ve probably run into problems. In this updated guide, I’ll cover the new, official and recommended method to upgrade openSUSE Leap to 16.0 from 15.6 using the openSUSE Migration Tool.
Why the Old --releasever Method No Longer Works
In my previous guide, I showed how you could upgrade openSUSE Leap releases with:
sudo zypper --releasever=16.0 dup
That used to work reliably in earlier Leap versions. However, with SLE (SUSE Linux Enterprise) 16, SUSE introduced major backend and repository format changes. The new openSUSE Leap 16.0 release merges more closely with SLE infrastructure, which means the repositories and release metadata formats have changed significantly.
If you try to use the --releasever flag now, you’ll likely see repository or GPG key errors during the upgrade. That’s because the old repository layout no longer matches Leap 16’s new structure.
The New Official Method: opensuse-migration-tool
Instead of manually changing repositories, Leap 16 introduces a dedicated migration utility designed to handle all the details for you. The tool automatically adjusts your repositories, resolves new dependencies, and manages system configuration changes.
Step 1: Install the Migration Tool
First, fully update your Leap 15.6 system:
sudo zypper refresh
sudo zypper up
Then install the new migration package:
sudo zypper install opensuse-migration-tool
Step 2: Run the Migration Process
Start the migration utility:
sudo opensuse-migration-tool
The tool will analyze your current system, identify obsolete packages, and suggest repository transitions for Leap 16.0. The system prompts you to confirm before proceeding with the distribution upgrade.
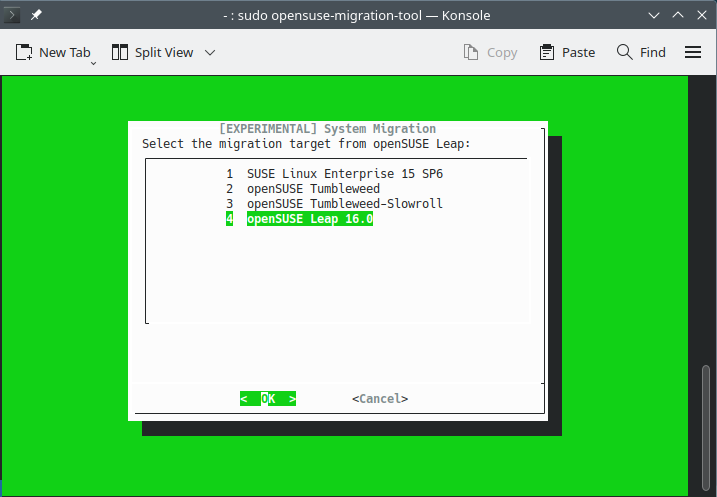
You’ll want to select openSUSE Leap 16.0 with the arrow keys on your keyboard, select OK and hit Enter.
You will probably encounter the following screen about disabling third-party repositories:
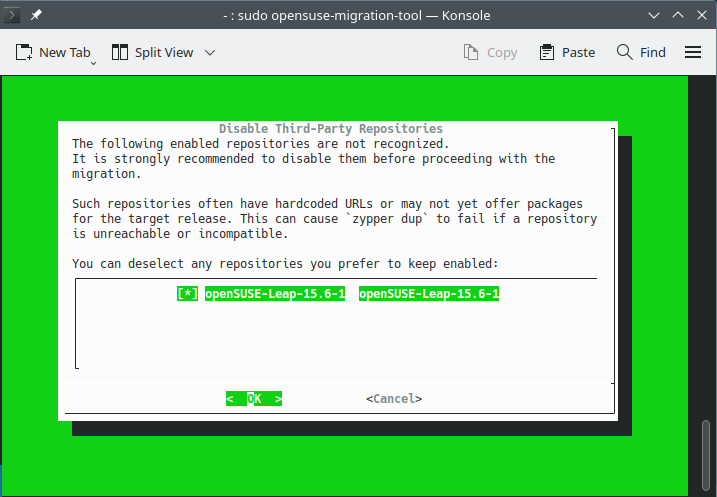
This happens because Leap 16.0 changes how repositories are structured. You can simply hit Enter to confirm.
The upgrade process will then start! Wait a few minutes, then reboot into Leap 16.0 once the process finishes.
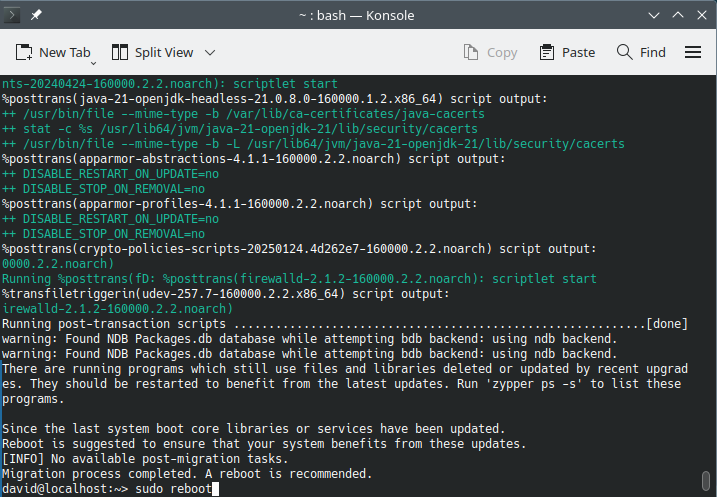
Step 3: Reboot into Leap 16.0
After the migration completes, simply reboot:
sudo reboot
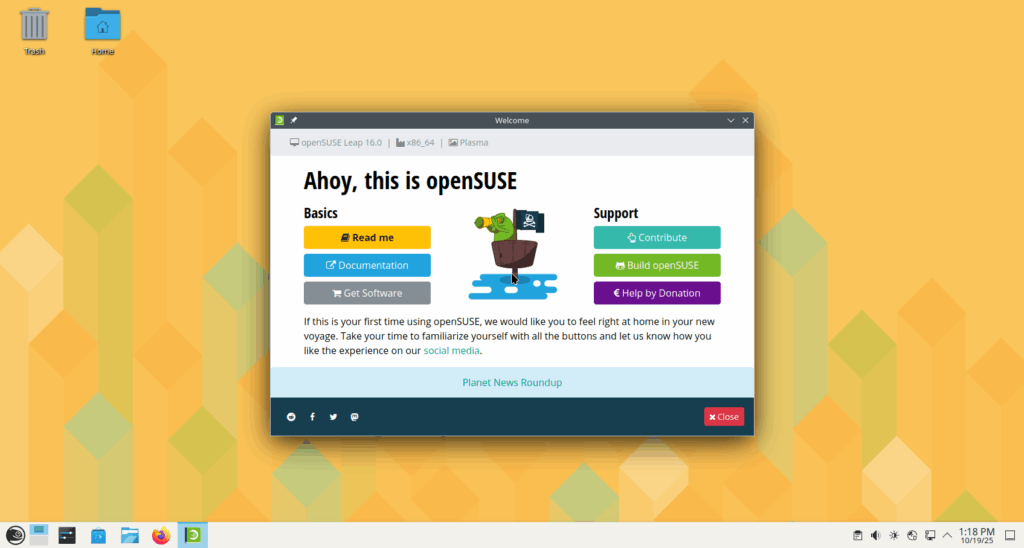
You’ll now be running openSUSE Leap 16.0 with the updated repository structure.
Troubleshooting Tips
- Do not use
zypper dup --releasever=16.0. It may break dependencies. - If you encounter repository signature errors, remove or rename old
.repofiles in/etc/zypp/repos.d/before re-running the migration tool. - Ensure your disk has sufficient space and that all third-party repositories are disabled before starting the upgrade.
Final Thoughts
The openSUSE team has streamlined the upgrade path to make system migrations more reliable and aligned with SUSE’s enterprise ecosystem. While older zypper --releasever methods are now deprecated, the openSUSE Migration Tool simplifies the process and ensures compatibility with the new Leap 16 architecture.
The post Upgrade openSUSE Leap to 16.0 from 15.6 appeared first on TechOpt.
]]>The post How to Make Ethernet Cables: A Complete Step-by-Step Guide appeared first on TechOpt.
]]>This comprehensive guide will walk you through everything you need to know, from selecting the right cable and connectors, to crimping, testing, and troubleshooting your custom cables.
Why Make Your Own Ethernet Cable?
There are several advantages to building your own network cables:
- Custom Lengths: No more coiled-up mess or cables that come up just short. Instead, you can make cables the exact length you need.
- Cost Savings: Bulk ethernet cable and connectors are far cheaper per foot than buying pre-made cables.
- Better Quality Control: You choose the cable type, shielding, and connectors, therefore avoiding cheap copper-clad aluminum (CCA) cables.
- Skill Building: This is a useful DIY skill for anyone interested in networking, home labs, or IT work.
Tools and Materials Needed
Here’s what you’ll need to make DIY ethernet cables successfully:
- Ethernet Cable (Cat6, Cat6a, or Cat5e): Prefer solid copper rather than CCA for best performance and compliance with standards. Cat6 bulk cable on Amazon
- RJ45 Connectors: Choose connectors rated for your cable type (Cat6, Cat6a, or Cat5e). Passthrough connectors are easier for beginners. Cat6 RJ45 passthrough connectors
- RJ45 Crimping Tool: Used to secure connectors to the cable. Most crimpers also include a wire cutter and stripper. RJ45 crimp tool
- Cable Tester (Recommended, but optional): Ensures your wiring is correct and detects any faults. Basic cable tester or advanced network tester
- Strain Relief Boots (Recommended, but optional): Add durability to the connector ends. Strain relief boots
- Wire Cutters/Scissors: For trimming cable and internal wires. Wire strippers/cutters
Tip: Avoid “Cat7” or “Cat8” cables sold cheaply online. These are not officially recognized Ethernet standards and often use questionable materials.
Step 1: Measure and Cut Your Cable
Pull the amount of cable you need from the box, then add roughly 30 cm (about 1 foot) of extra length for trimming and flexibility. Cut the cable cleanly using the crimper’s cutting blade or a pair of wire cutters.
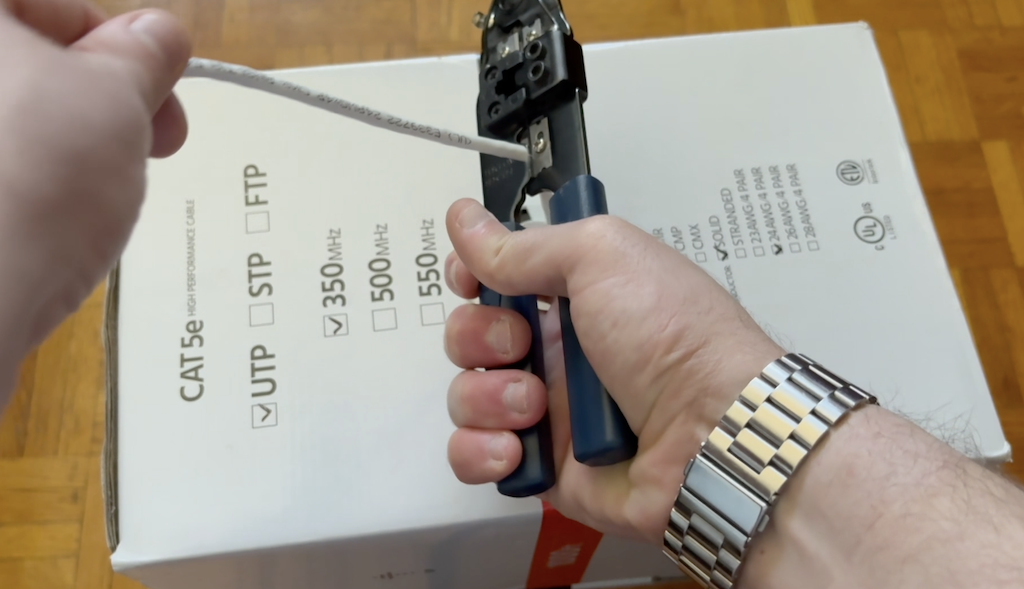
Step 2: Strip the Outer Jacket
Use the stripping blade on your crimping tool (or a dedicated wire stripper) to remove 5–10 cm (2–3 inches) of the outer jacket from both ends of the cable. Be careful not to nick the internal wires.
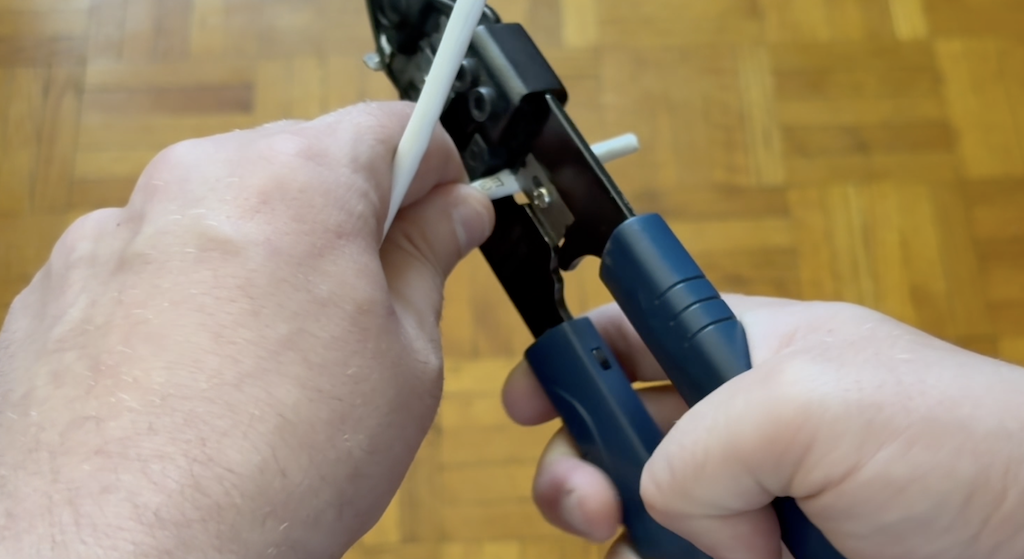
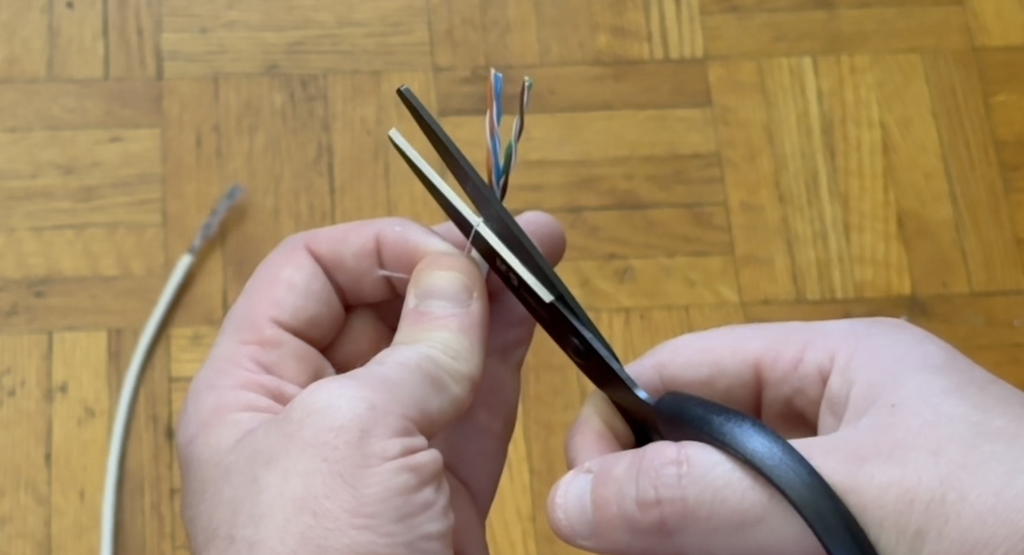
After that, remove the internal string, if present.
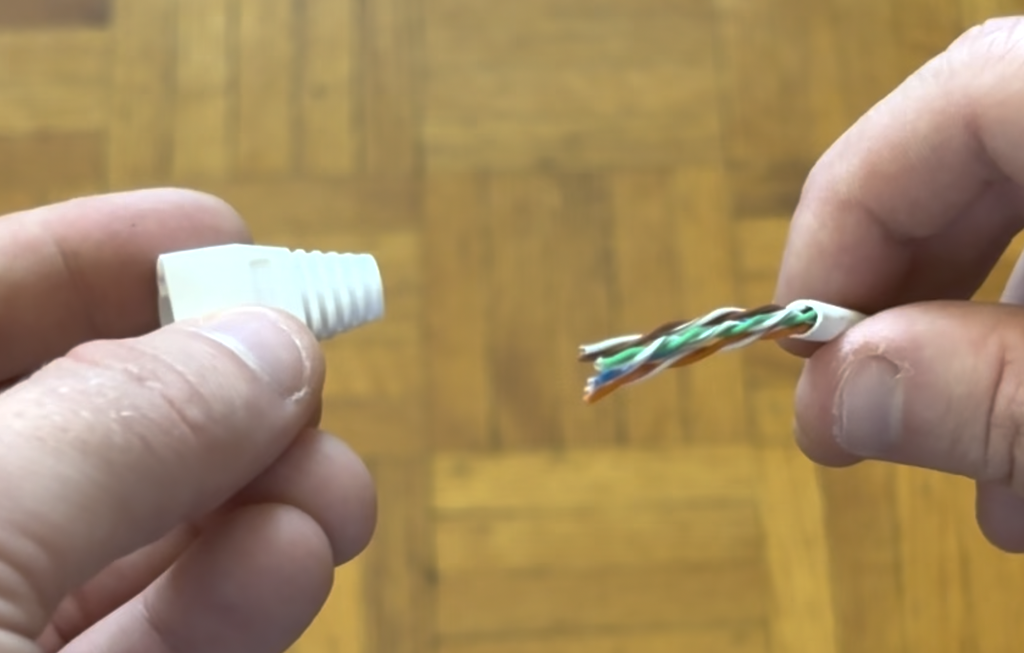
At this stage, slide on the strain relief boots if you’re using them—forgetting them is a common mistake. Therefore, it’s best to add them now. You want the larger side facing outward from the end of the cable on both sides.
Step 3: Untwist and Arrange the Wires
Inside the jacket are four twisted pairs of wires (8 total). Untwist the pairs and straighten them.
Then, arrange them in either T-568A or T-568B wiring order. Use the same standard on both ends.
T-568A Wiring Order:
- White/Green
- Green
- White/Orange
- Blue
- White/Blue
- Orange
- White/Brown
- Brown
T-568B Wiring Order (Most Common in North America):
- White/Orange
- Orange
- White/Green
- Blue
- White/Blue
- Green
- White/Brown
- Brown
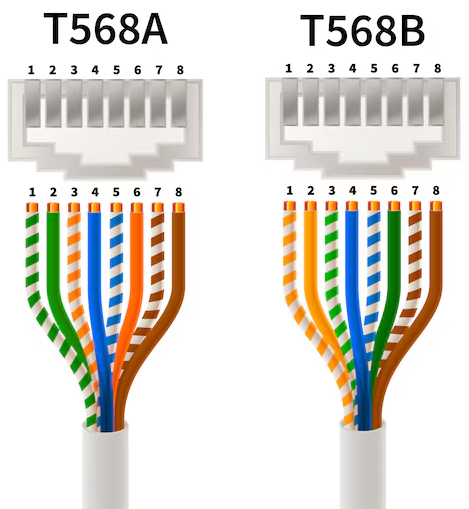
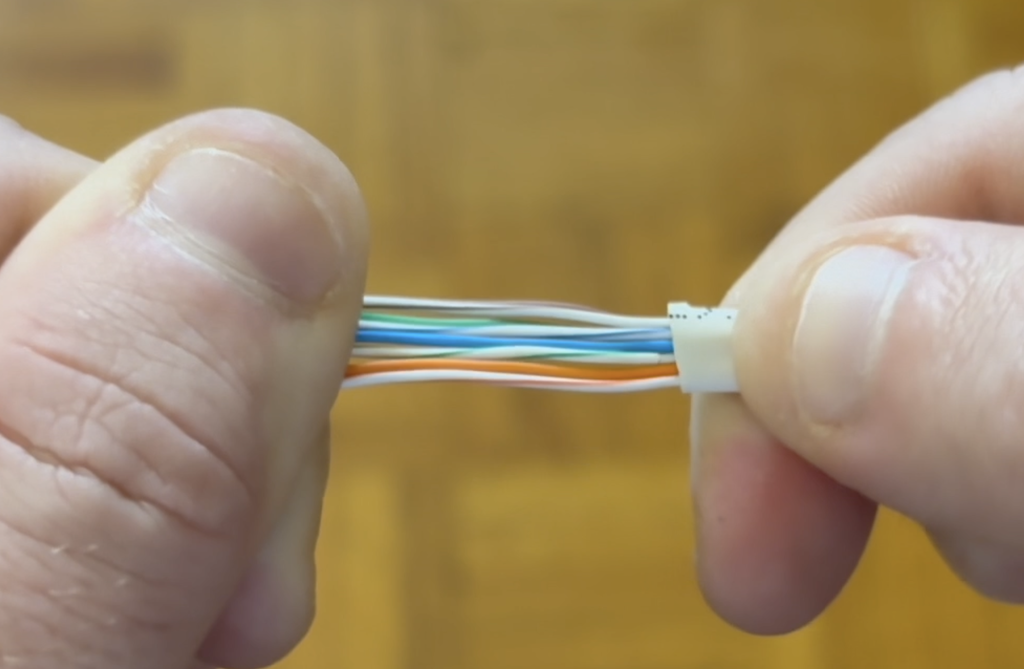
Lay the wires flat and keep them in the correct order. Finally, flatten them gently with your thumb for easier insertion.
Use my RJ45 pinout tool as a quick reference for both the T-568A and T-568B standards.
Step 4: Trim Wires to Length
For non-passthrough connectors, trim the wires so that they are just long enough to reach the end of the connector when inserted. Cut them evenly so they line up perfectly.
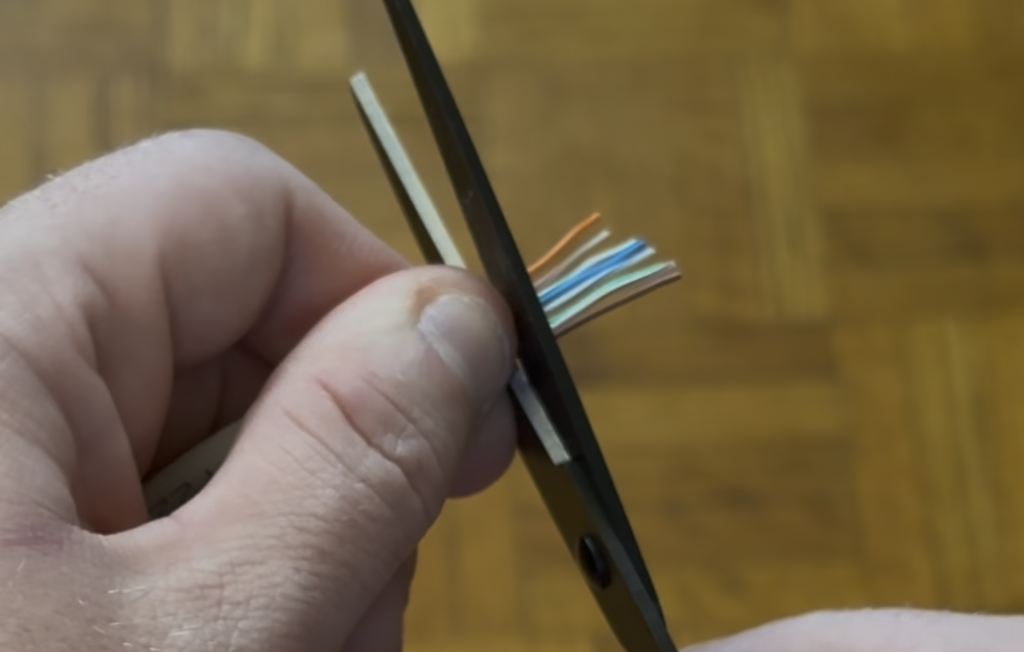
For passthrough connectors, leave them a bit longer since the ends will protrude and be trimmed after crimping.
Step 5: Insert Wires Into the RJ45 Connector
Slide the wires into the connector carefully, ensuring they remain in the correct order. Push firmly until:
- Each wire reaches the very end of the connector.
- The outer jacket passes the strain relief tab for a strong connection.
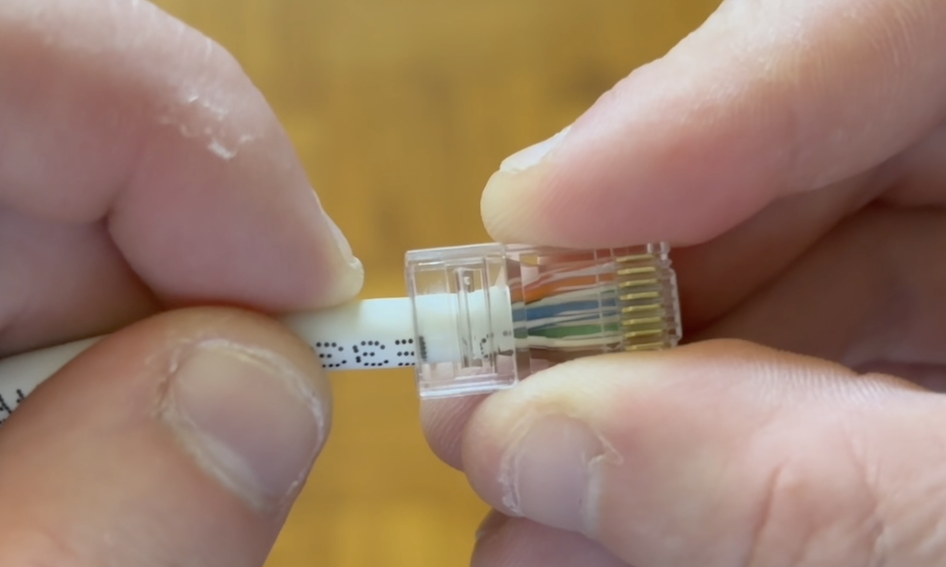
For passthrough connectors, the wires should stick out slightly from the other side.
As soon as you confirm the order, you’re ready to crimp.
Step 6: Crimp the Connector
Place the connector into the crimping tool and squeeze firmly until the pins press down into the wires and the strain relief tab locks onto the outer jacket.
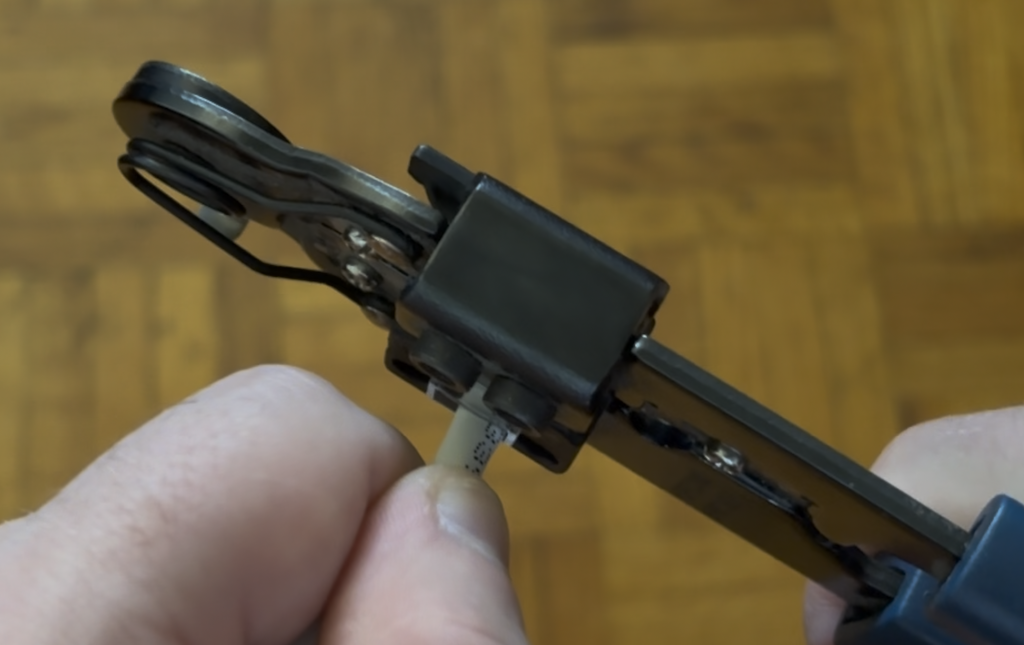
Additionally, for passthrough connectors, trim the wire ends flush with the connector after crimping.
Then, repeat this entire process for the other end of the cable!
Step 7: Test Your Cable
Use a cable tester to confirm that all eight wires are connected in the correct order.
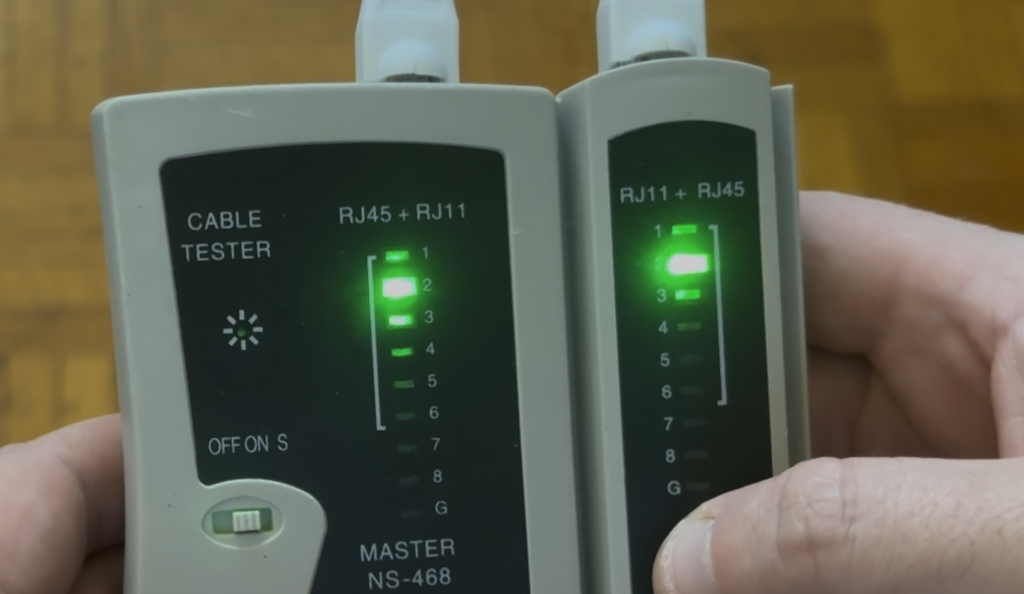
The lights on both ends should flash in sequence.
If any wires are misaligned, cut off the connector and repeat the process on that side.
Once confirmed, your custom ethernet cable is ready for use!
Cat6 vs Cat6a vs Cat5e: Which Should You Choose?
Not all Ethernet cables are created equal. Therefore, here’s a quick comparison to help you decide:
| Category | Maximum Speed | Maximum Bandwidth | Maximum Recommended Length | Best Use Case |
|---|---|---|---|---|
| Cat6 | Up to 1 Gbps (10 Gbps up to 55m) | 250 MHz | 100 m | Home and small office networks, gaming, streaming |
| Cat6a | 10 Gbps up to 100m | 500 MHz | 100 m | High-performance networks, data-heavy tasks, future-proofing |
| Cat5e | 1 Gbps | 100 MHz | 100 m | Budget builds, basic home networking |
Recommendation: Use Cat6 for most home setups, Cat6a if you want to future-proof or need maximum performance for longer runs, and Cat5e only if you already have it on hand or are working with very low-cost builds.
Frequently Asked Questions
Q: Can I mix T-568A on one end and T-568B on the other?
A: Only if you are intentionally creating a crossover cable. Otherwise, use the same wiring standard on both ends.
Q: How long can an Ethernet cable be?
A: Standard twisted-pair Ethernet cables (Cat5e, Cat6, Cat6a) are rated for up to 100 meters (328 feet) in total length. This includes patch cables at both ends. Beyond this length, you may experience signal loss or reduced speeds.
For 10 Gbps on Cat6, keep runs under 55 meters; use Cat6a for longer 10 Gbps runs.
Q: Do I really need a cable tester?
A: While optional, it saves time and frustration by catching miswires before you plug into your network.
Q: Should I ever use CCA cable?
A: No. Instead, always use solid copper cable for performance, safety, and compliance with Ethernet standards.
Troubleshooting Common Issues When Making Ethernet Cables
- Tester Shows Miswired Pair: Re-check wiring order on both ends, re-crimp if needed.
- Cable Doesn’t Click Securely: Ensure the strain relief tab is pressed down properly during crimping. Also ensure that the release tab covers on your strain relief boots aren’t too stiff and pressing down on the release tabs of the RJ45 connectors as a result. You may want to work the rubber of the strain relief boots with your thumbs a bit to stretch and break them in.
- Poor Network Speeds: Test on another device and verify that you’re using solid copper cable, not CCA.
Final Remarks
Learning how to make ethernet cables saves money, eliminates clutter, and gives you full control over your network setup. Whether you’re wiring a home office, building a home lab, or just need a few short patch cables, this DIY approach is a game changer.
Practice a few times and you’ll be making professional-quality network cables in minutes!
If you prefer a video guide, you can watch my video guide below.
The post How to Make Ethernet Cables: A Complete Step-by-Step Guide appeared first on TechOpt.
]]>The post GPU Passthrough to Proxmox LXC Container for Plex (or Jellyfin) appeared first on TechOpt.
]]>In this guide, I’ll walk you through enabling GPU passthrough in Proxmox (or Jellyfin) LXC step by step.
Step 1: Enabling PCI(e) Passthrough in Proxmox
The first step is enabling PCI passthrough at the Proxmox host level. I mostly followed the official documentation here: Proxmox PCI Passthrough Wiki.
I’ll summarize what should be done below.
Enable IOMMU in BIOS
Before you continue, enable IOMMU (Intel VT-d / AMD-Vi) in your system’s BIOS. This setting lets GPUs pass directly through to containers or VMs.
Each BIOS Is different, so if you’re not sure you should check your motherboard’s instruction manual.
Enable IOMMU Passthrough Mode
Not all hardware supports IOMMU passthrough, but if yours does you’ll see a big performance boost. Even if your system doesn’t, enabling it won’t cause problems, so it’s worth turning on.
Edit the GRUB configuration with:
nano /etc/default/grubLocate the GRUB_CMDLINE_LINUX_DEFAULT line and add:
iommu=ptIntel vs AMD Notes
- On Intel CPUs with Proxmox older than v9 (kernel <6.8), also add:
intel_iommu=on - On AMD CPUs, IOMMU is enabled by default.
- On Intel CPUs with kernel 6.8 or newer (Proxmox 8 updated or Proxmox 9+), you don’t need the
intel_iommu=onparameter.
With an AMD CPU on Proxmox 9, my file looked like this in the end:
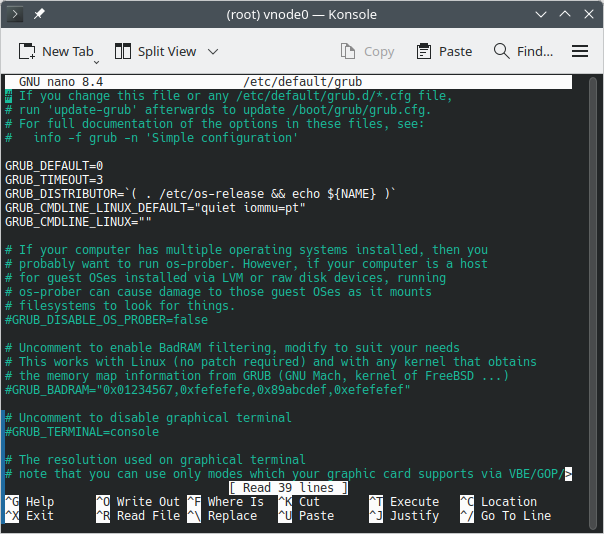
Save the file by typing CTRL+X, typing Y to confirm and then Enter to save.
Then update grub by running:
update-grubLoad VFIO Kernel Modules
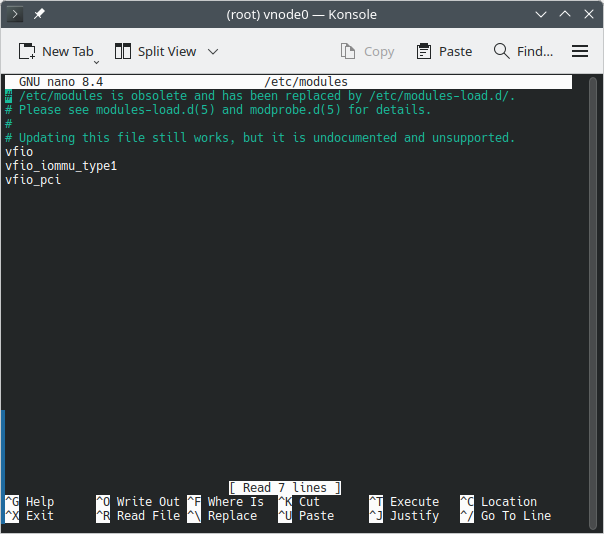
Next, we need to load the VFIO modules so the GPU can be bound for passthrough. Edit the modules file with:
nano /etc/modulesAdd the following lines:
vfio
vfio_iommu_type1
vfio_pci
My file looked like this in the end:
Save and exit, then update initramfs:
update-initramfs -u -k allReboot and Verify
Reboot your Proxmox host and verify the modules are loaded:
lsmod | grep vfioYou should see the vfio modules listed. This is what my output looks like:
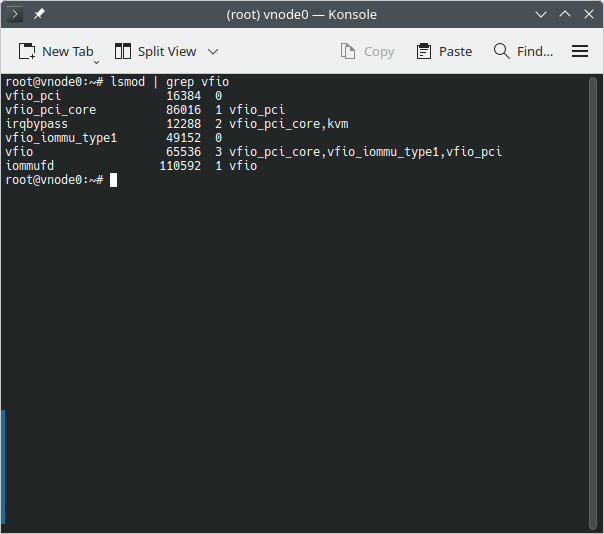
If you don’t get any output, the kernel modules have not loaded correctly and you probably forgot to run the update-initramfs command above.
To double-check IOMMU is active, run:
dmesg | grep -e DMAR -e IOMMU -e AMD-ViDepending on your hardware, you should see confirmation that IOMMU or Directed I/O is enabled:
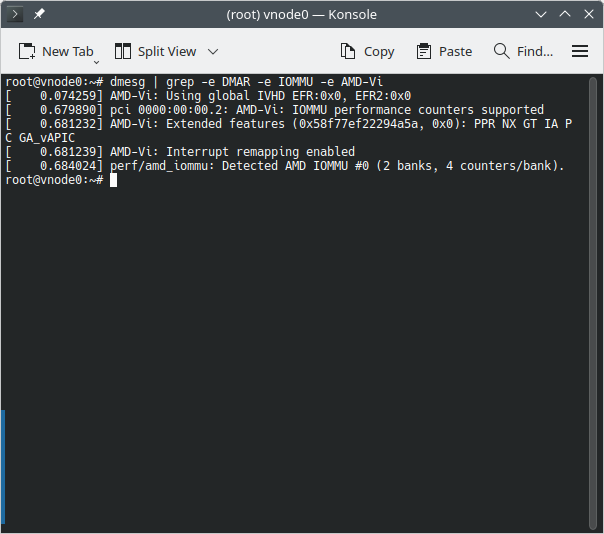
Step 2: Finding the GPU Renderer Device Path
Now that PCI passthrough support is enabled, the next step is to figure out the device path of the renderer for the GPU you want to pass through.
Run the following on your Proxmox host:
ls /dev/driThis will print all the detected GPUs. For example, my output looked like this:
by-path card0 card1 renderD128 renderD129If you only have a single GPU, you can usually assume it will be something like renderD128. But if you have multiple GPUs (as I did), you’ll need to identify which renderer belongs to your Intel Arc card.
First, run:
lspciThis will list all PCI devices. From there, I found my Intel Arc GPU at 0b:00.0:
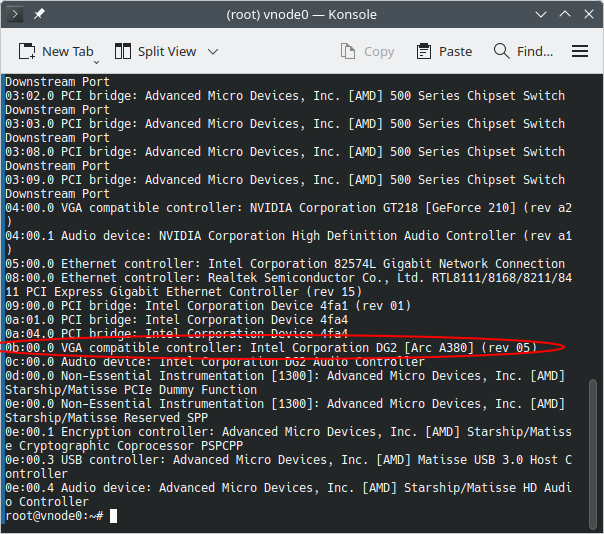
Next, run:
ls -l /dev/dri/by-path/My output looked like this:
lrwxrwxrwx 1 root root  8 Aug 24 11:54 pci-0000:04:00.0-card -> ../card0
lrwxrwxrwx 1 root root 13 Aug 24 11:54 pci-0000:04:00.0-render -> ../renderD129
lrwxrwxrwx 1 root root  8 Aug 24 11:54 pci-0000:0b:00.0-card -> ../card1
lrwxrwxrwx 1 root root 13 Aug 24 11:54 pci-0000:0b:00.0-render -> ../renderD128
From this, I confirmed that my Intel Arc GPU was associated with renderD128. That means the full device path I need to pass to my LXC container is:
/dev/dri/renderD128Step 3: Passthrough GPU Device to the Plex LXC Container
Now that we know the correct device path, we can pass it through to the LXC container.
- Stop the container you want to pass the GPU into.
- In the Proxmox web UI, select your Plex LXC container.
- Go to Resources.
- At the top, click Add → Device Passthrough.
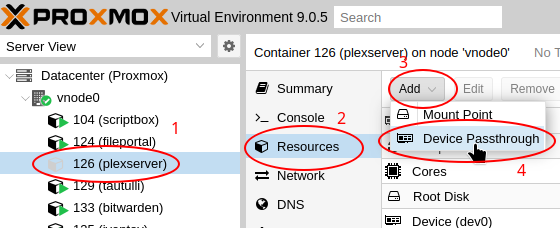
- In the popup, set Device Path to the GPU renderer path you identified in Step 2 (in my case,
/dev/dri/renderD128). - In the Access mode in CT field, type:
0666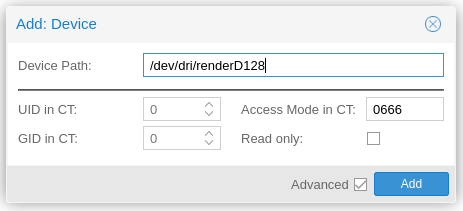
- Click Add.
- Once added, you can start the container again.
A Note About Permissions
Normally, you would configure a proper UID or GID in CT for the render group inside the container so only that group has access. However, in my testing I wasn’t able to get the GPU working correctly with that method.
Using 0666 permissions allows read/write access for everyone. Since this is a GPU device node and not a directory containing files, I’m not too concerned, but it’s worth noting for anyone who takes their Linux permissions very seriously.
Step 4: Installing GPU Drivers Inside the LXC Container
With the GPU device passed through, the container now needs the proper drivers installed. This step varies depending on the Linux distribution you’re running inside the container.
Some distros may already include GPU drivers by default. But if you reach Step 5 and don’t see your GPU as an option in Plex (or Jellyfin), chances are you’re missing the driver inside your container.
In my case, I’m using a Debian container, which does not include Intel Arc drivers by default. Here’s what I did:
- Edit your apt sources to enable the non-free repo:
nano /etc/apt/sources.list - Add
non-freeto the end of each Debian repository line: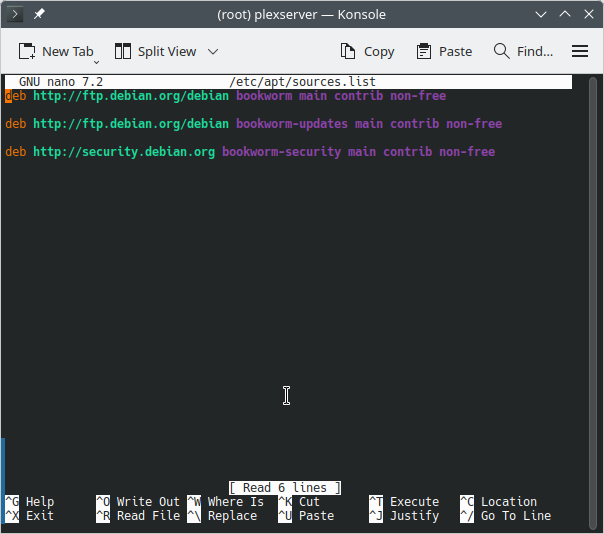
- Refresh apt sources:
apt update - Install the Intel Arc driver package:
apt install intel-media-va-driver-non-free - Restart the container.
For Debian, I followed the official documentation here: Debian Hardware Video Acceleration Wiki.
Note: These steps will vary depending on your GPU make, model and container distribution. Make sure to check the official documentation for your hardware and distro.
Step 5: Enabling Hardware Rendering in Plex
Now that your GPU and drivers are ready, the final step is to enable hardware transcoding inside Plex.
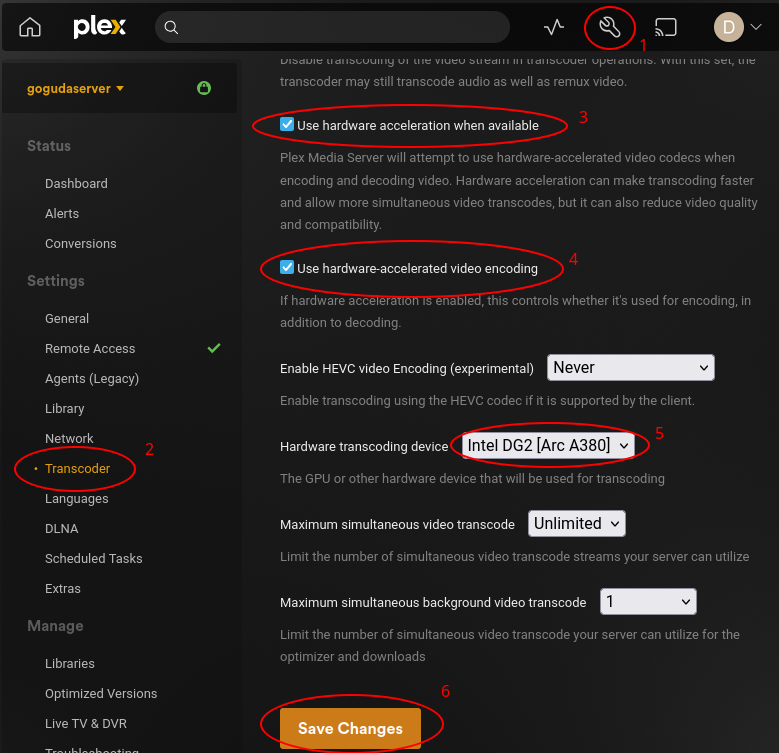
- Open the Plex Web UI.
- Go to Settings (top-right corner).
- In the left sidebar, scroll down and click Transcoder under Settings.
- Make sure the following options are checked:
- Use hardware acceleration when available
- Use hardware-accelerated video encoding
- Under Hardware transcoding device, you should now see your GPU. If not, double-check Step 4. In my case, it showed up as
Intel DG2 [Arc A380] - Select your GPU and click Save Changes.
Testing Hardware Transcoding
To verify that hardware transcoding is working:
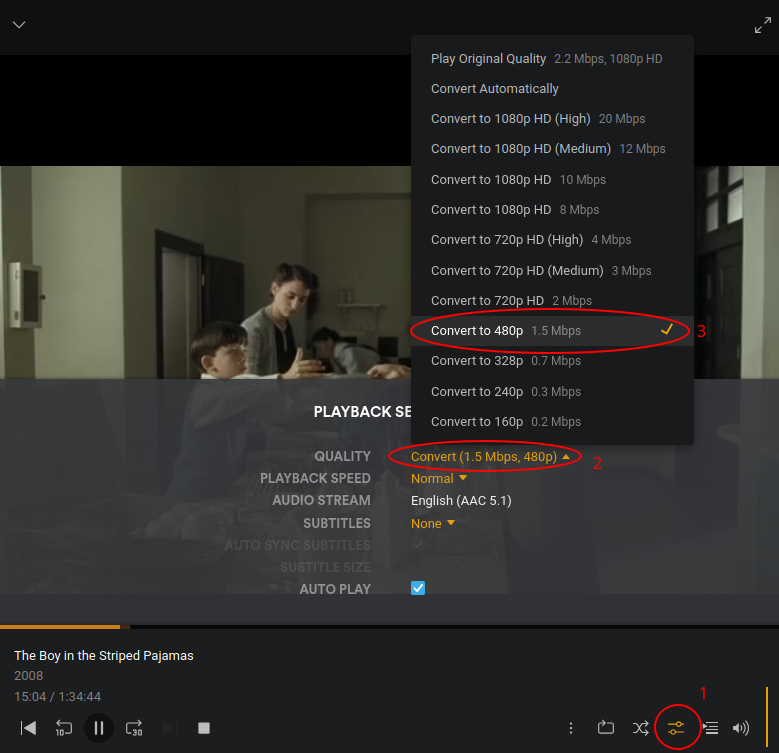
- Play back any movie or TV show.
- In the playback settings, change the quality to a lower resolution that forces Plex to transcode:
- While it’s playing, go to Settings → Dashboard.
- If the GPU is handling transcoding, you’ll see
(hw)beside the stream being transcoded: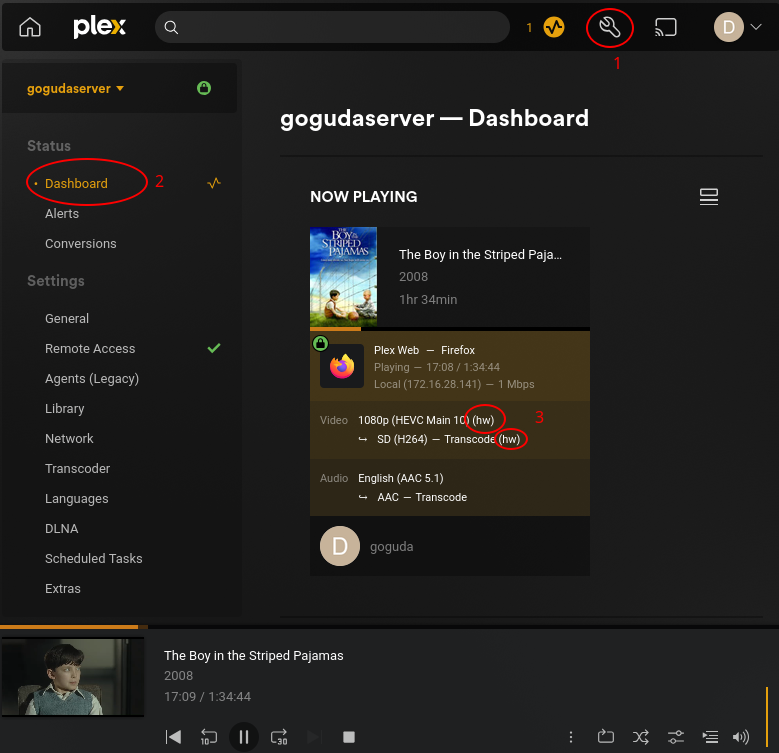
That’s it! You’ve successfully set up GPU passthrough in Proxmox LXC for Plex. These same steps should also work for Jellyfin with minor adjustments for the Jellyfin UI.
The post GPU Passthrough to Proxmox LXC Container for Plex (or Jellyfin) appeared first on TechOpt.
]]>The post Solving Next.js dynamic() Flicker with React.lazy appeared first on TechOpt.
]]>dynamic() function for component-level code splitting, you may have encountered an annoying issue: flickering during rendering of a conditionally-rendered dynamic component. Unfortunately, this is a known issue with the App Router and the dynamic function in Next.js. This behavior can degrade user experience, so solving the Next.js dynamic flicker on your website is crucial.
In this post, I’ll break down:
- Why
next/dynamiccauses flickering - Why it’s worse with nested dynamic components
- When
dynamic()is still safe to use - A practical alternative using
React.lazy()andSuspense - What trade-offs to expect when switching
The Flickering Problem in Next.js
Using dynamic() from next/dynamic is a great way to lazy-load components and reduce your JavaScript bundle size. It also supports options like { ssr: false } to only load components on the client side.
However, when you use these components with the App Router, they often cause a flash of missing or unstyled content, especially during fast navigation or when conditionally rendering dynamic components.
Nested dynamic() calls tend to amplify this issue. For example, a parent component conditionally loading a child via dynamic(), which in turn loads another sub-component dynamically, can make the flickering more severe.
This issue has been reported in GitHub issues and community threads, but a rock-solid fix hasn’t yet made it into the framework.
Interestingly, this flicker seems to affect nested dynamic components more than top-level ones. In my testing, first-level dynamically rendered components used directly in the page file rarely exhibit the issue, which means it’s generally safe to use next/dynamic there to avoid flash of unstyled content (FOUC) during initial mount.
The Better Alternative: React.lazy() + Suspense
One workaround that has proven effective is switching from next/dynamic to native React.lazy() with Suspense. This approach introduces fewer hydration inconsistencies and minimizes flickering, even with nested lazy-loaded components.
Use next/dynamic for components initially rendered on the page, and use React.lazy() for nested components that are rendered conditionally inside those components.
Example 1: Top-level safe usage with next/dynamic
import dynamic from 'next/dynamic';
import { isSignedInAsync } from '../auth';

const PageShell = dynamic(() => import('../components/PageShell'));

export default async function Home() {
  const isSignedIn = await isSignedInAsync();

  if (isSignedIn) return null;

  return <PageShell />;
}
In this example, PageShell is conditionally rendered on the server using dynamic components. This is safe since the dynamic component is rendered with the initial HTML from the server.
Example 2: Nesting with React.lazy() and Suspense
"use client";
import dynamic from 'next/dynamic';

const NestedComponent = dynamic(() => import('./NestedComponent'));

export default function PageShell() {
  const [showNested, setShowNested] = useState(false);

  return (
    <div>
      <h1>Welcome</h1>
      <button onClick={() => setShowNested(true)}>Load Nested Component</button>
      {showNested && (
        <Suspense fallback={<div>Loading nested...</div>}>
          <NestedComponent />
        </Suspense>
      )}
    </div>
  );
}
We can safely use React.lazy() and Suspense inside our dynamically-rendered PageShell component to conditionally render our NestedComponent, and still benefit from lazy-loading and code-splitting.
If we try using the dynamic function instead of React.lazy here, we may get the Next.js dynamic flicker.
Trade-offs of Using React.lazy() Instead of dynamic
While React.lazy() and Suspense often result in smoother rendering, there are two notable downsides:
1. No Server-Side Rendering
Unlike next/dynamic, which lets you disable or enable SSR, React.lazy() only supports client-side rendering. This might hurt SEO if your component needs to be visible to crawlers.
2. Flash of Unstyled Content (FOUC) on Mount
If you do try to use React.lazy() for SSR and use it in the server-rendered HTML, React.lazy() may cause a brief flash of unstyled content because the Next.js bundler doesn’t automatically include the styles for components loaded through React.lazy() in the server-rendered HTML. This limitation can lead to inconsistent rendering.
This is why it’s best to use next/dynamic for components that are visible in the server-rendered HTML, ensuring that styles and structure are present at first paint, while reserving React.lazy() for non-critical or nested components. Using next/dynamic in the initial server-rendered HTML does not seem to cause flickering.
Final Thoughts on Preventing the Next.js Dynamic Flicker
If you’re seeing flickering with next/dynamic and conditional rendering, especially in complex nested layouts, you’re not alone. While the Next.js team continues to evolve App Router, switching to React.lazy() and Suspense where you can may provide a smoother user experience at this time.
To summarize:
- Use
next/dynamicsafely for top-level page components - Use
React.lazy()for nested dynamic imports to reduce flicker
The post Solving Next.js dynamic() Flicker with React.lazy appeared first on TechOpt.
]]>The post Fixing ‘Sequence contains more than one matching element’ Android Build appeared first on TechOpt.
]]>> Task :react-native-device-country:prepareLintJarForPublish
> Task :react-native-device-info:createFullJarRelease
> Task :react-native-device-info:extractProguardFiles
> Task :react-native-device-info:generateReleaseLintModel
> Task :react-native-device-info:prepareLintJarForPublish
> Task :react-native-fbsdk-next:createFullJarRelease
> Task :react-native-fbsdk-next:extractProguardFiles
> Task :app:stripReleaseDebugSymbols
> Task :react-native-fbsdk-next:generateReleaseLintModel
> Task :app:buildReleasePreBundle FAILED
> Task :app:uploadCrashlyticsMappingFileRelease
[Incubating] Problems report is available at: file:///Users/dev/Documents/app/android/build/reports/problems/problems-report.html
FAILURE: Build failed with an exception.
* What went wrong:
Execution failed for task ':app:buildReleasePreBundle'.
> Sequence contains more than one matching element.
* Try:
> Run with --stacktrace option to get the stack trace.
> Run with --info or --debug option to get more log output.
> Run with --scan to get full insights.
> Get more help at https://help.gradle.org.
Deprecated Gradle features were used in this build, making it incompatible with Gradle 9.0.
You can use '--warning-mode all' to show the individual deprecation warnings and determine if they come from your own scripts or plugins.
For more on this, please refer to https://docs.gradle.org/8.14.1/userguide/command_line_interface.html#sec:command_line_warnings in the Gradle documentation.
BUILD FAILED in 1h 6m 21s
1222 actionable tasks: 1208 executed, 14 up-to-date
node:child_process:966
throw err;
^
Error: Command failed: ./gradlew bundleRelease
at genericNodeError (node:internal/errors:984:15)
at wrappedFn (node:internal/errors:538:14)
at checkExecSyncError (node:child_process:891:11)
at Object.execSync (node:child_process:963:15)
at /Users/dev/Documents/app/buildscripts/buildserv/build/build-android.js:8:23
at Object.<anonymous> (/Users/dev/Documents/app/buildscripts/buildserv/build/build-android.js:11:3)
at Module._compile (node:internal/modules/cjs/loader:1529:14)
at Module._extensions..js (node:internal/modules/cjs/loader:1613:10)
at Module.load (node:internal/modules/cjs/loader:1275:32)
at Module._load (node:internal/modules/cjs/loader:1096:12) {
status: 1,
signal: null,
output: [ null, null, null ],
pid: 22055,
stdout: null,
stderr: null
}
Node.js v20.19.3
Cleaning up project directory and file based variables 00:00
ERROR: Job failed: exit status 1If you noticed from the stack trace above, this is a React Native app. I tried deleting my node_modules folder, deleting my build folders, running ./gradlew clean. I would run the build again and again, but nothing worked. The same error kept popping up every time, right near the end of the build.
No amount of –debug or –stacktrace was giving me any sort of additional information. The most information I could get from this error had already been given to me.
ChatGPT and Copilot were no help, suggesting that this is a Kotlin error and most likely resides in a native library I’m using within the app.
But this didn’t make sense, because I was able to build the project on my local system with the latest dependencies just fine. It was only once I sent the build to my GitLab instance, which runs the build on a macOS VM with gitlab-runner, that I started getting this error.
So is the error with the build process, or one of the build tools itself?
Narrowing Down the Cause
After a ton of googling of this error, I finally came across this Google IssueTracker post that pointed me in the right direction. This person describes the exact same issue I’m having.
This person also says that this error started happening after an upgrade to AGP 8.9.0.
Now we’re getting somewhere. It doesn’t look like they’re using React Native, but at this point I was confident the issue isn’t stemming from anything to do with React Native.
AGP is an Android build tool. It’s possible that my macOS VM has a newer version of AGP than my local system does. This would explain why it’s only happening once I send the app to build in the macOS VM.
So, what’s the problem?
Well, it can be traced back to this section here in the app’s build.gradle:
...
splits {
        abi {
            reset()
            enable enableSeparateBuildPerCPUArchitecture
            universalApk false
            include "armeabi-v7a", "x86", "arm64-v8a", "x86_64"
        }
    }
...
This section of the build.gradle file tells gradle to output different APK files for different CPU architectures.
When this part of the build.gradle file is encountered by running the bundleRelease gradle task, the “sequence contains more than one matching element” exception is thrown because bundleRelease expects to be generating a single universal AAB file instead of separate APK files, that can then be uploaded to the Google Play Store.
The Fix
All I did was remove this section from our build.gradle file:
...
splits {
        abi {
            reset()
            enable enableSeparateBuildPerCPUArchitecture
            universalApk false
            include "armeabi-v7a", "x86", "arm64-v8a", "x86_64"
        }
    }
...
And it resolved the issue! We weren’t using the multiple APKs anyways, so I’m not even sure why we had this in our build.gradle file. We only upload the single universal AAB to the Play Store.
Additional Notes
In the issue tracker linked above, Google states that they do not plan on fixing this, since they don’t officially support creating multiple APKs when running bundleRelease. However, if you still need multiple APK support, someone on the issue tracker suggests the following fix:
splits {
        abi {
            // Detect app bundle and conditionally disable split abis
            // This is needed due to a "Sequence contains more than one matching element" error
            // present since AGP 8.9.0, for more info see:
            // https://issuetracker.google.com/issues/402800800

            // AppBundle tasks usually contain "bundle" in their name
            val isBuildingBundle = gradle.startParameter.taskNames.any { it.lowercase().contains("bundle") }

            // Disable split abis when building appBundle
            isEnable = !isBuildingBundle

            reset()
            //noinspection ChromeOsAbiSupport
            include("armeabi-v7a", "arm64-v8a", "x86_64")

            isUniversalApk = true
        }
}
This enables APK splitting while disabling APK splitting for the bundleRelease task, preventing the “sequence contains more than one matching element” error.
The post Fixing ‘Sequence contains more than one matching element’ Android Build appeared first on TechOpt.
]]>The post How to Identify Fake FLAC Files appeared first on TechOpt.
]]>While there’s no foolproof method to detect a fake FLAC, there are some telltale signs based on bitrate and frequency response that can help you spot them. One of my go-to tools for this task is Spek, a free and open-source audio spectrum analyzer.
What Is a Fake FLAC or Fake Lossless Files?
People create fake FLAC files by converting lossy formats—like MP3 or AAC—into lossless containers such as FLAC. Although the file extension and size might suggest high quality, the underlying audio data remains compromised. These files often originate from people who re-encode lossy sources and redistribute them under the guise of high fidelity.
Also note that while FLAC is the most common lossless audio format, other containers such as WAV and ALAC do exist as well. The indicators mentioned in this article for spotting fake lossless audio files are generic and apply regardless of the container format.
Using Spek to Analyze Frequency Spectrum
When you open a file in Spek, it displays the audio spectrum across the entire track. This visual representation reveals how much of the frequency range the file actually contains. A true lossless FLAC will have no abrupt cutoffs in the upper frequencies, whereas fake FLACs often exhibit sharp drop-offs.
Here’s a general guideline for identifying the cutoff frequencies and their corresponding bitrates:
- 11 kHz = 64 kbps
- 16 kHz = 128 kbps
- 19 kHz = 192 kbps
- 20 kHz = 320 kbps
If you notice a sharp cutoff around these frequencies, the file may have been upsampled from a lossy source.

What to Expect from True Lossless FLACs
Depending on the sample rate and bit depth, a legitimate FLAC file should show frequency content extending to the upper limits of the spectrum:
- 44.1 kHz, 16-bit: Should display frequencies up to 22 kHz
- 48 kHz, 16-bit: Should reach up to 24 kHz
- 96 kHz, 24-bit: May extend up to 48 kHz, but a smooth fade to nothing somewhere between 20-30 kHz is normal
- 192 kHz, 24-bit: May extend up to 96 kHz, but a smooth fade to nothing somewhere between 20-30 kHz is normal

You can often spot upsampling when you see a sharp cutoff at 22 kHz. There may also be very faint or random noise in the 22 kHz and up range. This pattern usually means someone took a 44.1 kHz file and padded it to 48 or 96 kHz.

It’s also worth noting that there’s ongoing debate about whether audio content above 20 kHz contributes meaningfully to music. An audio engineer or producer might even intentionally apply a low-pass filter to cut out all frequencies above a certain inaudible range. This will result in a steeper drop-off, even in a genuine lossless file.
Additionally, not all instruments produce frequencies in this high range, so a natural lack of content above 20 kHz doesn’t necessarily indicate the file is fake.
Bitrate as Another Indicator of a Fake FLAC
Another clue is the file’s bitrate. While FLAC is a variable bitrate format, files with noticeably low average bitrates may be suspect. Here are some average bitrate ranges you might expect from real FLAC files:
- 44.1 kHz / 16-bit (CD quality): ~700–1100 kbps
- 48 kHz / 16-bit or 24-bit: ~800–1400 kbps
- 96 kHz / 24-bit: ~2000–3000 kbps (can vary widely depending on the content)
- 192 kHz / 24-bit: ~4000–7000 kbps (can vary widely depending on the content)
If you see a file with a much lower bitrate than expected and frequency cutoffs that match the patterns listed above, the file is almost certainly a fake FLAC.
Trust Your Ears
While visual analysis is helpful, always trust your ears. A song that sounds dull, muffled, or artifacted is likely not true lossless. That said, some minimal or acoustic recordings might not use the entire frequency spectrum and can still be genuine FLACs.
For example, a solo vocal track, acoustic guitar piece, or lo-fi bedroom recording may naturally have limited frequency content, especially in the high end. These types of recordings often focus on midrange clarity rather than full-spectrum detail, so a sparse frequency graph in Spek doesn’t always mean the file is fake.
Final Thoughts
Detecting fake FLAC files takes a combination of tools, knowledge, and critical listening. While Spek and bitrate guidelines provide strong indicators, no method is 100% reliable. Still, by learning to recognize the red flags, you can better curate a truly lossless music library.
The post How to Identify Fake FLAC Files appeared first on TechOpt.
]]>