The post React Performance in 2026: What Actually Matters appeared first on International JavaScript Conference.
]]>Note: This video and podcast was generated using AI, adapting the original content and technical insights created by the author of the blog post.
React performance has changed over the years. We used to fight to keep the number of renders as low as possible. Then hooks like useMemo became the key to performance optimization. But the JavaScript and React ecosystems evolve quickly, and today, things we once had to worry about are available out of the box. Of course, that doesn’t mean we no longer have to care about performance! Let’s see what makes the biggest difference when it comes to performance optimization in 2026.
React Compiler changed the memoization game
If you were part of the React community before 2025, you probably know how much attention was given to using useMemo and useCallback. It was also practically a standard interview question.
Want to make your application faster? Do this:
const filteredUsers = useMemo(
  () => users.filter(user => user.active),
  [users]
);

const handleClick = useCallback(
  (id: string) => {
    selectUser(id);
  },
  [selectUser]
);
Some people even wrote entire essays online about whether these functions should be used everywhere by default or only when we actually had reasons to worry that a function would run too often. Even back then, I found it strange that we had to focus on something like this during development and wondered why the library couldn’t simply do it for us. Apparently, more people thought the same, because React Compiler solved this problem. The compiler can now memoize computations and components where it is safe to do so.
It’s worth adding that manual memoization still has its use cases sometimes, but it’s more of an exception than a rule. Our code can look like this again:
function UserList({ users, onSelect }) {
  const activeUsers = users.filter(user => user.active);

  const handleClick = (id: string) => {
    onSelect(id);
  };

  return activeUsers.map(user => (
    <User
      key={user.id}
      user={user}
      onClick={handleClick}
    />
  ));
}
Does this mean the end of our application performance problems? Of course not. That would be too good to be true! We’ve only gotten rid of the need to create memoization-related micro-optimizations. The bad news is that React Compiler won’t fix an application that downloads 8MB of JavaScript on startup or generates enormous numbers of DOM elements.
So in 2026, the question shouldn’t be: “Did I add useMemo often enough?” but rather, “Am I even optimizing the right thing?”
Before you continue…
The reading list you'd build – if you had time.
The reads you'd find if you had time
Experts you can actually ask
Deep dives worth your weekend
Past conferences, ready when you are

Measure before you optimize
This advice is as old as web development itself, but I have the impression that some people are surprisingly resistant to it. I’ve often seen code like this:
const total = items.reduce((sum, item) => sum + item.price, 0);
In the past, I often heard that this was a perfect candidate for useMemo because code like this needed to be optimized. But when you look more closely, it turns out that items usually contains 30 elements, and reduce executes in a fraction of a second. Meanwhile, before this code even runs, we have to load 3MB of JavaScript.
That’s why, before optimizing, we first need to answer a few questions: what is actually slow? Startup? Interaction? Rendering? A request? Hydration? Scrolling? Once we’ve established what is slowing the application down, it’s worth figuring out why it’s slow. The answers can vary significantly here, and we have plenty of tools to help us, such as:
- React DevTools Profiler,
- Chrome Performance panel,
- Network panel,
- Lighthouse / Core Web Vitals,
- bundle analyzer,
performance.mark()/performance.measure()for our own critical paths.
So the simplest possible profiling could look like this:
performance.mark('search-start');
const results = await searchProducts(query);
performance.mark('search-end');
performance.measure(
  'product-search',
  'search-start',
  'search-end'
);
Profiling a specific part of React, on the other hand, could look like this:
<Profiler
  id="ProductList"
  onRender={(id, phase, actualDuration) => {
    console.log({
      id,
      phase,
      actualDuration
    });
  }}
>
  <ProductList products={products} />
</Profiler>
The point is simply not to optimize things that don’t need optimization, but rather to focus on the parts that can have a real impact on performance. Browser engines in 2026 are already really fast, and if something is genuinely slow, we usually have a real problem and micro-optimizations simply won’t help.
So the order should be exactly this: locate the problem and fix it. Not: put useMemo everywhere and hope something improves.
Your biggest performance problem may happen before React renders anything
This is an often-overlooked truth. Ok, your components are beautifully compiled and render in milliseconds. But before the application even starts, it has to download a huge bundle, parse the JavaScript, and compile it. And let’s not forget that enormous library it has to initialize. Then we just need to make a dozen requests, followed by a few more that depend on the previous ones.
A common mistake is an enormous bundle size created almost by accident because of suboptimal application architecture. For example, we might have code like this:
import HugeChartingLibrary from 'huge-charting-library';
Meanwhile, we use it to render a single chart that is inside a modal opened by 5% of the users. Something like this would make much more sense:
const AnalyticsChart = lazy(() => import('./AnalyticsChart'));

function Dashboard() {
  const [showAnalytics, setShowAnalytics] = useState(false);

  return (
    <>
      <button onClick={() => setShowAnalytics(true)}>
        Show analytics
      </button>

      {showAnalytics && (
        <Suspense fallback={<ChartSkeleton />}>
          <AnalyticsChart />
        </Suspense>
      )}
    </>
  );
}
But be careful! Code splitting isn’t the answer to every problem either. Creating chunks too aggressively can increase network overhead, and poorly designed loading can even lead to additional waterfalls.
In general, we should be very careful about what ends up in our bundle. Think about how many lines of code you’ve written/generated yourself and how much you’re actually shipping to the user in the form of huge libraries when you only use a fraction of their functionality. And of course, remember the network and network waterfalls. This is fairly obvious to some people, but let’s do a quick refresher. If you have calls like these:
const user = await getUser();
const projects = await getProjects(user.id);
const permissions = await getPermissions(user.id);
const notifications = await getNotifications(user.id);
And the next three depend on the first one; it’s worth solving it like this:
const user = await getUser();
const [projects, permissions, notifications] =
  await Promise.all([
    getProjects(user.id),
    getPermissions(user.id),
    getNotifications(user.id)
  ]);
Keeping an eye on things like this can seriously optimize your application much more than optimizing a dozen renders.
Data architecture can matter more than React itself
Very often, in large applications, React isn’t actually the biggest problem. It’s the way data flows through the application. Let’s imagine some simple code like this:
function App() {
  const [data, setData] = useState(null);

  useEffect(() => {
    fetch('/api/products')
      .then(res => res.json())
      .then(setData);
  }, []);

  // ...
}
And that’s exactly the point! The code itself is correct. In small applications, it’s probably perfectly sufficient. But in huge enterprise apps with tons of requests, things aren’t that simple. Suddenly, we care about questions like: When does this actually load? Do multiple pages reuse this list? Is there a cache? When we return to the page, do we fetch everything all over again, etc.? Fortunately, we have many ways to manage this; for example, TanStack Query:
const { data, isPending } = useQuery({
  queryKey: ['products', category],
  queryFn: () => fetchProducts(category),
  staleTime: 60_000
});
Here, we get much more control over what happens in our application. Very often, better-controlled requests are the real performance lifesaver and give us much more than dozens of micro-optimizations.
Server Components: where they make sense
Server Components are quite popular, and of course, there’s a good reason for that. They allow us to move logic and data fetching to the server without increasing the client-side JavaScript bundle.
async function ProductPage({ id }) {
  const product = await db.product.findUnique({
    where: { id }
  });
  return <ProductDetails product={product} />;
}
Yes, this doesn’t have to be part of the initial bundle and can be executed on the server. We can save the browser quite a lot of work. Server components aren’t the answer to everything. They’re especially useful for e-commerce pages, huge dashboards, and content-heavy websites. But remember that this doesn’t mean we should move everything to the server. Doing so won’t solve all our problems. Server components won’t help us much in places that inherently require client-side state, event handlers, or direct access to browser APIs. Imagine some code like this:
'use client';

function DrawingCanvas() {
  // pointer events
  // local state
  // animations
  // immediate feedback
}
There’s not much point in moving this to the server. Let’s also not forget that it’s perfectly possible to create terrible data architecture and server-side waterfalls on the server too. Moving things there doesn’t give us permission to stop caring about code quality.
When rendering performance actually matters
It’s often true that the number of renders isn’t always the most important thing. But there are places where it still absolutely matters. Take this code:
{products.map(product => (
  <ProductRow
    key={product.id}
    product={product}
  />
))}
If you have 10, or even 50, items on the list, everything is fine. But what if there are 50,000? Sometimes that’s actually necessary! That’s where virtualization comes in, and here it’s the absolute minimum optimization:
const virtualizer = useVirtualizer({
  count: products.length,
  getScrollElement: () => parentRef.current,
  estimateSize: () => 40
});
The browser doesn’t need to render 50,000 elements when the user can only see 20. Another example is expensive visualizations or data that updates frequently. For example, if a render happens once when a button is clicked, nothing bad is happening. But imagine something like this:
window.addEventListener('pointermove', event => {
  setPosition({
    x: event.clientX,
    y: event.clientY
  });
});
Now we start thinking about things like batching, throttling, requestAnimationFrame, or refs instead of state, where a re-render isn’t needed. Sometimes it’s even worth moving part of the rendering to canvas or WebGPU instead of the DOM. React is great at rendering, but the DOM simply isn’t always the best rendering engine for every workload.
Before you continue…
The reading list you'd build – if you had time.
The reads you'd find if you had time
Experts you can actually ask
Deep dives worth your weekend
Past conferences, ready when you are
The React Performance Checklist for 2026
Here’s a short checklist of what we should do to improve performance:
- Measure first. Don’t take shortcuts and don’t guess. Find the actual bottleneck.
- Check what happens before React. Check the bundle size and large libraries, and see whether you have network waterfalls.
- Fix data fetching architecture. Especially in large applications, ask yourself whether you’re optimizing data fetching correctly.
- Ship less JavaScript. Remember things like code splitting, lazy loading, and server/client boundaries if you’re using SSR.
- Let React Compiler handle routine memoization. Don’t start optimization by manually sprinkling
useMemoall over your application. That’s no longer necessary. - Reduce work instead of making unnecessary work slightly faster. Your optimization shouldn’t be about making 50K rows in a table render faster. Don’t render that many in the first place.
- Optimize rendering when rendering is actually the bottleneck. Remember virtualization and expensive visualizations. Watch out for high-frequency updates.
- Measure again. Repeat step one. “It feels faster” is unfortunately not a good metric.
As we can see, in 2026 React itself increasingly gets out of the way and helps us make applications faster and efficiently. The problems are more often found in our architecture and in how we manage the application. Meanwhile, the best optimization often isn’t about making expensive operations run faster but about avoiding them altogether.
The post React Performance in 2026: What Actually Matters appeared first on International JavaScript Conference.
]]>The post Watch Session: A Front-end Identity Crisis in the Age of AI appeared first on International JavaScript Conference.
]]>The post Watch Session: A Front-end Identity Crisis in the Age of AI appeared first on International JavaScript Conference.
]]>The post Building Declarative UI for AI Assistants appeared first on International JavaScript Conference.
]]>Note: This video and podcast was generated using AI, adapting the original content and technical insights created by the author of the blog post.
We are in the middle of a fundamental shift in how users interact with software. For decades, the paradigm has been static: designers and engineers agree on a panel layout, engineers bind panel controls to a view model, and that view model talks to the document model. This works well when your feature set and workflows are mostly known in advance. But AI assistants break this model. Users express intent in natural language, and the system figures out what controls to present.
This creates an architectural challenge that existing frontend patterns don’t address: How do you build a UI layer that can dynamically compose whatever controls an LLM decides are relevant without hand‑coding every possible combination?
This article dives deep into an architecture for solving this problem at scale. We will explore:
- Why AI assistant UIs are fundamentally different from static panels
- A dual-purpose action definition pattern that serves both LLM and UI needs
- A type-safe declarative schema for dynamic forms
- The runtime mechanics of lazy loading, replay, and multi‑action composition
- Patterns you can apply to your own AI‑powered applications
In other words, when every possible interface can’t be pre-built, you build the system that builds interfaces.
Problem: AI assistants break static UI assumptions
For something like an Adobe Express‑style assistant, the system can propose hundreds of actions: “increase opacity,” “swap background,” “add a drop shadow,” “animate this group,” or “apply a cinematic intro preset.” The important detail is not just the number of actions, but that the combination and ordering of actions is not known at design time. The assistant might decide to show the following:
- A single slider for opacity.
- A compound form with a color picker, a border thickness slider, and an “Apply to all pages” toggle.
- A preset editor surfaced from a remote service that returns a JSON schema describing the controls.
Consider what happens when an LLM responds to “give this image a red border and make it slightly transparent”:
{
  "actions": [
    { "action": "setBorderStyle", "parameters": { "color": "#ff0000", "size": 30 } },
    { "action": "setOpacity", "parameters": { "opacity": 0.8 } }
  ]
}
The assistant needs to display:
- A color picker for the border color
- A slider for the border thickness
- A slider for the opacity
These controls must appear together, in a dynamically composed UI, derived entirely from the LLM’s response. And there might be 100+ different actions, each with different UI requirements. If every new action requires a hand‑crafted panel, bespoke bindings, and one‑off wiring to the document model, your assistant platform effectively does not scale. The result is a brittle UI layer that constrains what your AI can safely suggest.
This is exactly the gap a generative UI layer has to close: the assistant can freely generate or retrieve action specifications, and the client can deterministically turn these specs into safe, consistent, accessible UI.
Before you continue…
The reading list you'd build – if you had time.
The reads you'd find if you had time
Experts you can actually ask
Deep dives worth your weekend
Past conferences, ready when you are
What “generative UI” really means
Generative UI isn’t about chatbots streaming text. It’s about interfaces that materialize at runtime based on AI‑interpreted user intent.
The core insight: every action the AI can suggest should declare what UI it needs. Not “here’s a panel with a slider,” but “I need a slider with min 0, max 100, current value 50.”
This inverts the traditional relationship. Instead of UI that knows about actions, you have actions that describe their UI requirements.
const SetOpacityAction = {
  // For the LLM
  actionId: "setOpacity",
  description: "Changes transparency of selected elements",
  parameters: { type: "number", min: 0, max: 1 },

  // For the UI
  uiSettings: {
    componentType: "Slider",
    generatePayload: (inputs) => ({
      min: 0,
      max: 100,
      value: inputs.opacity * 100,
      label: "Opacity",
    }),
    parsePayload: (payload) => ({
      opacity: payload.value / 100,
    }),
  },
};
The same definition feeds both sides:
- The LLM understands what the action does and how to call it.
- The UI knows exactly what control to render and how to map between UI state and action parameters.
Most AI integrations treat these as separate concerns: they have one schema for the LLM and separate UI code for each feature. This works at a small scale but becomes a maintenance nightmare as you add actions.
A more scalable pattern is a single AssistantAction definition that serves both “masters”:
interface AssistantAction {
  // === LLM-facing properties ===

  // The ID the LLM uses to invoke this action
  actionId: string;

  // Natural language description for the LLM (max 256 chars)
  // Try to complete: "This action..."
  description: string;

  // Categories for organizational context
  categories: string[];

  // Parameter schema the LLM uses to construct invocations
  parameters: ParameterSchema;

  // Few-shot examples for the LLM
  examples?: string[];

  // === UI-facing properties ===

  // What types of elements this applies to
  applicableTo?: string[];

  // Whether this action can be undone
  isUndoable: boolean;

  // The declarative UI specification
  uiSettings?: {
    componentType: ComponentType;
    generatePayload: (inputs: ActionInputs) => ComponentPayload;
    parsePayload: (payload: ComponentPayload) => ActionInputs;
  };
}
The LLM sees actionId, description, categories, parameters, and examples. It uses these to understand what the action does and how to invoke it with the right parameters.
The UI layer sees uiSettings, which specifies what controls to render and how to transform between action inputs and UI state.
Both perspectives are defined in a single file for a single action. When you add a new action, you define both its LLM interface and its UI in one place.
Approach: declarative schema and bidirectional transforms
The core idea is to move from “UI as code” to “UI as data.” We define a declarative forms framework where each control is a parameterized type described by a payload and callbacks. At runtime, the assistant (or another service) chooses which controls to show by sending a description.
The framework is built on a simple idea: bidirectional transforms between action state and UI state.

Every action with UI declares:
- componentType: what kind of control (Slider, ColorPicker, Picker, Flex)
- generatePayload: convert action inputs → component props
- parsePayload: convert component state → action inputs
Here’s a border action with multiple controls:
const SetBorderAction = {
  actionId: "setBorderStyle",
  uiSettings: {
    componentType: "Flex",
    generatePayload: (inputs) => ({
      direction: "column",
      children: [
        inputs.size !== undefined && {
          key: "size",
          componentType: "Slider",
          label: "Thickness",
          min: 0,
          max: 150,
          value: inputs.size,
        },
        inputs.color !== undefined && {
          key: "color",
          componentType: "ColorPicker",
          label: "Color",
          value: inputs.color,
        },
      ].filter(Boolean),
    }),
    parsePayload: (payload) =>
      payload.children.reduce((acc, child) => {
        acc[child.key] = child.value;
        return acc;
      }, {} as Record<string, unknown>),
  },
};
Now the action can express a composed UI: a flex column containing a slider and a color picker, generated automatically from its own inputs.
Type-safe component mapping
With 100+ actions, you want the compiler catching mistakes, not your users.
You can model component payloads as a map:
interface ComponentPayloadMap {
  Slider: { value: number; min: number; max: number; label: string };
  ColorPicker: { value: string; label?: string };
  Picker: {
    value: string;
    label: string;
    options: { value: string; label: string }[];
  };
  Flex: {
    direction: "row" | "column";
    children: ChildPayload[];
  };
}
Then define a helper type that picks the right payload type based on componentType:
type UISettings<TInputs> = {
  [K in keyof ComponentPayloadMap]: {
    componentType: K;
    generatePayload: (inputs: TInputs) => ComponentPayloadMap[K];
    parsePayload: (payload: ComponentPayloadMap[K]) => Partial<TInputs>;
  };
}[keyof ComponentPayloadMap];
When you write componentType: “Slider”, TypeScript now knows that:
- generatePayload must return { value: number; min: number; max: number; label: string }.
- parsePayload will receive that same shape.
Wrong payload shape? Compile error.
Teams can extend the map for custom components via declaration merging:
declare module "./types" {
  interface ComponentPayloadMap {
    ShadowControl: {
      offsetX: number;
      offsetY: number;
      blur: number;
      color: string;
    };
  }
}
Your generative UI framework stays open for extension while preserving type safety for every component.
Lazy loading: only load what you need
You don’t want to import 100 components upfront just in case the AI might use them. A registry pattern defers loading until the AI actually suggests an action that needs a given component:
class ComponentRegistry {
  private cache = new Map<string, any>();
  private loaders = new Map<string, () => Promise<any>>();

  register(type: string, loader: () => Promise<any>) {
    this.loaders.set(type, loader);
  }

  async get(type: string) {
    if (!this.cache.has(type)) {
      const loader = this.loaders.get(type);
      if (!loader) {
        throw new Error(`No loader registered for component type "${type}"`);
      }
      const component = await loader();
      this.cache.set(type, component);
    }
    return this.cache.get(type);
  }
}

// Registration
registry.register("Slider", () => import("./Slider"));
registry.register("ColorPicker", () => import("./ColorPicker"));
The first time the AI suggests an opacity change, the Slider component loads. Subsequent uses hit the cache. Components that the AI never suggests are never loaded.
Before you continue…
The reading list you'd build – if you had time.
The reads you'd find if you had time
Experts you can actually ask
Deep dives worth your weekend
Past conferences, ready when you are
Rendering the dynamic UI
Putting it together, here’s how AI output becomes interactive controls:
async function renderActionUI(invocation: ActionInvocation, actionDef: AssistantAction) {
  const { componentType, generatePayload, parsePayload } = actionDef.uiSettings!;

  // Get component (lazy loads if needed)
  const component = await registry.get(componentType);

  // Generate initial payload from action inputs
  const payload = generatePayload(invocation.inputs);

  // Render with callbacks
  return component.render(payload, {
    onInput: (newPayload: ComponentPayload) => {
      // Real-time feedback while dragging
      replayAction(invocation, parsePayload(newPayload), { preview: true });
    },
    onChange: (newPayload: ComponentPayload) => {
      // Commit when released
      replayAction(invocation, parsePayload(newPayload), { commit: true });
    },
  });
}
The replay pattern is key: UI changes don’t directly mutate document state. They trigger the action again with new inputs. The action remains the single source of truth for what happens to the document and how it is recorded in history.
Handling multiple actions
When the AI suggests several actions at once, UI components should appear together and not as disjoint pieces.
async function renderAllActionUIs(invocations: ActionInvocation[]) {
  // Deduplicate: same action on same element = one UI
  const deduped = deduplicateByActionAndTarget(invocations);

  // Render each
  const elements = await Promise.all(
    deduped
      .filter((inv) => inv.actionDef.uiSettings)
      .map((inv) => renderActionUI(inv, inv.actionDef)),
  );

  // Compose into container
  return elements;
}
The deduplication step prevents redundant UI. If the AI suggests two opacity changes on the same element, users see one slider, not two.
Real examples
Slider: opacity control
uiSettings: {
  componentType: "Slider",
  generatePayload: (inputs) => ({
    min: 0,
    max: 100,
    step: 1,
    value: (inputs.opacity ?? 1) * 100,
    label: "Opacity",
  }),
  parsePayload: (p) => ({ opacity: p.value / 100 }),
}
Color picker: border color
uiSettings: {
  componentType: "ColorPicker",
  generatePayload: (inputs) => ({
    value: inputs.color ?? "#000000",
    label: "Border color",
  }),
  parsePayload: (p) => ({ color: p.value }),
}
Picker: border style dropdown
uiSettings: {
  componentType: "Picker",
  generatePayload: (inputs) => ({
    value: inputs.style ?? "solid",
    label: "Style",
    options: [
      { value: "solid", label: "Solid" },
      { value: "dashed", label: "Dashed" },
      { value: "dotted", label: "Dotted" },
    ],
  }),
  parsePayload: (p) => ({ style: p.value }),
}
Composed: multiple controls in a flex container
uiSettings: {
  componentType: "Flex",
  generatePayload: (inputs) => ({
    direction: "column",
    children: [
      {
        key: "size",
        componentType: "Slider",
        label: "Size",
        min: 0,
        max: 150,
        value: inputs.size ?? 50,
      },
      {
        key: "color",
        componentType: "ColorPicker",
        label: "Color",
        value: inputs.color ?? "#ff0000",
      },
      {
        key: "style",
        componentType: "Picker",
        label: "Style",
        value: inputs.style ?? "solid",
        options: [
          { value: "solid", label: "Solid" },
          { value: "dashed", label: "Dashed" },
          { value: "dotted", label: "Dotted" },
        ],
      },
    ],
  }),
  parsePayload: (p) =>
    Object.fromEntries(p.children.map((c: any) => [c.key, c.value])),
}
The complete flow
- User: “Add a thick red border.”
- LLM returns: { action: “setBorderStyle”, params: { color: “#ff0000”, size: 50 } }.
- The action executes, and the border appears on the canvas.
- The generative UI layer renders: slider + color picker materialize using uiSettings.
- User drags the slider → parsePayload → replay action with updated inputs → border updates live.
- User releases → commit to undo stack.
The UI didn’t exist until the AI decided the user needed it. It materialized from a lightweight specification, bound itself to reactive state, and disappeared when no longer relevant.
Before you continue…
The reading list you'd build – if you had time.
The reads you'd find if you had time
Experts you can actually ask
Deep dives worth your weekend
Past conferences, ready when you are
Conclusion
The shift from static panels to generative UI is not just a technical refactor. It is a rethinking of who owns the interface. In a traditional application, designers and engineers negotiate a fixed contract. In an AI-powered application, the assistant becomes a runtime author, and the UI layer has to be ready for whatever it proposes.
The architecture described here meets that challenge by inverting a longstanding assumption. Instead of UI that knows about actions, you have actions that know about their UI. Every action ships with a specification: what control to render, how to initialize it from action inputs, and how to map user interactions back to action parameters. The LLM and the interface layer each get exactly what they need, derived from the same source of truth.
This is the right mental model for AI-native UI at scale. The future is not less UI. It is UI that assembles itself in response to AI‑interpreted user intent. When every possible interface can’t be pre‑built, you build the system that builds interfaces. That’s declarative forms for AI assistants.
The post Building Declarative UI for AI Assistants appeared first on International JavaScript Conference.
]]>The post Agentic UI: Building User Interfaces for AI Agents appeared first on International JavaScript Conference.
]]>In a conversation with Michael Dowden, Google Developer Expert and Angular specialist Manfred Steyer discusses how agentic applications can be designed without sacrificing architectural clarity, safety, or user control. A central idea is that chat should not automatically be considered the default interface for AI-powered applications.
A Chatbot Is Not the End Goal
Many AI applications currently follow the same interaction pattern: a user enters a prompt, a large language model processes it, and the application returns a text response.
Note: This video was generated using AI, adapting the original content and technical insights created by the author of the blog post.
That pattern works well when users primarily need information. It becomes less effective when an AI system is expected to perform tasks.
An agent may need to analyze data, trigger workflows, use external tools, prepare a dashboard, or execute a sequence of actions. In these situations, forcing every interaction through a conversational interface can make the experience unnecessarily complicated.
The important distinction is not whether an application includes a chat box. It is whether the system understands the user’s goal and can select the appropriate interaction model.
An agentic interface might therefore:
- assemble a dashboard,
- visualize relevant information,
- display interactive controls,
- prepare the next step in a workflow,
- or collaborate with the user across several stages of a task.
The user interface does not disappear. Instead, it becomes an increasingly important part of how the agent communicates its state and results.
From Text Responses to Dynamic Interfaces
Text is not always the best way to communicate information.
If a user wants to compare datasets, a table may communicate the result more effectively than several paragraphs. If parameters need to be adjusted, sliders, input fields, or selection controls may provide a better interaction model.
The same applies to complex collections of metrics. A dynamically assembled dashboard can often provide more context than a purely conversational response.
This leads toward generative or adaptive user interfaces: interfaces that can change at runtime depending on the user’s goal, the available data, and the current state of the task.
However, dynamic interfaces also create an architectural problem. If the frontend communicates directly with one particular AI framework, backend implementation, or LLM provider, the user interface can become tightly coupled to technologies that may change quickly.
Open standards such as AG-UI and A2UI are intended to address this separation.
What Is AG-UI?
AG-UI provides a standardized communication layer between an AI agent and the frontend.
Its primary architectural benefit is decoupling.
The frontend should not need to understand which agent framework, backend technology, or large language model is operating behind the application. Instead, the frontend and the agent communicate through defined messages and events.
These interactions can represent activities such as:
- starting or completing an agent run,
- streaming text,
- invoking tools,
- reporting state changes,
- returning action results,
- or emitting events that require a frontend response.
This separation makes it possible to change the technology behind an agent without rebuilding the entire user interface.
That is particularly relevant for enterprise applications because the AI ecosystem is evolving rapidly. An architecture that is tightly coupled to a specific provider or agent framework can quickly become difficult to maintain. AG-UI establishes a clearer boundary between the agent layer and the application interface.
Before you continue…
The reading list you'd build – if you had time.
The reads you'd find if you had time
Experts you can actually ask
Deep dives worth your weekend
Past conferences, ready when you are
What Is A2UI?
AG-UI addresses communication between agents and applications. A2UI addresses a related challenge: how an agent can request an appropriate user interface.
Instead of allowing a language model to generate arbitrary HTML or JavaScript, the agent can produce a structured description of the interface it needs.
The frontend can then map that description to components that already exist within the application’s design system.
For example, an agent might determine that a user’s request is better represented as a dashboard rather than a paragraph of text. It can describe the required structure and data, while the frontend remains responsible for rendering approved components.
This provides an important balance.
The AI gains the flexibility to select an appropriate interface, but the application still controls which components exist and how they behave. The model operates within predefined boundaries instead of receiving unrestricted control over frontend code.
AI Agent Autonomy Needs Clear Boundaries
The more actions an agent can perform, the more important safety becomes.
A text-generating model has comparatively limited direct impact. An agent that can invoke tools, modify data, or initiate business processes can have consequences beyond the conversation itself.
For this reason, relying exclusively on model-level guardrails is not enough.
A stronger architectural approach is to place deterministic boundaries around a non-deterministic system.
The application should define which tools and actions are available to the agent and under which conditions they can be used. The agent can operate flexibly within those constraints, but it should not receive unrestricted access to the underlying system.
In this model, software architecture itself becomes part of the safety mechanism.
Human-in-the-Loop Does Not Mean Confirming Every Action
Human-in-the-loop patterns are often associated with confirmation dialogs.
An agent proposes an action, the application asks whether the user is sure, and the user confirms or rejects it.
That approach becomes impractical for longer agentic workflows. Requiring approval for every intermediate decision removes much of the benefit of delegating work to an autonomous agent.
A more useful model is to provide visibility and meaningful opportunities for intervention.
For example, an interface can use action cards to show what an agent is doing or has already done. Instead of requiring prior approval for every action, the application might offer an undo mechanism.
Users should also have an obvious way to stop an agent when a workflow appears to be moving in the wrong direction.
Human oversight therefore becomes less about continuous approval and more about transparency, intervention, and recovery.
Why Agentic Applications Need Continuous Feedback
A long-running agent should not leave the user looking at a loading indicator without any indication of what is happening.
During a complex task, users need enough information to understand whether the system is still working, what major actions have occurred, and whether intervention is possible.
This does not mean exposing every internal reasoning step produced by an AI model. The interface should instead communicate meaningful application-level activity.
For example, users may need to know:
- what the agent is currently doing,
- whether an action has changed data,
- what stage the workflow has reached,
- and whether they can stop or modify the process.
Feedback is therefore not merely a cosmetic UX feature. It is an essential part of creating understandable and trustworthy agentic systems.
Feedback Loops Instead of a Black Box
Agentic applications differ from conventional software because their behavior is not completely predetermined.
Traditional application logic is largely deterministic: known inputs and states should produce predictable outcomes. Large language models are probabilistic.
That does not mean the entire application has to become unpredictable.
Reliable software architecture can surround probabilistic AI behavior with deterministic rules, interfaces, and constraints.
Feedback loops are a central part of this model.
An agent performs an action, receives the resulting state, evaluates that result, and decides what to do next. At the same time, the application and the user can verify that the workflow continues to operate within the permitted boundaries.
The interaction therefore becomes an iterative cycle of goal, action, result, and adjustment rather than a single request followed by a single response.
How Should Agentic UIs Be Tested?
Agentic applications also require a different testing strategy.
Testing for an exact text response from an LLM is often fragile because the underlying model may produce different but equally valid outputs.
The more useful question is whether the application behaves correctly.
Developers can test questions such as:
- Can the agent access the intended function?
- Does the application render the correct component?
- Can the user interact with the generated interface?
- Does the agent remain inside the defined architectural boundaries?
Steyer therefore highlights black-box testing at the component level. The focus is placed on observable application behavior rather than internal implementation details or identical model responses.
For Angular applications, Vitest is also relevant to this testing approach.
The model itself does not have to produce deterministic text. The application’s rules, boundaries, and observable outcomes should remain testable.
Agentic UI Changes the Role of the Frontend
Agentic AI is not exclusively a backend concern.
As soon as agents interact directly with users, the frontend becomes part of the agentic architecture.
It has to represent state, render dynamic components, display tool results, communicate agent activity, provide intervention mechanisms, and return user feedback to the agent.
At the same time, the frontend should remain separated from the implementation details of the agent backend.
Standards such as AG-UI provide a communication boundary, while approaches such as A2UI offer a structured way to describe dynamic user interfaces.
The result is not software in which AI replaces the frontend. Instead, AI agents, conventional application logic, and user interfaces each take responsibility for the tasks they are best suited to perform.
Before you continue…
The reading list you'd build – if you had time.
The reads you'd find if you had time
Experts you can actually ask
Deep dives worth your weekend
Past conferences, ready when you are
The Goal Is Not More AI in the Interface, It Is a Better Interface
The larger product question is not how to add an AI chat box to every application.
Developers instead need to determine where natural-language interaction is useful and where structured interfaces provide a better experience.
That requires answering architectural and product questions such as:
- Where should natural language be used?
- Where does the user need a structured interface?
- Which decisions can an agent make autonomously?
- When should a user be able to intervene?
- How can the frontend remain independent from the agent implementation?
- How can a probabilistic AI system be integrated into a reliable application?
Some of the most interesting AI-native applications may therefore emerge precisely where the traditional chatbot interaction ends.
Agentic UI is not simply about placing AI inside an existing interface. It requires developers to reconsider how people, software, and autonomous agents collaborate to complete tasks.
The post Agentic UI: Building User Interfaces for AI Agents appeared first on International JavaScript Conference.
]]>The post Convince Your Boss: iJS Conference Munich 2026 Business Case appeared first on International JavaScript Conference.
]]>Why is iJS Munich 2026 particularly relevant this year?
The question for development teams is no longer whether AI will influence software engineering. It already does.
The more important question is how teams can use AI agents without sacrificing architecture, predictability, security, and maintainability.
At iJS Munich 2026, agentic development is therefore not treated as a collection of isolated AI demos. The program looks at what happens when agents become part of real engineering workflows: when they can generate code, interact with applications, use tools, work with shared state, and make changes that have consequences beyond a single prompt.
For you and your team, this means gaining practical guidance at the point where many organizations are still defining their own standards.
Instead of discovering the limitations of agentic development through production incidents, unmaintainable code, or security problems, you can learn from concrete patterns and approaches that are already emerging across the industry.
How can you move AI agents from experiments to engineering discipline?
AI coding tools can produce code quickly. The harder problem is making sure that code still respects the architecture and conventions of your application.
Several topics at iJS Munich address exactly this challenge.
Sessions around WebMCP, MCP Apps, AI-assisted Angular development, shared application state, and agentic user interfaces explore how agents can interact with software in a more controlled and predictable way.
One of the central ideas is simple: if an agent is going to work inside your codebase, it needs rules.
Architecture boundaries, state-management conventions, permitted actions, and UI constraints cannot exist only as knowledge in the heads of experienced developers. They increasingly need to become explicit enough that both humans and AI-supported development workflows can follow them.
For teams already experimenting with coding agents, this can help answer questions such as:
- Which parts of an application can an agent change independently?
- Where do we need strict architectural contracts?
- How should an agent interact with shared application state?
- How can we prevent AI-generated functionality from bypassing established patterns?
- When should an agent generate an interface freely, and when should it operate inside a predefined structure?
The Agentic UI with Angular workshop adds a hands-on dimension, giving participants the opportunity to work directly with agent-driven interfaces rather than only discussing them conceptually.
The result is knowledge that can be transferred back into actual engineering guidelines, architecture decisions, and development workflows.
Before you continue…
The reading list you'd build – if you had time.
The reads you'd find if you had time
Experts you can actually ask
Deep dives worth your weekend
Past conferences, ready when you are
What changes in security once agents can read, write, and act?
Giving an AI system more capabilities also creates a larger attack surface.
An agent that can access application data, call tools, work with credentials, modify information, or trigger actions needs a very different level of control than a chatbot that only returns text.
That is why security is one of the strongest arguments for attending iJS Munich 2026.
The program covers both established web security practices and risks introduced or amplified by AI-assisted development.
Topics include the OWASP Top Ten 2025, HTTP security headers, privacy and security risks in AI development tools, and the architectural implications of the EU AI Act.
For development teams, the relevance is very practical.
AI coding tools may receive proprietary source code, credentials, internal information, or sensitive context. Agentic applications may also be able to execute actions that previously required a human user.
Understanding where information can leak, which permissions agents should receive, and how compliance requirements affect system architecture can help teams establish safeguards before an incident occurs.
A preventable security or privacy problem can easily cost significantly more than conference attendance. Learning how to recognize these risks early is therefore not only a technical benefit but a business one.
Which React, Angular, and Next.js developments can you bring back to your projects?
AI may be the headline topic, but the frontend frameworks teams use every day are continuing to evolve as well.
iJS Munich 2026 includes practical sessions covering current developments in Angular, React, and Next.js, with a particular focus on state management, performance, data handling, and architecture.
Angular developers can explore topics such as the Resource APIs and modern approaches to state management, including when to use NgRx, when Signal Store is appropriate, and how the two can work together.
React teams can look at approaches for creating more deterministic relationships between data and UI state.
For Next.js developers, multi-tenant architecture brings another set of practical questions around tenant isolation, routing, and incremental static regeneration strategies.
These are not only topics for long-term technology roadmaps. They can influence architecture reviews and pull requests immediately after the conference.
That makes iJS Munich useful both for teams exploring the next generation of AI-assisted development and for teams focused on improving the frontend applications they already operate today.
Why does engineering craft become even more important with AI-generated code?
Agentic tools amplify the quality of the environment in which they operate.
If a codebase has clear boundaries, understandable architecture, consistent conventions, and manageable dependencies, an AI-supported workflow has a much better foundation.
If a codebase is already difficult to understand, agents can multiply that complexity just as quickly.
That is why the iJS Munich program also looks beyond AI tooling itself.
Sessions address topics such as:
- why development teams overengineer solutions,
- what makes architecture understandable to both AI agents and new team members,
- how to modernize legacy software incrementally,
- and how to design production systems that can recover from incidents without losing data.
The underlying lesson is important: AI-friendly architecture and human-friendly architecture have a great deal in common.
Clear modules, explicit responsibilities, predictable data flows, and well-defined boundaries make software easier for experienced developers, new colleagues, and AI-supported tools alike.
For a manager, that makes conference attendance easier to justify. The goal is not simply to learn another AI tool. It is to improve the engineering practices that determine whether those tools create sustainable productivity or additional technical debt.
What does the whole team gain when one person attends?
A conference should create more value than the experience of a single attendee.
A strong business case therefore includes a concrete plan for transferring knowledge back into the team.
After iJS Munich, you could turn what you learned into:
- an internal recap of the agentic engineering patterns most relevant to your codebase,
- a short briefing on AI security, privacy, and EU AI Act considerations,
- recommendations on which React, Angular, or Next.js developments are worth adopting,
- a small pilot or proof of concept for an agentic workflow,
- or updated team guidelines for AI-assisted development.
This turns one conference ticket into structured input for the entire development team.
Recorded sessions extend that value further. Colleagues can revisit relevant material after the conference instead of relying solely on notes or second-hand summaries.
What is the advantage of the Agentic Web Week Full Week Pass?
iJS Munich takes place within Agentic Web Week Munich, which brings together iJS, IPC, and webinale.
For teams whose work extends beyond JavaScript alone, the Full Week Pass can therefore offer an even broader return.
It includes workshops across all three conferences as well as recordings of 100+ sessions, creating access to expertise beyond the sessions one attendee can physically visit during the week.
That can be particularly valuable for cross-functional development teams working across frontend, architecture, AI, security, backend systems, and web technologies.
Instead of purchasing isolated training for individual topics, the week provides the opportunity to explore several connected challenges in one place.
What makes the workshops especially valuable?
Conference sessions are useful for orientation and new ideas. Workshops provide the time to apply those ideas in practice.
The program surrounding Agentic Web Week includes hands-on formats covering areas such as agentic UI development, LangChain, enterprise AI engineering, and web application performance.
Rather than leaving with only a list of tools to investigate later, workshops give you an opportunity to work through concepts, understand their limitations, and evaluate how they could fit your own projects.
This makes it easier to return to your team with something more concrete than inspiration: patterns, prototypes, architectural ideas, and practical next steps.
How can you convince your manager?
The strongest argument for attending iJS Munich 2026 is not simply that the conference covers current technologies.
It is that several decisions development teams are making right now are becoming increasingly difficult to separate.
Adopting AI coding tools is also an architecture decision.
Giving agents access to application functions is also a security decision.
Using proprietary code as AI context is also a privacy and governance decision.
Updating Angular, React, or Next.js affects both development productivity and maintainability.
And improving a codebase for AI-supported development often means improving it for human developers at the same time.
iJS Munich brings these questions together in one program and gives you the opportunity to evaluate them before committing your team to tools, architectures, or workflows that may be difficult to reverse later.
The post Convince Your Boss: iJS Conference Munich 2026 Business Case appeared first on International JavaScript Conference.
]]>The post AG-UI: The Standard For Agentic User Interfaces appeared first on International JavaScript Conference.
]]>The source code used for this can be found here on GitHub in the agentic branch.
Agentic AI and the Frontend
Our demo application can be used entirely without AI integration. However, if users get stuck or want to streamline workflows, they can activate a sidecar and chat with an LLM using a server-side agent (Fig. 1).
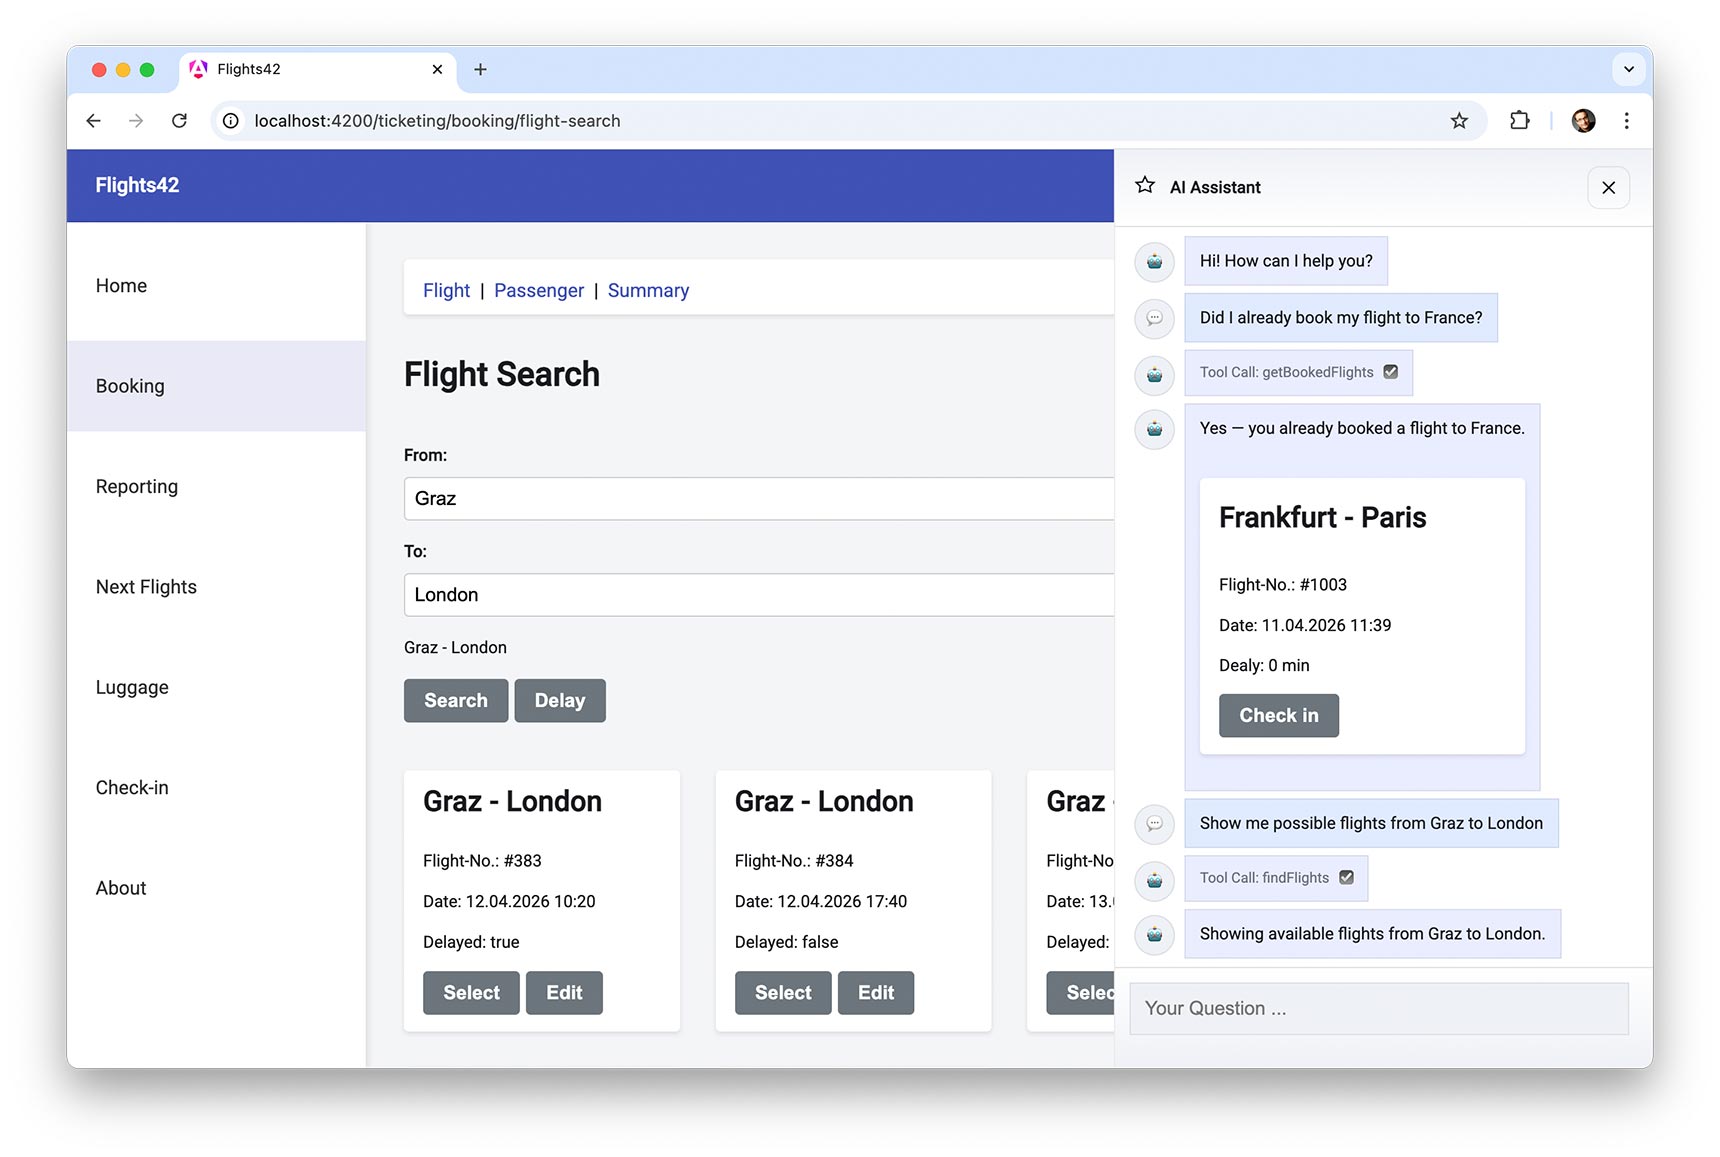
Fig. 1: Sample application
The LLM can utilize tools that the sidecar provides to answer questions. On the backend, it can access databases and it handles tasks related to stores, forms, and routing on the frontend.
The LLM can also select components from a catalog, which the Sidecar displays. It passes data determined by the tools to these components.
Let’s look at the two tools used in the example. getBookedFlights is a server-side tool that retrieves the current user’s flights. The findFlights tool initiates a flight search on the client side. It navigates to the page with the search form, fills it out, and triggers the search.
For transparency, it’s good practice to inform users about steps taken like tool calls. The example makes this very explicit by also outputting the internal tool names. In a business application, this would be phrased in slightly less technical terms. Instead of “Tool Call: getBookedFlights,” the sidecar could write “Determine booked flights…” in the chat history.
Besides the tool calls, the chat also displays textual responses and a flight map selected by the LLM. The sidecar passes the flight that will be displayed to this map. The Angular application accesses the agent via HTTP, which has access to one (or more) LLM(s) (Fig. 2). An agent client handles communication details, informing the agent about the client-side tools and components. The agent also maintains a list of server-side tools.
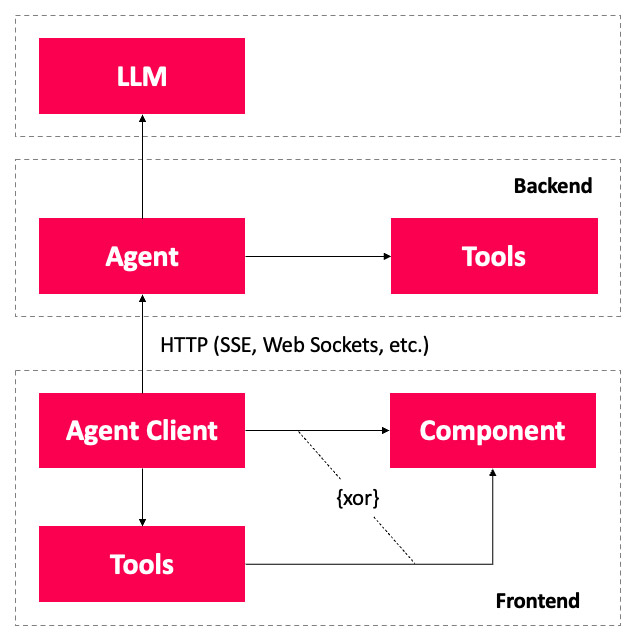
Fig. 2: Architecture
When the agent forwards the user’s request to the LLM, it also sends the collected information about server-side tools, client-side tools, and components. The LLM determines what additional data it needs and requests tool calls. The agent handles server-side tool calls and delegates client-side tool execution to the agent client. It reports its results back to the LLM, which continues processing its task.
To provide the final response to the query, the LLM returns free-form text. It can also send a JSON document specifying which components the sidecar should display. The values for these components’ inputs are also included in the JSON. Depending on the LLM’s capabilities, this JSON document can be a structured response or parameters passed to a client-side tool.
The structured response-also called Structured Output-is the cleaner solution from a semantic perspective. Many LLMs support a formal description of parameters for tool calls using JSON Schema. Because of this, using tool calling to display components is often the more pragmatic solution. This raises the question of how communication with the agent should be designed without creating too strong a coupling with the client. The AG-UI standard provides answers.
Before you continue…
The reading list you'd build – if you had time.
The reads you'd find if you had time
Experts you can actually ask
Deep dives worth your weekend
Past conferences, ready when you are
What is AG-UI?
To stay independent of server technologies and avoid vendor lock-in with individual LLM providers, the AG-UI standard defines the message types for communication between client and agent. The creators of CopilotKit, a convenient frontend SDK for developing AI-based assistants and sidecars, are behind the standard. Adapters now exist for virtually all well-known agent frameworks. At the time of writing, the AG-UI website listed the following supported frameworks:
- AG2
- Agno
- AWS Bedrock AgentCore
- AWS Bedrock Agents
- AWS Strands Agents
- Cloudflare Agents
- CrewAI
- Google ADK
- LangGraph
- LlamaIndex
- Mastra
- Microsoft Agent Framework
- OpenAI Agent SDK
- Pydantic AI
AG-UI defines messages exchanged between the client and the agent. These messages describe the transmission of text or tool calls along with their results, for example. Subsequent messages can provide further details based on information from previous messages. This forms the basis for streaming text and parameters for tool calls.
AG-UI is deliberately designed to be transport-agnostic, so it makes no assumptions about the underlying transport protocol. Typically, HTTP with Server-Sent Events (SSE) or WebSockets are used.
Message Types in AG-UI
For individual messages exchanged between the agent and the client, AG-UI defines types that can be subdivided into different categories. Table 1 shows a selection of message types that we’ll use in this article.
| Category | Message Type | Description |
|---|---|---|
| Lifecylce | RUN_STARTED | Starts a run that contains all the messages needed to answer a question. These messages include text messages and ones that describe tool calls. |
| RUN_FINISHED | Completes a run. | |
| RUN_ERROR | Reports an error for a run. | |
| Text Message | TEXT_MESSAGE_START | Start by sending a text message. |
| TEXT_MESSAGE_CONTENT | Provides (additional) parts of the text message. | |
| TEXT_MESSAGE_END | Ends a text message. | |
| Tool Call | TOOL_CALL_START | Initiates a tool call. |
| TOOL_CALL_ARGS | Provides (additional) parameters for the tool call. | |
| TOOL_CALL_END | Ends the tool call. | |
| TOOL_CALL_RESULT | Returns the result of a tool call. |
Table 1: Selected message types in AG-UI
According to the terminology, a run begins with a user’s question. It encompasses all messages that the agent sends in response. This includes messages related to tool calls, results of tool calls, and textual responses. For instance, two runs can be identified in Fig. 1 at the beginning. The first begins with the question about a flight to France, and the second with the search query for flights from Graz to London.
To enable streaming, AG-UI lets most information be split into multiple messages. Examples of this are the message types TEXT_MESSAGE_CONTENT and TOOL_CALL_ARGS. Multiple messages of these types can gradually provide text or additional arguments for a tool call.
The messages in Listing 1, which reflect the first run from Figure 1, show AG-UI usage.
Listing 1
{"type":"RUN_STARTED", "threadId":"f66a", "runId":"95e2"}

{"type":"TOOL_CALL_START", "toolCallId":"3PQX", "toolCallName":"getBookedFlights"}

{"type":"TOOL_CALL_ARGS", "toolCallId":"3PQX", "delta":"{}"}

{"type":"TOOL_CALL_END", "toolCallId":"3PQX"}

{"type":"TOOL_CALL_RESULT", "toolCallId":"3PQX", "content":"...JSON...", "role":"tool"}

{"type":"TEXT_MESSAGE_START","messageId":"d110","role":"assistant"}

{"type":"TEXT_MESSAGE_CONTENT","messageId":"d110","delta":"Yes - you already booked "}

{"type":"TEXT_MESSAGE_CONTENT","messageId":"d110", "delta":"a flight to France."}

{"type":"TEXT_MESSAGE_END","messageId":"d110"}

{"type":"TOOL_CALL_START", "toolCallId":"TjaS", "toolCallName":"showComponents"}

{"type":"TOOL_CALL_ARGS", "toolCallId":"TjaS", "delta":"...JSON..."}

{"type":"TOOL_CALL_END", "toolCallId":"TjaS"}

{"type":"RUN_FINISHED", "threadId":"f66a", "runId":"95e2"}
These messages describe a tool call for the server tool getBookedFlights and for the client tool showComponents, as well as a textual response. For readability, the IDs-which are typically GUIDs-have been truncated to 4 digits, and the JSON embedded in strings containing arguments and tool results is only hinted at. Thanks to the IDs, we can trace which initiated tool call the supplied arguments or logged results belong to.
To make sure that initial content can be displayed even during transmission, the agent splits its response into two text messages. In practice, this division is often even more granular. Similar to tool calls, messages that form a response together are assigned the same ID.
The two lifecycle messages that start and end the run contain the runId and a threadId. This is used to group all runs in a chat history.
Before you continue…
The reading list you'd build – if you had time.
The reads you'd find if you had time
Experts you can actually ask
Deep dives worth your weekend
Past conferences, ready when you are
AG-UI SDK
So that we don’t have to start from scratch, AG-UI comes with a protocol specification and with SDKs for TypeScript and Python. Many adapters for agent frameworks are built on top of these. The Microsoft Agent Framework comes with its own implementation to support AG-UI on the server side via C# as well. In addition, the official AG-UI repository also contains community implementations for other languages like Java and C++ and frameworks like Spring AI.
The official SDKs for TypeScript and Python support HTTP via Server-Sent Events: Each run triggers an HTTP request, and then the server-side agent gradually sends its response containing individual text messages and tool calls to the client. These messages can be encoded using JSON or, in binary format, via Protocol Buffers.
TypeScript SDK on the Server
To illustrate the server-side use of the TypeScript SDK, Listing 2 shows a simple hard-coded example that sends simple AG-UI-compliant messages without using a language model. To do this, the server follows an old rule of small talk: it’s never wrong to talk about the weather.
Listing 2
import { HttpAgent } from '@ag-ui/client';

import { BaseEvent, EventType, RunAgentInput } from '@ag-ui/core';

import { Observable } from 'rxjs';

export class FlightWeatherAgent extends AbstractAgent {

run(input: RunAgentInput): Observable<BaseEvent> {

return new Observable((observer) => {

const { threadId, runId } = input;

observer.next({ type: EventType.RUN_STARTED, threadId, runId });

observer.next({

type: EventType.TEXT_MESSAGE_START,

messageId: '1001',

role: 'assistant',

});

observer.next({

type: EventType.TEXT_MESSAGE_CONTENT,

messageId: '1001',

delta: 'Checking flight weather for Frankfurt...',

});

observer.next({ type: EventType.TEXT_MESSAGE_END, messageId: '1001' });

\[…\]

observer.next({ type: EventType.RUN_FINISHED, threadId, runId });

observer.complete();

});

}

}
The FlightWeatherAgent shown here inherits from AbstractAgent. The run method processes user requests. It starts a run, sends a text message to the client, and then terminates the run.
Typically, run delegates to an agent framework such as Mastra, LangGraph, Google ADK, Microsoft Agent Framework, or Spring AI, and converts the received information into AG-UI-compliant messages. You usually don’t have to write this integration yourself, especially since the AG-UI SDK provides adapters for many frameworks, and some frameworks even have their own integration.
Note that the SDK does not handle the connection to the selected transport protocol-for example, sending SSE via HTTP. That’s why the included demo project also contains a small piece of glue code that logs in to the agent and sends all messages as SSE.
TypeScript SDK on the Client
On the client side, the TypeScript SDK lets us define an AgentSubscriber with an event handler for incoming messages (Listing 3).
Listing 3
import { AgentSubscriber } from '@ag-ui/client';

const subscriber: AgentSubscriber = {

onRunStartedEvent: ({ event }) => {

console.log(

\`RUN_STARTED: threadId=\${event.threadId}, runId=\${event.runId}\`,

);

},

onTextMessageStartEvent: ({ event }) => { \[…\] },

onTextMessageContentEvent: ({ event }) => { \[…\] },

onTextMessageEndEvent: ({ event }) => { \[…\] },

\[…\]

onRunFinishedEvent: ({ event }) => { \[…\] },

};
A separate handler is provided for each message type. Using the HttpAgent, which the SDK also provides, you can establish a connection to the agent on the server side (Listing 4).
Listing 4
import { FlightWeatherAgent } from './server.js';

const threadId = '4711';

const url = 'https://...';

const agent = new HttpAgent({ url, threadId });

const userMessage = {

id: 'msg-user-1',

role: 'user' as const,

content: 'What is the flight weather in Frankfurt?',

};

agent.addMessage(userMessage);

await agent.runAgent({ runId: '0815' }, subscriber);
The addMessage method initially adds the userMessage only to a client-side array. The locally collected messages are transmitted only when runAgent starts the next run. As soon as the responses from the agent arrive via SSE, runAgent calls the corresponding handlers in the passed-in AgentSubscriber.
Depending on whether the agent remembers the conversation history between individual runs, the client either sends all messages exchanged so far or only the newly added ones.
Server-Side Tool Calling
So far, our demo has only sent simple text messages. However, the agent’s process for requesting tool calls is very similar. Typically, information to be sent also comes from the chosen language model and the agent formats it in accordance with the AG-UI. For simplicity’s sake, we’ll continue using a few hard-coded messages in our demo (Listing 5).
Listing 5
// Server Code

// Step 1: Tool Call

observer.next({

type: EventType.TOOL_CALL_START,

toolCallId: '2001',

toolCallName: 'loadFlightWeather',

});

observer.next({

type: EventType.TOOL_CALL_ARGS,

toolCallId: '2001',

delta: '{"city":"Frankfurt"}',

});

observer.next({

type: EventType.TOOL_CALL_END,

toolCallId: '2001'

});

// Step 2: Execute Server-side Tool

const weatherResult = \[…\];

// Step 3: Answer Tool Call

observer.next({

type: EventType.TOOL_CALL_RESULT,

toolCallId: '2001',

messageId: '3001',

role: 'tool',

content: JSON.stringify(weatherResult),

});
With the first three messages, the agent indicates that the LLM has requested a tool call. Since this is a server-side tool, the agent executes it and returns the result to the language model. It also logs the result via an additional AG-UI message.
Based on these messages, the client can inform users about the tool call. This creates transparency and prevents prolonged downtime in the UI.
Client-Side Tool Calling
Client tools are executed similarly to server tools. Here, too, the agent provides information about the call and its parameters via the relevant tool call messages. The difference is that the client responds to these messages by executing a tool and returning the result in the next run.
However, this presents a challenge at first. The language model must be informed about the available client tools. The TypeScript SDK comes to our aid for this task. It has a Tool data type that can be used to define the client tools. In addition to a name and a textual description, this type also includes information about the expected parameters (Listing 6).
Listing 6
// Client Code

import { Tool } from '@ag-ui/client';

import { z } from 'zod';

const weatherSchema = z.object({

condition: z.string()

.describe('e.g., sunny, cloudy, rainy.'),

temperature: z.string()

.describe('e.g., 25°C, 77°F.'),

wind: z.string()

.describe('e.g., 5 km/h, 3 mph.'),

});

export const showWeatherTool: Tool = {

name: 'showWeather',

description: 'Provide weather data the client can render.',

parameters: z.toJSONSchema(weatherSchema)

};
The parameters must be defined as a JSON schema. Our example uses the popular zod schema library to provide this schema. Based on the tool’s description and the parameters, the LLM can decide when and how to invoke the tool.
The runAgent method takes the tool descriptions and sends them to the agent (Listing 7).
Listing 7
// Client Code

// 1st run

await agent.runAgent(

{ runId: '0815', tools: \[showWeatherTool\] },

subscriber);

// Look into received client-side tool calls

// and perform respective actions

const toolCallResultMessage = \[…\];

// Add Tool Call Result

agent.addMessage(toolCallResultMessage);

// 2nd run

await agent.runAgent(

{ runId: '0816', tools: \[showWeatherTool\] },

subscriber);
After each run, the client checks whether the AgentSubscriber has received requests for client-side tool calls. If so, it executes those tools and sends the results back to the agent as part of another run.
AG-UI, the message history, and client tools
Messages stored via addMessage, as well as the information regarding the client tools, are transmitted via the payload of the HTTP request that triggers the next run. Unlike the messages discussed, the AG-UI protocol does not define this payload’ structure. It’s merely an implementation detail of the AG-UI SDK. Given the official nature of this SDK, hopefully other implementations will follow this model.
Reading information about client tools on the server
As mentioned earlier, the adapters of individual agent frameworks forward the received information about client tools to the LLM. If you wish to manually handle this information in the agent, you can find it in the tools property of the parameter object passed to run (Listing 8).
Listing 8
class FlightWeatherAgent extends AbstractAgent {

run(input: RunAgentInput): Observable<BaseEvent> {

return new Observable((observer) => {

console.log('tools', input.tools);

\[…\]

});

}

}
This is a JSON schema containing the parameter descriptions and textual information that the client defined using Zod (Fig. 3).
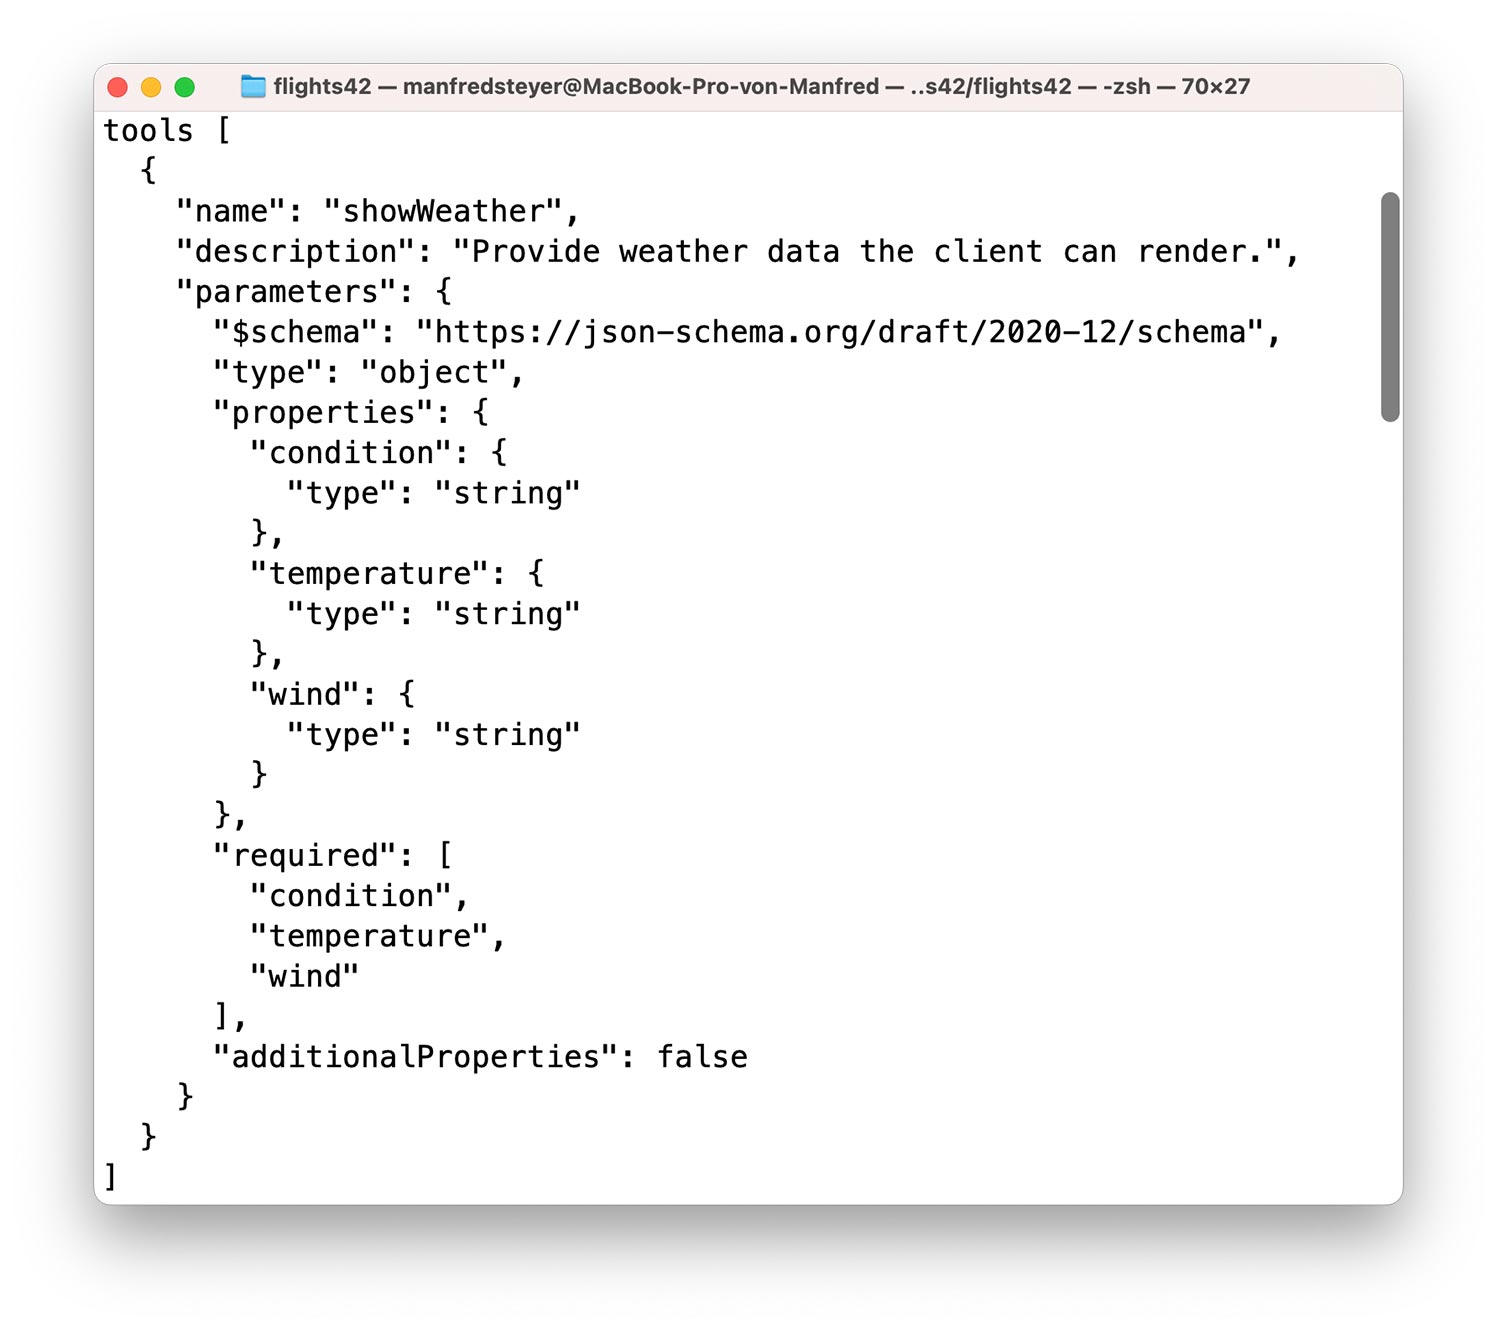
Fig. 3: JSON schema for client tools
Integration into Angular
The AG-UI SDK provides a solid foundation for integration into Angular. But you need an extra abstraction layer in order to use it conveniently, without unnecessary boilerplate code. The demo project contains this kind of abstraction in the libs/ag-ui-client folder. To simplify imports, the tsconfig.json file contains a path mapping @internal/ag-ui-client that points to it.
The linchpin of this implementation is an agUiResource for communicating with the agent. It also provides a WidgetContainer component that displays components requested by the agent, like the flight map shown at the beginning. The underlying API design is heavily inspired by the Hashbrown framework, which, from an Angular developer’s perspective, allows for an extremely idiomatic approach to working with LLMs, but currently doesn’t include AG-UI integration yet.
This article treats this abstraction as a black box that should eventually be provided by a library. Feel free to use the source code as a basis for your own projects.
By using AG-UI, the Angular example is independent of server-side technologies and models. To make execution as simple as possible, the demo application includes an agent that uses the extremely convenient TypeScript-based agent framework Mastra. Since the AG-UI SDK provides an adapter for Mastra, agents developed with it can be easily integrated via AG-UI.
The client has been tested with both OpenAI’s GPT-5 and Google’s Gemini 3. Details on setting up and running the demo can be found in the README.
Before you continue…
The reading list you'd build – if you had time.
The reads you'd find if you had time
Experts you can actually ask
Deep dives worth your weekend
Past conferences, ready when you are
Connecting agents via agUiResource
The agUiResource provided by @internal/ag-ui-client implements Angular’s Resource API and can be used similarly to the typical httpResource or rxResource (Listing 9).
Listing 9
import { defineAgUiComponent } from '@internal/ag-ui-client';

\[…\]

private readonly chat = agUiResource({

url: '<http://localhost:3001/ag-ui/ticketingAgent>',

useServerMemory: true,

tools: \[

findFlightsTool,

getLoadedFlightsTool,

toggleFlightSelectionTool,

getCurrentBasketTool,

displayFlightDetailTool,

createShowComponentsTool(\[

flightWidgetComponent

\]),

\],

});
The properties refer to the agent’s URL. With useServerMemory, the caller specifies whether the agent should save the chat history. If not, the client must repeat the entire chat history in every call.
In the tools list, the consumer registers all client-side tools that the agent is permitted to request. One special tool is showComponents, which is created via a factory. This factory accepts the description of possible components that the agent can integrate to answer questions. In our case, only a flight map (flightWidget) is available.
The individual tools can be described using the defineAgUiTool function (Listing 10).
Listing 10
import { findFlightsTool } from '@internal/ag-ui-client';

import { z } from 'zod';

\[…\]

export const findFlightsTool = defineAgUiTool({

name: 'findFlights',

description:

\`Searches for flights and redirects the user to the result\`,

schema: z.object({

from: z.string().describe('airport of departure'),

to: z.string().describe('airport of destination'),

}),

execute: async (args) => {

const store = inject(FlightStore);

const router = inject(Router);

store.updateFilter(args.from, args.to);

await router.navigate(\['/ticketing/booking/flight-search'\]);

},

});
Besides a name, a description, and parameter definitions based on Zod, the tool definition also includes an execute method. When the agent requests a tool, the agUiResource executes this method.
The parameter object args is of the TypeScript type defined by the Zod schema. In our case, this is an object with the properties from and to. The implementation shown triggers a flight search by passing these search criteria to the FlightStore and navigates users to the results page.
Tools that retrieve data-such as locally available states or user responses-can report this back to the model via the return value. An example of this is the getLoadedFlightsTool, which informs the agent about the flights that the application is currently displaying to the user (Listing 11).
Listing 11
export const getLoadedFlightsTool = defineAgUiTool({

name: 'getLoadedFlights',

description: \`

Returns the currently loaded/displayed flights\`

execute: () => {

const store = inject(FlightStore);

return store.flightsValue().map(toFlightInfo);

},

});
Components are defined in a similar way, but in this case the passed-in schema describes the available inputs (Listing 12). In this example, the flight property refers to another Zod schema (Listing 13).
Listing 12
import { defineAgUiComponent } from '@internal/ag-ui-client';

import { z } from 'zod';

export const flightWidgetComponent = defineAgUiComponent({

name: 'flightWidget',

description:

\`Displays a concrete flight as an interactive card. Use it when referring to one or more specific flights.\`,

component: FlightWidget,

schema: z.object({

flight: flightSchema,

status: z.enum(\['booked', 'other'\]).describe('Status of the flight'),

}),

});

**Listing 13**

const flightSchema = z.object({

id: z.number().describe('The flight id'),

from: z.string().describe('Departure city'),

to: z.string().describe('Arrival city'),

date: z.string().describe('Departure date in ISO format'),

delay: z.number().describe('Delay in minutes'),

});

To send a request to the agent, the client uses the _sendMessage_ method:

this.chat.sendMessage({

role: 'user',

content: 'Did I book my flight to France?'

});
Now the client just needs to display the response messages returned by the agent via the AG-UI in the chat history. The next section covers this.
Displaying the Chat History in the Template
The entire chat history is contained in the value of the AgUiResource. This is a signal that contains an array of AgUiChatMessages (Listing 14).
Listing 14
@for (message of chat.value(); track message.id) {

@if (message.content) {

<div>{{ message.content }}</div>

}

@for (widget of message.widgets; track widget.id) {

<app-widget-container \[widget\]="widget" />

}

@for (toolCall of message.toolCalls; track toolCall.id) {

<div>Tool Call: {{ toolCall.name }}</div>

}

}
In addition to a textual response (content), the iterated messages also contain a list of components (widgets) and tools (toolCalls). The widgets are components that have been registered for the showComponents tool and selected by the LLM. The WidgetContainer provided by _@internal/ag-ui-clien_t can dynamically generate these widgets and display them using the properties passed by the agent or LLM.
The toolCalls list provides information about the requested tools. Entries can refer to both client-side and server-side tools and are displayed here for transparency. We don’t need to worry about executing client-side tools however, since agUiResource handles this without any further action on our part.
The streamed AG-UI messages can be tracked using the browser’s Developer Tools (Fig. 4). This information makes the log accessible and aids troubleshooting.
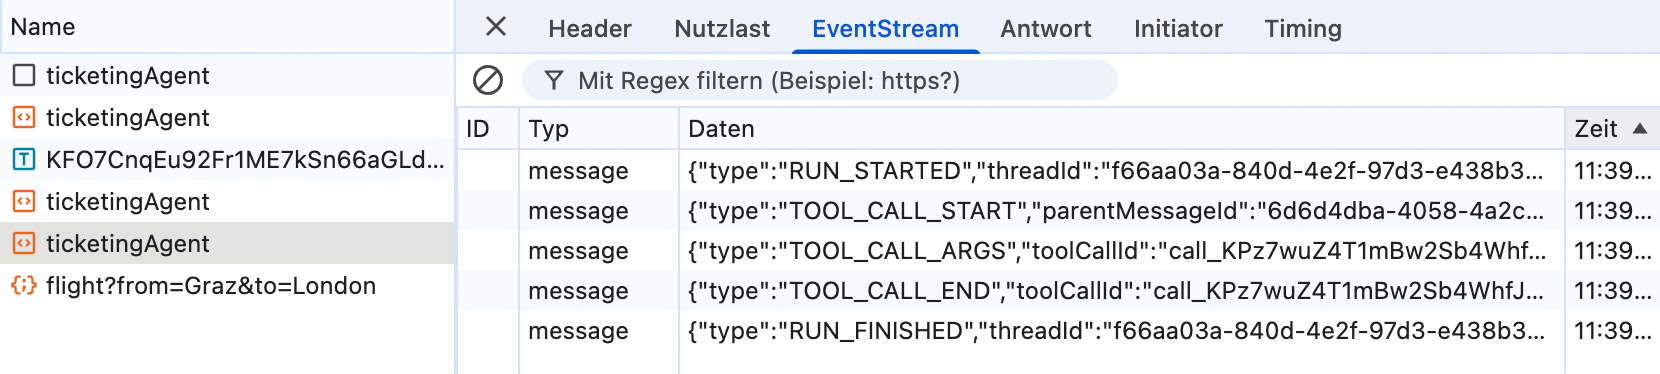
Fig. 4: AG-UI messages in the Dev Tools
Before you continue…
The reading list you'd build – if you had time.
The reads you'd find if you had time
Experts you can actually ask
Deep dives worth your weekend
Past conferences, ready when you are
Conclusion
AG-UI consistently decouples the frontend and agent via a clearly defined, message-based interface. This eliminates direct dependencies between the UI, backend, and LLM: tool calls, streaming, and UI updates are handled via standardized messages. It reduces complexity, facilitates the replacement of agent frameworks, and prevents vendor lock-in.
The existing SDK for TypeScript handles a large part of the integration work. It provides ready-made abstractions for runs, messages, and tool calls, as well as adapters for many existing agent frameworks. On the client side, this can be used to create lightweight, framework-specific wrappers that integrate AG-UI idiomatically without having to reimplement the protocol itself.
The post AG-UI: The Standard For Agentic User Interfaces appeared first on International JavaScript Conference.
]]>The post WebMCP: Bridging the Gap Between AI Agents and the Web appeared first on International JavaScript Conference.
]]>When an AI agent relies on standard web browsing modes, it’s essentially just an unimpressive scraper. It takes screenshots, parses messy, deeply nested DOM trees, and tries to guess what a button does based on heuristics, ARIA labels, ids, or CSS classes. The moment your app triggers a client-side layout shift, updates a component in your design system, or handles an asynchronous state change, the agent falls over. It gets stuck in loops or, worse, hallucinates data and submits half-baked forms.
What if our web applications didn’t have to sit passively while an external AI agent tries to brute-force its way through a user interface designed exclusively for human eyes? What if we could design interfaces that explicitly, cleanly, and securely tell AI agents exactly what they can do, how to interact with them, and what structured data they expect? This is exactly what WebMCP (Web Model Context Protocol) aims to solve.
Recently proposed as a new web standard and available as an early preview in Google Chrome, WebMCP is a game-changer for front-end engineering in the AI era. It allows us, front-end developers, to bridge the gap between our web applications and the rapidly expanding ecosystem of AI agents through a clean architecture pattern: progressive enhancement for AI.
In this article, we are going to explore the underlying mechanics of WebMCP, evaluate why it is an essential tool for the modern front-end stack, analyze its core architecture, and walk through a step-by-step implementation of both its imperative and declarative options.
Before you continue…
The reading list you'd build – if you had time.
The reads you'd find if you had time
Experts you can actually ask
Deep dives worth your weekend
Past conferences, ready when you are
The Fragility of Agentic Actuation
Before we can appreciate WebMCP, we must first deeply understand the architectural limitations of how AI agents interact with the web today.
In the current landscape, when an LLM-backed agent is tasked with completing an action on a website, such as booking a flight, filling out a complex expense form, or running an application diagnostic, it relies on a process called actuation. Actuation is the act of an agent simulating manual user interactions like mouse movements, clicks, scrolls, and keyboard inputs.
To accomplish this, the agent is usually fed a serialized representation of the active page. This might be a raw HTML string, a simplified accessibility tree, or a sequence of viewport screenshots. The agent processes this data, predicts the coordinates or the DOM selectors of the element it needs to interact with, and executes the simulated input.
This approach suffers from several catastrophic architectural flaws:
1. High semantic noise: web pages are packed with elements that are critical for human visual comprehension and brand identity but represent pure noise to an LLM. Navigation menus, promotional banners, sidebars, tracking scripts, and complex CSS layouts aren’t supposed to be used by an agent. The agent wastes valuable token context window space filtering out this layout noise just to find a single form field. That means this process is costly.
2. Contextual misinterpretation: Human-first user interfaces rely heavily on visual cues and micro interactions. A date picker component might look like a simple input field to a raw HTML parser, but interacting with it requires clicking a tiny calendar icon, navigating months via pagination arrows, and selecting a specific table cell in the picker panel. An AI agent trying to actuate this component directly through simulated clicks can break the component’s internal state.
3. State desynchronization: Single Page Applications (SPAs) built with modern frameworks like React, Next.js, or Vue manage state asynchronously. When an agent clicks a button that triggers a client-side route transition or a delayed state mutation, the agent may attempt its next action before the DOM has finished re-rendering, leading to target selection errors and broken flows.
4. Lack of determinism: LLMs are inherently probabilistic. If you ask an agent to fill out a registration form ten times using raw UI actuation, there is a statistically significant chance that it will misinterpret a field label or format a piece of data incorrectly on at least one of those attempts. In enterprise, financial, or healthcare applications, a 90% success rate is an absolute failure. We require 100% determinism when executing transactions.
WebMCP tries to solve all the above. Instead of forcing the agent to infer intent from presentation, WebMCP allows the presentation layer to explicitly declare its capabilities directly to the browser runtime.
What is WebMCP?
WebMCP is an adaptation and extension of the broader Model Context Protocol (MCP) originally created by Anthropic and open-source contributors. While standard MCP focuses on connecting AI models to local development tools, databases, and enterprise secure environments via transport layers like SSE (Server-Sent Events) or stdio, WebMCP brings this protocol natively into the browser.
WebMCP exposes a structured, highly secure bridge between the web page running in a tab and the underlying AI assistant operating at the browser level. It transforms your web application from a static document that must be visually scraped into a dynamic, queryable, and executable engine of tools.
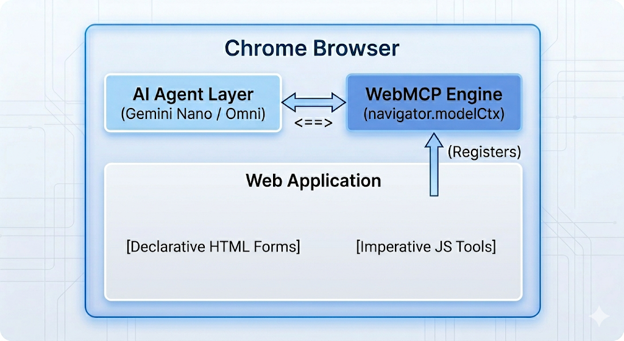
When a web page leverages WebMCP, it registers specific capabilities with the browser’s model context. The agent no longer needs to guess how to perform a task. It simply looks at the list of registered tools, reads their strictly typed definitions, and invokes them using deterministic JSON arguments.
The Three Pillars of WebMCP
To provide a robust alternative to raw UI actuation, WebMCP establishes three core pillars:
1. Standardized discovery: when a user navigates to a website, an agent operating within or alongside the browser needs a uniform way to query what operations are available on that specific page. WebMCP establishes a native browser API (navigator.modelContext) that acts as a registry. As soon as the page bootstraps, your application registers its tools. The browser can immediately communicate these capabilities to the underlying AI model without requiring the model to parse a single line of your application’s visual HTML layout.
2. Strict JSON schemas: one of the primary causes of agent failure is data formatting mismatch. For example, an agent inputting a full name into a field that strictly expects a split first and last name or sending an ISO timestamp to a custom input field expecting MM/DD/YYYY format.
WebMCP mandates that every registered tool must define an inputSchema adhering to the standard JSON Schema specification. This schema outlines:
- The exact properties the tool accepts
- The explicit primitive data types
- Enums restricting values to valid states
- Formats (such as date, email, or URI)
- Required vs. optional parameters
By validating the agent’s intended arguments against this JSON Schema before executing any code, WebMCP completely mitigates structural hallucinations. The LLM is forced to format its parameters precisely as your application logic requires.
3. Shared execution context & visual state: unlike server-to-server API calls, WebMCP tools execute directly inside the active browsing context of the user’s current tab. This is a critical distinction. When an agent calls a WebMCP tool, the tool’s handler runs your local client-side JavaScript.
This means the tool can directly read your application’s in-memory state, manipulate the DOM, update form components, or trigger client-side routers. Because this execution happens visually on screen, the human user retains full visibility. They can watch the application update in real time, preserving the human in the loop trust model without abandoning your application’s carefully crafted UI.
WebMCP vs. Standard MCP vs. Actuation
To fully understand where WebMCP fits into your tech stack, let’s compare it using some critical vectors against traditional UI actuation and standard backend Model Context Protocols.
| Feature | Traditional UI Actuation | Standard MCP (Backend) | WebMCP (Browser Native) |
|---|---|---|---|
| Execution Environment | External Agent (Headless/Virtual Display) | Server-side Node/Go/Python Runtime | Client-side Browser Tab Sandbox |
| Interface Medium | DOM Selectors, Coordinates, Screenshots | Secure APIs, DB Connections, File Systems | JavaScript Event Handlers, HTML Form Fields |
| User Visibility | Hidden from user (unless sharing the screen) | Completely invisible backend processing | Visibly executed on-screen within active UI |
| State Access | Purely visual / Serialized DOM scraping | Backend database or session records | Live, in-memory client-side application state |
| Reliability | Low (Vulnerable to layout and styling shifts) | High (Direct program-to-program APIs) | High (Direct program-to-agent contract) |
| Implementation Complexity | Zero on web app; extremely high on agent | High backend setup, authentication, proxying | Low-to-moderate frontend progressive enhancement |
The Two Implementation Models: Declarative vs. Imperative
The Chrome implementation of the WebMCP specification recognizes that web development scales from simple, static semantic documents to highly interactive, state-driven single-page applications. To accommodate this spectrum, it offers two distinct APIs:
1. The Declarative API: It is designed for fast, low-overhead integration. It allows you to transform standard HTML < form > elements into WebMCP tools purely by adding semantic attributes.
You don’t have to write custom JavaScript registries or manually handle schema extraction. The browser parses the form’s inputs, automatically derives a JSON Schema based on HTML5 validation attributes, and exposes it to the agent layer. When the agent invokes the tool, the browser automatically fills out the form fields and triggers the submit event.
2. The Imperative API: It is the powerhouse built for professional web developers handling complex UIs, client-side routing, state management libraries, and custom component design system libraries.
Using standard JavaScript via navigator.modelContext.registerTool(), you explicitly write code that maps the agent’s intent directly to your internal application logic, bypassing DOM interaction altogether if desired and executing clean state mutations.
Setting Up Your WebMCP Development Environment
Because WebMCP is currently tracking through the standards process and is actively under experimental origin trials in Google Chrome, you must explicitly prepare your development environment to recognize and execute the APIs.
Step 1: Flag Activation
- Launch Google Chrome
- In the omnibox, navigate to: chrome://flags/#enable-webmcp-testing
- Locate the WebMCP Testing flag and toggle its state to Enabled.

- Relaunch the browser.
Step 2: Incorporating the Permissions Policy
WebMCP features a robust, built-in security perimeter gated by a dedicated Permissions Policy called tools. By default, the policy resolves to self. This means that tool discovery and execution are permitted inside top-level browsing contexts and same-origin iframes. It strictly blocks untrusted, cross-origin third-party iframes from registering tools that could hijack an agentic session.
If your architecture explicitly demands hosting a WebMCP-enabled application inside a cross-origin iframe (for instance, an embedded booking widget or a white-labeled payment gateway), you must explicitly allow the context via the allow attribute:
< iframe src=”https://trusted-widget.sparxys.com” allow=”tools”></ iframe>
Step 3: Installing the Inspector Subsystem
To debug and verify your application schemas without needing to integrate a massive external agent orchestration framework, you should utilize the Model Context Tool Inspector Extension available via the Chrome Developer ecosystem.
This tool introduces an inspector panel that accesses navigator.modelContext, instantly listing all registered imperative and declarative tools on the active page. It includes a natural language prompting playground backed by locally or cloud-hosted Gemini models (such as Gemini Nano), letting you input natural text to verify that the agent cleanly extracts arguments and maps them to your schemas.
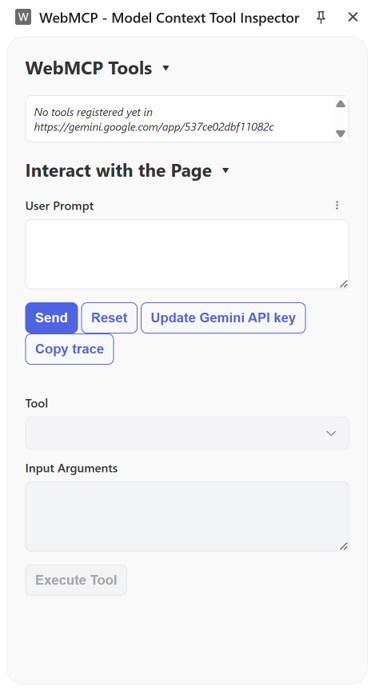
Implementing the Imperative API
The Imperative API is where real architectural control lives. If you’re building a single-page application with complex state boundaries, you don’t want the agent touching the DOM at all. You want it to talk directly to your logic. Let’s look at how to register a tool using navigator.modelContext.registerTool by building a small usage example with the imperative API. In this example, we will create a small booking form that includes the destination, travel month, and number of guests.
Step 1: Constructing the Semantic HTML Interface
Create an index.html file.
<!DOCTYPE html>
<html lang="en">
<head>
    <meta charset="UTF-8">
    <title>Hotel Search - Imperative WebMCP</title>
    <link rel="stylesheet" href="booking.css">
</head>
<body>

<div class="booking-form">
    <div class="form-group">
        <label>Destination</label>
        <input type="text" id="dest" value="Orlando">
    </div>
    <div class="form-group">
        <label>Travel Month</label>
        <input type="month" id="dates" value="2026-08">
    </div>
    <div class="form-group">
        <label>Guests</label>
        <input type="number" id="guests" value="5">
    </div>
    <button onclick="executeSearch()">Search</button>
</div>

<div id="results"></div>

<script src="scripts.js"></script>
</body>
</html>
Step 2: Authoring the Imperative Registration Script
Now, let’s craft scripts.js. Pay careful attention to how we construct our JSON schema. We want the agent to pass three strictly typed fields: destination, dates, and guests.
function updateUI(dest, dates, guests) {
    const output = `Searching for ${guests} guests in ${dest} for ${dates}...`;
    const render = () => document.getElementById('results').innerText = output;

    if (document.startViewTransition) {
        document.startViewTransition(render);
    } else {
        render();
    }
}

function executeSearch() {
    const dest = document.getElementById('dest').value;
    const dates = document.getElementById('dates').value;
    const guests = document.getElementById('guests').value;
    updateUI(dest, dates, guests);
}

// WebMCP Imperative Registration
if ('modelContext' in navigator) {
    navigator.modelContext.registerTool({
        name: 'searchHotel',
        description: 'Search for hotel room availability by destination, dates, and guest count.',
        inputSchema: {
            type: 'object',
            properties: {
                destination: { type: 'string' },
                dates: { type: 'string' },
                guests: { type: 'number' }
            },
            required: ['destination', 'dates', 'guests']
        },
        execute: async (params) => {
            updateUI(params.destination, params.dates, params.guests);

            // Update visual inputs to reflect agent's actions
            document.getElementById('dest').value = params.destination;
            document.getElementById('dates').value = params.dates;
            document.getElementById('guests').value = params.guests;

            return JSON.stringify({ status: 'success', summary: `Search initiated for ${params.destination}` });
        }
    });
}
Implementing the Declarative API
The imperative API provides complete program control, but it requires you to manually maintain schema layouts in synchronization with your state architecture. For standard text entry pipelines, data processing forms, or support desks, the declarative API is faster and cleaner.
Let’s see how we can change the previous imperative example to use the declarative way.
Writing the Annotated Declarative Markup
By using standard HTML attributes and applying the webmcp-tool configuration layout, we instruct the Chrome parsing layout to handle the registration on our behalf.
Create a separate index file called declarative.html:
<!DOCTYPE html>
<html lang="en">
<head>
    <meta charset="UTF-8">
    <title>Hotel Search - Declarative WebMCP</title>
    <link rel="stylesheet" href="booking.css">
</head>
<body>

<form class="booking-form"
      id="searchForm"
      toolname="searchHotel"
      tooldescription="Search for hotel room availability"
      toolautosubmit>

    <div class="form-group">
        <label for="dest">Destination</label>
        <input type="text" name="destination" id="dest" value="Orlando"
               toolparamdescription="The city to search for hotels in">
    </div>
    <div class="form-group">
        <label for="dates">Travel Month</label>
        <input type="month" name="dates" id="dates" value="2026-08"
               toolparamdescription="The month and year of travel">
    </div>
    <div class="form-group">
        <label for="guests">Guests</label>
        <input type="number" name="guests" id="guests" value="5"
               toolparamdescription="Total number of guests traveling">
    </div>
    <button type="submit">Search</button>
</form>

<div id="results"></div>

<script>
    const form = document.getElementById('searchForm');

    form.addEventListener('submit', (e) => {
        e.preventDefault();
        const data = new FormData(form);
        const outputMsg = `Searching for ${data.get('guests')} guests in ${data.get('destination')} for ${data.get('dates')}...`;

        const updateUI = () => document.getElementById('results').innerText = outputMsg;

        if (document.startViewTransition) {
            document.startViewTransition(updateUI);
        } else {
            updateUI();
        }

        // The agentInvoked is true if the browser's agent triggered the form
        if (e.agentInvoked) {
            e.respondWith(Promise.resolve(JSON.stringify({
                status: 'success',
                message: outputMsg
            })));
        }
    });

    // Listen for agent actuation events for debugging/logging
    window.addEventListener('toolactivated', ({ toolName }) => {
        console.log(`Agent activated WebMCP tool: ${toolName}`);
    });
</script>
</body>
</html>
Deconstructing the Declarative Engine Conversion
What’s elegant here is how much work the browser handles under the hood. By simply using native HTML5 validation attributes and standard markup, WebMCP automatically infers the types, constraints, and enums, exposing a perfectly structured JSON schema to the agent without a single line of manual JavaScript mapping:
  {
    "name": "searchHotel",
    "description": "Search for hotel room availability",
    "inputSchema": {
      "type": "object",
      "properties": {
        "destination": {
          "type": "string",
          "description": "The city to search for hotels in"
        },
        "dates": {
          "type": "string",
          "format": "^[0-9]{4}-(0[1-9]|1[0-2])$",
          "description": "The month and year of travel"
        },
        "guests": {
          "type": "number",
          "multipleOf": 1,
          "description": "Total number of guests traveling"
        }
      },
      "required": []
    }
  }
When the agent attempts to run searchHotel, the browser injects the values safely into the inputs, fires browser-native validation checks to ensure the data matches, and calls the submit event.
Architectural Deep Dive: Security and Data Isolation Boundaries
When discussing protocols that allow external systems to invoke operations within an active web page session, security must be one of our top architectural concerns. If malicious entities could inject tools or call unauthorized actions, WebMCP would represent a massive security vulnerability. The standard addresses this through several core security boundaries:
1. Same-Origin boundary preservation: WebMCP tools are strictly tied to the security context of the origin that registered them. A tool registered by https://secure.sparxys.com cannot be discovered or invoked by an agent looking at a tab pointed to https://attacker-compromised-site.io. The execution boundary honors standard DOM isolation.
2. Mandatory human-in-the-loop patterns: WebMCP doesn’t grant automated agents blind, blanket approval to execute any arbitrary code path in headless background threads. As the browser window must remain active and visible (headless state execution is blocked by the spec design), a user can witness every single manipulation.
For highly sensitive actions such as clicking a final purchase confirmation button, transferring funds, changing root IAM configurations, or modifying passwords, the architecture specification advises embedding standard user confirmation modals inside your JavaScript handler code.
handler: async (args) => {
    const userConsent = await showCustomConfirmationModal("Are you sure you want to authorize this transaction?");
    if (!userConsent) {
        return { success: false, error: "USER DENIED CONSENT" };
    }
    // Proceed with operational routine...
}
This structural safety constraint guarantees that an agent can gather parameters and streamline forms, but the final authorization remains strictly under the user’s control.
Performance Optimization and Memory Management in WebMCP Applications
Exposing structural tools directly inside client-side runtimes requires careful monitoring to avoid memory leaks, sluggish frame rates, and excessive CPU context switching, especially when building on modern SPA stacks like React or Next.js.
1. Avoid stale closure retainers: when registering an imperative tool via navigator.modelContext.registerTool inside a React hook or functional component lifecycle, ensure you clean up properly when components unmount. If you continuously re-register tools on every single re-render cycle, you will accumulate stale closures that retain heavy component state references in memory, leading to memory leaks.
// React useEffect example
useEffect(() => {
    if (!navigator.modelContext || !navigator.modelContext.registerTool) return;

    const abortController = new AbortController();

    navigator.modelContext.registerTool({
        name: "update_dashboard_filter",
        description: "Updates data viewing parameters.",
        inputSchema: { /* ... */ },
        handler: async (args) => {
            // Context execution parameters
        }
    }, { signal: abortController.signal });

    return () => {
        abortController.abort();
    };
}, [reactiveDependencyDependencies]);
2. Keep asynchronous handlers non-blocking: your handler code blocks the agent’s orchestration path until it resolves. If your handler must perform heavy computation, massive client-side data sorting, or wait for sluggish third-party API networks, hand off the tracking workload smoothly. Return a Pending status to the agent or step down execution priorities via requestIdleCallback to prevent locking the browser’s primary UI rendering thread.
Before you continue…
The reading list you'd build – if you had time.
The reads you'd find if you had time
Experts you can actually ask
Deep dives worth your weekend
Past conferences, ready when you are
Summary
The web is evolving. We are rapidly transitioning away from an era in which web browsers were used exclusively by humans interacting with visual point and click layouts. We are moving into a hybrid web ecosystem where human users are accompanied by highly specialized, context-aware AI agents designed to handle heavy operational lifting.
As senior front-end developers and software architects, our design philosophy must expand. We need to stop thinking about progressive enhancement merely to handle disabled JavaScript or slow mobile connections. We must treat agentic accessibility as a foundational element of the modern front-end engineering stack.
WebMCP gives us the exact blueprint we need to achieve this. By dedicating time to defining clean, strictly typed contracts through imperative registries and declarative HTML5 form layouts, we ensure our applications remain incredibly robust, highly performant, and perfectly discoverable in an increasingly agentic web ecosystem.
The spec is taking shape in real-time. Turn on the flags, test your forms with the inspector extension, and start thinking about your UI as an API.
The post WebMCP: Bridging the Gap Between AI Agents and the Web appeared first on International JavaScript Conference.
]]>The post AI, JavaScript, and the End of the Website appeared first on International JavaScript Conference.
]]>
Note: This video and podcast was generated using AI, adapting the original content and technical insights created by the author of the iJS blog post.
Podcast Guide: AI, JavaScript, and the End of the Website
Post-AI Shift: What Is Changing?
The foundations of web development remain remarkably stable. Modern web applications are still built with HTML, JavaScript, and CSS. What is changing is not the technology stack itself, but how software is created and who can create it.
Framework expertise remains valuable, but AI increasingly lowers the barrier to entry. Knowledge that once required years of hands-on experience is now embedded in the models developers use every day. With a solid understanding of software engineering principles and effective use of AI tools, developers can work productively across frameworks, languages, and ecosystems that may not be their primary area of expertise.
At the same time, AI is increasing the importance of genuine expertise. Models can generate code, explain APIs, and suggest solutions, but they cannot reliably judge whether a design decision is appropriate, a security risk is acceptable, or an architectural trade-off makes sense in a particular context. The more capable AI becomes, the more valuable expert judgment becomes as the mechanism that validates, challenges, and guides its output.
How AI Is Reshaping Fullstack JavaScript
Fullstack as a discipline won’t go away. It’s gaining an additional dimension. Frontend, backend, and AI each have their own focus, but borders between expertise areas are getting blurrier. Frontend engineers can now deploy applications more easily, implement backend APIs, and cross into areas they previously couldn’t.
If an app’s only server dependency is AI inference, that inference could now move to the frontend, potentially eliminating the server entirely in some cases. Small, focused apps that previously needed a backend just to proxy an API call can now run the whole thing client-side. That’s a genuine architectural change, not just a blurring of roles. But the backend model overall will remain. It may mediate AI inference or connect to a cloud provider.
The question is no longer “are you a frontend or backend developer?” but “where does each piece of logic actually belong, and what’s the most appropriate place to run it?” AI adds a third answer to that question that didn’t exist before.
Learn more about how AI changes software development at iJS New York (September 28 – October 2, 2026):
- Signals, Standalone, and Super-Brains — Hrushikesh Pokala
How AI agents can modernize Angular applications at scale. - Unlocking Agentic Engineering with Spec-Driven Development — John Riviello
A practical approach to structuring AI-assisted software development. - Full-Stack AI Engineering in TypeScript Bootcamp — Nir Kaufman
Build production-grade AI systems with TypeScript and LangChain.
Before you continue…
The reading list you'd build – if you had time.
The reads you'd find if you had time
Experts you can actually ask
Deep dives worth your weekend
Past conferences, ready when you are
Does AI Introduce a New Layer of Architectural Complexity in JavaScript?
AI doesn’t alter JavaScript itself, as basic principles stay the same. It changes how systems are extended and orchestrated. Christian Liebel, frontend specialist and frequent iJS speaker, argues that we should think of “AI as an addition to JavaScript, not a transformation of it.”
In the monolithic era, you added code blocks. In the microservices and micro-fronted era, you added services. Now, you add tools and agents. The core idea is similar, but the connectors, dispatching, and routing logic are different.
Sebastian Springer, a React and Node.js expert and regular iJS speaker, argues that AI introduces a new type of architectural component into modern applications. “Usually, you program the decision into your code: is it true or false, is it A, B, or C? Now, you have a smart node in your application, and this makes the decision. So your software becomes much more flexible, much more dynamic.”
Learn more about how AI changes software architecture at iJS New York (September 28 – October 2, 2026):
- Contract-First APIs in the Age of AI Agents — Chad Green
Why AI agents require a new generation of APIs. - The Good, the Bad, and the Agentic: Node.js Backends Are the New Wild West — Laurie Lay
How backend architectures evolve when agents become active consumers. - Engineering Interactive AI with WebMCP and MCP Apps — Gil Fink
Building systems that can act, render, and interact.
Where Does AI Inference Fit in Server-Side JavaScript?
Fundamentally, calling an AI is just another HTTP call to an external service. It’s another tool and another abstraction layer. What’s different now is that instead of structured data, you exchange naturally formulated prompts and then have to force the output back into structure to make it machine-processable. However, the challenge consists of enforcing reliable structured output from inherently probabilistic systems.
Streaming APIs are critical, Liebel adds, and many developers are not yet comfortable building backends around them. Node.js now has the Web Streaming API implemented. It allows sharing streaming code between client and server, which is a significant practical improvement.
AI in the Browser
AI in the browser isn’t just the big hype of generative AI. It includes traditional machine learning. Background blurring in Google Meet, for instance, is a long-established example of an AI model running locally. The main question here is, “where is the AI model executed?” There are two approaches:
Approach 1: Bring your own AI
The website brings its own pre-trained model (e.g., from Hugging Face open-weights models) and runs it inside the JavaScript engine already present in the browser. Relevant APIs include WebGPU and WebNN. On the frameworks side of things, you can use Apache TVM, Transformers.js, or ONNX Runtime Web.
Approach 2: Built-in AI
The browser itself holds the model and runs it. The developer picks the use case, not the model. This is currently implemented in Chrome and Edge. Chrome uses Gemini Nano, and it’s downloaded into the browser and executed on the device. The prompt API is the language model interface for this approach.
Tradeoffs between the two approaches
| Bring your own AI | Built-in AI |
|
|
“Running AI locally is sort of edge AI, meaning on the user’s device itself. Nobody else can see it. It’s offline-capable and very good for privacy,” says Christian Liebel.
When Local AI Beats the Cloud
There are some cases where local/in-browser AI makes more sense than cloud inference. Liebel identifies the following four points:
- Cost: No cloud inference costs. This is relevant for companies and hobbyists who want AI features but can’t afford per-user inference fees.
- Latency: Example: background blurring. Sending video frames to a server and back would be too slow. Local processing is near zero latency.
- Privacy: Prompt and input data never leave the device.
- Offline capability: Works regardless of connection state.
Security and Privacy in AI-Powered Web Apps
We need to make a distinction between two security dimensions: AI-assisted attacks, when attackers use AI to find vulnerabilities, and AI-introduced vulnerabilities that emanate from integrating AI into applications.
AI models are good at pattern detection and can find vulnerabilities much more effectively than humans. The errors aren’t necessarily more numerous, they’re just more detectable. Anthropic’s Mythos project is a striking example of this. It uncovered a bug in BSD, a widely used operating system, that had gone undetected by humans for roughly 30 years. This is a reminder of how fragile the IT world actually is and how much AI can see what we can’t.
A practical countermeasure for AI-assisted attacks, suggested by Springer, is to make AI-based security analysis a standard part of your software development process. Use the tools your attackers would use before they can use them against you. AI-assisted vulnerability scanning should be part of your pipeline.
These security concerns exist because AI is increasingly becoming part of the application itself. That raises another question: if AI becomes a native building block of web applications, does it also change what an application looks like?
Before you continue…
The reading list you'd build – if you had time.
The reads you'd find if you had time
Experts you can actually ask
Deep dives worth your weekend
Past conferences, ready when you are
From Websites to AI-Native Applications
Applications have traditionally been organized around pages. Users navigate through menus, search results, forms, and workflows to reach the information or functionality they need. AI-powered interfaces challenge that model.
Nir Kaufman, fullstack developer, AI instructor and keynote speaker at iJS, describes a future in which users no longer navigate complete applications. Instead, they interact with an AI assistant that guides them through a conversation while dynamically assembling “the entire website chopped into tiny pieces and streamed to me.” A map appears when location matters, a booking component when a reservation is needed, and a payment widget when it’s time to complete a transaction.
This represents more than a new frontend pattern. It changes the role of the application itself. Rather than guiding users through pages and navigation structures, applications expose capabilities that can be invoked as part of an ongoing conversation. The website becomes less of a destination and more of a collection of services, data, and interaction components that an AI assistant can draw upon when needed.
For developers, Kaufman believes this may require a different way of constructing applications. Instead of organizing software around pages, routes, and navigation hierarchies, applications may increasingly be built as collections of reusable components that can be selected and assembled dynamically. In this model, developers design capabilities and interactions rather than predefined user journeys.
Emerging approaches such as Google’s Agent-to-UI (A2UI) protocol explore this idea. Agents describe interface elements as structured objects, while clients render the appropriate user interface on demand. Rather than sending complete screens, systems can stream focused interaction components into an ongoing conversation as they become relevant.
Viewed this way, AI is not simply another feature added to existing systems. It becomes a new access layer between users and applications. The architectural challenge shifts from designing pages and user flows to designing capabilities that can be discovered, combined, and orchestrated dynamically.
Learn more about how AI changes web applications at iJS New York (September 28 – October 2, 2026):
- Engineering Interactive AI with WebMCP and MCP Apps — Gil Fink
Moving beyond text-only interactions toward AI-native interfaces. - Full-Stack AI Engineering in TypeScript Bootcamp — Nir Kaufman
Building applications designed around agents, tools, and conversations. - Designing with Intent: A New Layer for AI-Generated UI — Selam Moges
What happens when interfaces are assembled dynamically around user intent?
Designing AI-Native User Experiences
If AI becomes a new access layer to applications, the next challenge is no longer primarily technical. It is about designing interactions that people can understand, trust, and control.
Christian Kuhn, UX researcher and consultant, approaches this question through a set of six design principles. Rather than treating AI as a feature, he focuses on how people collaborate with intelligent systems. The principles emphasize human agency, empathy, transparency, controllability, and the ability to recover from mistakes.
This perspective starts with a fundamental shift in how interactions are conceived. As Kuhn puts it, “The central unit of interaction is no longer the page but the conversation itself.” Users increasingly express goals, preferences, and constraints, while the system determines how best to support them. The challenge for designers is therefore not only to create interfaces, but also to shape the interaction between human intent and machine capabilities.
Kuhn’s principles provide a practical framework for this challenge:
- Human First: AI should amplify human capabilities rather than replace human judgment.
- Empathy First: Systems should understand user context and needs instead of forcing users to adapt to the machine.
- Automation vs. Augmentation: Not every task should be fully automated. Users often benefit from remaining active participants in the process.
- Transparency and Confidence: Users need to understand where information comes from and how reliable it is.
- Control and Editability: AI-generated results should remain editable, reversible, and subject to user control.
- Mental Models and Graceful Failure: Systems must help users understand how they work and provide clear recovery paths when mistakes occur.
Several of these principles become increasingly important as AI systems move beyond the chat interface. In Kuhn’s view, “Text writing is de facto the most exhausting and worst input mode.” As voice, vision, and contextual awareness continue to mature, conversational experiences are likely to expand far beyond typing into a text box.
For UX designers, this creates a new design discipline. The goal is no longer limited to optimizing screens, navigation paths, or workflows. It increasingly involves designing how people and AI systems cooperate, communicate, and recover when things go wrong.
Learn more about how AI changes user experience at iJS New York (September 28 – October 2, 2026):
- Designing with Intent: A New Layer for AI-Generated UI — Selam Moges
How AI-generated interfaces challenge traditional UX assumptions. - Engineering Interactive AI with WebMCP and MCP Apps — Gil Fink
Designing interactions that combine conversation with dynamic UI elements.
Where Is Web Development Heading?
The architecture of web applications is changing. So is the way users interact with them. As AI becomes part of the web stack, questions that once belonged primarily to developers increasingly overlap with concerns traditionally associated with architects, product teams, and UX designers. Decisions about inference, interfaces, workflows, and user guidance can no longer be treated as separate domains.
This makes collaboration more important, not less. Building AI-powered web applications requires technical, architectural, and experiential perspectives to work together much earlier in the process than many teams are accustomed to today.
At the same time, the emergence of AI does not invalidate the foundations of software engineering. If anything, it reinforces them. Clean architectures, clear documentation, reliable automation, comprehensive testing, strong observability, and security that is considered from the beginning rather than added later remain essential. As systems become more dynamic and more complex, these disciplines become increasingly important.
For web developers, architects, and UX designers alike, the challenge is therefore twofold: to remain open to new architectural and interaction models while continuing to apply the engineering principles that have always been necessary to build reliable software.
The post AI, JavaScript, and the End of the Website appeared first on International JavaScript Conference.
]]>The post Angular 22: What’s New in the Latest Release appeared first on International JavaScript Conference.
]]>In Angular 22, OnPush is no longer just an optional performance optimization. It is now the default for new components. This change goes beyond performance and reflects the direction Angular is taking with signals. This shift didn’t happen overnight. It is the final step of a carefully planned transition.
iJS Newsletter
Join the JavaScript community and keep up with the latest news!
The Roadmap to the New Default:
- The Zoneless Foundation: Starting with version 21, the framework enabled zoneless support by default, signaling the end of the zone.js era and the beginning of a lighter, faster runtime.
- The Deprecation of “Default:” In version 21.2, the old ChangeDetectionStrategy.Default was officially marked as deprecated. It was essentially rebranded as the Eager strategy, a new, more descriptive name that better reflects what this mode actually does in Angular.
- The Angular 22 Milestone: Now, in version 22, Angular comes full circle. When you create a new component, OnPush is applied automatically. What used to be a performance-oriented choice is now the default way Angular components work.
What does this mean for your existing projects?
If you’re upgrading an existing codebase, you don’t need to worry about a “breaking change” headache. The Angular team has built an intelligent migration tool into the ng update process that handles the transition automatically.

When you run the update, the migrator automatically scans your components. Any component that relied on the old, implicit Default behavior is updated to ChangeDetectionStrategy.Eager (Listing 1). This ensures your application behaves exactly as it did before, with no hidden changes to the logic.
You are not forced into OnPush for your entire codebase. The migration preserves your existing behavior while bringing your project in line with the new Angular standards.
Listing 1
@Component({
  selector: 'app-captain-dashboard',
  imports: [
    CrewWidgetComponent,
  ],
  templateUrl: './captain-dashboard.component.html',
  changeDetection: ChangeDetectionStrategy.Eager,
  styleUrl: './captain-dashboard.component.scss',
})
export class CaptainDashboardComponent {
The Stable Milestone: Resource API, Signal Forms & Angular Aria
Angular 22 marks an important step in the maturity of several newer APIs. Resource API, Signal Forms, and Angular Aria are now stable, making them much easier to adopt in production.
- Resource API has come a long way. Introduced in Angular 19 as an experimental feature, it quickly drew a lot of attention from the community. Now, after several iterations and refinements, resource, httpResource, and rxResource are finally stable.
- Signal Forms are also stable now, bringing a more modern approach to handling form states. Angular 22 also includes more detailed documentation and improved compatibility with Angular Material and Angular Aria. One nice improvement worth mentioning is the new debounce option for validateAsync and validateHttp. Previously, debouncing had to be applied at the control level, so it affected all validators attached to that control, including synchronous ones like required. That delayed instant feedback for simple checks just to accommodate async calls.
- Angular Aria is now stable as well, which is especially important for teams building accessible custom components. It gives developers a more reliable foundation for production use.
iJS Newsletter
Join the JavaScript community and keep up with the latest news!
Simplifying Dependency Injection: The @Service Decorator
Angular is making dependency injection a bit more straightforward. The new @Service() decorator is intended to cover most of the cases where we previously used @Injectable({ providedIn: ‘root’ }), giving us a cleaner and simpler way to define services.
Before Angular 22, the CLI generated services with @Injectable({ providedIn: ‘root’ }), as shown in Listing 2. In Angular 22, the same command now uses the new @Service() decorator by default (Listing 3), keeping the same root-provided behavior but with a shorter, more focused syntax.
Listing 2
@Injectable({
  providedIn: 'root'
})
export class CatService {
Listing 3
@Service()
export class CatService {
Why the switch?
The biggest win here is getting rid of boilerplate. @Injectable is very flexible, but it exposes options like useValue, useClass, or useExisting that most simple services never need.
@Service is much more opinionated. It is aimed at the common case of a singleton service provided in the root injector. By limiting the configuration surface (you only get a simple factory function if you really need it), it helps keep service definitions straightforward.
On top of that, @Service is designed to be used with the inject() function instead of constructor injection, which keeps dependencies closer to where they are used and makes the class easier to read at a glance. If you try to use constructor injection with @Service, Angular will now fail the build with an error.
Listing 4
@Service()
export class CatService {

    constructor(http: HttpClient) {
    }
}

Turning off automatic provisioning
By default, @Service() registers the class in the root injector. In some cases, though, you may want the service to exist only within a smaller part of the UI. That is where autoProvided: false comes in (Listing 5). It lets you skip automatic provisioning and add the service manually where you need it.
For example, if a service should live only as long as a specific component is active, you can provide it in that component’s providers array (Listing 6).
Listing 5
@Service({ autoProvided: false })
export class DraftWorkspaceService {

}
Listing 6
@Component({
  selector: 'app-draft-editor',
  providers: [DraftWorkspaceService],
  template: `...`,
})
export class DraftEditorComponent {
  protected draftWorkspace = inject(DraftWorkspaceService);
}
If you forget to add the service to the component’s providers array, Angular will fail to resolve it and throw an error, as shown in the screenshot below.

When should you stick with @Injectable?
Use @Injectable() when:
- Your service requires more advanced provider configuration
- You need constructor injection
- The service should live in a non-root scope, such as providedIn: ‘platform’.
In practice, @Service() becomes the new default for simple, root-scoped services, while @Injectable() remains the better tool for advanced DI scenarios. The split is quite clean: use @Service() for the common, simple cases, and switch to @Injectable() when the service needs more flexibility.
Lazy-loaded services with injectAsync()
While @Service() simplifies the common case, Angular now goes one step further with injectAsync(), which is especially useful for lazy-loaded services. Angular has always had a strong dependency injection system, but loading services only on demand has often required more manual work. InjectAsync() makes that much easier by letting Angular resolve a service asynchronously, exactly when it becomes necessary.
This is especially useful when a service depends on a heavy library or supports a feature that is only used occasionally, such as a rich text editor, because you want to keep the initial page load as light as possible. When the service is first requested, the bundler loads a separate JavaScript chunk, and Angular then resolves the service like any other singleton.
Important: Lazy loading works only with auto-provided services, such as @Injectable({ providedIn: ‘root’ }) or @Service().
The example below (Listing 7) shows a dashboard component that loads its chart service asynchronously when it is actually needed. The service is fetched only when showCharts() is called, and only the first call triggers the actual download.
Listing 7
@Component({
  selector: 'app-dashboard',
  template: `...`,
})
export class DashboardComponent {
  private charts = injectAsync(() =>
    import('./dashboard-charts.service').then((m) => m.DashboardChartsService)
  );


  async showCharts() {
    const charts = await this.charts();
    charts.render();
  }
}
If you want to start the download earlier, you can pass a prefetch trigger in the options. By default, it is onIdle (Listing 8), a built-in trigger that waits until the browser becomes idle before starting the load. You are not limited to onIdle, a prefetch trigger can be any function that returns a promise.
Listing 8
export class DashboardComponent {
  private charts = injectAsync(() =>
    import('./dashboard-charts.service').then((m) =>m.DashboardChartsService),
	{ prefetch: onIdle }
  );
Browser URL Support for RouterLinks
Angular 22 introduces a small but useful routing improvement. RouterLink now gets a new browserUrl input. It allows you to set a different URL in the browser than the one Angular uses internally for navigation.
This gives you more control over what users see in the address bar. The app can keep its internal route logic unchanged, while the visible URL feels more user-friendly.
Why it matters:
- Cleaner and more readable URLs.
- A visible URL that can differ from the internal route.
- Better support for aliases or alternative navigation paths.
- More flexibility in how navigation is presented to users.
This small API addition gives developers more flexibility when shaping how routes appear to users.
debounced() for Signals
Another interesting addition is debounced(), currently available as an experimental feature. It brings a built-in debounce mechanism directly to signals, filling a noticeable gap in signal-based code.
The Problem It Solves
This is especially relevant in UI patterns like autocomplete or search inputs. When an input changes on every keystroke, you usually do not want to trigger an API call immediately each time. Without debouncing, that can easily lead to too many requests while the user is still typing.
Until now, the usual workaround involved a multi-step loop: converting the signal to an Observable, applying RxJS debounceTime, and then converting the result back into a signal. While it worked, it added unnecessary complexity to something that should feel native.
Powered by the Resource API
What makes debounced() so useful is that it gives you both the debounced value and its state in one place. Instead of returning a plain signal, it returns a Resource, allowing you to track exactly what is happening under the hood:
- loading state: while the timer is running, the resource stays in a loading state and continues to expose the previously settled value.
- resolved state: once the specified delay passes, the resource automatically moves to resolved with the new value.
- errors: if the source signal throws an error, the resource switches to an error state immediately.
Automatic cleanup
Because debounced() runs inside an injection context, Angular handles cleanup automatically. When the injector is destroyed, Angular clears any pending timer and disposes of the resource without any extra code.
Example
In practice, this fits naturally into features like user search or autocomplete.
Listing 9
export class UserSearch {
  userQuery = signal('');
  debouncedUserQuery = debounced(this.userQuery, 400);


  results = httpResource<User[]>(() => {
    const search = this.debouncedUserQuery.value();
    return `http://localhost:3000/api/users?query=${search}`;
  });
}
Here, userQuery updates immediately with every keystroke while debouncedUserQuery settles only after 400ms of inactivity. As a result, httpResource does not fire a new request on every single character.
iJS Newsletter
Join the JavaScript community and keep up with the latest news!
Template comments
Angular now supports both single-line and block comments in templates, which makes it much easier to leave notes right where they matter. That kind of support may sound minor, but it removes one of those tiny everyday annoyances that developers have simply learned to live with. And when a framework takes care of little things like this, the whole developer experience feels smoother.
The example below shows both single-line and block comments in an Angular template.
Listing 10
<div
  //Single line comment
  class="card">

  <h2>User profile</h2>
  <button
    /* Multi-line
      comment
      continues here */
    type="button">Edit</button>
</div>
WebMCP
Angular’s latest updates are not only about improving the framework’s core developer experience and performance. The framework is also starting to explore how modern web applications can better integrate with AI-powered workflows.
Web applications are becoming increasingly AI-aware, but communication between AI agents and web apps is still limited. Most agents still rely on DOM inspection and inferred behavior, which makes the whole process fragile and harder to trust.
This is the problem WebMCP aims to solve. Introduced by the Chrome team at Google, WebMCP proposes a more structured way for AI agents to communicate with web applications by exposing actions and workflows directly in the browser. Instead of forcing agents to interpret the entire UI, applications can explicitly define what actions are available and how they should be executed.
While the proposal is still experimental, Angular has already introduced early support for WebMCP, making it easier to integrate AI-friendly capabilities directly into Angular applications.
Currently, Angular provides several integration levels for WebMCP:
- Global Availability with Application Scope:
When you want to expose features that should be accessible regardless of where the user is currently navigating, you use the application scope. By registering tools using provideExperimentalWebMcpTools within your app.config.ts (Listing 11), you make those capabilities available to AI agents across the entire lifecycle of the application.
A key advantage here is that the execution of these tools runs within an injection context. This means that inside the execute function, you can directly use inject() to access your services.
Listing 11
export const appConfig: ApplicationConfig = {
  providers: [
    provideExperimentalWebMcpTools([
      {
        name: 'searchAdoptionPets',
        description: 'Search the pet adoption registry for animals ready for adoption based on species, age group, and behavioral traits.',
        inputSchema: {
          type: 'object',
          properties: {
            query: { type: 'string', description: 'Search keywords.' },
            species: { type: 'string', enum: ['Dog', 'Cat', 'Rabbit'], description: 'The type of animal.' },
            ageGroup: { type: 'string', enum: ['Puppy/Kitten', 'Young', 'Adult', 'Senior'], description: 'The age group of the animal.' },
          },
          required: ['query', 'species'],
          additionalProperties: false,
        },
        execute: ({ query, species, ageGroup }) => {
          const animals = inject(AnimalsService).search(query, species, ageGroup);
          return { content: [{ type: 'text', text: JSON.stringify(animals) }] };
        },
      },
    ]),
  ]
};
- Route Scope:
You can also attach WebMCP tools to specific routes by providing provideExperimentalWebMcpTools directly within your route configuration (Listing 12).
However, to ensure this integration behaves predictably, you should configure the router to use withExperimentalAutoCleanupInjectors (Listing 13). This is the key that enables Angular’s automatic cleanup mechanism. When the user navigates away from a route, the framework immediately unregisters the associated AI tools.
Listing 12
export const routes: Routes = [
    {
        path: 'shelter-management',
        loadComponent: () => import('./pages/management/management.component').then((m) => m.ManagementComponent),
        providers: [
            provideExperimentalWebMcpTools([
                {
                    name: 'calculateWeeklySupplyNeeds',
                    description: 'Calculates weekly food and medical supply requirements for a specific shelter zone based on current animal occupancy.',
                    inputSchema: {
                        type: 'object',
                        properties: {
                            sectionName: {
                                type: 'string',
                                enum: ['Dog Quarantine', 'Cat Pavilion', 'Small Mammals'],
                                description: 'The target shelter zone.'
                            },
                            includeBufferStock: {
                                type: 'boolean',
                                description: 'Set to true if the user asks for an extra safety margin or buffer for new arrivals.',
                                default: false
                            }
                        },
                        required: ['sectionName'],
                        additionalProperties: false,
                    },
                    execute: ({ sectionName, includeBufferStock }) => {
                        const inventoryService = inject(ShelterInventoryService);
                        const report = inventoryService.calculateSupplies(sectionName, includeBufferStock);
                        return { content: [{ type: 'text', text: JSON.stringify(report) }] };
                    },
                },
            ]),
        ],
    },
];
Listing 13
import { provideRouter, withExperimentalAutoCleanupInjectors } from '@angular/router';


export const appConfig: ApplicationConfig = {
  providers: [
    provideRouter(routes, withExperimentalAutoCleanupInjectors()),
  ]
};
- Service Scope:
You can also bind WebMCP tools directly to individual services using declareExperimentalWebMcpTool. The tool’s lifecycle is tied strictly to the service instance: it becomes available when the service is initialized and is automatically unregistered when the service is destroyed.
Listing 14
@Service()
export class AdoptionApplicationService {
  readonly activeApplication = signal<AdoptionApplication | null>(null);

  constructor() {
    declareExperimentalWebMcpTool({
        name: 'getAdoptionApplicationStatus',
        description: 'Returns the current evaluation status and pending tasks for the active pet adoption application.',
        inputSchema: { type: 'object', properties: {} },
        execute: () => ({
            content: [{ type: 'text', text: JSON.stringify(this.activeApplication()) }],
        }),
    });
  }
}
- Signal Forms Scope:
This scope bridges the gap between AI assistants and user input by turning standard Angular Signal Forms into intelligent, AI-ready endpoints. Once you register the feature globally via provideExperimentalWebMcpForms (Listing 15), enabling it is as simple as adding the experimentalWebMcpTool property directly to your form definition.
Listing 15
import { provideExperimentalWebMcpForms } from '@angular/forms/signals';


export const appConfig: ApplicationConfig = {
  providers: [
    provideExperimentalWebMcpForms()
  ]
};
The biggest advantage of this scope is zero-boilerplate schema generation. Angular inspects your form’s data model and active validators to dynamically present a structured schema to the browser’s AI. The agent can then fill out and submit the entire form programmatically, handling validation errors directly just like a human user would.
Listing 16
readonly volunteerForm = form(
    this.model,
    (f) => {
      required(f.fullName);
      required(f.email);
      required(f.experience);
      minLength(f.experience, 30);
    },
    {
      experimentalWebMcpTool: {
        name: 'submitVolunteerApplication',
        description: 'Submits an application to become a shelter volunteer. Requires fullName, email, and an experience description of at least 30 characters.',
      },
      submission: {
        action: async (value) => this.volunteerService.registerPendingVolunteer(value),
      },
    },
  );
}
Important: Both WebMCP and Angular’s integration with it are still in an early phase, so some APIs and behaviors may change in future updates.
iJS Newsletter
Join the JavaScript community and keep up with the latest news!
Conclusion
Angular 22 brings a strong mix of stabilization and new ideas, giving developers both a more solid foundation and a few genuinely interesting directions to explore. The official stabilization of the Resource API, Signal Forms, and Angular Aria makes the framework feel more production-ready in the areas that matter most. At the same time, Angular keeps adding features that solve real-world problems more directly, from routing tweaks to signal-based debouncing and new dependency injection capabilities. Of course, these are only some of the highlights. Angular 22 also includes bug fixes and other improvements that help round out the release.
What stands out most is the direction of these changes. Angular is continuing to reduce friction, replace workarounds with native solutions, and make the developer experience feel smoother without losing the framework’s maturity. It is a release that feels less like a reinvention and more like a confident step forward.
Angular keeps proving that maturity does not have to mean stagnation. What are you most excited to try first in Angular 22?
The post Angular 22: What’s New in the Latest Release appeared first on International JavaScript Conference.
]]>The post Watch Session: An AI Assistant for Your Angular Applications appeared first on International JavaScript Conference.
]]>The post Watch Session: An AI Assistant for Your Angular Applications appeared first on International JavaScript Conference.
]]>