In this lesson, you will learn how to connect the MySQL database in Python using the ‘MySQL Connector Python‘ module. This Python MySQL tutorial demonstrates how to develop and integrate Python applications with a MySQL database server.
In Python, We can use the following modules to communicate with MySQL.
MySQL Connector PythonPyMySQLMySQLDBMySqlClientOurSQL
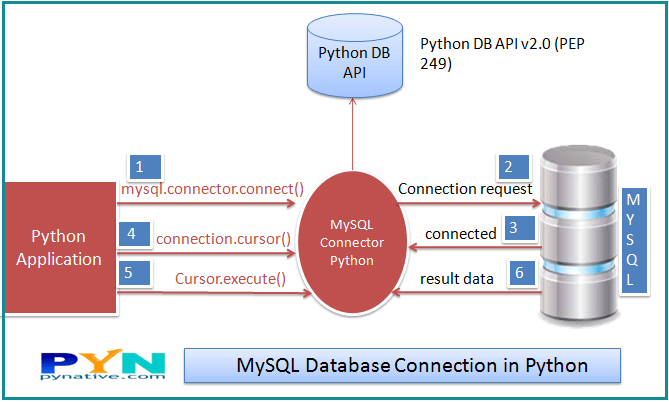
Note: Above all interfaces or modules are adhere to Python Database API Specification v2.0 (PEP 249) that means the syntax, method, and way of access the database is the same in all.
PEP 249 is designed to encourage and maintain similarity between the Python modules that are used to access databases. By doing this, above all modules are following rules defined in Python Database API Specification v2.0 (PEP 249).
You can choose any of the above modules as per your requirements. The way of accessing the MySQL database remains the same. I recommend you to use any of the following two modules:-
- MySQL Connector Python
- PyMySQL
Note: This tutorial focuses on the MySQL Connector Python module. All examples are created using MySQL Connector Python.
Advantages and benefits of MySQL Connector Python: –
- MySQL Connector Python is written in pure Python, and it is self-sufficient to execute database queries through Python.
- It is an official Oracle-supported driver to work with MySQL and Python.
- It is Python 3 compatible, actively maintained.
Table of contents
How to connect MySQL database in Python
Let’s see how to connect the MySQL database in Python using the ‘MySQL Connector Python’ module.
Arguments required to connect
You need to know the following detail of the MySQL server to perform the connection from Python.
| Argument | Description |
|---|---|
| Username | The username that you use to work with MySQL Server. The default username for the MySQL database is a root. |
| Password | Password is given by the user at the time of installing the MySQL server. If you are using root then you won’t need the password. |
| Host name | The server name or Ip address on which MySQL is running. if you are running on localhost, then you can use localhost or its IP 127.0.0.0 |
| Database name | The name of the database to which you want to connect and perform the operations. |
How to Connect to MySQL Database in Python
- Install MySQL connector module
Use the pip command to install MySQL connector Python.
pip install mysql-connector-python - Import MySQL connector module
Import using a
import mysql.connectorstatement so you can use this module’s methods to communicate with the MySQL database. - Use the connect() method
Use the
connect()method of the MySQL Connector class with the required arguments to connect MySQL. It would return aMySQLConnectionobject if the connection established successfully - Use the cursor() method
Use the cursor() method of a
MySQLConnectionobject to create a cursor object to perform various SQL operations. - Use the execute() method
The execute() methods run the SQL query and return the result.
- Extract result using fetchall()
Use
cursor.fetchall()orfetchone()orfetchmany()to read query result. - Close cursor and connection objects
use
cursor.clsoe()andconnection.clsoe()method to close open connections after your work completes
Run the below query on the MySQL console if you have not created any database in MySQL. Otherwise, you can skip the below query.
Create Database in MySQL
Create database Electronics;Code language: Python (python)Example to connect to MySQL Database in Python
Output.
Connected to MySQL Server version  5.7.19
You're connected to database:  ('electronics',)
MySQL connection is closed
Points to remember
- Catch exceptions that may occur during this process by importing the Error class from the MySQL connector module using a
from mysql.connector import Errorstatement.
Error class is useful to debug when we failed to connect to MySQL. For example, ACCESS DENIED ERROR when the username or password is wrong. - The
connect()method can throw aDatabase errorexception if one of the required parameters is wrong. For example, if you provide a database name that is not present in MySQL. - The
is_connected()is the method of theMySQLConnectionclass through which we can verify is our Python application connected to MySQL. - At last, we are closing the MySQL database connection using a
close()method of MySQLConnection class.
Create MySQL table from Python
Now you know how to connect to a MySQL server from Python, In this section, we will learn how to create a table in MySQL from Python. Let’s create table ‘Laptop’ under the ‘Electronics’ database.
Output:
Laptop Table created successfully
MySQL connection is closed
Python MySQL CRUD Operation
Also, learn how to execute various MySQL operations from Python by referring to the following articles.
Click on each tutorial to study operations in detail.
- Insert rows into MySQL table from Python: Insert a single and multiple rows into the MySQL table. Also, learn how to use Python variables in the parameterized query to insert dynamic data into a table.
- Select rows from MySQL table using Python: Execute a SQL SELECT query from a Python application to fetch rows from MySQL table. Also, learn how to process SELECT query results, Fetch all rows or single rows from the table, and count total rows of a table.
- Update rows of MySQL table from Python: Update a single row, multiple rows, a single column, and various columns. Additionally, learn how to use python variables in the parameterized query to update table data.
- Delete table rows from Python: Delete a single row, multiple rows, a single column, and various columns. Also, learn to Delete all Rows, Delete tables, and an entire database from MySQL using python.
- Execute MySQL stored procedures from Python and learn how to pass IN and OUT parameters to the MySQL stored procedure.
- Python MySQL Parameterized Query and Prepared Statement: Learn to use Parameterized Queries or Prepared Statement to use Python variables in the SQL query to pass dynamic data to MySQL table.
- Python MySQL Commit and Rollback to Manage Transactions: Manage MySQL database transactions from Python to maintain the ACID property of MySQL transactions using the commit() and rollback() methods.
- Python Database Connection Pooling With MySQL: Learn to create and use a connection pool to increase the performance of your Python MySQL applications.
- Python MySQL BLOB Insert and Retrieve digital data: Learn to insert or fetch any digital information such as a file, image, video, or song as blob data into MySQL table from Python.
Python MySQL Connection arguments list
We already discussed the four mandatory arguments required to connect the MySQL Server.
Let see what other connection arguments we can use to communicate with the MySQL server from Python. Below is the list of all other connection arguments and their meaning.
port: The TCP/IP port of the MySQL server. This value must be an integer. We can specify the different port number if the MySQL server is listening to a different port. The default value for this port argument is 3306.use_unicode: Specify whether to use Unicode or not. The default value is True.charset: MySQL character set to use, character set variables relate to a client’s interaction with the server. There are almost 30 to 40 charset MySQL server supports. The default value of the charset argument is “utf8″.auto-commit: Set it to true if you want to auto-commit transactions. If you wish to manage transactions in MySQL from Python, you need to set this value true or false. The default value is False, i.e., the changes are not committed to the database. You need to explicitly call a commit method to persist your changes in the database.get_warnings: To fetch warning, this is helpful to know the connection is established but with warnings. The default value is False.raise_on_warnings: Set it when you want to raise an exception on warnings. The Default value is False.connection_timeout (connect_timeout*): Timeout for the TCP and Unix socket connections. The connection terminates after this timeout expired.buffered: If true, the cursor objects fetch the results immediately after executing queries. The default value is False.raw: If true, MySQL results are returned as-is rather than converting into Python types. The default value is False. You can set it to true if you want a query result in MySQL type.force_ipv6: When setting to True, uses IPv6 when an address resolves to both IPv4 and IPv6. By default, IPv4 is used in such cases. The default value for this argument is false.pool_name: It is the Connection pool name that you are creating or using.pool_size: Connection pool size that you want to create. The default value is 5.pool_reset_session: Reset session variables when the connection is returned to the pool. The default is True.use_pure: Specify whether to use pure Python or C Extension. If use_pure=False, then a pure Python module is used; otherwise, it connects MySQL using C extension. Moreover, if C Extension is not available, MySQL Connector Python automatically falls back to the pure Python implementation.unix_socket: The location of the Unix socket file. These enable communication between two processes.auth_plugin: Authentication plugin to use, Added in 1.2.1.collation: MySQL collation to use. You can use the collation that you set while installing MySQL Server. The default value is utf8_generalW_chiich.sql_mode: Set the sql_mode session variable at connection time.
Use the Dictionary to keep MySQL Connection arguments
Furthermore, let see how to use a dictionary to store all of these connection arguments.
If you have lots of connection arguments, it’s best to keep them in a dictionary and use the ** operator. for example, you know you require a minimum of four arguments (i.e., username, password, hostname, database name) to connect MySQL.
If you have lots of connection arguments, it’s best to keep them in a dictionary and use the ** operator. In exceptional cases, we need more than four arguments in the connect method to connect the MySQL database. Let’s understand this. For example, below are three more connection arguments we can use in the connect() method.
connection_timeout– Timeout for the TCP and Unix socket connectionsauto_commit– Whether to auto-commit transactions. The default is falsepool_size– Connection pool size if you want to use connection pooling.
You can use many other connection arguments as per your need, add them all in a dictionary, and pass a dictionary to connect() method. Let’s demonstrate it in the below example.
Change MySQL Connection Timeout from Python
Sometimes we need to change the connection timeout value if we read or insert extensive data to the MySQL server. Connection terminates if the request takes more time than this value.
Use a connection_timeout argument of MySQL connector Python to manage the timeout issues by increasing the timeout value.
The connection_timeout is the timeout value in second for the TCP and Unix socket connections. This time denotes the number of seconds the MySQL server waits to fulfill the current request.
You can also set the following Parameters of the MySQL server by executing SQL query from Python to handle the connection timeout issue. Change the following parameters’ value only when the connection_timeout argument alone can’t control the timeout issue.
interactive_timeout: The number of seconds the server should wait for activity on an interactive connection before closing it.wait_timeout– Number of seconds the server should wait for activity on a connection before closing it.
Example
As you can see, I have set all connection timeout values to 180 seconds, i.e., 3 min in the above program.
Connect to MySQL Using Connector Python C Extension
Python connector module has a C Extension interface to connect the MySQL database. The use_pure connection argument determines whether to connect to MySQL using a pure Python interface or a C Extension.
The default value of use_pure is False means it uses the pure Python implementation to connect that we already discussed. The below example demonstrates how to connect using a C extension.
Next Steps:
To practice what you learned in this article, Please solve a Python Database Exercise project to Practice and master the Python Database operations.
I have created a Hospital Information System exercise using Python and MySQL. This Exercise has six questions. I have provided the required tables so you can proceed directly to solve the problems of this Exercise.
That’s it, Folks. Let me know your comments in the section below.
Hello sir there are two syntax error in tutorial ;
7. Close cursor and connection objects
use cursor.clsoe() and connection.clsoe() method to close open connections after your work completes
correction: cursor.close() and connection.close()
i got this error
Can’t connect to MySQL server on ‘%-.100s:%u’ (%s) (Warning: %u format: a real number is required, not str)
i am new to python
its saying that your input has to be in integer for use ‘int’
I would like to learn Python. Do you offer Python classes?
Have you ever learned to **look up**? If you do that, there is a clear, bold named section “Learn Python”… more?
Hey, i try to execute a stored procedure which write a new line in a table. i think to execute the procedure, i need “use database;” and “call procedure;”. But when i write two selects in the mySql_Create_Table_Query = “”” “””, the programm returns “failed to execute: use multi=True when executing multiple statements”. I know its very self explanatory but i dont get it. I tryed to put the “multi=True” after the “password=’xxx’, ” but this dosn’t work. Mayby you can help me.
Does anyone know any python mysql module that supports connection pooling with connection idle timeout? All the libraries I have tried, do not have any option to set the idle timeout for idle connections sitting in the pool. I want to be able to remove the idle connections from the pool after a certain timeout.
When you call the connect function, could you insert the host IP as the host to allow for remote connections to the database?
Yes you can
You my hero! <3
hey there is syntax and usage errors together… if you want to use C extension, you have to set “use_pure=False” not “use_pure=true”… If you want to use pure python, you have to set “use_pure=True” not “use_pure=true”… “use_pure=true” will rise “NameError”
I need to input the database IP, username and password while run the file.
How to do that ?
Please, can you explain how I can connect to an online database too, I’ve successfully practiced it on my localhost, thanks to the article you posted here
Hey Mohammed, Instead of localhost please provide the URL where your database is present
Hi Vishal,
Great content in your web site. Really help full for python developers.
Could you help me to resolve one issue while writing connection code .I am getting ” ModuleNotFoundError: No module named ‘dns’ ”
have tried pip install dnspython
Thanks
Thank you Saru, Please read this answer it will help.
Hey, Vishal, thanks for this tutorial.
just a comment: if Python couldn’t connect to mysql, connection would not be defined in the finally block. To fix that, I added
connection=Nonebefore the try and changed the condition in the finally to
best,
Juanma
Great
Agree and would be great to amend your code accordingly
What is the best way to dynamically define the MySQL connection between local host and production?
Do we have something similar to PHP’s $ _SERVER [‘HTTP_HOST’] to check if we are on a production server or localhost?
Thank you sir for this wonderful explanation. But please help me with my project. I have created a login register application using Tkinter and Python connectivity with MySQL database. I have successfully created the register page but need your help with login. the details with which I registered go to a table named customers in my MySql database. When I login I want to login with those details but I can’t code that program. I have tried zomething like this :-
def loginfunc():
          userfield=e1.get()
          passfield=e2.get()
          cursor2=con.cursor(buffered=True)
          cursor3=con.cursor(buffered=True)
          usersql=("SELECT User_ID from customers WHERE User_ID = '%s' ")
          passsql=("SELECT Password from customers WHERE Password = '%s'; ")
          cursor2.execute(usersql,userfield)
          cursor3.execute(passsql,passfield)
          userverify=list(cursor2.fetchall())
          passverify=list(cursor3.fetchall())

          if(userfield in userverify) and (passfield in passverify):
                    messagebox.showinfo("Login","Success")
          else:
                    messagebox.showinfo("Login","Fail")
Please help!
Hi Vishal,
I am just getting started, but your tutorial looks very helpful. Two comments:
1) A minor typo. You mixed up your homophones — “your” and “you’re” — in the first script:
`print("You're connected to database: ", record)`2) In addition to `mysql> create database Electronics;` I needed:
Perhaps that is because I chose a password for ‘root’ when I installed MySQL 8.0.18.
Thanks. Looking forward to the rest of the tutorial.
Thank you Steve for your feedback and suggestions.
Hi Vishal,
Excellent work!!
Need your help on this:
Any idea of how multiple connection can be stored in a dictionary?
cnx={}
cnx.update({'host1']:mysql.connector.connect(host='host1',...
cnx.update({'host2']:mysql.connector.connect(host='host2',...
Thanks,
Bronco
Hi Bronco.
you can try this:
import mysql.connector
from mysql.connector import Error

connection_dic = {}

try:
    connection_dic['host1'] = mysql.connector.connect(host='host1', database='Electronics', user='root', password='pynative@#29')

    connection_dic['host2'] = mysql.connector.connect(host='host2', database='Electronics', user='root', password='pynative@#29')

    sql_select_Query = "select * from Laptop"
    cursor = connection_dic.get("host1").cursor()
    cursor.execute(sql_select_Query)
    records = cursor.fetchall()
    print("Total number of rows in Laptop is: ", cursor.rowcount)

    sql_select_Query = "select * from Laptop"
    cursor = connection_dic.get("host2").cursor()
    cursor.execute(sql_select_Query)
    records = cursor.fetchall()
    print("Total number of rows in Laptop is: ", cursor.rowcount)

except Error as e:
    print("Error reading data from MySQL table", e)
finally:
	#check connection is open or not before closing
    if (connection_dic.get("host1").is_connected()):
        connection_dic.get("host1").close()
        connection_dic.get("host2").close()
        cursor.close()
Or instead of creating multiple connections and storing in the dictionary. you can create a common connection method and call it from multiple locations with required connection arguments. For example
import mysql.connector from mysql.connector import Error def mySQLConnect(host, database, user, password): try: connection = mysql.connector.connect(host=host, database=database, user=user, password=password) except Error as e: print("Error creating connection", e) return connection def closeConnection(connection): if (connection.is_connected()): connection.close() print("MySQL connection is closed") sql_select_Query = "select * from Laptop" connection = mySQLConnect('host1','Electronics','root', 'pynative@#29') cursor = connection.cursor() cursor.execute(sql_select_Query) records = cursor.fetchall() print("Total number of rows in Laptop is: ", cursor.rowcount) closeConnection(connection) sql_select_Query = "select * from Laptop" connection = mySQLConnect('host2','Electronics','root', 'pynative@#29') cursor = connection.cursor() cursor.execute(sql_select_Query) records = cursor.fetchall() print("Total number of rows in Laptop is: ", cursor.rowcount) closeConnection(connection)Hi Vishal,
Your (1st) solution looks fantastic. I will definitely use it!
Thanks,
Bronco
Bronco, I am glad it helped you.
I’ve just solved a fundamental issue experienced why trying to follow your tutorial. Saving the sample code in a local file and then executing,
python3 BasicConnection.py
would yield an error message that reads,
Traceback (most recent call last):
File “BasicConnection.py”, line 1, in
import mysql.connector
ModuleNotFoundError: No module name ‘mysql’
which, it would appear, was caused because the “pip” command you quote has added the MySQL module, but only to my python2 environment and not python3.
Your tutorial does not state whether it is appropriate for python2 or 3 and your quote of the pip command does not differentiate how to use that tool based on whether the user is trying to operate the Python2 or Python3 environment.
All told, whilst the basics of what you are trying to convey is likely quite sound, your failure to correctly set context, to explain the relevant distinction of environments, seems in retrospect to be a bit of an omission. You might want to extend the article to make a clearer distinction of version dependencies.
Hello Vishal,
I have followed every step up to “After connecting to MySQL Server, you should get below output.” However, I see a blank screen when I refresh the browser. Any suggestions as to what might be wrong in my configurations?
Hi Ilyas, can you please provide me your code. so I can suggest
Hello
Help is needed.
What the fragment of the database connection program will look like.
The base is physically located on disk
C:\Shop\Shop.mdfand created earlier inMicrosoft SQL Server 2012
Thank.
thanks
I keep on getting this error : “Import error : No module named mysql”
Any tips would be appreciated!
Are you using mysql connector python? or tell me the module name. you need to install DB module using pip
I am using the module you had recommended.
This is the exact error :
Traceback (most recent call last): File "/home/pi/Desktop/mysql-test.py", line 1, in import mysql.connector File "/usr/lib/python3/dist-packages/thonny/backend.py", line 317, in _custom_import module = self._original_import(*args, **kw) ImportError: No module named 'mysql'I keep getting mysql.connector.errors.ProgrammingError: 1698 (28000): Access denied for user. Any troubleshooting tips?
Please check permissions. you can refer to Stackoverflow access denied for localhost
How to connect mysql from my PC using python?
Hey Uyin,
Please refer to this Steps to connect MySQL Database
Are you facing any specific problems?
Yes..i cannot connect my db from my laptop..i use shared hosting..i think need hosting login..
Yes you need hosting domain name or ip
Thank you for such informative article with deatiled explanations
I am glad you liked it