The LearnDash Course Builder is a visual drag-and-drop tool designed to help you create, structure, and organize your online courses easily. Instead of manually adding lessons, topics, and quizzes one by one, the Course Builder allows you to see your entire course layout in one place and make changes instantly.
With the Course Builder, you can:
- Add, remove, and rearrange lessons, topics, and quizzes effortlessly.
- Structure your course using sections for better organization.
- Quickly access and modify content without navigating to multiple pages.
This tool is designed to make course creation faster, more intuitive, and accessible—whether you’re an educator, trainer, or business owner.
NOTE: The Course Builder is turned on by default. If you don’t see it when editing your course, check your global course settings to make sure it’s enabled.
How to Access the Course Builder #
There are a couple of ways you can access the LearnDash course builder.
For Existing Courses #
If you’ve already created a course:
- Navigate to LEARNDASH LMS > COURSES
- Hover over an existing course
- Click the “Builder” link

Alternatively:
- On the Edit Course page, click the “Builder” tab at the top.
- Click the course title or the “Edit” link.

Creating Your First Course? #
- Navigate to LEARNDASH LMS > COURSES
- Click the “Add New” button at the top of the page
- Click the “Builder” tab in the top navigation bar
Course Builder Overview #
At the top of the course builder, you’ll see:

- The total number of steps in the Course , which includes all lessons, topics, and the final quiz.
- An “Undo” link to undo any changes after your first edit.
- A link to “Expand All” or “Collapse All” Course steps. This helps you quickly view and organize all your course steps, making it easier to add, remove, or rearrange them.
Below this, you’ll find all your course content, where you’ll spend most of your time building and organizing your course.

Add Content to Your Course #
There are multiple ways to add content with the Course builder, depending on:
- The type of content you want to add (e.g., lessons, topics, quizzes)
- Personal Preference
IMPORTANT: All new content created via the Course Builder (i.e. Lessons, Topics, and Quizzes) is automatically published and set to “Public” once the changes are saved for the course. Meaning they will be visible to other users that are visiting or using your website.
Section Headings #
Section headings (requires LearnDash 3.0+) provide a simple way to break your course into sections. They don’t contain any actual content, and are simply a text-only heading that can be placed between any two lessons. They work in a similar fashion to chapters in a book.
- Click on the lesson before where you want the section heading to appear
- Click the “New Section Heading” link
- Type your heading
- Hit ENTER, or click the “Add Section Heading” button

To edit a section heading…
- Click on its title
- Make your edits
- Press ENTER or click the “Save” button
To remove a section heading…
- Hover over the section heading
- Click the red “Remove” link

For the other content (lessons, topics, and quizzes), you can either:
- Create them first one by one, then use the Course Builder to add them to your course,
- Or create them directly in the Course Builder, organize them as you go, and come back to add more content later.
It all depends on your preference and how you want to set up your course.
Lessons #
Aside from section headings, lessons will likely be the first type of content you’ll want to add to your course. You can create brand new lessons directly from the course builder, or add existing lessons that you’ve already created. Let’s take a look at each.
Create New Lessons #
- Click the “New Lesson” link
- Type the name of your lesson
- Press ENTER, or click the “Add Lesson” button

Add Existing Lessons #
To add lessons you’ve already created, find them in the “Lessons” box in the sidebar. By default, your most recent lessons are shown, but you can use the search box to find a specific lesson by title, and click “View all” to see all lessons.
IMPORTANT: Make sure Shared Course Steps are enabled, or existing lessons, topics, and quizzes won’t be available for selection. If you don’t see the Lessons box, click the gear icon to display the sidebar.
NOTE If you don’t see the lessons box depicted below, click the gear icon to display the sidebar.

There are multiple ways to add existing lessons.
Add a single lesson: Hover over a lesson in the lesson box and click the “Add” button. This will add the lesson to the end of your course.

Add multiple lessons: Select the checkbox next to multiple lessons, and then click the “Add Selected” button. This will add all selected lessons to the end of your course.

Drag & drop: If you’d like to add lessons in a particular spot within your course, you can click & hold down your mouse, drag the lesson to the course builder in the spot you want it, and then release. This will place the lesson in your specified location within the course.

Edit a Lesson Title #
- Click on the title of the lesson
- Make your changes
- Hit ENTER or click the “Save” button

Edit a Lesson’s Content #
Hover over the lesson and click the blue “Edit” link. This will open the “Edit Lesson” page in the same window. Remember to save any changes to your course first before editing the lesson content.

NOTE This will open the “Edit Lesson” page in the same window. Be sure to save any edits to your course first.
Remove a Lesson #
Hover over the lesson you’d like to remove from the course, and click the red “Remove” link.
Topics #
Topics are optional but can be helpful for organizing content within a lesson. You need at least one lesson in your course to add topics. Here’s how you can create and add topics to your course using the Course Builder.
Create New Topics #
- Ensure your course has at least one lesson. (Follow the instructions above to add a lesson first.)
- Expand the lesson by clicking Expand All at the top of the builder or the down arrow next to the lesson.
- Click the New Topic link.
- Type the name of your topic.
- Press Enter or click Add Topic.
- Hit Enter, or click the Add Topic button

Add Existing Topics #
IMPORTANT: Make sure Shared Course Steps are enabled, or you won’t be able to select existing lessons, topics, or quizzes.
You can find your existing topics in the “Topics” box next to the Course Builder. By default, the most recent topics will show, but you can:
- Use the search box to find a specific topic by its title.
- Click “View All” to see all topics.

There are multiple ways to add existing topics.
NOTE Before adding topics, you should click on the lesson where you want to insert a topic. This will select the lesson, highlighting it with a grey background & blue border.
Before adding topics, click on the lesson where you want to add them. This will highlight the lesson with a grey background and a blue border.
To add existing topics:

Add multiple topics: Check the boxes next to the topics you want to add, then click “Add Selected”. This will add all selected topics to the end of the selected lesson.

Drag & drop: If you’d like to add topics in a particular spot within your course, you can click & hold down your mouse, drag the topic to the course builder in the spot you want it, and then release. This will place the topic in your specified location within the course.
Edit a Topic #
To edit a topic’s title:
- Click on the topic’s title.
- Make your changes.
- Press Enter or click Save.

Edit a Topic’s Content #
To edit a topic’s content:
- Hover over the topic and click the blue “Edit” link.
- This will open the topic in a new tab so you can return to the Course Builder without losing your place.

NOTE You can open this link in a new tab so you can easily return to the course builder without losing your place.
Remove a Topic #
To remove a topic from your course:
- Hover over the topic.
- Click the red “Remove” link.
Quizzes #
Quizzes can be added to lessons & topics, or as a final quiz to the course itself. Any combination of these will work. You can create new quizzes directly from the course builder, or pull in existing quizzes you’ve already created.
Course quizzes are located at the bottom of the course builder, under the “FINAL QUIZZES” heading. Lesson & topic quizzes can be found within the lesson/topic that they belong to.
Quizzes Overview & Setup #
Quizzes in LearnDash can be added to lessons, topics, or as a final quiz for an entire course. You can use any combination of these options to assess learners at different stages.
Where to Find Quizzes in the Course Builder #
- Course Quizzes: Located at the bottom of the Course Builder under the “FINAL QUIZZES” section. These serve as end-of-course assessments.
- Lesson & Topic Quizzes: Found within each Lesson or Topic, allowing you to evaluate learners as they progress through the course.
Create New Quizzes #
- Navigate to the lesson/topic where you want to add a quiz (or simply scroll to the “FINAL QUIZZES” section at the bottom)
- Click the “New Quiz” link
- Type the name of your quiz
- Hit Enter, or click the “Add Quiz” button

Add Existing Quizzes #
IMPORTANT Shared Course Steps must be enabled or existing lessons, topics, and quizzes will not be available for selection.
Adding Existing Quizzes
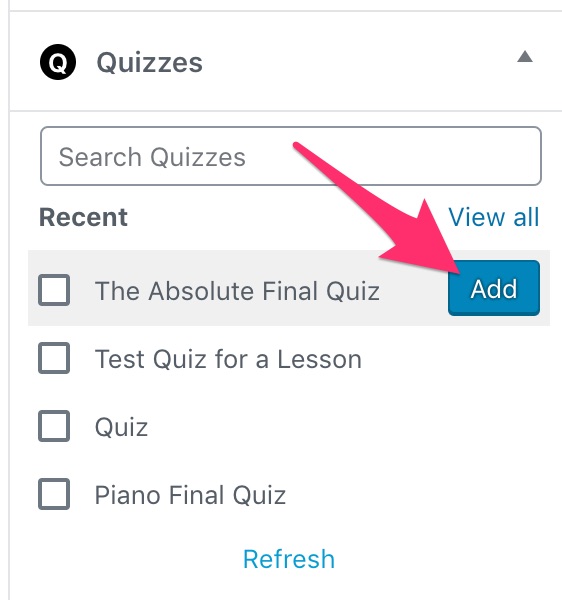
You can easily reuse quizzes you’ve already created by adding them to your courses, lessons, or topics using the Course Builder. This helps save time and maintain consistency across your content. Your existing quizzes can be found in the “Quizzes” box in the sidebar. By default, your most recent quizzes are shown, but you can click “View all” to see all quizzes, or use the search box to find a specific quiz by title.
How to Access Existing Quizzes
- In the Course Builder, look for the “Quizzes” panel on the right-hand side (sidebar).
- By default, your most recently created quizzes will be shown.
- Click View All to browse everything, or use the search bar to locate a quiz by its title.
There are multiple ways to add existing quizzes.
Add a single quiz: Hover over a quiz in the quiz box and click the “Add” button.
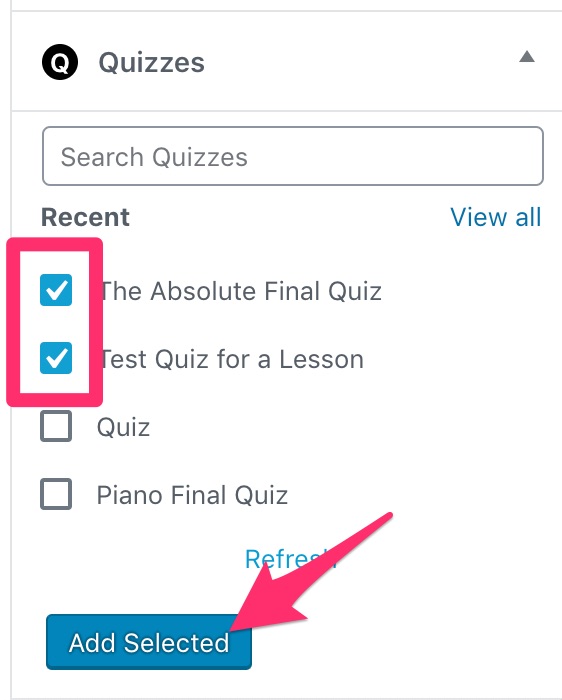
Add multiple quizzes: Select the checkbox next to multiple quizzes, and then click the “Add Selected” button.
Drag & drop: If you’d like to add quizzes in a particular spot within your course, you can click & hold down your mouse, drag the quiz to the course builder in the spot you want it, and then release. This will place the quiz in your desired location within the course.
Editing & Managing Quizzes in LearnDash #
You can modify quiz titles, settings, questions, or remove quizzes directly from the Course Builder.
Edit a Quiz Title #
- Click on the title of the quiz
- Make your edits
- Hit Enter or click the “Save” button
Edit Quiz Settings & Questions #
If you’d like to edit the quiz settings and/or quiz questions, click the blue “Edit” link that appears when you hover over a quiz.

NOTE You can open this link in a new tab so you can easily return to the course builder without losing your place.
Tip: Right-click the “Edit” link and open it in a new tab so you can quickly return to the Course Builder without losing progress.
Removing a Quiz from a Course #
The quiz will be removed from the course, but it will not be deleted from your LearnDash database—you can add it back anytime if needed.
- Hover over the quiz you want to remove.
- Click the red Remove link.
Removing a Quiz from a Course #
Hover over the quiz you’d like to remove, and click the red “Remove” link.
Rearrange Course Content #
The Course Builder not only allows you to add lessons, topics, and quizzes—it also gives you full control over the order of your content. You can easily rearrange items to fit the structure and flow of your course.
Two Ways to Rearrange Content #
Drag & drop #
This method offers the most flexibility for reordering any type of course content. Each section heading, lesson, topic, and quiz has a 6-dot icon to the left. Hover over the dots until your cursor changes into a hand icon. Click, hold, and drag the item to your desired location within the course structure.

“Move” Arrows(Up/Down) #
- Located just above and below the 6-dot icon for section headings and lessons.
- Click the up or down arrow to move the selected section or lesson up or down in the sequence.
NOTE: The move arrows currently work only for section headings and lessons—they are not available for topics or quizzes
