Adding MySQL Users to Databases
If you have created MySQL users to help you organize your database management, you can give each user access to specific databases and specific privileges.
You can assign MySQL users to databases and give them permissions using:
Using cPanel to Add MySQL Users to Databases
If you aren’t familiar with using the command line interface, use cPanel to add users to specific databases.
- Log into your cPanel account for the database’s domain. If you aren’t sure how to access cPanel, read Getting Started with cPanel first.
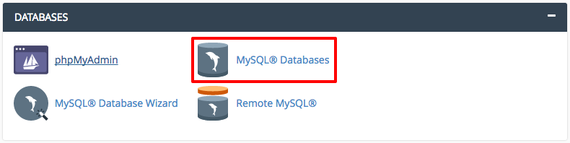
- Scroll down to the Databases section on the cPanel home page and click on MySQL Databases. This is where you can create new databases, manage current databases, create users, and manage users.

- Scroll down to the Add User to Database section. Using the dropdown menus, first choose the User and then choose the Database. Click Add.

- Now you’ll choose user privileges by checking the boxes next to the privileges you want to give to this user. Here is a basic explanation of these privileges:
- ALL – This allows the user access to change everything in the database.
- ALTER – Enables the ability to change the structure of tables.
- CREATE – Allows creation of new databases and tables.
- CREATE TEMPORARY TABLES – The user can create temporary tables.
- DELETE – Allows the user to delete rows from the tables in the database.
- EVENT – Required to create, alter, drop or see events for the Event Scheduler.
- INDEX – Enables the user to create or drop (remove) indexes. Index applies to existing tables.
- LOCK TABLES – Allows the user to lock tables and prevent other sessions from reading the locked table.
- SELECT – This privilege is needed for statements that read column values.
- TRIGGER – Enables trigger operations to create, drop, execute or display triggers for a table.
- ALTER ROUTINE – Alters or drops stored procedures and functions.
- CREATE ROUTINE – This allows the user to create stored procedures and functions within the database.
- CREATE VIEW – Creates a new view or replaces an existing view.
- DROP – Allows databases, tables and views to be removed.
- EXECUTE – This is required to execute stored procedures and functions.
- INSERT – Allows the user to insert rows into tables.
- REFERENCES – Unused prior to MySQL 5.5.41, and creation of a foreign key constraint requires additional privileges for the parent table.
- SHOW VIEW – This enables use of the command SHOW CREATE VIEW.
- UPDATE – Allows rows to be updated in the database tables.
You can also read more about each privilege on the MySQL website.
- Click Make Changes to finish adding your user to a database. You’ll see a confirmation that your user has been added to a database.

- If you click Go Back, you’ll see the user you just added to the database is listed next to the database name in the Current Databases section. If you ever want to change a user’s privileges or delete a user from a database, you can click on the username to change those settings.


Using the Command Line to Add MySQL Users to Databases
If you’re comfortable with the command line, it is simple to add MySQL users to databases.
- Using the terminal program of your choice, log into your server as root. If you haven’t logged into your server using the command line before, read Logging into Your Server via Secure Shell (SSH) first.
- Now you’ll log into your MySQL server by typing
mysql -u root -p
Then press Enter. The -u root flag tells MySQL you want to log in as the root user, and the -p flag prompts MySQL to ask you for a password. When prompted, enter your root password and press Enter.
- You’ll now see a MySQL prompt that looks like
mysql>
- First decide what permissions you’d like to give your user. Some commonly used privileges are: You can also read more about privileges on the MySQL website.
- ALL – This allows the user access to change everything in the database.
- ALTER – Enables the ability to change the structure of tables.
- CREATE – Allows creation of new databases and tables.
- CREATE TEMPORARY TABLES – The user can create temporary tables.
- DELETE – Allows the user to delete rows from the tables in the database.
- EVENT – Required to create, alter, drop or see events for the Event Scheduler.
- INDEX – Enables the user to create or drop (remove) indexes. Index applies to existing tables.
- LOCK TABLES – Allows the user to lock tables and prevent other sessions from reading the locked table.
- SELECT – This privilege is needed for statements that read column values.
- TRIGGER – Enables trigger operations to create, drop, execute or display triggers for a table.
- ALTER ROUTINE – Alters or drops stored procedures and functions.
- CREATE ROUTINE – This allows the user to create stored procedures and functions within the database.
- CREATE VIEW – Creates a new view or replaces an existing view.
- DROP – Allows databases, tables and views to be removed.
- EXECUTE – This is required to execute stored procedures and functions.
- INSERT – Allows the user to insert rows into tables.
- REFERENCES – Unused prior to MySQL 5.5.41, and creation of a foreign key constraint requires additional privileges for the parent table.
- SHOW VIEW – This enables use of the command SHOW CREATE VIEW.
- UPDATE – Allows rows to be updated in the database tables.
- Once you’ve decided what privileges your user needs, you’re ready to start adding them! In the command prompt, you’ll follow this syntax:
GRANT privilege ON database.table TO 'user'@'localhost';
You’ll replace parts of this command with your information.
Example:GRANT CREATE ON mysite1.mysite TO 'myuser'@'localhost';
Press the Enter key to apply the privilege.
Include All Databases or Tables
You can use an asterisk (*) to give a user privileges to all databases or all tables. Instead of typingdatabase.table
you’ll type
*.*
(You can also replace only the table field with an asterisk to give someone access to all the tables in a database.
- Instead of typing privilege, you’ll type in the privilege name.
- Instead of typing database.table, you’ll type the database name followed by a period and then the table name.
- Instead of typing user you’ll type in the username you’re granting privileges to.
You’ve added privileges to your users! To double check which privileges a user has, you can use the SHOW GRANTS command. Type
SHOW GRANTS FOR 'testuser'@'localhost';
Remember to replace “testuser” with the username you’ve been granting privileges to.
You have all the tools you need to start managing MySQL users and privileges!