<?xml version="1.0" encoding="utf-8"?><feed xmlns="http://www.w3.org/2005/Atom" xml:lang="en"><generator uri="https://jekyllrb.com/" version="4.4.1">Jekyll</generator><link href="https://aristath.github.io/feed.xml" rel="self" type="application/atom+xml" /><link href="https://aristath.github.io/" rel="alternate" type="text/html" hreflang="en" /><updated>2026-06-14T09:00:41+00:00</updated><id>https://aristath.github.io/feed.xml</id><title type="html">Ari Stathopoulos</title><subtitle>Software Architect, Accessibility &amp; Sustainability evangelist, Human.</subtitle><author><name>Ari Stathopoulos</name></author><entry><title type="html">My journey to AI independence so far</title><link href="https://aristath.github.io/blog/ai-independence-journey" rel="alternate" type="text/html" title="My journey to AI independence so far" /><published>2026-06-12T00:00:00+00:00</published><updated>2026-06-12T00:00:00+00:00</updated><id>https://aristath.github.io/blog/my-ai-stack</id><content type="html" xml:base="https://aristath.github.io/blog/ai-independence-journey"><![CDATA[<p>Wow, I haven’t written a post here in 6 years… I think it’s time I start again. 😊</p>

<p>I was using Claude, ChatGPT, Cursor, and others… All of them at once. Each of them has its pros and cons, each of them is best at something, and they all have some gaps that another one fills beautifully. However, the bills just started piling up. And it’s not like I could just cancel one of them because I kept hitting the limits of the max plans on all of them. At some point, it became clear that paying “rent” for AI was unsustainable long-term. So an investment was made to become somewhat independent.</p>

<p>When I was thinking of starting this journey, I had a great discussion (as always) with <a href="https://joost.blog/">Joost de Valk</a>, and as a result of that discussion, the initial (<strong>substantial</strong>) funding for this journey was from my employer, <a href="https://emilia.capital">emilia.capital</a>. I then continued by expanding the build with more compute over the course of months - and I fear it’s not done yet 😅</p>

<hr />

<h2 id="the-hardware">The Hardware</h2>

<ul>
  <li>CPU: AMD Ryzen 9950X</li>
  <li>RAM: 64GB (2x32GB)</li>
  <li>Motherboard: Asrock X870e-Taichi</li>
  <li>GPUs: 4x Radeon AI PRO R9700 (32GB each) + 1x RTX3090 (24GB) for a total of 152GB VRAM</li>
  <li>NVMe: 4TB for storage and models + 1TB for the system.</li>
</ul>

<p>I started with 2x R9700 GPUs. Over the course of the following months I managed to get 2 more R9700 GPUs (one every couple of months) and a used NVIDIA RTX3090.</p>

<p>Of course they can’t all connect to a motherboard with just 2 PCIe ports, so the 4 AMD GPUs are now connected to a bifurcation card (R34A), and the RTX3090 is connected to an M.2 slot via an M.2-to-OcuLink-to-PCIe adapter.</p>

<p>Future expansion: I can still connect 2 more GPUs: One on the remaining M.2 slot, and another one via USB4. I already have the adapters for these, just not the GPUs yet - looking on Vinted daily for opportunities.</p>

<p>The reason I went with AMD and not NVIDIA is twofold:</p>

<ol>
  <li>Price. The obvious one! An NVIDIA RTX 5090 cost ~€5-6k for 32GB of VRAM. An AMD R9700 cost somewhere between a 3rd and a 4th of that, for the same amount of VRAM. The RTX3090 I got was used from Vinted and I got it for €800.</li>
  <li>Power consumption. The AMD GPUs are simply not as power-hungry as NVIDIAs.</li>
</ol>

<p>Would it be better to go for NVIDIA GPUs instead of AMD? Well… I would definitely have a faster system, <strong>but</strong> I would pay for it many times over in the electric bill, and performance is not the only metric that matters. There are lots of ethical concerns in the middle too.</p>

<p>Pros: Lots of VRAM.</p>

<p>Cons: vLLM is basically pointless on this setup. PCIe speed has dropped significantly due to the bifurcation and all the adapters, which means that tensor-splitting a model is painful. My router (explained below) <em>can</em> run vLLM/safetensors backends but due to the way my hardware evolved I don’t bother (not to mention that ROCm made running vLLM a PITA). Instead, I’m using llama.cpp with Vulkan (not Cuda for the NVIDIA + ROCm for the AMDs, that was painfully slow).</p>

<hr />

<h2 id="the-software">The Software</h2>

<p>This is where things get a little more interesting. Had to build a couple of projects in order to accommodate my personal workflow.</p>

<h3 id="ergonstudio"><a href="https://github.com/aristath/ergon.studio">ergon.studio</a></h3>

<p>(<a href="https://github.com/aristath/ergon.studio">Link to GitHub repo</a>)</p>

<p>This is a plugin for OpenCode which does the following:</p>

<h4 id="agents">Agents</h4>

<p>The plugin adds multiple agents and sub-agents. Some of them are public-facing, others are internal only.</p>

<p>The way I usually work is this:</p>

<ul>
  <li>I use the <a href="https://github.com/aristath/ergon.studio/blob/main/agents/scout.md"><code class="language-plaintext highlighter-rouge">scout</code></a> agent for discussion, brainstorming and <a href="https://github.com/aristath/ergon.studio/blob/main/agents/scout.md#planning-mode">planning</a>. Tried to make it think a bit like I do when planning, so it’s a multi-step process. Kinda crude, but it works.</li>
  <li>Once a plan is finalized, I switch to the <a href="https://github.com/aristath/ergon.studio/blob/main/agents/orchestrator.md"><code class="language-plaintext highlighter-rouge">orchestrator</code></a> agent which handles the actual implementation and coding. The orchestrator calls multiple sub-agents as needed, and also implements a best-of-N flow when needed.</li>
</ul>

<p>These are the main agents, the others are mostly internal:</p>

<p>a team of specialists (architect, coder, reviewer, tester, critic, researcher, design-reviewer, quality-controller) that the orchestrator delegates to. The one I’d single out is the quality-controller. After any coding task, the orchestrator <strong>has to</strong> run it - it bundles the reviewer, the design-reviewer and a completion checklist and returns either APPROVED or REJECTED. The orchestrator can’t skip it, and after 3 rejections it stops and asks me what to do.</p>

<h4 id="memory-steward">Memory Steward</h4>

<p>Memory usually fails in coding harnesses because the agent needs to judge when to call memories, when to save a memory etc. 
It’s a fragile thing.</p>

<p>The memory-steward does something slightly different: It has a small model running at all times (currently it’s a <code class="language-plaintext highlighter-rouge">qwen3.5-4b</code> model but that’s easy to change from the <a href="https://github.com/aristath/ergon.studio/blob/main/prompts/steward.md">markdown file of the steward</a>). The key idea is that the main coding model never has to decide anything about memory - the steward handles both sides, retrieving <em>and</em> saving.</p>

<p>What basically happens is this: When I send a message to OpenCode, it doesn’t go directly to OpenCode… It goes to the memory-steward service first. The steward rewrites my message into a tight search query, looks up relevant memories (via a memory MCP - currently OpenMemory, but it’s easy to switch that), and injects whatever it finds into that turn’s context before the main model ever sees the message. This happens on every single turn.</p>

<p>The rewrite step is more important than it sounds. Memory lookup is an embedding search, and embedding search is surprisingly sensitive to phrasing - two messages with the exact same intent but worded differently will land in different places. If I search with my raw, rambling message, I get worse hits than if I search with a clean 3-8 word query. So the steward’s first job is to strip my message down to what I’m actually looking for, <em>then</em> search.</p>

<p>Then, after the exchange is done, the steward looks at it again and makes a separate judgement call on whether anything in it is worth saving. If so, it writes it back to the memory MCP. So retrieval runs constantly in the background, and saving is a deliberate, judged decision - and neither one depends on the main model remembering to ask.</p>

<h4 id="scratchpad">Scratchpad</h4>

<p>Local models that can run on my hardware don’t have 1M context, so I need to account for that - as well as preferences persistence on a per-project basis.</p>

<p>The scratchpad is a <a href="https://github.com/aristath/ergon.studio/blob/main/skills/scratchpad/SKILL.md">simple skill</a> that does exactly what you’d expect: It’s a scratchpad, allowing the LLM to write to a file things we’ve discussed so that they stay pinned. It’s also used for internal notes of the LLM itself. Scratchpad notes are appended to the system prompt so the model can always see them.</p>

<p>When OpenCode trims the conversation to stay under the context limit, the scratchpad gets re-injected, so the things I pinned survive the compaction even though the rest of the conversation got summarized away. That’s the whole point - it’s the bit of context that <em>doesn’t</em> get thrown out.</p>

<h4 id="handoff">Handoff</h4>

<p>This is just a handoff document that allows me to switch between agents and persist long sessions.</p>

<p>Think of it like the plan documents that Claude creates. Same concept, different implementation.</p>

<p>This is just <a href="https://github.com/aristath/ergon.studio/blob/main/skills/handoff/SKILL.md">another skill file</a>. When I make a plan with the <code class="language-plaintext highlighter-rouge">scout</code> agent, it writes the handoff document. When I then switch to the <code class="language-plaintext highlighter-rouge">orchestrator</code> agent, it reads that file and starts the implementation.</p>

<hr />

<h3 id="inference-router"><a href="https://github.com/aristath/inference-router">Inference-router</a></h3>

<p>(<a href="https://github.com/aristath/inference-router">Link to GitHub repo</a>)</p>

<p>Too many models, too many configurations, it’s hard to keep track of everything. I needed to be able to easily load multiple models in VRAM, switch between them easily, be able to edit the configs from a web-UI and so on. This project does something similar to what llama-router does, but more tailored to my own flows. It is a fully transparent proxy, and basically instead of pointing my OpenCode config to llama.cpp directly, I point it to this project instead.</p>

<ul>
  <li><strong>Web UI</strong> to manage the models</li>
  <li><strong>Allow setting aliases for models</strong>. This way I can have a “coder” or “brainstormer” alias, and just assign it to a model that is already in my config. Small but important convenience because it allows me to just define 4-5 “models” in the OpenCode config, and then manage how they are assigned from the web-UI. The alternative would be to have 20-30 models in the OpenCode config and navigate those. Tried it for a few months - not convenient. This allows me to be more flexible without breaking anything.</li>
  <li><strong>Infinite loops recovery</strong>. This one is important and saved me lots of frustration. Some models are amazing (<code class="language-plaintext highlighter-rouge">qwen3.6-27b</code> for example), but occasionally they fall into infinite thinking loops or infinitely looping tool calls. The inference-router handles both, with two separate guards. Thinking loops are caught by a streaming detector that watches the output for repeating text (a tandem-repeat detector running on the token stream); when it trips, it replays the partial output and injects a corrective prompt, then retries. Looping tool calls are caught by a separate cross-turn guard that watches for a repeating <code class="language-plaintext highlighter-rouge">tool_call → result → tool_call</code> pattern across messages. The injected nudge isn’t subtle, and it escalates if the model keeps looping - the first interrupt asks it to step back and identify the real next action, and by the third it’s down to “emit only the next required action, no thinking, no commentary”.</li>
  <li><strong>Speculative decoding</strong>. The router supports both MTP draft-heads and external draft models (plus context checkpoints for the hybrid-recurrent Qwen3.5 models), to improve performance for the models I use most.</li>
  <li><strong>Automatic VRAM management</strong>. It’s not just “load a model” - it reads the GGUF metadata, estimates how much VRAM the model needs, and evicts idle models under pressure (scored by how long they’ve been idle and how big they are). It also auto-generates the <code class="language-plaintext highlighter-rouge">--tensor-split</code> to greedily fill across the GPUs, so I don’t have to hand-tune placement every time.</li>
  <li><strong>Per-model replicas for concurrency</strong>. One instance of a model is fine for a single stream, but throughput suffers when several agents hit it at once. So when a request comes in and every running instance of that model is already busy, the router spins up another full instance (its own process, its own port) and sends the request there - idle instance first, otherwise the least-busy one. It keeps scaling out until it hits either a per-model cap I set or the VRAM ceiling, then new requests just ride the least-busy instance. Lets me run several agents against the same model without them choking a single process. Useful since ergon.studio &amp; OpenCode make heavy use of sub-agents.</li>
  <li><strong>Mixed-vendor GPUs</strong>. My rig is 4x AMD + 1x NVIDIA, and the router enumerates all of them - AMD via Vulkan, NVIDIA via <code class="language-plaintext highlighter-rouge">nvidia-smi</code>, and even Intel Arc if I had one plugged in (I have one but it’s on a different dedicated assistant device - so I know it works). The same physical card can be addressed as either a CUDA device, a ROCm device, a Battlemage device, or a Vulkan device depending on what I want a model to use. Some models run better on ROCm in AMD GPUs, others (most) run better on Vulkan, CUDA makes the GPU fans go nuts while Vulkan is more quiet and so on… So I can define the backend on a per-model basis.</li>
  <li><strong>Binary presets</strong>. I rebuild llama.cpp constantly (new commits, new flags, experimental branches). Instead of editing the binary path on every single model whenever I rebuild, I define the binary once as a “preset” and point models at it. Rebuild, update the preset, and every model picks up the new build automatically.</li>
</ul>

<hr />

<h3 id="orchestrator---the-one-that-started-it-all"><a href="https://github.com/aristath/orchestrator">orchestrator</a> - the one that started it all</h3>

<p>(<a href="https://github.com/aristath/orchestrator">Link to GitHub repo</a>)</p>

<p>Before any of the above existed, there was this. It’s worth mentioning because it’s where the whole journey started, and because the idea behind it is still useful on its own if you’re not ready to go fully local yet.</p>

<p>Back when I was still paying for Claude, ChatGPT and the rest, the thing that seemed insane was paying frontier-model prices for grunt work. Generating boilerplate, applying a review’s feedback, writing tests, reshaping a JSON config, or simple repetitive tasks… none of that needs a frontier model. Nobody needs a frontier model for simple stuff.</p>

<p>So the idea was simple: <strong>keep the expensive model as the senior engineer who thinks, decides and verifies - and delegate the mechanical work to local models, at zero marginal cost.</strong></p>

<p>In practice it’s an MCP server. You register it with Claude Code (or any MCP-compatible agent) and it exposes the local models as a set of tools: <code class="language-plaintext highlighter-rouge">generate_code</code>, <code class="language-plaintext highlighter-rouge">edit_code</code>, <code class="language-plaintext highlighter-rouge">improve_code</code>, <code class="language-plaintext highlighter-rouge">simplify_code</code>, <code class="language-plaintext highlighter-rouge">generate_tests</code>, <code class="language-plaintext highlighter-rouge">review_code</code>, <code class="language-plaintext highlighter-rouge">plan_task</code>, <code class="language-plaintext highlighter-rouge">transform_json</code>. Claude stops writing code itself and instead orchestrates: it plans the task, hands the actual typing to a local coder model, sends the result to a local reviewer model, feeds the review back for a fix, and only then verifies the result itself. The frontier model goes from writing every line to making decisions about lines other models wrote - which is a lot fewer tokens, and a much smaller bill.</p>

<p>It worked well enough that the obvious next question was: if the local models are doing all the real work anyway, do I even need the frontier model in the loop? That question is what led to <a href="#ergonstudio">ergon.studio</a> and the fully-local setup. So orchestrator was a stepping stone - but a genuinely useful one, and if you’ve got some local compute lying idle and a Claude bill you’d like to shrink, it’s a low-effort way to do exactly that.</p>

<p>IMPORTANT NOTES:</p>
<ol>
  <li>I haven’t used that project in quite some time. Some things are hardcoded (like for example the models slugs etc), so you’ll probably need to edit a couple of things to make it suit your needs.</li>
  <li>Claude, ChatGPT etc have to make a “conscious” decision to actually use this MCP. Most times they don’t. So if you use this project (or a concept similar to this project), you should also add a couple of lines in the <code class="language-plaintext highlighter-rouge">CLAUDE.md</code>/<code class="language-plaintext highlighter-rouge">AGENTS.md</code> etc files to <strong>force</strong> them to delegate tasks.</li>
</ol>

<hr />

<h2 id="can-local-open-source-models-really-do-what-frontier-models-can">Can local, open-source models really do what frontier models can?</h2>

<p>Well… Yes and no.</p>

<p>Frontier models are genuinely amazing. An open-source model with a few billion parameters cannot compare to a frontier model that is (probably) trillions of params!! However, the harness is sometimes more important than the model itself. Think of it this way: You have a brilliant person on one hand, and an average one on the other hand. You can tell to the brilliant person “build this”, and they will. They will make lots of assumptions along the way, lots of things that you probably won’t like and won’t catch. The end result is usually great and they work FAST! And then you have the average person. The one that needs hand-holding. That’s what the harness does… it’s the handholding part. That’s what the <a href="https://github.com/aristath/ergon.studio/blob/main/agents/scout.md"><code class="language-plaintext highlighter-rouge">scout</code></a> agent for example does in ergon.studio when I want to make a plan! It breaks the process down into steps:</p>
<ol>
  <li>Imagine the optimal solution without being tied to the current codebase</li>
  <li>Strip it down, remove all the inherent over-engineering fluff that LLMs usually add</li>
  <li>Compare to the current codebase, find how we can achieve the “ideal” we imagined, what needs to happen to the codebase</li>
  <li>Start making a high-level plan. Start from the goal and work backwards. No specifics, just the overarching architectural decisions etc.</li>
  <li>Iterative zoom-in. Start from the abstract plan and zoom-in, one step at a time, making it more specific</li>
  <li>Find the friction points, risks, uncertainties, etc. Define them, find solutions to issues BEFORE they become a problem.</li>
  <li>Make the plan</li>
  <li>Assume you’re wrong. Review the plan, look at things more holistically, and iterate.</li>
</ol>

<p>These are steps that I specifically defined, in order to make the average person produce code that is on par with a frontier model.</p>

<p>Does it work? Yes, it does. However, you need to adjust your workflow significantly. With a frontier model you can build projects with one-shot prompts. You give them a goal and they start working towards that goal. With local models you can’t do that efficiently. I mean sure you can, but not if you want genuinely good results. So my current workflow is not “one-shot” builds. I am the senior engineer, the LLM is the junior. I know what I want to accomplish, I have the architecture in my head, the LLM helps write the code one step at a time. I don’t make a grand plan, I make smaller plans, one at a time. The grand plan lives in my head, the LLM gets parts of it. So I have for example 3 terminals open:</p>
<ol>
  <li>An OpenCode session where I have a high-level discussion with the LLM about the overall architecture and what I want to achieve. This is using the scout agent from ergon.studio. No touching code, just a freeform discussion.</li>
  <li>An OpenCode session where I’m working on the current task (running the orchestrator agent from ergon.studio) - this one does the actual coding on the current task. The orchestrator reads the HANDOFF.md file that is already on-disk, and works on it.</li>
  <li>An OpenCode session where I’m planning the next step in the grand plan. This is again using the scout agent from ergon.studio. Discussing, finding the best solution to what we want to achieve, then once session #2 finishes we write the plan to the HANDOFF.md file, session #2 starts working on it, I reset session #3 and start discussing the next step in the grand plan.</li>
</ol>

<p><strong>So yes, local models can actually accomplish what a frontier model does - just not using the same mental model or process.</strong></p>

<p>Keep in mind that local models get released quite often… this is what makes this really exciting for the future!</p>

<p>The limitations I faced and all the things I needed to do to get around them are because of the current state of OSS LLMs. It was different 6 months ago, and it will be different 6 months from now. Friction keeps reducing, and you can think of OSS LLMs as the frontier models from 6-12 months ago. We were doing lots of things last year with Claude, right? Since then Claude has moved on… But we can get similar intelligence to last year’s Claude with Qwen3.6-27b and others today - or whatever you can run locally. Want to use Claude Opus 4.8? Sorry, can’t do unless you have the budget for half a TB VRAM. Then you could probably run HUGE local LLMs that are really frontier and on par with Opus.</p>

<hr />

<p>That’s all for this post, hope it helps someone. When I started this journey most of this stuff did not exist, nowadays you can probably find multiple similar alternatives to what I did - but regardless, it was worth documenting these.</p>

<p>This post was written by a human.</p>]]></content><author><name>Ari Stathopoulos</name></author><category term="AI" /><category term="Hardware" /><summary type="html"><![CDATA[Wow, I haven’t written a post here in 6 years… I think it’s time I start again. 😊]]></summary></entry><entry><title type="html">Pay it Forward Pledge</title><link href="https://aristath.github.io/blog/pledge" rel="alternate" type="text/html" title="Pay it Forward Pledge" /><published>2020-05-22T00:00:00+00:00</published><updated>2020-05-22T00:00:00+00:00</updated><id>https://aristath.github.io/blog/my-pledge</id><content type="html" xml:base="https://aristath.github.io/blog/pledge"><![CDATA[<p>Lately I’ve been doing a lot of thinking, and I believe it’s time I change the way I operate.<br />
In the past 12 years I started a few businesses and open-source frameworks… bootstrap-commerce, Shoestrap, Maera, Kirki, a bunch of others that nobody has ever heard of. I always do the same thing; I build something that I feel will help people, I open-source it and then after a couple of years I try to monetize it by building addons, extrensions etc., for the free thing that I built. It has worked for others so why would it not work for me, right?<br />
Well, the thing is… it doesn’t work for me. It never did. Maybe that’s because I’m no good at promoting what I build. Maybe it’s because I refuse to spend a single cent on advertising. Or maybe it’s the fact that I go at it alone. The reason doesn’t matter… what matters is that it doesn’t work for me, and I’ve spent too much time and energy trying to make it work.<br />
After a decade I have decided to change the way I operate.</p>

<h2 id="i-hereby-pledge-to-share-and-release-everything-i-build-openly">I hereby pledge to share and release everything I build openly.</h2>

<p><strong>All my products will cost you $0</strong>.<br />
when you download something I’ve built, <strong>it has already been paid for</strong>. The cost will be covered initially by me with the time I’ve spent to built them, and if you want to donate something and <strong>pay it forward for the next person</strong> who downloads that product, feel free to do so. That way you spread some goodness and help me sustain these products, evolve them, and build greater things that will benefit more people.<br />
To that end, I have created a <a href="https://github.com/sponsors/aristath">GitHub Sponsors</a> page and a link to that page will be added to all my future products.<br />
Hopefully, at some point, the time I spend to build the things I build, do the things I do for the community, and help the people I help, will be offset by your contributions.<br />
<strong>Any premium products I already have will be open on GitHub for everyone to get and use</strong>.<br />
The only exception to that are a couple of projects where I use ACF-Pro. Obviously I can’t give that because it’s not mine to give, but that’s just a temporary exception to the rule due to technical difficulties. A solution will be provided to that in time for those that already have a license to one of these products.</p>]]></content><author><name>Ari Stathopoulos</name></author><category term="WordPress" /><summary type="html"><![CDATA[Lately I’ve been doing a lot of thinking, and I believe it’s time I change the way I operate. In the past 12 years I started a few businesses and open-source frameworks… bootstrap-commerce, Shoestrap, Maera, Kirki, a bunch of others that nobody has ever heard of. I always do the same thing; I build something that I feel will help people, I open-source it and then after a couple of years I try to monetize it by building addons, extrensions etc., for the free thing that I built. It has worked for others so why would it not work for me, right? Well, the thing is… it doesn’t work for me. It never did. Maybe that’s because I’m no good at promoting what I build. Maybe it’s because I refuse to spend a single cent on advertising. Or maybe it’s the fact that I go at it alone. The reason doesn’t matter… what matters is that it doesn’t work for me, and I’ve spent too much time and energy trying to make it work. After a decade I have decided to change the way I operate.]]></summary></entry><entry><title type="html">Using CSS Grid for Gutenberg Columns</title><link href="https://aristath.github.io/blog/converting-gutenberg-columns-to-use-css-grid" rel="alternate" type="text/html" title="Using CSS Grid for Gutenberg Columns" /><published>2019-10-29T00:00:00+00:00</published><updated>2019-10-29T00:00:00+00:00</updated><id>https://aristath.github.io/blog/convert-gutenberg-columns-to-use-css-grid</id><content type="html" xml:base="https://aristath.github.io/blog/converting-gutenberg-columns-to-use-css-grid"><![CDATA[<p>The Gutenberg editor allows you to create columns and each column can have its own width. By default all columns are the same width, but you can define if for example you want the to be 1/3 - 2/3 etc.</p>

<h2 id="what-gutenberg-generates">What Gutenberg Generates</h2>

<p>The default HTML generated by the WordPress editor looks something like this:</p>

<div class="language-html highlighter-rouge"><div class="highlight"><pre class="highlight"><code><span class="nt">&lt;div</span> <span class="na">class=</span><span class="s">"wp-block-columns"</span><span class="nt">&gt;</span>
    <span class="nt">&lt;div</span> <span class="na">class=</span><span class="s">"wp-block-column"</span> <span class="na">style=</span><span class="s">"flex-basis:33.33%"</span><span class="nt">&gt;</span>
        <span class="nt">&lt;p&gt;</span>Column 1<span class="nt">&lt;/p&gt;</span>
    <span class="nt">&lt;/div&gt;</span>

    <span class="nt">&lt;div</span> <span class="na">class=</span><span class="s">"wp-block-column"</span> <span class="na">style=</span><span class="s">"flex-basis:66.66%"</span><span class="nt">&gt;</span>
        <span class="nt">&lt;p&gt;</span>Column 2<span class="nt">&lt;/p&gt;</span>
    <span class="nt">&lt;/div&gt;</span>
<span class="nt">&lt;/div&gt;</span>
</code></pre></div></div>

<p>The accompanying styles relevant to what we want to do here:</p>

<div class="language-css highlighter-rouge"><div class="highlight"><pre class="highlight"><code><span class="nc">.wp-block-columns</span> <span class="p">{</span>
    <span class="nl">display</span><span class="p">:</span> <span class="nb">flex</span><span class="p">;</span>
<span class="p">}</span>
</code></pre></div></div>

<p>What it does is pretty clever and elegant(ish), but depending on what you’re working on it may not always be the best solution. If the theme you’re working on has a relatively simple layout then getting things to work properly is a piece of cake. However if you have a more complex layout then <code class="language-plaintext highlighter-rouge">flex</code> may not be the best choice, and the reason is padding. If columns don’t have a padding, then there will not be any space between columns. I’ve seen themes use padding, margins, for a while I even user this:</p>

<div class="language-css highlighter-rouge"><div class="highlight"><pre class="highlight"><code><span class="nc">.wp-block-column</span> <span class="p">{</span>
    <span class="nl">border-left</span><span class="p">:</span> <span class="m">0.5em</span> <span class="nb">solid</span> <span class="nb">transparent</span><span class="p">;</span>
    <span class="nl">border-right</span><span class="p">:</span> <span class="m">0.5em</span> <span class="nb">solid</span> <span class="nb">transparent</span><span class="p">;</span>
<span class="p">}</span>
</code></pre></div></div>
<p>The above code will add an extra <code class="language-plaintext highlighter-rouge">0.5em</code> border on the left and right of your columns, therefore separating them and creating a “gap” between them. The problem however with solutions like that is that they add additional space on the left and right of all columns, therefore making the contents of your columns narrower and they don’t line up vertically with the rest of your content. If you can add a left margin on the <code class="language-plaintext highlighter-rouge">.wp-block-columns</code> element and just make it larger by 1em then you’re OK. But what if you can’t?<br />
See, <code class="language-plaintext highlighter-rouge">flex</code> is OK, but in some cases using <code class="language-plaintext highlighter-rouge">grid</code> makes more sense. For columns the benefit of <code class="language-plaintext highlighter-rouge">grid</code> is the <code class="language-plaintext highlighter-rouge">css-gap</code> property.</p>

<p>Unfortunately I haven’t found a filter or anything like that that would allow me to change the egenerated markup. We’re a bit “trapped” by a limited system.<br />
The only available alternative is to use JS to change things.</p>

<p>Here’s some code you can use:</p>

<div class="language-js highlighter-rouge"><div class="highlight"><pre class="highlight"><code><span class="kd">function</span> <span class="nf">griddConvertColumnsToGridLayout</span><span class="p">()</span> <span class="p">{</span>

    <span class="c1">// Get all column-wrappers.</span>
	<span class="kd">var</span> <span class="nx">griddColumns</span> <span class="o">=</span> <span class="nb">document</span><span class="p">.</span><span class="nf">querySelectorAll</span><span class="p">(</span> <span class="dl">'</span><span class="s1">.wp-block-columns</span><span class="dl">'</span> <span class="p">);</span>

    <span class="c1">// Loop column-wrappers.</span>
	<span class="nx">griddColumns</span><span class="p">.</span><span class="nf">forEach</span><span class="p">(</span> <span class="kd">function</span><span class="p">(</span> <span class="nx">columnsWrapper</span> <span class="p">)</span> <span class="p">{</span>
		<span class="kd">var</span> <span class="nx">columns</span> <span class="o">=</span> <span class="nx">columnsWrapper</span><span class="p">.</span><span class="nx">childNodes</span><span class="p">,</span>
			<span class="nx">gridTemplateCols</span> <span class="o">=</span> <span class="p">[];</span>

        <span class="c1">// Loop columns.</span>
		<span class="nx">columns</span><span class="p">.</span><span class="nf">forEach</span><span class="p">(</span> <span class="kd">function</span><span class="p">(</span> <span class="nx">column</span> <span class="p">)</span> <span class="p">{</span>
			<span class="k">if </span><span class="p">(</span> <span class="nx">column</span><span class="p">.</span><span class="nx">style</span><span class="p">.</span><span class="nx">flexBasis</span> <span class="p">)</span> <span class="p">{</span>
				<span class="nx">gridTemplateCols</span><span class="p">.</span><span class="nf">push</span><span class="p">(</span> <span class="dl">'</span><span class="s1">minmax(300px, calc(</span><span class="dl">'</span> <span class="o">+</span> <span class="nx">column</span><span class="p">.</span><span class="nx">style</span><span class="p">.</span><span class="nx">flexBasis</span> <span class="o">+</span> <span class="dl">'</span><span class="s1"> - 0.5em))</span><span class="dl">'</span>  <span class="p">);</span>
			<span class="p">}</span> <span class="k">else</span> <span class="p">{</span>
				<span class="nx">gridTemplateCols</span><span class="p">.</span><span class="nf">push</span><span class="p">(</span> <span class="dl">'</span><span class="s1">minmax(300px, 1fr)</span><span class="dl">'</span> <span class="p">);</span>
			<span class="p">}</span>
		<span class="p">});</span>

		<span class="nx">columnsWrapper</span><span class="p">.</span><span class="nx">style</span><span class="p">.</span><span class="nx">display</span> <span class="o">=</span> <span class="dl">'</span><span class="s1">grid</span><span class="dl">'</span><span class="p">;</span>
		<span class="nx">columnsWrapper</span><span class="p">.</span><span class="nx">style</span><span class="p">.</span><span class="nx">gridTemplateColumns</span> <span class="o">=</span> <span class="nx">gridTemplateCols</span><span class="p">.</span><span class="nf">join</span><span class="p">(</span> <span class="dl">'</span><span class="s1"> </span><span class="dl">'</span> <span class="p">);</span>
		<span class="nx">columnsWrapper</span><span class="p">.</span><span class="nx">style</span><span class="p">.</span><span class="nx">gridGap</span> <span class="o">=</span> <span class="dl">'</span><span class="s1">calc(1em</span><span class="dl">'</span><span class="p">;</span>
	<span class="p">});</span>
<span class="p">}</span>
<span class="nf">griddConvertColumnsToGridLayout</span><span class="p">();</span>
</code></pre></div></div>

<p>The above snippet (<a href="https://github.com/wplemon/gridd/blob/92fb296378481d17afd8a0e430414d4661ae7afb/assets/js/convert-columns-to-grid.js">taken from the currently alpha version of the Gridd 2.0.0 theme</a>) is vanilla JS and will convert your columns to use a grid layout.</p>

<p>Of course if you use that you’ll also have to take into account mobile visitors and make sure that columns collapse by adding some CSS:</p>

<div class="language-css highlighter-rouge"><div class="highlight"><pre class="highlight"><code><span class="k">@media</span> <span class="nb">screen</span> <span class="n">and</span> <span class="p">(</span><span class="n">min-width</span><span class="p">:</span><span class="m">600px</span><span class="p">)</span> <span class="p">{</span>
    <span class="nc">.wp-block-columns</span> <span class="p">{</span>
        <span class="nl">display</span><span class="p">:</span> <span class="nb">flex</span><span class="p">;</span> <span class="c">/* block also works fine. */</span>
    <span class="p">}</span>
<span class="p">}</span>
</code></pre></div></div>]]></content><author><name>Ari Stathopoulos</name></author><category term="WordPress" /><summary type="html"><![CDATA[The Gutenberg editor allows you to create columns and each column can have its own width. By default all columns are the same width, but you can define if for example you want the to be 1/3 - 2/3 etc.]]></summary></entry><entry><title type="html">The Gutenberg Layout Problem</title><link href="https://aristath.github.io/blog/the-gutenberg-layout-problem" rel="alternate" type="text/html" title="The Gutenberg Layout Problem" /><published>2019-10-29T00:00:00+00:00</published><updated>2019-10-29T00:00:00+00:00</updated><id>https://aristath.github.io/blog/the-gutenberg-layout-problem</id><content type="html" xml:base="https://aristath.github.io/blog/the-gutenberg-layout-problem"><![CDATA[<p>The Gutenberg editor is amazing. It allows for flexibility that was previously unheard of without a dedicated page builder. And though everyone kept saying “<em>Gutenberg is not a page-builder</em>”, I think there’s no denying it. <strong>It is a page-builder</strong>. You can call it an immersive editing experience for all I care, but the truth is it’s a page-builder.</p>

<p>With all the good things it brought, there were (and still are) some difficulties, mostly regarding the way we can style things - both in the editor and the frontend. This post is about one of the many solutions that you can implement, depending on your layouts.<br />
If your theme doesn’t have a sidebar and instead the content is the whole viewport-width, then things are pretty simple. In the <a href="https://wplemon.com/gridd">Gridd theme</a> however <strong>there is no standard layout</strong>. Users build their own grid. A site may be just a logo on the top and then the content, or it can have 4 widget-areas on the sides. And therein lies the problem:<br />
How can we account for ALL cases?</p>

<h2 id="what-gutenberg-generates">What Gutenberg generates</h2>

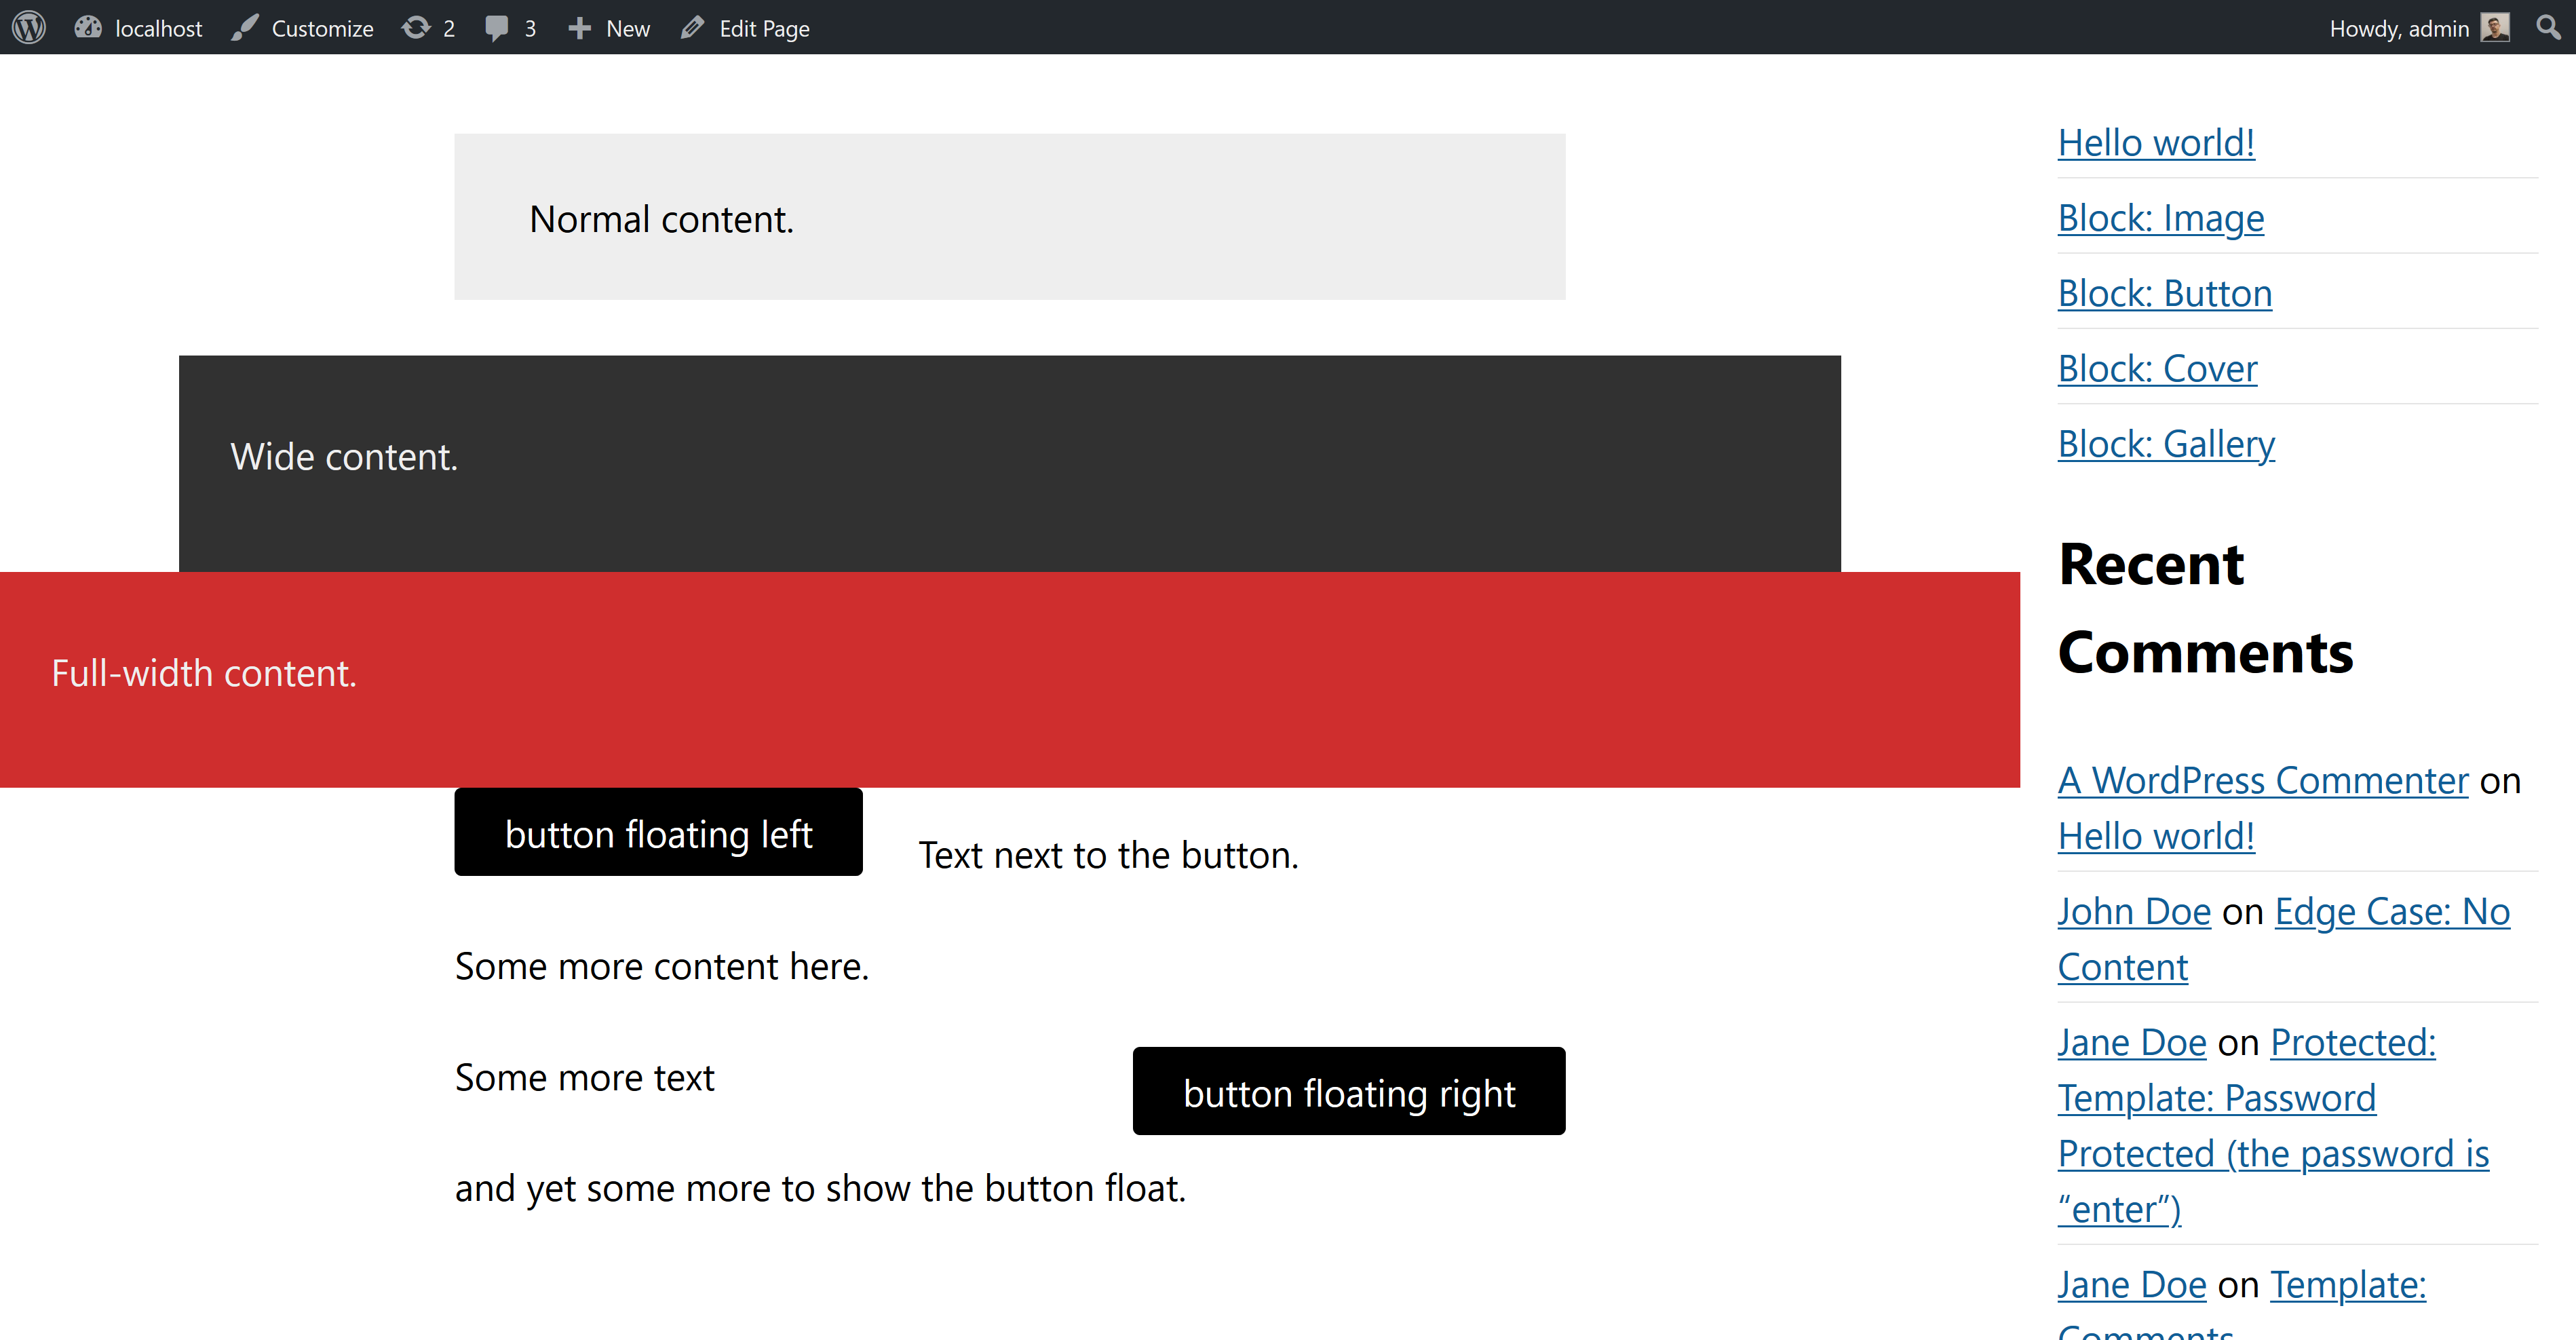
<p>I created a dummy post with all the cases I could think of at the time, so this is what we’ll try to accomplish:</p>

<p><img src="https://aristath.github.io/assets/article_images/screenshot_2019-10-29-test-post-localhost.png" alt="screenshot of a post written in the WordPress editor using a normal paragraph, a wide element, a full-width element, some dummy content and 2 buttons - one of them floating on the left and a 2nd one floating on the right." /></p>

<p>First of all we have the Gutenberg-generated HTML:</p>

<div class="language-html highlighter-rouge"><div class="highlight"><pre class="highlight"><code><span class="nt">&lt;div</span> <span class="na">class=</span><span class="s">"my-container"</span><span class="nt">&gt;</span>
  <span class="nt">&lt;div</span> <span class="na">class=</span><span class="s">"entry-content container"</span><span class="nt">&gt;</span>
      <span class="nt">&lt;p</span> <span class="na">class=</span><span class="s">"has-background has-very-light-gray-background-color"</span><span class="nt">&gt;</span>Normal content.<span class="nt">&lt;/p&gt;</span>
      <span class="nt">&lt;div</span> <span class="na">class=</span><span class="s">"wp-block-group alignwide has-very-dark-gray-background-color has-background"</span><span class="nt">&gt;</span>
          <span class="nt">&lt;div</span> <span class="na">class=</span><span class="s">"wp-block-group__inner-container"</span><span class="nt">&gt;</span>
              <span class="nt">&lt;p</span> <span class="na">class=</span><span class="s">"has-text-color has-very-light-gray-color"</span><span class="nt">&gt;</span>Wide content.<span class="nt">&lt;/p&gt;</span>
          <span class="nt">&lt;/div&gt;</span>
      <span class="nt">&lt;/div&gt;</span>
      <span class="nt">&lt;div</span> <span class="na">class=</span><span class="s">"wp-block-group alignfull has-vivid-red-background-color has-background"</span><span class="nt">&gt;</span>
          <span class="nt">&lt;div</span> <span class="na">class=</span><span class="s">"wp-block-group__inner-container"</span><span class="nt">&gt;</span>
              <span class="nt">&lt;p</span> <span class="na">class=</span><span class="s">"has-text-color has-very-light-gray-color"</span><span class="nt">&gt;</span>Full-width content.<span class="nt">&lt;/p&gt;</span>
          <span class="nt">&lt;/div&gt;</span>
      <span class="nt">&lt;/div&gt;</span>
      <span class="nt">&lt;div</span> <span class="na">class=</span><span class="s">"wp-block-button alignleft"</span><span class="nt">&gt;</span>
          <span class="nt">&lt;a</span> <span class="na">class=</span><span class="s">"wp-block-button__link"</span><span class="nt">&gt;</span>button floating left<span class="nt">&lt;/a&gt;</span>
      <span class="nt">&lt;/div&gt;</span>
      <span class="nt">&lt;p&gt;</span>Text next to the button.<span class="nt">&lt;/p&gt;</span>
      <span class="nt">&lt;p&gt;</span>Some more content here.<span class="nt">&lt;/p&gt;</span>
      <span class="nt">&lt;div</span> <span class="na">class=</span><span class="s">"wp-block-button alignright"</span><span class="nt">&gt;</span>
          <span class="nt">&lt;a</span> <span class="na">class=</span><span class="s">"wp-block-button__link"</span><span class="nt">&gt;</span>button floating right<span class="nt">&lt;/a&gt;</span>
      <span class="nt">&lt;/div&gt;</span>
      <span class="nt">&lt;p&gt;</span>Some more text<span class="nt">&lt;/p&gt;</span>
      <span class="nt">&lt;p&gt;</span>and yet some more to show the button float.<span class="nt">&lt;/p&gt;</span>
  <span class="nt">&lt;/div&gt;</span>
<span class="nt">&lt;/div&gt;</span>
</code></pre></div></div>

<p>The wrapping <code class="language-plaintext highlighter-rouge">my-container</code> element there is just our theme’s wrapper for the content.</p>

<h2 id="styling">Styling</h2>

<p>In the code above we can see a lot of classes, most of them color-related. I added them when editing the post to make it clear in the screenshot what each element is and what its dimensions are. But here are the important ones and what they should do:</p>

<ul>
  <li><code class="language-plaintext highlighter-rouge">.alignwide</code> makes an element wider than the normal content.</li>
  <li><code class="language-plaintext highlighter-rouge">.alignfull</code> makes an element span the full width of its parent container.</li>
  <li><code class="language-plaintext highlighter-rouge">.alignleft</code> floats an element to the left - while still keeping it inside the constraints of the “regular” content’s width</li>
  <li><code class="language-plaintext highlighter-rouge">.alignright</code> - similar to <code class="language-plaintext highlighter-rouge">.alignleft</code>, but obviously floating on the right side.</li>
</ul>

<p>What we <em>need</em> to accomplish:</p>

<ul>
  <li>We want our normal content to have a maximum width of <code class="language-plaintext highlighter-rouge">50em</code>.</li>
  <li>Elements that have the <code class="language-plaintext highlighter-rouge">.alignwide</code> class should be 25% wider than normal content.</li>
  <li>Elements with the <code class="language-plaintext highlighter-rouge">alignfull</code> class should be 100% of their container.</li>
  <li>We also want a padding on 1em on the left &amp; right of our elements, otherwise on mobile they’re going to stick to the edges of the window.</li>
</ul>

<p>Let’s start by defining some variables, and add the padding to our container:</p>

<div class="language-css highlighter-rouge"><div class="highlight"><pre class="highlight"><code><span class="nc">.my-container</span> <span class="p">{</span>
    <span class="py">--padding</span><span class="p">:</span> <span class="m">1em</span><span class="p">;</span>
    <span class="py">--content-width</span><span class="p">:</span> <span class="m">50em</span><span class="p">;</span>
    <span class="py">--wide-diff</span><span class="p">:</span> <span class="m">25%</span><span class="p">;</span>
    <span class="py">--wide-width</span><span class="p">:</span> <span class="nf">calc</span><span class="p">(</span><span class="nf">var</span><span class="p">(</span><span class="l">--content-width</span><span class="p">)</span> <span class="o">*</span> <span class="m">1.25</span><span class="p">);</span>

    <span class="nl">padding</span><span class="p">:</span> <span class="m">0</span> <span class="nf">var</span><span class="p">(</span><span class="l">--padding</span><span class="p">)</span> <span class="m">0</span> <span class="nf">var</span><span class="p">(</span><span class="l">--padding</span><span class="p">);</span>
<span class="p">}</span>
</code></pre></div></div>

<h3 id="normal-elements">Normal elements</h3>

<p>Next up, we can start adding styles for elements that should have a normal width:</p>

<div class="language-css highlighter-rouge"><div class="highlight"><pre class="highlight"><code><span class="nc">.entry-content</span> <span class="o">&gt;</span> <span class="nd">:not</span><span class="o">(</span><span class="nc">.alignfull</span><span class="o">)</span><span class="nd">:not</span><span class="o">(</span><span class="nc">.alignwide</span><span class="o">)</span><span class="nd">:not</span><span class="o">(</span><span class="nc">.alignleft</span><span class="o">)</span><span class="nd">:not</span><span class="o">(</span><span class="nc">.alignright</span><span class="o">)</span> <span class="p">{</span>
  <span class="nl">max-width</span><span class="p">:</span> <span class="nf">var</span><span class="p">(</span><span class="l">--content-width</span><span class="p">);</span>
  <span class="nl">margin-left</span><span class="p">:</span> <span class="nb">auto</span><span class="p">;</span>
  <span class="nl">margin-right</span><span class="p">:</span> <span class="nb">auto</span><span class="p">;</span>
<span class="p">}</span>
</code></pre></div></div>

<p>The above is fairly simply: For all elements that are direct children of our main container, if they are not alignfull/alignwide/alignleft/alignright we’re adding our content-width css-variable as the element’s maximum width.
Once we do that, we notice that the element is on the left of the screen, so we’re adding the margin-left and margin-right lines and set them to auto. This way our element gets properly centered.</p>

<h3 id="alignwide-elements"><code class="language-plaintext highlighter-rouge">.alignwide</code> elements</h3>

<p>Moving on to the “wide” elements:</p>

<div class="language-css highlighter-rouge"><div class="highlight"><pre class="highlight"><code><span class="nc">.entry-content</span> <span class="nc">.alignwide</span> <span class="p">{</span>
  <span class="nl">width</span><span class="p">:</span> <span class="nf">calc</span><span class="p">(</span><span class="nf">var</span><span class="p">(</span><span class="l">--content-width</span><span class="p">)</span> <span class="o">+</span> <span class="nf">var</span><span class="p">(</span><span class="l">--wide-diff</span><span class="p">)</span> <span class="o">+</span> <span class="m">2</span> <span class="o">*</span> <span class="nf">var</span><span class="p">(</span><span class="l">--padding</span><span class="p">));</span>
  <span class="nl">max-width</span><span class="p">:</span> <span class="m">100%</span><span class="p">;</span>
  <span class="nl">margin-left</span><span class="p">:</span> <span class="nb">auto</span><span class="p">;</span>
  <span class="nl">margin-right</span><span class="p">:</span> <span class="nb">auto</span><span class="p">;</span>
<span class="p">}</span>
</code></pre></div></div>
<p>This here is a bit more complicated: To calculate the width of our element we’re adding the <code class="language-plaintext highlighter-rouge">--wide-diff</code> var to our content-width, and then we also add the padding (doubled since it exists both on the left and right of our container).</p>

<h3 id="alignfull-elements"><code class="language-plaintext highlighter-rouge">.alignfull</code> elements</h3>

<p>The “full” elements are not without their difficulties too:</p>

<div class="language-css highlighter-rouge"><div class="highlight"><pre class="highlight"><code><span class="nc">.entry-content</span> <span class="nc">.alignfull</span> <span class="p">{</span>
  <span class="nl">transform</span><span class="p">:</span> <span class="nf">translateX</span><span class="p">(</span><span class="nf">calc</span><span class="p">(</span><span class="m">0px</span> <span class="o">-</span> <span class="nf">var</span><span class="p">(</span><span class="l">--padding</span><span class="p">)));</span>
  <span class="nl">width</span><span class="p">:</span> <span class="nf">calc</span><span class="p">(</span><span class="m">100%</span> <span class="o">+</span> <span class="m">2</span> <span class="o">*</span> <span class="nf">var</span><span class="p">(</span><span class="l">--padding</span><span class="p">));</span>
  <span class="nl">max-width</span><span class="p">:</span> <span class="nf">calc</span><span class="p">(</span><span class="m">100%</span> <span class="o">+</span> <span class="m">2</span> <span class="o">*</span> <span class="nf">var</span><span class="p">(</span><span class="l">--padding</span><span class="p">));</span>
  <span class="nl">margin-left</span><span class="p">:</span> <span class="nb">auto</span><span class="p">;</span>
  <span class="nl">margin-right</span><span class="p">:</span> <span class="nb">auto</span><span class="p">;</span>
<span class="p">}</span>
</code></pre></div></div>
<p>For these ones we have to move the element to the left by the amount of our defined padding, and then set its width to be equal to 100% of our available space, plus the padding doubled so there’s no space on the left and right.</p>

<h3 id="alignleft--alignright-elements"><code class="language-plaintext highlighter-rouge">.alignleft</code> &amp; <code class="language-plaintext highlighter-rouge">.alignright</code> elements</h3>

<p>Now that we’re done with the basics let’s move on to the hard part: Getting the floats right.</p>

<p>By default these are not restricted by the <code class="language-plaintext highlighter-rouge">50em</code> we want for our content since they use <code class="language-plaintext highlighter-rouge">float</code>. As a result they will literally float to the edges of the screen. Well, not quite the edge, <code class="language-plaintext highlighter-rouge">1em</code> from the edge ‘cause that’s the padding we have defined. So how do we get them to be within the limits of our invisible and theoretical “normal content” box?</p>

<p>The best solution I could come up with so far is this:</p>

<div class="language-css highlighter-rouge"><div class="highlight"><pre class="highlight"><code><span class="nc">.entry-content</span> <span class="nc">.alignleft</span> <span class="p">{</span>
  <span class="nl">float</span><span class="p">:</span> <span class="nb">left</span><span class="p">;</span>
  <span class="nl">margin-left</span><span class="p">:</span> <span class="nf">calc</span><span class="p">(</span><span class="m">50%</span> <span class="o">-</span> <span class="nf">var</span><span class="p">(</span><span class="l">--content-width</span><span class="p">)</span> <span class="o">/</span> <span class="m">2</span><span class="p">);</span>
<span class="p">}</span>

<span class="nc">.entry-content</span> <span class="nc">.alignright</span> <span class="p">{</span>
  <span class="nl">float</span><span class="p">:</span> <span class="nb">right</span><span class="p">;</span>
  <span class="nl">margin-right</span><span class="p">:</span> <span class="nf">calc</span><span class="p">(</span><span class="m">50%</span> <span class="o">-</span> <span class="nf">var</span><span class="p">(</span><span class="l">--content-width</span><span class="p">)</span> <span class="o">/</span> <span class="m">2</span><span class="p">)</span>
<span class="p">}</span>
</code></pre></div></div>

<p>The above snippet will add a left margin to elements that are floated to the left and a right margin to elements floated to the right, therefore displacing them visually and moving them to the place we need the to be. It’s counter-intuitive and I absolutely hate it. It’s an ugly hack that makes absolutely no sense. But it works (most of the time).</p>

<h2 id="got-a-better-idea">Got a better idea?</h2>

<p>How do you handle this? Do you have a better idea? If you do, please let me know. I’ve been banging my head against the wall for a long time trying to find an elegant solution.</p>]]></content><author><name>Ari Stathopoulos</name></author><category term="WordPress" /><summary type="html"><![CDATA[The Gutenberg editor is amazing. It allows for flexibility that was previously unheard of without a dedicated page builder. And though everyone kept saying “Gutenberg is not a page-builder”, I think there’s no denying it. It is a page-builder. You can call it an immersive editing experience for all I care, but the truth is it’s a page-builder.]]></summary></entry><entry><title type="html">What is the meaning of all this?</title><link href="https://aristath.github.io/blog/personal/what-is-all-this-for" rel="alternate" type="text/html" title="What is the meaning of all this?" /><published>2019-10-15T00:00:00+00:00</published><updated>2019-10-15T00:00:00+00:00</updated><id>https://aristath.github.io/blog/personal/what-is-all-this-for</id><content type="html" xml:base="https://aristath.github.io/blog/personal/what-is-all-this-for"><![CDATA[<p>This is one of those random posts that has no real point, it’s just spewing random thoughts and trying to reach a conclusion. There is no structure here, don’t expect to find anything meaningful.</p>

<p>I’ve been thinking a lot lately about my future. What my goals are, my purpose, what my legacy will be. I’m 39 and not getting any younger.</p>

<p>I love my job and I work extremely long hours. I work my normal job, and then when that is done I work on my personal open-source projects, I learn new things, improve my skills and so on. On minimum I am in front of my laptop a minimum of 16 hours/day writing code or studying and learning. So my daily routine looks something like this:</p>

<ul>
  <li>Wake up time varies, usually between 7am and 9am</li>
  <li>Take the dog for a 30-40 minute walk</li>
  <li>Take my octuple espresso (yep, that’s right… 8 espressos - preferably Guatemalan - in a tall glass with ice, no sugar)</li>
  <li>Get back home with my coffee and work my normal (paying) job</li>
  <li>Finish work &amp; grab something to eat, usually while watching a tutorial or a tech talk.</li>
  <li>Start work on open-source &amp; other projects until 1-2am</li>
  <li>Put on something stupid to watch on Netflix</li>
  <li>Fall asleep around 4am</li>
  <li>Repeat</li>
</ul>

<p>On weekends I just skip the normal (paying) job and instead work 16 hours on my other projects.</p>

<p>I see my normal job and my open-source projects as different sides of the same coin. I can’t efficiently do one without the other… I learn things in my day job working with others that I bring to my side-projects, and all the work I put in my side-projects regarding web-accessibility and sustainability heavily affect the way I work on my day job, helping me make more responsible decisions there and improving the way I code.</p>

<p>The amount of work doesn’t really bother me, in fact I think I’d just go crazy if I stopped working. Even when not working in front of a computer, I’m still working on the back of my head. Plus - believe it or not - the extra work prevents the burnout effect because there’s a feeling of satisfaction and accomplishment from the side-projects that a normal job simply can’t offer. That shit is mine, I built it, it works and it helps hundreds of people, runs on tens of thousands of websites and other developers use the things that I’ve built to make a living. It’s arrogant and makes me feel good about myself.</p>

<p>I do get mini-burnouts though… I can’t work more than 6-8 hours on the same thing, my brain just gets stuck and I get frustrated. So every few hours I’m rotating my focus. I’ll work on issue A for a couple of hours, then switch to issue B, then back to A, then B or even C. After a certain point though, I’m done. I don’t know if the term exists but I’ll just call it focus-overload for lack of a better word. It’s a mini-burnout. After a while I end up staring at a screen and all I see is random letters and symbols without any meaning. While working on a project, you inadvertently build puzzles in your mind, and as a coder my job is to solve these puzzles. But they do pile up… each puzzle you solve is a smaller piece in a larger puzzle. Switching from one piece of the puzzle to another works ‘cause you’re shifting focus, but after working on a few pieces, you’re left with shattered unrecognizable fragments of a larger image you can no longer see. It’s the curse of big projects. When that “mini-burnout” happens (on a daily basis), that’s when it’s time to switch to another completely different project, with a completely different focus. It’s a fresh start. It’s a mental soft-reboot. All the puzzles I was trying to solve and had accumulated in my head get thrown away and I’m starting to work not on a different piece of the same puzzle, but a different puzzle altogether. A smaller puzzle. And then another. And another (and that’s one of the reasons I also decided to split the Kirki framework to smaller, self-contained packages, I can work on them more efficiently).</p>

<hr />

<p>Here’s a question: What am I working for? Why am I torturing and slowly destroying myself? Is it so that when I’m old I can move to a house by the beach and live happily ever after until I die alone and someone finds me a week later half-eaten by the cats I’ll have in the garden? Why the fuck do I live in Athens instead of the countryside with a sea view?</p>

<p>I have come to terms with the idea that I will never have a family and that’s OK. I used to feel the need to have children, but I no longer feel that urge. If it happens it will be a bliss, but I am whole as I am, there’s no void I need to fill. So there’s nothing keeping me tied to a place, why am I not just moving someplace nice, by the sea, in a house with a garden where the dogs can run and the cats can come and go as they please, and I can plant my trees and do my gardening? Other people have their religion or their children to rely on. “When I die I’ll go to heaven”, or “my children are my contribution to this world”. What the fuck is my contribution? Is it my work? Is it the people I’ve talked to and interacted with all these years? And is my work all that will be left of me? Do I really want that? If so, it better be some fine piece of work.</p>

<hr />

<p>I’m almost 40 which means that I’ve already lived more than half of what what I am expected to live, and I have maybe 10, maximum 20 years of work left in me (I haven’t seen any 60-year old developers, have you?) Plus the situation in my country is a bit weird. By “weird” I mean that I’m not going to be able to live with dignity after I stop working. The pensions are laughable and I don’t think I’ll even qualify for a pension when the time comes. See the problem is that for a great number of years I’ve been working for companies abroad, and that is not recognized as “working” years by my country. Employers in Greece are required by law to pay for the employee’s insurance, social security and so on. By working for companies outside of Greece, I automatically lose all these benefits and am left to fend for myself. At 65 I’ll get a pension of $300 if I’m lucky. So yeah… that’s probably one of the reasons that make me work this hard. I feel that I need to build something that will be able to sustain me so that I don’t starve to death in 20 years. Of course that’s assuming I make it to 60 and I don’t die from lung cancer ‘till then ‘cause I’m not only addicted to caffeine but also nicotine (but hey… at least I don’t drink alcohol, never liked it).</p>

<hr />

<p>The only thing that’s really keeping me in Athens is my love for my brother and my baby niece. We live in the same building and yet I don’t see them very often, so basically I’m just staying here hoping that I see them more often. But is it really worth it? I’m not happy here and I know it. I feel I’m wasting my years closed between 4 walls. And of course that’s not really going to change if I move somewhere in the country, there will still be 4 walls and a laptop. But at least I feel I’ll have more freedom. Freedom to make better friends, go out more, be at the beach in 5 minutes if I so desire. And if I feel the need to be in a big city it’s only going to be 1h by train or car.</p>

<p>So… that’s something I’ll need to sleep on. When I finally manage to fall asleep that is, it’s already 3.30am.</p>

<p>Cheers.</p>]]></content><author><name>Ari Stathopoulos</name></author><category term="JavaScript" /><category term="WordPress" /><summary type="html"><![CDATA[This is one of those random posts that has no real point, it’s just spewing random thoughts and trying to reach a conclusion. There is no structure here, don’t expect to find anything meaningful.]]></summary></entry><entry><title type="html">The Hidden Color Functions in WordPress</title><link href="https://aristath.github.io/blog/the-hidden-color-functions-in-wp" rel="alternate" type="text/html" title="The Hidden Color Functions in WordPress" /><published>2019-09-21T00:00:00+00:00</published><updated>2019-09-21T00:00:00+00:00</updated><id>https://aristath.github.io/blog/the-hidden-color-functions-in-wp</id><content type="html" xml:base="https://aristath.github.io/blog/the-hidden-color-functions-in-wp"><![CDATA[<p>Today I want to bring to your attention a hidden gen in WordPress. And I say “hidden” because in all my years in WordPress I’ve seen fery few developers use it - most likely because not everyone knows about it.</p>

<h2 id="some-background-on-why">Some background on <em>why</em>.</h2>

<p>While working on an <a href="https://github.com/WordPress/twentytwenty/pull/351">implementation for accessible colors</a> in the <a href="https://github.com/WordPress/twentytwenty">twentytwenty</a> theme for WordPress 5.3 I needed a way to get various color properties like for example hue, saturation, lightness, relative luminance, contrast with other colors etc. All that so we could calculate colors that are readable and comply with WCAG rules for colors.</p>

<p>Initially I started pulling functions from a <a href="https://aristath.github.io/wcagColors.js/">wcagColors.js</a> library I wrote a while ago for the <a href="https://wplemon.com/downloads/kirki-wcag-link-colorpicker/">Kirki WCAG Link Colorpicker</a> and <a href="https://wplemon.com/downloads/kirki-wcag-text-colorpicker/">Kirki WCAG Text Colorpicker</a> controls. But these controls were a lot more complex than what we were trying to accomplish in the twentytwenty theme, so those were a bit of an overkill. A simpler solution was required. Enter WordPress’s own <code class="language-plaintext highlighter-rouge">Color</code> functions.</p>

<h2 id="where-are-they">Where are they?</h2>

<p>The reason you may have never heard of them is because they don’t exist as a separate script. They should, but instead they’re just <a href="https://github.com/Automattic/Iris/blob/858001593f00e6ad8028d4e1a7c48eccf55f75ac/dist/iris.js#L909-L1446">tucked away inside the iris colorpicker</a>. They are available as a separate script on <a href="https://github.com/Automattic/Color.js">github.com/Automattic/Color.js</a> but it’s been completely neglected, hasn’t been updated since 2015.</p>

<h2 id="so-how-can-you-enqueue-them">So how can you enqueue them?</h2>

<p>Since they don’t exist as a separate script, to use them you’ll first have to make sure that the <code class="language-plaintext highlighter-rouge">wp-color-picker</code> script is enqueued. So you can simply add that as a dependency to your own scripts.</p>

<h2 id="usage">Usage</h2>

<p>Unfortunately the code is very poorly documented, so to get an idea of what you can do and how you can use it, you’d have to read the source. Or you can just keep reading. :)</p>

<h3 id="getting-properties-of-a-color">Getting properties of a color</h3>

<p>First we need to instantiate the color:</p>

<div class="language-js highlighter-rouge"><div class="highlight"><pre class="highlight"><code><span class="kd">let</span> <span class="nx">myColor</span> <span class="o">=</span> <span class="nc">Color</span><span class="p">(</span> <span class="dl">'</span><span class="s1">#cd2653</span><span class="dl">'</span> <span class="p">);</span>
</code></pre></div></div>

<p>Then we can get the properties we need:</p>

<div class="language-js highlighter-rouge"><div class="highlight"><pre class="highlight"><code><span class="c1">// Get red.</span>
<span class="kd">let</span> <span class="nx">red</span> <span class="o">=</span> <span class="nx">myColor</span><span class="p">.</span><span class="nf">r</span><span class="p">();</span>
<span class="c1">// Get green.</span>
<span class="kd">let</span> <span class="nx">green</span> <span class="o">=</span> <span class="nx">myColor</span><span class="p">.</span><span class="nf">g</span><span class="p">();</span>
<span class="c1">// Get blue.</span>
<span class="kd">let</span> <span class="nx">blue</span> <span class="o">=</span> <span class="nx">myColor</span><span class="p">.</span><span class="nf">b</span><span class="p">();</span>
<span class="c1">// Get alpha.</span>
<span class="kd">let</span> <span class="nx">alpha</span> <span class="o">=</span> <span class="nx">myColor</span><span class="p">.</span><span class="nf">a</span><span class="p">();</span>
<span class="c1">// Get hue.</span>
<span class="kd">let</span> <span class="nx">alpha</span> <span class="o">=</span> <span class="nx">myColor</span><span class="p">.</span><span class="nf">h</span><span class="p">();</span>
<span class="c1">// Get saturation.</span>
<span class="kd">let</span> <span class="nx">saturation</span> <span class="o">=</span> <span class="nx">myColor</span><span class="p">.</span><span class="nf">s</span><span class="p">();</span>
<span class="c1">// Get lightness.</span>
<span class="kd">let</span> <span class="nx">lightness</span> <span class="o">=</span> <span class="nx">myColor</span><span class="p">.</span><span class="nf">l</span><span class="p">();</span>
</code></pre></div></div>

<p>The above are the basics, but there’s more! You can also get the relative luminance of the color:</p>

<div class="language-js highlighter-rouge"><div class="highlight"><pre class="highlight"><code><span class="kd">let</span> <span class="nx">luminance</span> <span class="o">=</span> <span class="nx">myColor</span><span class="p">.</span><span class="nf">toLuminosity</span><span class="p">();</span>
</code></pre></div></div>

<p>You can also get the <a href="http://www.w3.org/TR/2008/REC-WCAG20-20081211/#contrast-ratiodef">WCAG contrast</a> between 2 colors:</p>

<div class="language-js highlighter-rouge"><div class="highlight"><pre class="highlight"><code><span class="c1">// Create background-color object.</span>
<span class="kd">let</span> <span class="nx">backgroundColor</span> <span class="o">=</span> <span class="nc">Color</span><span class="p">(</span> <span class="dl">'</span><span class="s1">#fff</span><span class="dl">'</span> <span class="p">);</span>
<span class="c1">// Create text-color object.</span>
<span class="kd">let</span> <span class="nx">textColor</span> <span class="o">=</span> <span class="nc">Color</span><span class="p">(</span> <span class="dl">'</span><span class="s1">#000</span><span class="dl">'</span> <span class="p">);</span>

<span class="c1">// Get the contrast between the 2 colors.</span>
<span class="kd">let</span> <span class="nx">contrast</span> <span class="o">=</span> <span class="nx">textColor</span><span class="p">.</span><span class="nf">getDistanceLuminosityFrom</span><span class="p">(</span> <span class="nx">backgroundColor</span> <span class="p">);</span>
</code></pre></div></div>

<p>If you want to get the color you should be using for your text depending on the background-color, there’s a neat <code class="language-plaintext highlighter-rouge">getMaxContrastColor</code> function that will return a <code class="language-plaintext highlighter-rouge">Color</code> object of either white (<code class="language-plaintext highlighter-rouge">#fff</code>) or black (<code class="language-plaintext highlighter-rouge">#000</code>):</p>

<div class="language-js highlighter-rouge"><div class="highlight"><pre class="highlight"><code><span class="c1">// Get black/white Color object depending on background.</span>
<span class="kd">let</span> <span class="nx">textColor</span> <span class="o">=</span> <span class="nc">Color</span><span class="p">(</span> <span class="dl">'</span><span class="s1">#f2f2f2</span><span class="dl">'</span> <span class="p">).</span><span class="nf">getMaxContrastColor</span><span class="p">();</span>
</code></pre></div></div>

<p>You can also automatically get a readable text-color:</p>

<div class="language-js highlighter-rouge"><div class="highlight"><pre class="highlight"><code><span class="c1">// Create background-color object.</span>
<span class="kd">let</span> <span class="nx">backgroundColor</span> <span class="o">=</span> <span class="nc">Color</span><span class="p">(</span> <span class="dl">'</span><span class="s1">#fff</span><span class="dl">'</span> <span class="p">);</span>
<span class="c1">// Create text-color object.</span>
<span class="kd">let</span> <span class="nx">myColor</span> <span class="o">=</span> <span class="nc">Color</span><span class="p">(</span> <span class="dl">'</span><span class="s1">#cd2653</span><span class="dl">'</span> <span class="p">);</span>

<span class="c1">// Get a readable color, with a minimum contrast of 7:1</span>
<span class="kd">let</span> <span class="nx">readable</span> <span class="o">=</span> <span class="nx">myColor</span><span class="p">.</span><span class="nf">getReadableContrastingColor</span><span class="p">(</span> <span class="nx">backgroundColor</span><span class="p">,</span> <span class="mi">7</span> <span class="p">);</span>
</code></pre></div></div>
<p>The above is not what was used in the twentytwenty theme because we needed something a bit more customized than that, but the above method also works perfectly fine.</p>

<h3 id="manipulating-colors">Manipulating colors.</h3>

<p>Retrieving color values is not the only thing you can do, you can also use this library to manipulate your colors.</p>

<p>The following functions are available:</p>
<ul>
  <li><code class="language-plaintext highlighter-rouge">darken</code></li>
  <li><code class="language-plaintext highlighter-rouge">lighten</code></li>
  <li><code class="language-plaintext highlighter-rouge">saturate</code></li>
  <li><code class="language-plaintext highlighter-rouge">desaturate</code></li>
  <li><code class="language-plaintext highlighter-rouge">toGrayscale</code></li>
  <li><code class="language-plaintext highlighter-rouge">getComplement</code></li>
  <li><code class="language-plaintext highlighter-rouge">getSplitComplement</code></li>
  <li><code class="language-plaintext highlighter-rouge">getAnalog</code></li>
  <li><code class="language-plaintext highlighter-rouge">getTetrad</code></li>
  <li><code class="language-plaintext highlighter-rouge">getTriad</code></li>
</ul>

<p>You can also use the <code class="language-plaintext highlighter-rouge">r</code>, <code class="language-plaintext highlighter-rouge">g</code>, <code class="language-plaintext highlighter-rouge">b</code>, <code class="language-plaintext highlighter-rouge">a</code>, <code class="language-plaintext highlighter-rouge">h</code>, <code class="language-plaintext highlighter-rouge">s</code>, <code class="language-plaintext highlighter-rouge">l</code> methods I mentioned above in the example for retrieving a value simply by defining a value inside them:</p>

<div class="language-js highlighter-rouge"><div class="highlight"><pre class="highlight"><code><span class="c1">// Darken color by 30%:</span>
<span class="kd">let</span> <span class="nx">myColor</span> <span class="o">=</span> <span class="nc">Color</span><span class="p">(</span> <span class="dl">'</span><span class="s1">#cd2653</span><span class="dl">'</span> <span class="p">).</span><span class="nf">darken</span><span class="p">(</span> <span class="mi">30</span> <span class="p">);</span>

<span class="c1">// Change the red value.</span>
<span class="kd">let</span> <span class="nx">myColor</span> <span class="o">=</span> <span class="nc">Color</span><span class="p">(</span> <span class="dl">'</span><span class="s1">#cd2653</span><span class="dl">'</span> <span class="p">).</span><span class="nf">r</span><span class="p">(</span> <span class="mi">50</span> <span class="p">);</span>
</code></pre></div></div>

<h3 id="cloning-an-object">Cloning an object</h3>

<p>If you don’t want your calculations to be applied in-place but instead want to apply them to a clone of the object so that you can still have access to the unmodified object, you can use the <code class="language-plaintext highlighter-rouge">clone</code> method:</p>

<div class="language-js highlighter-rouge"><div class="highlight"><pre class="highlight"><code><span class="kd">let</span> <span class="nx">background</span> <span class="o">=</span> <span class="nc">Color</span><span class="p">(</span> <span class="dl">'</span><span class="s1">#fff</span><span class="dl">'</span> <span class="p">);</span>
<span class="kd">let</span> <span class="nx">otherBackground</span> <span class="o">=</span> <span class="nx">background</span><span class="p">.</span><span class="nf">clone</span><span class="p">();</span>
</code></pre></div></div>

<h3 id="getting-the-css-value-from-a-color-object">Getting the CSS value from a color object</h3>

<p>Easy, just use the <code class="language-plaintext highlighter-rouge">toCSS</code> method:</p>

<div class="language-js highlighter-rouge"><div class="highlight"><pre class="highlight"><code><span class="kd">let</span> <span class="nx">background</span> <span class="o">=</span> <span class="nc">Color</span><span class="p">(</span> <span class="dl">'</span><span class="s1">#fff</span><span class="dl">'</span> <span class="p">);</span>
<span class="nx">background</span><span class="p">.</span><span class="nf">darken</span><span class="p">(</span> <span class="mi">30</span> <span class="p">);</span>
<span class="kd">let</span> <span class="nx">newValue</span> <span class="o">=</span> <span class="nx">background</span><span class="p">.</span><span class="nf">toCSS</span><span class="p">();</span>
</code></pre></div></div>

<h3 id="chaining">Chaining</h3>

<p>You can chain multiple functions to get what you need faster. In the example below we’re getting the complementary color or our original value, then darkening it by 30%, desaturating it by 10% and returning the CSS value:</p>

<div class="language-js highlighter-rouge"><div class="highlight"><pre class="highlight"><code><span class="kd">let</span> <span class="nx">newColor</span> <span class="o">=</span> <span class="nc">Color</span><span class="p">(</span> <span class="dl">'</span><span class="s1">#cd2653</span><span class="dl">'</span> <span class="p">)</span>
    <span class="p">.</span><span class="nf">getComplement</span><span class="p">()</span>
    <span class="p">.</span><span class="nf">darken</span><span class="p">(</span> <span class="mi">30</span> <span class="p">)</span>
    <span class="p">.</span><span class="nf">desaturate</span><span class="p">(</span> <span class="mi">10</span> <span class="p">)</span>
    <span class="p">.</span><span class="nf">toCSS</span><span class="p">();</span>
</code></pre></div></div>

<h2 id="read-the-source">Read the source</h2>

<p>The above are nothing but scratching the surface, there’s a lot more you can do. I suggest you <a href="https://github.com/Automattic/Color.js/blob/master/src/color.js">read the source</a> of this neat little gem. It may not be properly documented, but the functions and parameters have very descriptive names so it’s easy to understand.</p>

<p>A big thank you to <a href="https://twitter.com/mattwiebe">Matt Wiebe</a> for building this. It’s been a long time since you did this, but it’s still amazing.</p>]]></content><author><name>Ari Stathopoulos</name></author><category term="JavaScript" /><category term="WordPress" /><summary type="html"><![CDATA[Today I want to bring to your attention a hidden gen in WordPress. And I say “hidden” because in all my years in WordPress I’ve seen fery few developers use it - most likely because not everyone knows about it.]]></summary></entry><entry><title type="html">Fluid Typography with CSS Variables</title><link href="https://aristath.github.io/blog/fluid-typography-css-vars" rel="alternate" type="text/html" title="Fluid Typography with CSS Variables" /><published>2019-09-16T00:00:00+00:00</published><updated>2019-09-16T00:00:00+00:00</updated><id>https://aristath.github.io/blog/flyid-typography-css-vars</id><content type="html" xml:base="https://aristath.github.io/blog/fluid-typography-css-vars"><![CDATA[<p>By “Fluid Typography” in this article I’m referring to typography that scales depending on the screen size.<br />
Traditionally sites have a fixed font-size, like for example <code class="language-plaintext highlighter-rouge">14px</code>. The problem with that approach is that devices nowadays vary a lot. There are 4-inch smartphones, 40-inch Smart-TVs and everything in between.</p>

<p>Using CSS-Variables (aka <em>Custom Properties</em>) is not necessary, you can achieve the same result fine without them and I’ll also be showing an example of that.</p>

<p>First of all, the code we’ll be talking about:</p>
<div class="language-css highlighter-rouge"><div class="highlight"><pre class="highlight"><code><span class="nd">:root</span> <span class="p">{</span>
  <span class="py">--base-font-size</span><span class="p">:</span> <span class="m">12px</span><span class="p">;</span>
  <span class="py">--fluid-typography-ratio</span><span class="p">:</span> <span class="m">0.9</span><span class="p">;</span>

  <span class="py">--rem</span><span class="p">:</span> <span class="nf">calc</span><span class="p">(</span><span class="nf">var</span><span class="p">(</span><span class="l">--base-font-size</span><span class="p">)</span> <span class="o">+</span> <span class="nf">var</span><span class="p">(</span><span class="l">--fluid-typography-ratio</span><span class="p">)</span> <span class="o">*</span> <span class="m">1vw</span><span class="p">);</span>

  <span class="nl">font-size</span><span class="p">:</span> <span class="nf">var</span><span class="p">(</span><span class="l">--rem</span><span class="p">);</span>
<span class="p">}</span>
</code></pre></div></div>

<p>The above is a simple technique that allows the font-size of your site to be readable no matter the device used. In fact that is the exact code used on this site.<br />
Now to explain what that code does:</p>

<p>First we’re defining 2 values: <code class="language-plaintext highlighter-rouge">--base-font-size</code>, and <code class="language-plaintext highlighter-rouge">--fluid-typography-ratio</code>. Feel free to tweak these values to achieve the result you want, these 2 are responsible for the rest of the site and calculations.</p>

<p>Next we’re defining the <code class="language-plaintext highlighter-rouge">--rem</code> variable.<br />
This is a value that gets calculated from the font-size and typography-ratio we defined.</p>

<p>If you’re reading this post on a device that has a screen-width of <code class="language-plaintext highlighter-rouge">500px</code> then the font-size will be calculated like this:</p>
<div class="language-plaintext highlighter-rouge"><div class="highlight"><pre class="highlight"><code>12px + ( 500px / 100 ) * 0.9 = 17px
</code></pre></div></div>
<p>The <code class="language-plaintext highlighter-rouge">( 500px / 100 )</code> is because we used <code class="language-plaintext highlighter-rouge">1vw</code> which according to this <a href="https://developer.mozilla.org/en-US/docs/Web/CSS/length">article on MDN</a> is defined as</p>

<blockquote>
  <p>Equal to 1% of the width of the viewport’s initial containing block.</p>
</blockquote>

<p>So on a 500px-wide screen, 1vw is equal to <code class="language-plaintext highlighter-rouge">500px/100</code>.</p>

<p>If on the other hand you’re reading this post on a 3000px-wide screen, then the font-size will be</p>
<div class="language-plaintext highlighter-rouge"><div class="highlight"><pre class="highlight"><code>12px + ( 3000px / 100 ) * 0.9 = 42px
</code></pre></div></div>

<h2 id="without-css-variables">Without CSS Variables</h2>

<p>To do the same without CSS Variables you can replace the whole block of code from the beginning of this post with this:</p>
<div class="language-css highlighter-rouge"><div class="highlight"><pre class="highlight"><code><span class="nd">:root</span> <span class="p">{</span>
  <span class="nl">font-size</span><span class="p">:</span> <span class="nf">calc</span><span class="p">(</span><span class="m">12px</span> <span class="o">+</span> <span class="m">0.9vw</span><span class="p">);</span>
<span class="p">}</span>
</code></pre></div></div>

<p>Depending on your use-case that might be preferable since it’s a lot shorter. In my case I’m using the base-font-size and typography-ratio variables for a bunch of other calculations too so it makes sense to use them.</p>

<h2 id="if-youre-building-wordpress-themes">If you’re building WordPress Themes</h2>

<p>In case you’re a WordPress Theme Developer the above method can be particularly useful and can be achieved with 2 simple controls in the WordPress Customizer:</p>
<ul>
  <li>A slider control for the base font-size</li>
  <li>A slider control for the typography-ratio.</li>
</ul>

<p>If users set the typography-ratio to <code class="language-plaintext highlighter-rouge">0</code> then their sites will use a static font-size, otherwise the values they define in these 2 controls will change the sizes of everything on their site. Take a lookat the <a href="https://wordpress.org/themes/gridd">Gridd</a> for an example of how this can be done.</p>

<h2 id="working-with-the-above-approach-on-a-site">Working with the above approach on a site</h2>

<p>Though the above method is awesome and allows you to build more responsive layouts, you should be aware that you’ll need to consistently use relative units on your site instead of absolute for most things. So for sizing elements that contain text you can use <code class="language-plaintext highlighter-rouge">em</code>, <code class="language-plaintext highlighter-rouge">rem</code>, <code class="language-plaintext highlighter-rouge">ch</code>, <code class="language-plaintext highlighter-rouge">vw</code>, <code class="language-plaintext highlighter-rouge">%</code> etc. <strong>But not <code class="language-plaintext highlighter-rouge">px</code></strong>. The reason is simple: If you define your site-width as <code class="language-plaintext highlighter-rouge">960px</code> for example, then on a screen with a horizontal resolution of more than 3000px only a few characters will fit. If on the other hand you define your site-width as <code class="language-plaintext highlighter-rouge">65rem</code>, then the whole layout of the site resize to fit along with your text. And yes, you can use <code class="language-plaintext highlighter-rouge">rem</code> &amp; <code class="language-plaintext highlighter-rouge">em</code> for your media-queries too.</p>

<p>This is one of the things I’d like to see more of on the web: Please move away from absolute values and start using more relative values. We no longer live in a world where all screens are between 15 and 19 inches, those days are long gone. Our designs should fit the medium they are consumed in.</p>]]></content><author><name>Ari Stathopoulos</name></author><category term="CSS" /><summary type="html"><![CDATA[By “Fluid Typography” in this article I’m referring to typography that scales depending on the screen size. Traditionally sites have a fixed font-size, like for example 14px. The problem with that approach is that devices nowadays vary a lot. There are 4-inch smartphones, 40-inch Smart-TVs and everything in between.]]></summary></entry><entry><title type="html">Styling Links</title><link href="https://aristath.github.io/blog/styling-links" rel="alternate" type="text/html" title="Styling Links" /><published>2019-09-16T00:00:00+00:00</published><updated>2019-09-16T00:00:00+00:00</updated><id>https://aristath.github.io/blog/styling-links</id><content type="html" xml:base="https://aristath.github.io/blog/styling-links"><![CDATA[<p>Links are a part of any page. They have been a part of the web from its conception, and are the main way we navigate on our everyday lives. They’re everywhere! So it stands to reason you should style them appropriately.</p>

<p>Links should not blend in with their surrounding text. They need to be seen, they need to be different. If they’re not, it will be difficult to find them. Design should make our lives easier. So here are some rules you should follow:</p>

<ul>
  <li>Don’t remove the <code class="language-plaintext highlighter-rouge">underline</code> from links. If you remove it, replace it with something equally visible (like for example <code class="language-plaintext highlighter-rouge">border-bottom</code>).</li>
  <li>If there is no <code class="language-plaintext highlighter-rouge">underline</code>, <code class="language-plaintext highlighter-rouge">border-bottom</code> or <code class="language-plaintext highlighter-rouge">box-shadow</code> in your links, make sure that there is sufficient contrast between the colors you have selected. And by “sufficient contrast” I mean you should follow the WCAG guidelines: <code class="language-plaintext highlighter-rouge">7:1</code> contrast with the background, and <code class="language-plaintext highlighter-rouge">3:1</code> contrast with surrounding text. Lea Verou has built an amazing tool you can use to check these on <a href="https://contrast-ratio.com/">contrast-ratio.com</a>. Use it. These numbers were not just picked at random, there are real valid reasons why you should follow these guidelines. And it’s not just for “accessibility”, it’s to <strong>make things easy for everyone</strong>.</li>
  <li><code class="language-plaintext highlighter-rouge">:hover</code> should have different styling. It doesn’t need to be extremely different, but enough to indicate the user is hovering the link.</li>
  <li><code class="language-plaintext highlighter-rouge">:focus</code> and <code class="language-plaintext highlighter-rouge">active</code> should be properly indicated. By default browsers use an <code class="language-plaintext highlighter-rouge">outline</code> for these statuses, if you remove it then make sure you replace it with something else.</li>
</ul>

<p>Personally I don’t like using many colors, so I use something similar to this:</p>

<div class="language-css highlighter-rouge"><div class="highlight"><pre class="highlight"><code><span class="nt">a</span> <span class="p">{</span>
  <span class="nl">font-weight</span><span class="p">:</span> <span class="m">600</span><span class="p">;</span>
  <span class="nl">text-decoration</span><span class="p">:</span> <span class="nb">none</span><span class="p">;</span>
  <span class="nl">border-bottom</span><span class="p">:</span> <span class="m">.1em</span> <span class="nb">solid</span><span class="p">;</span>
<span class="p">}</span>

<span class="nt">a</span><span class="nd">:hover</span><span class="o">,</span>
<span class="nt">a</span><span class="nd">:focus</span><span class="o">,</span>
<span class="nt">a</span><span class="nd">:active</span> <span class="p">{</span>
  <span class="nl">box-shadow</span><span class="p">:</span> <span class="m">0</span> <span class="m">.1em</span><span class="p">;</span>
<span class="p">}</span>

<span class="nt">a</span><span class="nd">:focus</span><span class="o">,</span>
<span class="nt">a</span><span class="nd">:active</span> <span class="p">{</span>
  <span class="nl">outline</span><span class="p">:</span> <span class="m">.1em</span> <span class="nb">solid</span><span class="p">;</span>
<span class="p">}</span>
</code></pre></div></div>

<p>Breaking down the above code:</p>

<p>Since I don’t use a separate color for links, I’m adding some default styles to them that makes them look different and stand out.</p>

<p>In CSS we can’t control the thickness of the default undersline, so I chose to remove that and instead use <code class="language-plaintext highlighter-rouge">border-bottom</code> with a value of <code class="language-plaintext highlighter-rouge">.1em solid</code>. That makes the underline scale depending on the font-size, so headers have a thicker border than the main text. Additionally you can change the color of borders, so that provides more design options.</p>

<hr />

<p>On <code class="language-plaintext highlighter-rouge">:hover</code>, <code class="language-plaintext highlighter-rouge">:focus</code> and <code class="language-plaintext highlighter-rouge">:active</code> I’m adding a <code class="language-plaintext highlighter-rouge">box-shadow</code> with a value <code class="language-plaintext highlighter-rouge">0 .1em</code>. The box-shadow will sit right below the bottom border making it look a bit thicker. The reason I’m using <code class="language-plaintext highlighter-rouge">box-shadow</code> instead of just changing the value of <code class="language-plaintext highlighter-rouge">border-bottom</code> is because now I have the freedom to use a slightly different shade of the color I used for the border., which looks extremely well if you choose the right colors.</p>

<hr />
<p>Finally on <code class="language-plaintext highlighter-rouge">:focus</code> and <code class="language-plaintext highlighter-rouge">:active</code> I’m adding an <code class="language-plaintext highlighter-rouge">outline</code> of <code class="language-plaintext highlighter-rouge">.1em solid</code>. This way keyboard navigation is easier because it’s always clear where users using a keyboard instead of a mouse are.</p>

<hr />
<p>There are many ways you can handle styling links. As long as they are styled differently, are visible, and theis states are sufficiently different you’ll be OK. But <strong>do not, under any circumstances</strong> make them the same as your normal text. Doing so is just annoying and breaks the way we expect things to work. Not to mention it’s just an inconsiderate dick move for accessibility. You’re breaking the web.</p>]]></content><author><name>Ari Stathopoulos</name></author><category term="CSS" /><summary type="html"><![CDATA[Links are a part of any page. They have been a part of the web from its conception, and are the main way we navigate on our everyday lives. They’re everywhere! So it stands to reason you should style them appropriately.]]></summary></entry><entry><title type="html">Typography Scales with CSS Variables</title><link href="https://aristath.github.io/blog/typography-scales-with-css-vars" rel="alternate" type="text/html" title="Typography Scales with CSS Variables" /><published>2019-09-16T00:00:00+00:00</published><updated>2019-09-16T00:00:00+00:00</updated><id>https://aristath.github.io/blog/typography-scales-with-css-vars</id><content type="html" xml:base="https://aristath.github.io/blog/typography-scales-with-css-vars"><![CDATA[<p>A typography scape makes all our typography sizes relative to one another. These 2 quotes from the <a href="https://www.ibm.com/design/v1/language/experience/visual/typography/">IBM Design Language</a> site pretty much convey why a typography scale is useful:</p>

<blockquote>
  <p>Scale creates consistency in sizing across elements. A visual type scale turns a typographic balancing act into a set ratio. Use a type scale based on your users and their content.</p>
</blockquote>

<blockquote>
  <p><strong>Type scales help users quickly skim and scan</strong></p>

  <p>By using a type scale, you fulfill users’ expectations by giving order to how things should be communicated and how they should appear. A modular scale is a design tool, but not a guarantee. Good type application still relies on designers to apply aesthetic sensibility to their overall layout in a way that addresses user needs.</p>
</blockquote>

<p>So how can you do that on your site? Well, you can use the method below:</p>

<p>First I like defining some variables that I can use throughout the site:</p>
<div class="language-css highlighter-rouge"><div class="highlight"><pre class="highlight"><code><span class="nd">:root</span> <span class="p">{</span>
  <span class="py">--scale</span><span class="p">:</span> <span class="m">1.333</span><span class="p">;</span>
  <span class="c">/* Don't change the lines below, you only need to change the --scale above. */</span>
  <span class="py">--size-l-1</span><span class="p">:</span> <span class="nf">calc</span><span class="p">(</span><span class="m">1rem</span> <span class="o">*</span> <span class="nf">var</span><span class="p">(</span><span class="l">--scale</span><span class="p">));</span>
  <span class="py">--size-l-2</span><span class="p">:</span> <span class="nf">calc</span><span class="p">(</span><span class="nf">var</span><span class="p">(</span><span class="l">--size-l-1</span><span class="p">)</span> <span class="o">*</span> <span class="nf">var</span><span class="p">(</span><span class="l">--scale</span><span class="p">));</span>
  <span class="py">--size-l-3</span><span class="p">:</span> <span class="nf">calc</span><span class="p">(</span><span class="nf">var</span><span class="p">(</span><span class="l">--size-l-2</span><span class="p">)</span> <span class="o">*</span> <span class="nf">var</span><span class="p">(</span><span class="l">--scale</span><span class="p">));</span>
  <span class="py">--size-l-4</span><span class="p">:</span> <span class="nf">calc</span><span class="p">(</span><span class="nf">var</span><span class="p">(</span><span class="l">--size-l-3</span><span class="p">)</span> <span class="o">*</span> <span class="nf">var</span><span class="p">(</span><span class="l">--scale</span><span class="p">));</span>
  <span class="py">--size-l-5</span><span class="p">:</span> <span class="nf">calc</span><span class="p">(</span><span class="nf">var</span><span class="p">(</span><span class="l">--size-l-4</span><span class="p">)</span> <span class="o">*</span> <span class="nf">var</span><span class="p">(</span><span class="l">--scale</span><span class="p">));</span>
  <span class="py">--size-l-6</span><span class="p">:</span> <span class="nf">calc</span><span class="p">(</span><span class="nf">var</span><span class="p">(</span><span class="l">--size-l-5</span><span class="p">)</span> <span class="o">*</span> <span class="nf">var</span><span class="p">(</span><span class="l">--scale</span><span class="p">));</span>
  <span class="py">--size-l-7</span><span class="p">:</span> <span class="nf">calc</span><span class="p">(</span><span class="nf">var</span><span class="p">(</span><span class="l">--size-l-6</span><span class="p">)</span> <span class="o">*</span> <span class="nf">var</span><span class="p">(</span><span class="l">--scale</span><span class="p">));</span>
  <span class="py">--size-s-1</span><span class="p">:</span> <span class="nf">calc</span><span class="p">(</span><span class="m">1rem</span> <span class="o">/</span> <span class="nf">var</span><span class="p">(</span><span class="l">--scale</span><span class="p">));</span>
  <span class="py">--size-s-2</span><span class="p">:</span> <span class="nf">calc</span><span class="p">(</span><span class="nf">var</span><span class="p">(</span><span class="l">--size-s-1</span><span class="p">)</span> <span class="o">/</span> <span class="nf">var</span><span class="p">(</span><span class="l">--scale</span><span class="p">));</span>
  <span class="py">--size-s-3</span><span class="p">:</span> <span class="nf">calc</span><span class="p">(</span><span class="nf">var</span><span class="p">(</span><span class="l">--size-s-2</span><span class="p">)</span> <span class="o">/</span> <span class="nf">var</span><span class="p">(</span><span class="l">--scale</span><span class="p">));</span>
<span class="p">}</span>
</code></pre></div></div>
<p>The variables names vary depending on the project, but in the above example I named the variables using a pattern</p>
<div class="language-plaintext highlighter-rouge"><div class="highlight"><pre class="highlight"><code>--size-{large/small}-{multiplier}
</code></pre></div></div>
<p>So <code class="language-plaintext highlighter-rouge">--size-l-1</code> is <code class="language-plaintext highlighter-rouge">1rem</code> multiplied by our defined scale (the <code class="language-plaintext highlighter-rouge">--scale</code> var). <code class="language-plaintext highlighter-rouge">--size-l-2</code> is the <code class="language-plaintext highlighter-rouge">--size-l-1</code> var multiplied by <code class="language-plaintext highlighter-rouge">--scale</code>. Or if you prefer, <code class="language-plaintext highlighter-rouge">1em</code> multiplied 2 times by our <code class="language-plaintext highlighter-rouge">--scale</code> and so on. The <code class="language-plaintext highlighter-rouge">--size-s-1</code> is our base font-size (1rem) divided by our scale 1 time, <code class="language-plaintext highlighter-rouge">--size-s-2</code> is divided twice and so on.</p>

<p>Now that we have the sizes properly defined and calculated we can just use them in our styles:</p>

<div class="language-css highlighter-rouge"><div class="highlight"><pre class="highlight"><code><span class="nt">h1</span> <span class="p">{</span>
  <span class="nl">font-size</span><span class="p">:</span> <span class="nf">var</span><span class="p">(</span><span class="l">--size-l-5</span><span class="p">);</span>
<span class="p">}</span>
<span class="nt">h2</span> <span class="p">{</span>
  <span class="nl">font-size</span><span class="p">:</span> <span class="nf">var</span><span class="p">(</span><span class="l">--size-l-4</span><span class="p">);</span>
<span class="p">}</span>
<span class="nt">h3</span> <span class="p">{</span>
  <span class="nl">font-size</span><span class="p">:</span> <span class="nf">var</span><span class="p">(</span><span class="l">--size-l-3</span><span class="p">);</span>
<span class="p">}</span>
<span class="nt">h4</span> <span class="p">{</span>
  <span class="nl">font-size</span><span class="p">:</span> <span class="nf">var</span><span class="p">(</span><span class="l">--size-l-2</span><span class="p">);</span>
<span class="p">}</span>
<span class="nt">h5</span> <span class="p">{</span>
  <span class="nl">font-size</span><span class="p">:</span> <span class="nf">var</span><span class="p">(</span><span class="l">--size-l-1</span><span class="p">);</span>
<span class="p">}</span>
<span class="nt">h6</span> <span class="p">{</span>
  <span class="nl">font-size</span><span class="p">:</span> <span class="m">1rem</span><span class="p">;</span>
<span class="p">}</span>
<span class="nc">.large</span> <span class="p">{</span>
  <span class="nl">font-size</span><span class="p">:</span> <span class="nf">var</span><span class="p">(</span><span class="l">--size-l-1</span><span class="p">)</span>
<span class="p">}</span>
<span class="nc">.larger</span> <span class="p">{</span>
  <span class="nl">font-size</span><span class="p">:</span> <span class="nf">var</span><span class="p">(</span><span class="l">--size-l-2</span><span class="p">)</span>
<span class="p">}</span>
<span class="nc">.largest</span> <span class="p">{</span>
  <span class="nl">font-size</span><span class="p">:</span> <span class="nf">var</span><span class="p">(</span><span class="l">--size-l-3</span><span class="p">)</span>
<span class="p">}</span>
<span class="nt">small</span><span class="o">,</span> <span class="nc">.small</span> <span class="p">{</span>
  <span class="nl">font-size</span><span class="p">:</span> <span class="nf">var</span><span class="p">(</span><span class="l">--size-s-1</span><span class="p">)</span>
<span class="p">}</span>
<span class="nc">.smaller</span> <span class="p">{</span>
  <span class="nl">font-size</span><span class="p">:</span> <span class="nf">var</span><span class="p">(</span><span class="l">--size-s-2</span><span class="p">)</span>
<span class="p">}</span>
<span class="nc">.smallest</span> <span class="p">{</span>
  <span class="nl">font-size</span><span class="p">:</span> <span class="nf">var</span><span class="p">(</span><span class="l">--size-s-3</span><span class="p">)</span>
<span class="p">}</span>
</code></pre></div></div>

<p>You can also combine this with a <a href="/blog-fluid-typography-css-vars">Fluid Typography</a> implementation for better results on all screen-sizes.</p>

<h2 id="alternative-solutions">Alternative solutions</h2>

<p>If you don’t want to use css-variables, then you can hardcode these values. To get the values without doing all the math you can use a tool like <a href="https://type-scale.com/">Visual Typography Scales</a>, and then define your values using <code class="language-plaintext highlighter-rouge">rem</code> units.</p>

<h2 id="if-youre-building-wordpress-themes">If you’re building WordPress Themes</h2>

<p>The method described above is excellent for use in WordPress themes. Themes don’t need to include a separate control for H1, H2, H3 etc sizes. All you need is a slider control to let users define the scale. Take a lookat the <a href="https://wordpress.org/themes/gridd">Gridd</a> for an example.</p>]]></content><author><name>Ari Stathopoulos</name></author><category term="CSS" /><summary type="html"><![CDATA[A typography scape makes all our typography sizes relative to one another. These 2 quotes from the IBM Design Language site pretty much convey why a typography scale is useful:]]></summary></entry><entry><title type="html">A new comments system for my static Jekyll site</title><link href="https://aristath.github.io/blog/static-site-comments-using-github-issues-api" rel="alternate" type="text/html" title="A new comments system for my static Jekyll site" /><published>2019-09-15T00:00:00+00:00</published><updated>2019-09-15T00:00:00+00:00</updated><id>https://aristath.github.io/blog/jekyll-site-static-comments</id><content type="html" xml:base="https://aristath.github.io/blog/static-site-comments-using-github-issues-api"><![CDATA[<p>I love WordPress, but I strongly believe there’s a right tool for every job. This site is not a WordPress site. It’s built on <a href="https://jekyllrb.com/">Jekyll</a> and hosted on <a href="https://pages.github.com/">Github Pages</a> for free.<br />
I write my posts using simple Markdown and it’s just fast and convenient.<br />
However, what I always found annoying is the lack of a comment system. Until now I was using <a href="https://disqus.com/">disqus</a> for comments on this site, but I never really liked it. It was a last-resort solution. One I hated because Disqus loads a lot of assets and a lot of trackers.</p>

<p>Those who know me personally, know that I am concerned with online privacy and web-sustainability. I don’t even have analytics on my sites simply because I consider the policies of tech giants like Google abhorrent, and the fact that almost all sites load all these extra JS assets is insanely costly for the environment.</p>

<p>Disqus in particular was loading assets and trackers from Google, Facebook, Twitter and its own things. So I could no longer stand the thought of using Disqus, a custom solution had to be implemented.
Today I finally managed to do that and implement my new comments system.</p>

<p>Since this site is hosted on github pages there is already a repository. And since most of what I write is tech-related, it’s safe to assume that people reading these posts have an account on GitHub. So leveraging the <a href="https://developer.github.com/v3/issues/">GitHub Issues API</a>, whenever I want to enable comments on a post I just create a new issue on the repository, and then in the headers of my post just add this:</p>
<div class="language-plaintext highlighter-rouge"><div class="highlight"><pre class="highlight"><code>comments_id: 5
</code></pre></div></div>
<p>Of course <code class="language-plaintext highlighter-rouge">5</code> in the above example is just the ID of the issue in the repository and each tickets has its own.<br />
When someone wants to add a comment on a post, they click the link and they get taken to the corresponding issue on the repository where they can leave their comment.  As soon as a comment is posted it appears on the page.</p>

<h2 id="the-code">The Code</h2>

<p>I created a new <code class="language-plaintext highlighter-rouge">comments.html</code> file in my <code class="language-plaintext highlighter-rouge">_includes</code> folder, and wrote this in there:</p>

<div class="language-html highlighter-rouge"><div class="highlight"><pre class="highlight"><code><span class="nt">&lt;script&gt;</span>
<span class="kd">const</span> <span class="nx">GH_API_URL</span> <span class="o">=</span> <span class="dl">'</span><span class="s1">https://api.github.com/repos/aristath/aristath.github.com/issues/5/comments?per_page=100</span><span class="dl">'</span><span class="p">;</span>

<span class="kd">let</span> <span class="nx">request</span> <span class="o">=</span> <span class="k">new</span> <span class="nc">XMLHttpRequest</span><span class="p">();</span>
<span class="nx">request</span><span class="p">.</span><span class="nf">open</span><span class="p">(</span> <span class="dl">'</span><span class="s1">GET</span><span class="dl">'</span><span class="p">,</span> <span class="nx">GH_API_URL</span><span class="p">,</span> <span class="kc">true</span> <span class="p">);</span>
<span class="nx">request</span><span class="p">.</span><span class="nx">onload</span> <span class="o">=</span> <span class="kd">function</span><span class="p">()</span> <span class="p">{</span>
	<span class="k">if</span> <span class="p">(</span> <span class="k">this</span><span class="p">.</span><span class="nx">status</span> <span class="o">&gt;=</span> <span class="mi">200</span> <span class="o">&amp;&amp;</span> <span class="k">this</span><span class="p">.</span><span class="nx">status</span> <span class="o">&lt;</span> <span class="mi">400</span> <span class="p">)</span> <span class="p">{</span>
		<span class="kd">let</span> <span class="nx">response</span> <span class="o">=</span> <span class="nx">JSON</span><span class="p">.</span><span class="nf">parse</span><span class="p">(</span> <span class="k">this</span><span class="p">.</span><span class="nx">response</span> <span class="p">);</span>

		<span class="k">for</span> <span class="p">(</span> <span class="kd">var</span> <span class="nx">i</span> <span class="o">=</span> <span class="mi">0</span><span class="p">;</span> <span class="nx">i</span> <span class="o">&lt;</span> <span class="nx">response</span><span class="p">.</span><span class="nx">length</span><span class="p">;</span> <span class="nx">i</span><span class="o">++</span> <span class="p">)</span> <span class="p">{</span>
			<span class="nb">document</span><span class="p">.</span><span class="nf">getElementById</span><span class="p">(</span> <span class="dl">'</span><span class="s1">gh-comments-list</span><span class="dl">'</span> <span class="p">).</span><span class="nf">appendChild</span><span class="p">(</span> <span class="nf">createCommentEl</span><span class="p">(</span> <span class="nx">response</span><span class="p">[</span> <span class="nx">i</span> <span class="p">]</span> <span class="p">)</span> <span class="p">);</span>
		<span class="p">}</span>

		<span class="k">if </span><span class="p">(</span> <span class="mi">0</span> <span class="o">===</span> <span class="nx">response</span><span class="p">.</span><span class="nx">length</span> <span class="p">)</span> <span class="p">{</span>
			<span class="nb">document</span><span class="p">.</span><span class="nf">getElementById</span><span class="p">(</span> <span class="dl">'</span><span class="s1">no-comments-found</span><span class="dl">'</span> <span class="p">).</span><span class="nx">style</span><span class="p">.</span><span class="nx">display</span> <span class="o">=</span> <span class="dl">'</span><span class="s1">block</span><span class="dl">'</span><span class="p">;</span>
		<span class="p">}</span>
	<span class="p">}</span> <span class="k">else</span> <span class="p">{</span>
		<span class="nx">console</span><span class="p">.</span><span class="nf">error</span><span class="p">(</span> <span class="k">this</span> <span class="p">);</span>
	<span class="p">}</span>
<span class="p">};</span>

<span class="kd">function</span> <span class="nf">createCommentEl</span><span class="p">(</span> <span class="nx">response</span> <span class="p">)</span> <span class="p">{</span>
	<span class="kd">let</span> <span class="nx">user</span> <span class="o">=</span> <span class="nb">document</span><span class="p">.</span><span class="nf">createElement</span><span class="p">(</span> <span class="dl">'</span><span class="s1">a</span><span class="dl">'</span> <span class="p">);</span>
	<span class="nx">user</span><span class="p">.</span><span class="nf">setAttribute</span><span class="p">(</span> <span class="dl">'</span><span class="s1">href</span><span class="dl">'</span><span class="p">,</span> <span class="nx">response</span><span class="p">.</span><span class="nx">user</span><span class="p">.</span><span class="nx">url</span><span class="p">.</span><span class="nf">replace</span><span class="p">(</span> <span class="dl">'</span><span class="s1">api.github.com/users</span><span class="dl">'</span><span class="p">,</span> <span class="dl">'</span><span class="s1">github.com</span><span class="dl">'</span> <span class="p">)</span> <span class="p">);</span>
	<span class="nx">user</span><span class="p">.</span><span class="nx">classList</span><span class="p">.</span><span class="nf">add</span><span class="p">(</span> <span class="dl">'</span><span class="s1">user</span><span class="dl">'</span> <span class="p">);</span>

	<span class="kd">let</span> <span class="nx">userAvatar</span> <span class="o">=</span> <span class="nb">document</span><span class="p">.</span><span class="nf">createElement</span><span class="p">(</span> <span class="dl">'</span><span class="s1">img</span><span class="dl">'</span> <span class="p">);</span>
	<span class="nx">userAvatar</span><span class="p">.</span><span class="nx">classList</span><span class="p">.</span><span class="nf">add</span><span class="p">(</span> <span class="dl">'</span><span class="s1">avatar</span><span class="dl">'</span> <span class="p">);</span>
	<span class="nx">userAvatar</span><span class="p">.</span><span class="nf">setAttribute</span><span class="p">(</span> <span class="dl">'</span><span class="s1">src</span><span class="dl">'</span><span class="p">,</span> <span class="nx">response</span><span class="p">.</span><span class="nx">user</span><span class="p">.</span><span class="nx">avatar_url</span> <span class="p">);</span>

	<span class="nx">user</span><span class="p">.</span><span class="nf">appendChild</span><span class="p">(</span> <span class="nx">userAvatar</span> <span class="p">);</span>

	<span class="kd">let</span> <span class="nx">commentLink</span> <span class="o">=</span> <span class="nb">document</span><span class="p">.</span><span class="nf">createElement</span><span class="p">(</span> <span class="dl">'</span><span class="s1">a</span><span class="dl">'</span> <span class="p">);</span>
	<span class="nx">commentLink</span><span class="p">.</span><span class="nf">setAttribute</span><span class="p">(</span> <span class="dl">'</span><span class="s1">href</span><span class="dl">'</span><span class="p">,</span> <span class="nx">response</span><span class="p">.</span><span class="nx">html_url</span> <span class="p">);</span>
	<span class="nx">commentLink</span><span class="p">.</span><span class="nx">classList</span><span class="p">.</span><span class="nf">add</span><span class="p">(</span> <span class="dl">'</span><span class="s1">comment-url</span><span class="dl">'</span> <span class="p">);</span>
	<span class="nx">commentLink</span><span class="p">.</span><span class="nx">innerHTML</span> <span class="o">=</span> <span class="dl">'</span><span class="s1">#</span><span class="dl">'</span> <span class="o">+</span> <span class="nx">response</span><span class="p">.</span><span class="nx">id</span> <span class="o">+</span> <span class="dl">'</span><span class="s1"> - </span><span class="dl">'</span> <span class="o">+</span> <span class="nx">response</span><span class="p">.</span><span class="nx">created_at</span><span class="p">;</span>

	<span class="kd">let</span> <span class="nx">commentContents</span> <span class="o">=</span> <span class="nb">document</span><span class="p">.</span><span class="nf">createElement</span><span class="p">(</span> <span class="dl">'</span><span class="s1">div</span><span class="dl">'</span> <span class="p">);</span>
	<span class="nx">commentContents</span><span class="p">.</span><span class="nx">classList</span><span class="p">.</span><span class="nf">add</span><span class="p">(</span> <span class="dl">'</span><span class="s1">comment-content</span><span class="dl">'</span> <span class="p">);</span>
	<span class="nx">commentContents</span><span class="p">.</span><span class="nx">innerHTML</span> <span class="o">=</span> <span class="nx">response</span><span class="p">.</span><span class="nx">body</span><span class="p">;</span>

	<span class="kd">let</span> <span class="nx">comment</span> <span class="o">=</span> <span class="nb">document</span><span class="p">.</span><span class="nf">createElement</span><span class="p">(</span> <span class="dl">'</span><span class="s1">li</span><span class="dl">'</span> <span class="p">);</span>
	<span class="nx">comment</span><span class="p">.</span><span class="nf">setAttribute</span><span class="p">(</span> <span class="dl">'</span><span class="s1">data-created</span><span class="dl">'</span><span class="p">,</span> <span class="nx">response</span><span class="p">.</span><span class="nx">created_at</span> <span class="p">);</span>
	<span class="nx">comment</span><span class="p">.</span><span class="nf">setAttribute</span><span class="p">(</span> <span class="dl">'</span><span class="s1">data-author-avatar</span><span class="dl">'</span><span class="p">,</span> <span class="nx">response</span><span class="p">.</span><span class="nx">user</span><span class="p">.</span><span class="nx">avatar_url</span> <span class="p">);</span>
	<span class="nx">comment</span><span class="p">.</span><span class="nf">setAttribute</span><span class="p">(</span> <span class="dl">'</span><span class="s1">data-user-url</span><span class="dl">'</span><span class="p">,</span> <span class="nx">response</span><span class="p">.</span><span class="nx">user</span><span class="p">.</span><span class="nx">url</span> <span class="p">);</span>

	<span class="nx">comment</span><span class="p">.</span><span class="nf">appendChild</span><span class="p">(</span> <span class="nx">user</span> <span class="p">);</span>
	<span class="nx">comment</span><span class="p">.</span><span class="nf">appendChild</span><span class="p">(</span> <span class="nx">commentContents</span> <span class="p">);</span>
	<span class="nx">comment</span><span class="p">.</span><span class="nf">appendChild</span><span class="p">(</span> <span class="nx">commentLink</span> <span class="p">);</span>

	<span class="k">return</span> <span class="nx">comment</span><span class="p">;</span>
<span class="p">}</span>
<span class="nx">request</span><span class="p">.</span><span class="nf">send</span><span class="p">();</span>
<span class="nt">&lt;/script&gt;</span>

<span class="nt">&lt;hr&gt;</span>

<span class="nt">&lt;div</span> <span class="na">class=</span><span class="s">"github-comments"</span><span class="nt">&gt;</span>
	<span class="nt">&lt;h2&gt;</span>Comments<span class="nt">&lt;/h2&gt;</span>
	<span class="nt">&lt;ul</span> <span class="na">id=</span><span class="s">"gh-comments-list"</span><span class="nt">&gt;&lt;/ul&gt;</span>
	<span class="nt">&lt;p</span> <span class="na">id=</span><span class="s">"no-comments-found"</span><span class="nt">&gt;</span>No comments found for this article. Comments posted before 2019-09-15 are no longer available due to a system migration since I no longer use Disqus for comments.<span class="nt">&lt;/p&gt;</span>
	<span class="nt">&lt;p</span> <span class="na">id=</span><span class="s">"leave-a-comment"</span><span class="nt">&gt;</span>Join the discussion for this article on <span class="nt">&lt;a</span> <span class="na">href=</span><span class="s">"https://github.com/aristath/aristath.github.com/issues/5"</span><span class="nt">&gt;</span>this ticket<span class="nt">&lt;/a&gt;</span>. Comments appear on this page instantly.<span class="nt">&lt;/p&gt;</span>
<span class="nt">&lt;/div&gt;</span>
</code></pre></div></div>

<p>Depending on the number of requests you have on your site you may want to add thes at the end of the URL in the <code class="language-plaintext highlighter-rouge">GH_API_URL</code> constant in the above script:</p>
<div class="language-plaintext highlighter-rouge"><div class="highlight"><pre class="highlight"><code>?client_id=MY_CLIENT_ID&amp;client_secret=MY_CLIENT_SECRET
</code></pre></div></div>
<p>To get the client-ID and client-secret you’ll have to create a new application from your <a href="https://github.com/settings/applications/new">GitHub Profile &gt; Developer Settings &gt; OAuth Apps</a>. Don’t worry, it only requires an application name and a URL. You can use the same URL for the callback, so it only takes 10-20 seconds to create your app and get the keys.</p>

<p>You can see how that file is then loaded on the template for posts <a href="https://github.com/aristath/aristath.github.com/blob/f1b80c1202ed9edd3d5b8b9ba7cf15f347d4bfc6/_layouts/post.html#L22-L24">here</a>.</p>

<p>The logic is simple: We make a request to the GitHub API, we get the comments from the issue and render them. The code may seem a bit long but that’s only because I’m using Vanilla JS instead of libraries like jQuery, so elements have to be created individually and then added to the DOM. The above code will get the user avatar, create a link to the user’s profile, add the comment, add a link to the comment, the date and everything a comment usually has.</p>

<p>It’s fast, there’s no privacy concerns, no cookies, no nothing. And as an additional bonus you can just style it the way you want it.</p>

<p>I hope that helps someone out there, it took me quite a while to figure this one out.</p>]]></content><author><name>Ari Stathopoulos</name></author><category term="Jekyll" /><summary type="html"><![CDATA[I love WordPress, but I strongly believe there’s a right tool for every job. This site is not a WordPress site. It’s built on Jekyll and hosted on Github Pages for free. I write my posts using simple Markdown and it’s just fast and convenient. However, what I always found annoying is the lack of a comment system. Until now I was using disqus for comments on this site, but I never really liked it. It was a last-resort solution. One I hated because Disqus loads a lot of assets and a lot of trackers.]]></summary></entry></feed>