UI Overview
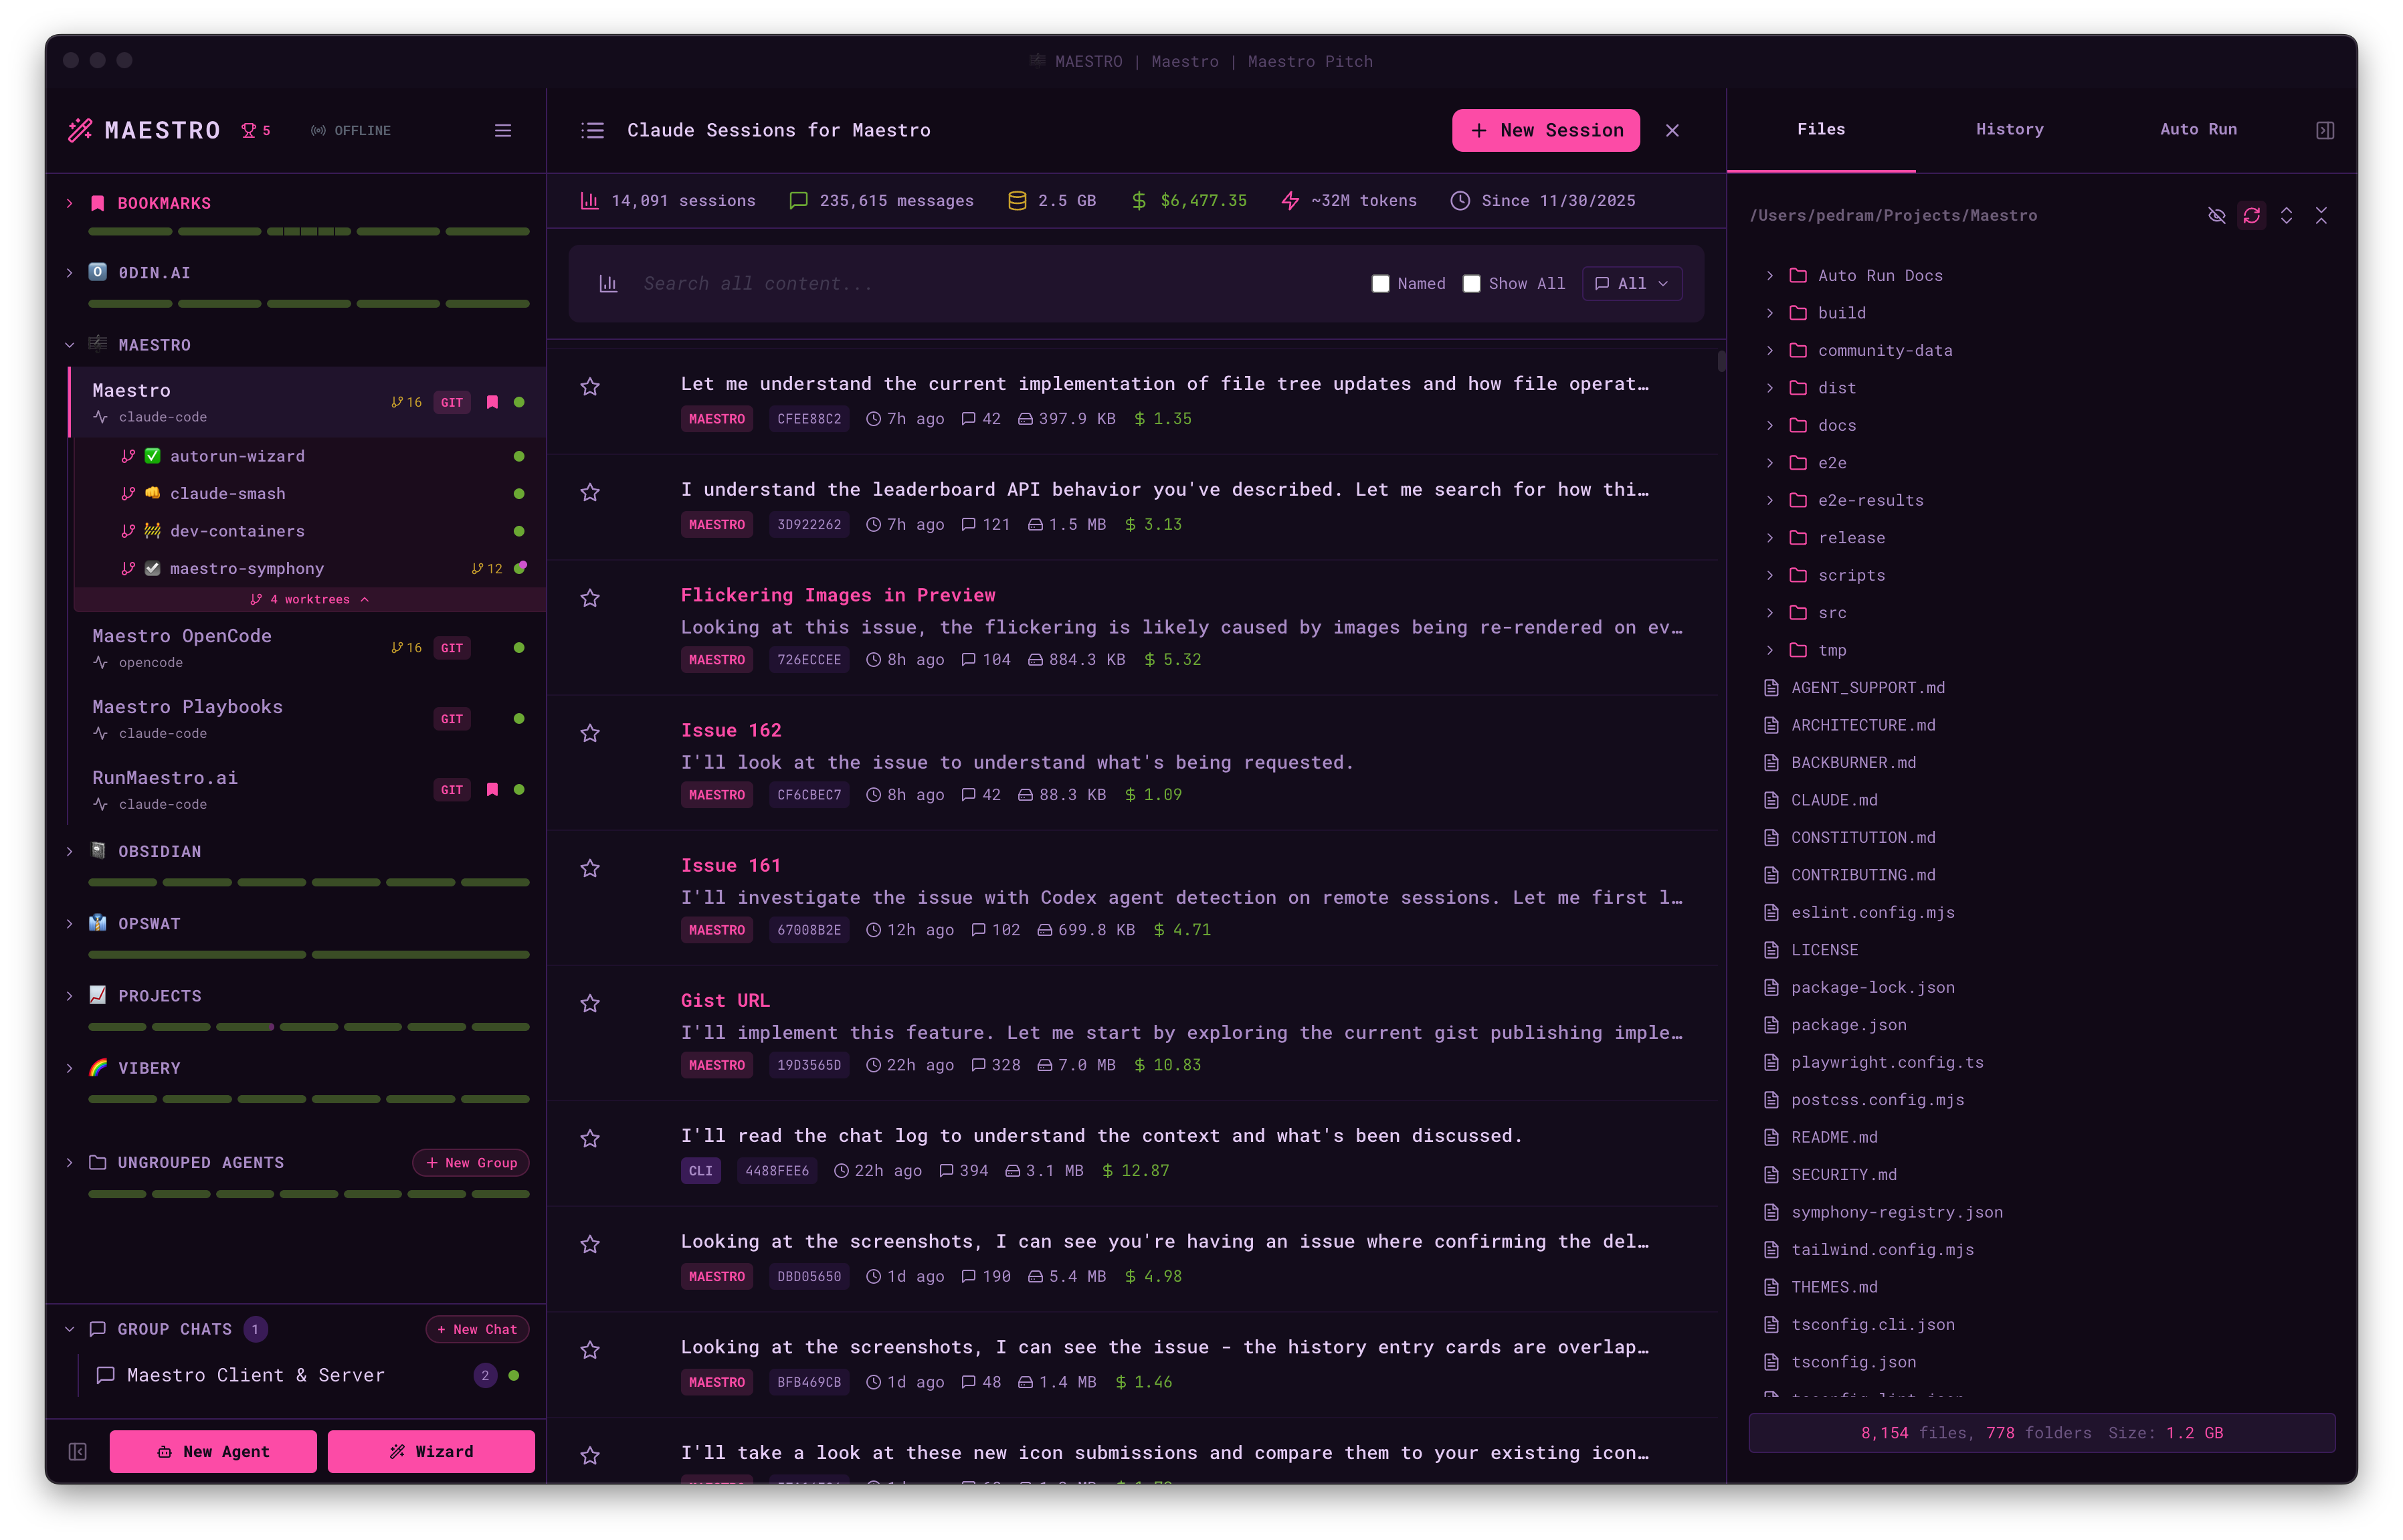
Maestro features a three-panel layout:- Left Panel - Agent list with grouping, filtering, search, bookmarks, and drag-and-drop organization
- Main Panel - Center workspace with two modes per agent:
- AI Terminal - Converse with your AI provider (Claude Code, Codex, or OpenCode). Supports multiple tabs (each tab is a session),
@file mentions, image attachments, slash commands, and draft auto-save. - Command Terminal - PTY shell with tab completion for files, branches, tags, and command history.
- Views: Session Explorer, File Preview, Git Diffs, Git Logs
- AI Terminal - Converse with your AI provider (Claude Code, Codex, or OpenCode). Supports multiple tabs (each tab is a session),
- Right Panel - Three tabs: File Explorer, History Viewer, and Auto Run
Agent Status Indicators
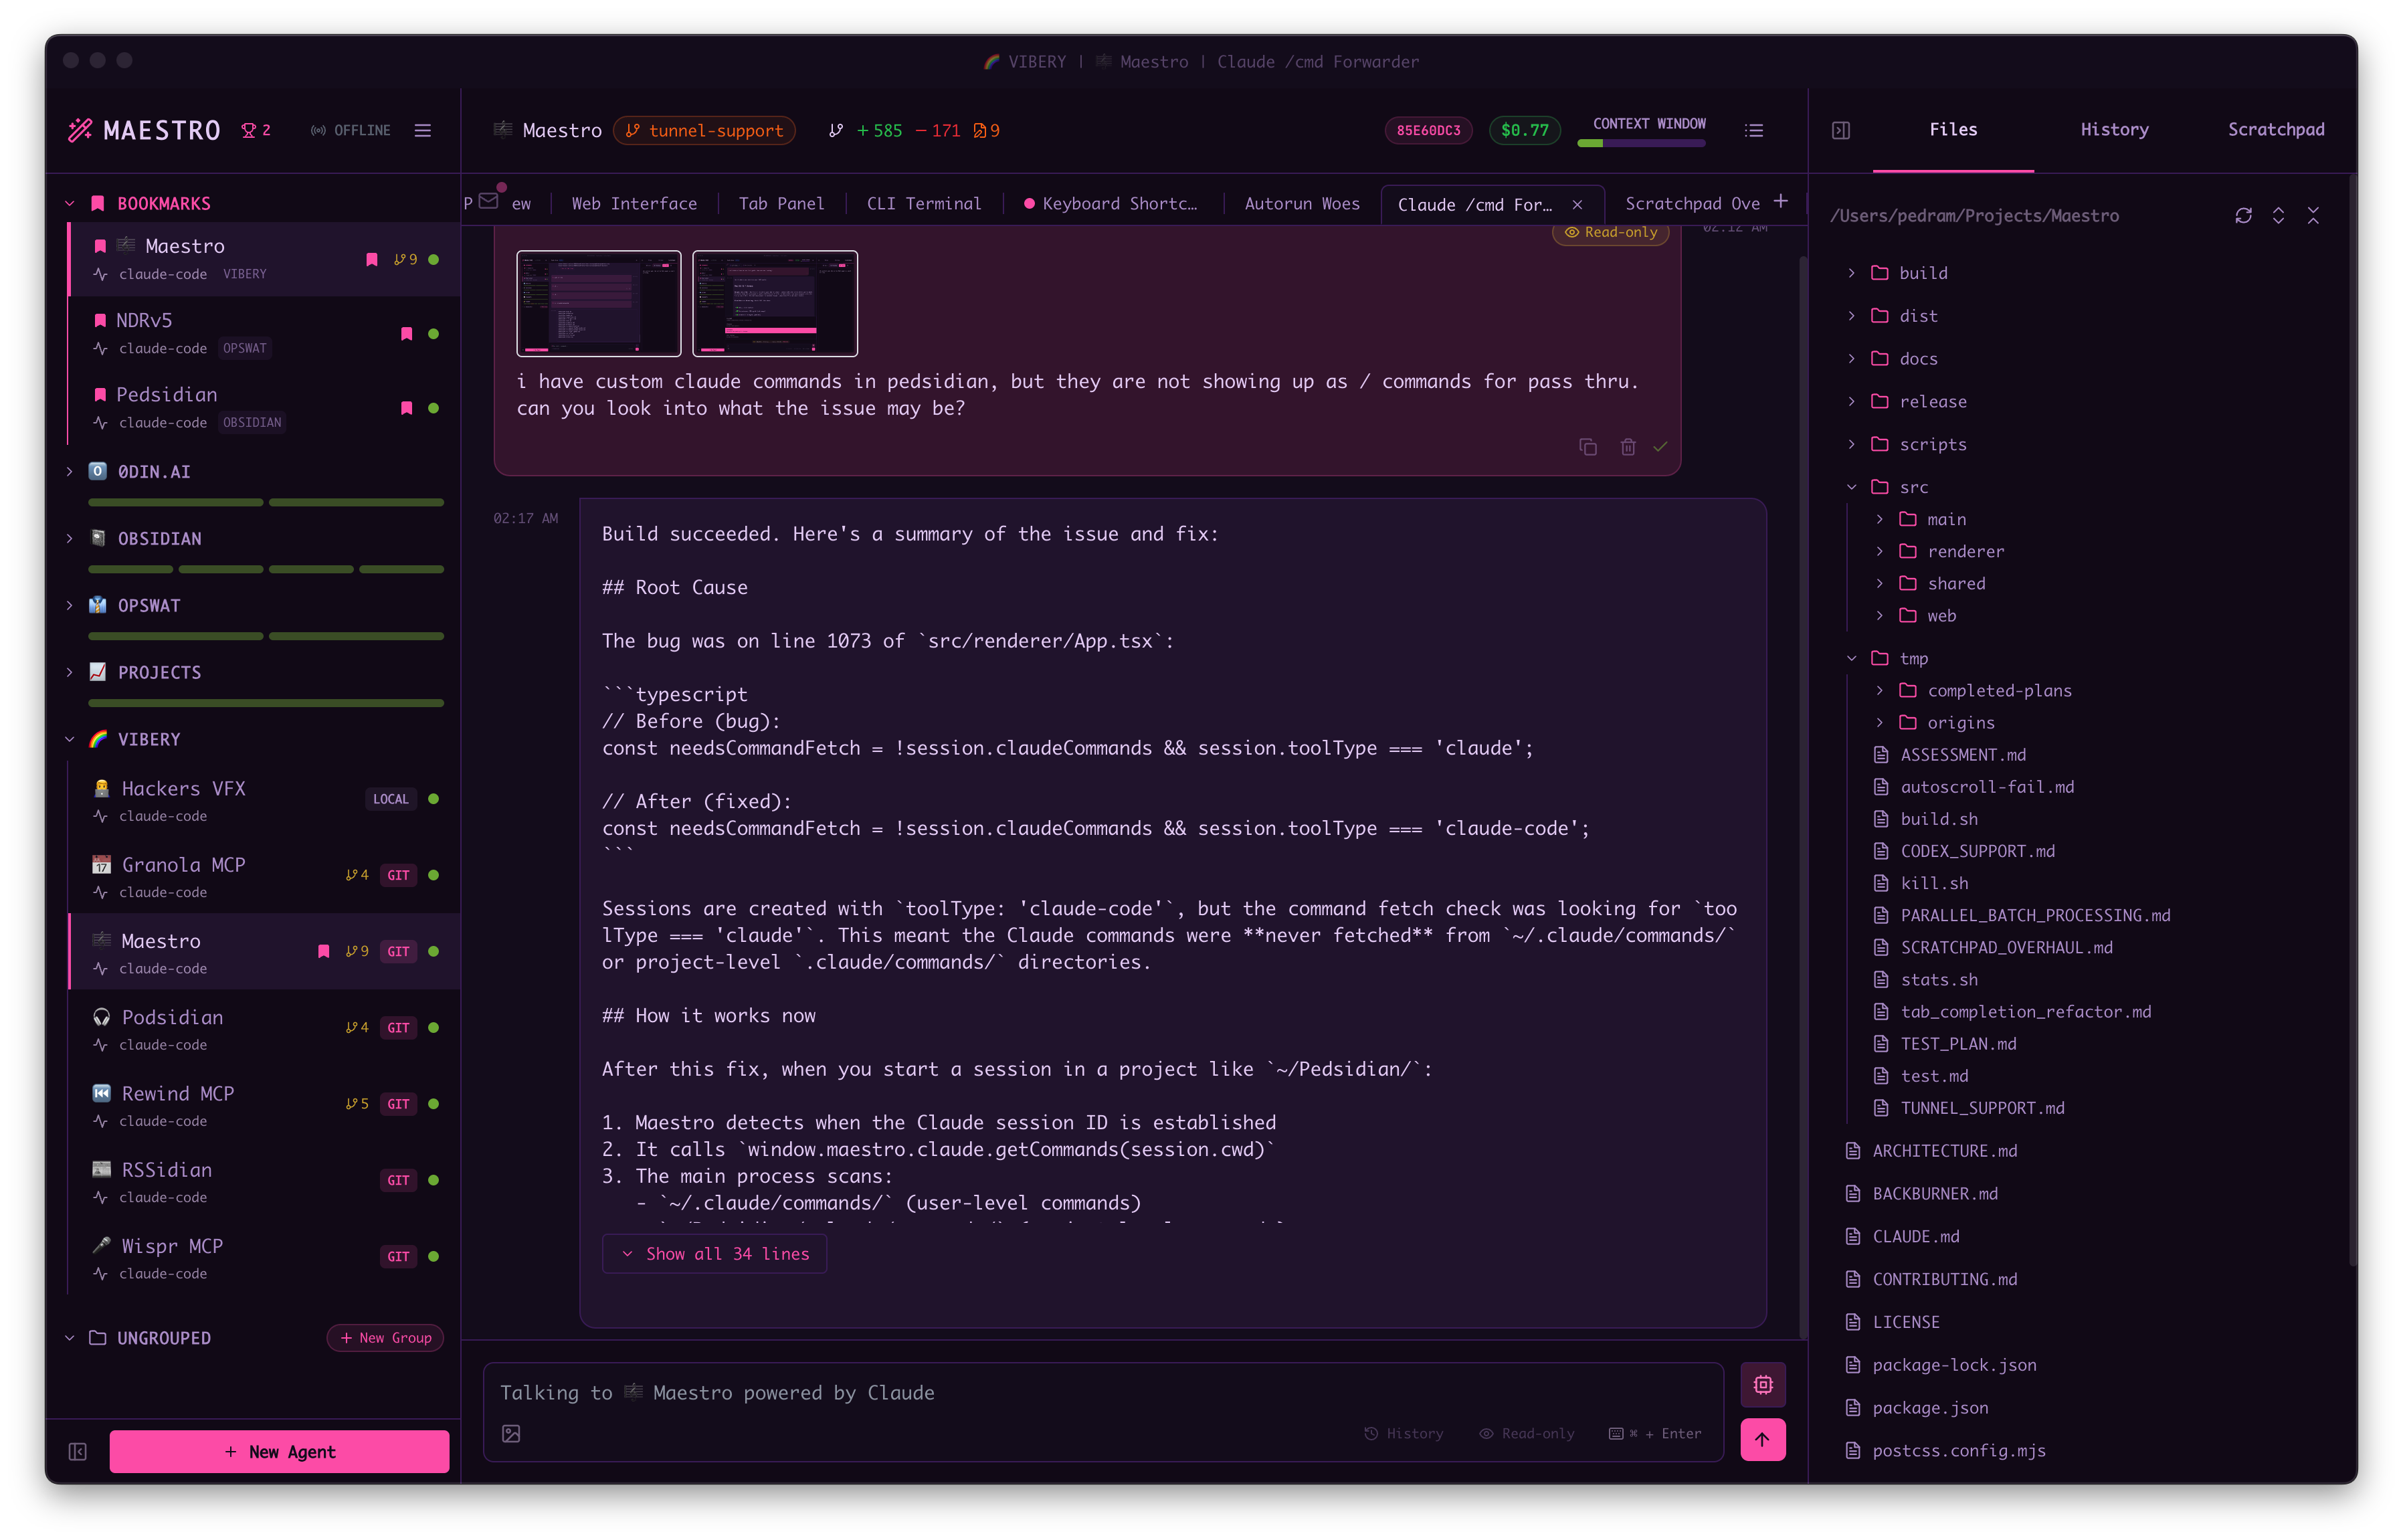
Each agent shows a color-coded status indicator:- 🟢 Green - Ready and waiting
- 🟡 Yellow - Agent is thinking or waiting for user input
- 🔴 Red - No connection with agent
- 🟠 Pulsing Orange - Attempting to establish connection
- 🔴 Red Badge - Unread messages (small red dot overlapping top-right of status indicator, iPhone-style)
File Explorer and Preview
The File Explorer (Right Panel → Files tab) lets you browse project files. Click any file to open it in the File Preview view.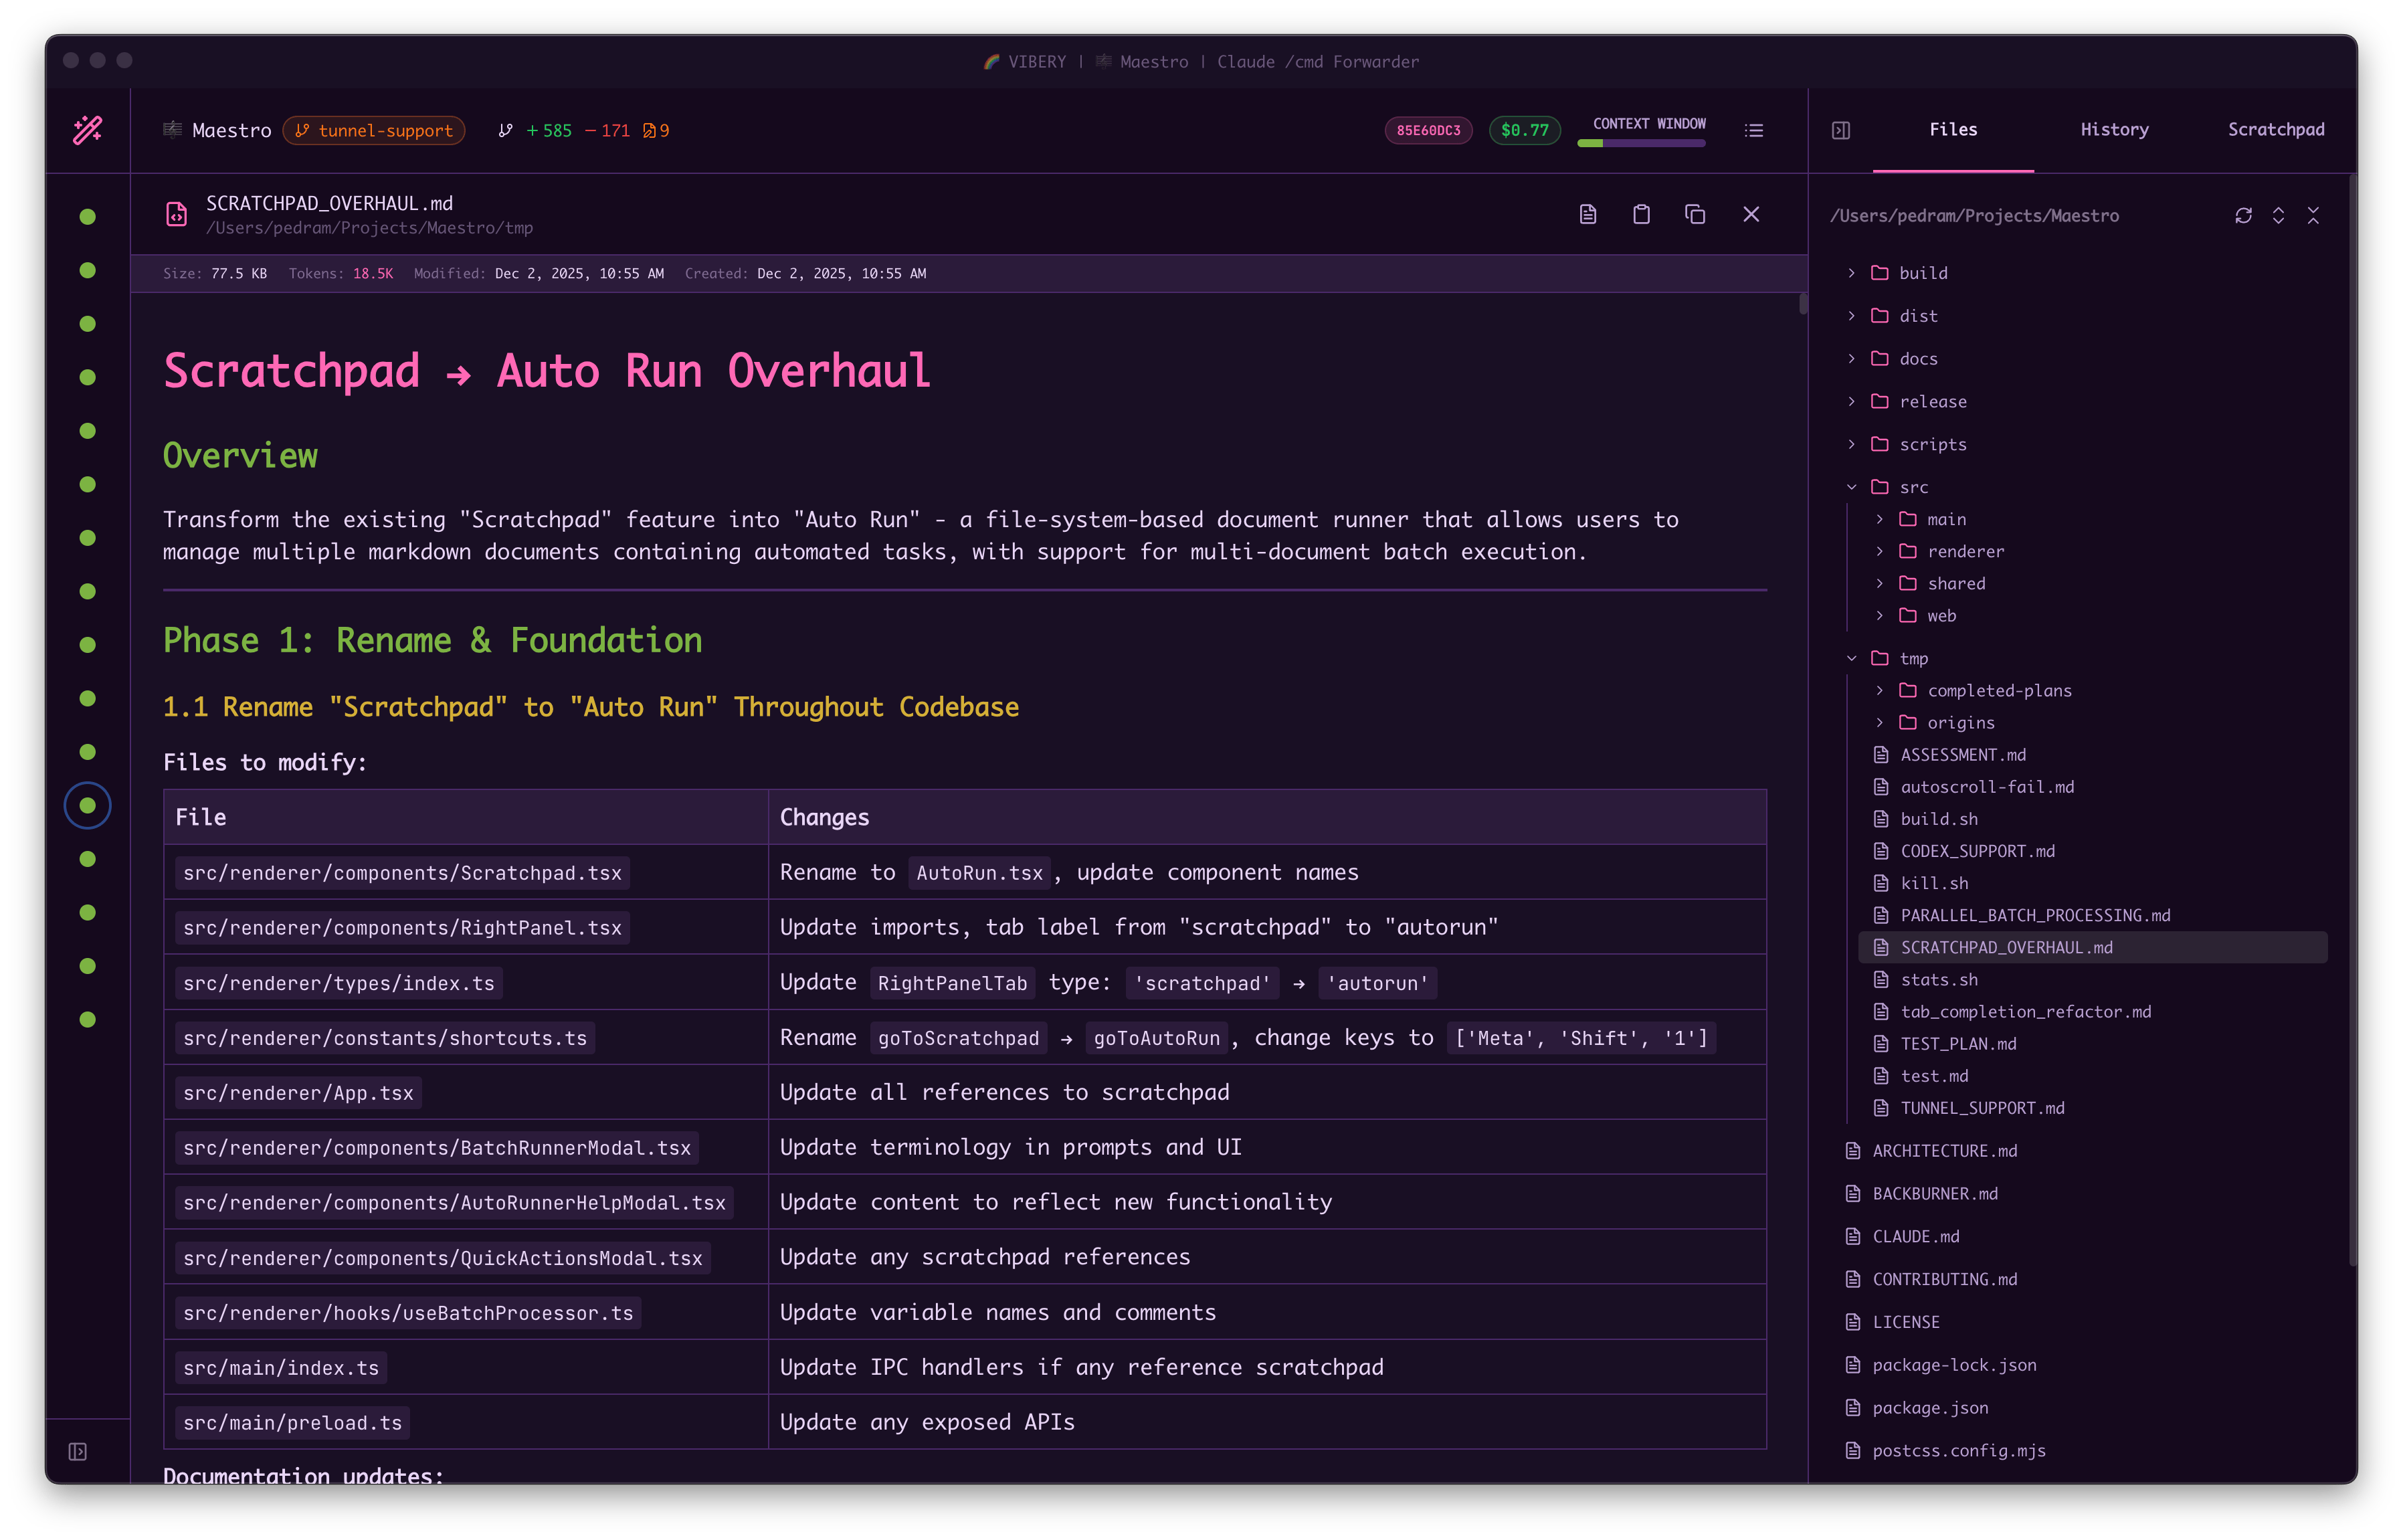
- Syntax highlighting for code files
- Markdown rendering with toggle between raw/preview (
Cmd+E/Ctrl+E) - Image viewing for common image formats
- Line numbers for easy reference
- Search within file (
Cmd+F/Ctrl+F)
File Explorer Keyboard Shortcuts
With the Files tab focused, navigate the file list without touching the mouse:
Use
Shift+Up / Shift+Down when you want to glance further down the tree without losing your place - the focused file stays put while the viewport slides.
Breadcrumb Navigation
When you open a file, a breadcrumb trail appears showing your navigation history. Click any breadcrumb to jump back to a previously viewed file. This makes it easy to compare files or return to where you were.File Editing
Files can be edited directly in the preview. PressCmd+S / Ctrl+S to save changes. If you navigate away or close the preview with unsaved changes, a confirmation dialog will ask whether to discard them.
Drag and Drop Files Into the Tree
Drag files or folders from your OS file manager (Finder on macOS, Explorer on Windows, your file manager on Linux) straight into the Files tab to copy them into the project:- Drop onto a folder row to copy the items inside that folder. The folder highlights as you hover it.
- Drop on empty space or a file row to copy into the project root. The panel border highlights to show the root is the target.
- Folders are copied recursively, with all of their contents.
- If a name already exists at the destination, a prompt lets you Overwrite, Auto-rename (adds a numeric suffix), or Skip the conflicting items.
Importing into the tree copies from your local machine, so it is not available for agents running on an SSH remote. Attaching files to the chat still works on remotes.
Publish as GitHub Gist
Share files directly as GitHub Gists from the File Preview: Prerequisites:- GitHub CLI (
gh) must be installed - You must be authenticated (
gh auth login)
- Open a file in File Preview
- Click the Share icon (↗) in the header toolbar, or
- Use
Cmd+K/Ctrl+K→ “Publish Document as GitHub Gist”
The confirmation modal focuses “Publish Secret” by default, so you can press
Enter to quickly publish. Press Esc to cancel.
After publishing:
- The gist URL is automatically copied to your clipboard
- A toast notification appears with a link to open the gist in your browser
The share button only appears when viewing files (not in edit mode) and when GitHub CLI is available and authenticated.
@ Mentions
Reference files in your AI prompts using@ mentions:
- Type
@followed by a filename - Select from the autocomplete dropdown
- The file path is inserted, giving the AI context about that file
@ picker can also reference other agents. Alongside files, it has an Agents section - pick one to consult it inline and stream its reply back into your chat. Maestro tells files and agents apart by shape: a path-like @src/app.ts is a file, while a bare @codex is an agent.
Prompt Composer
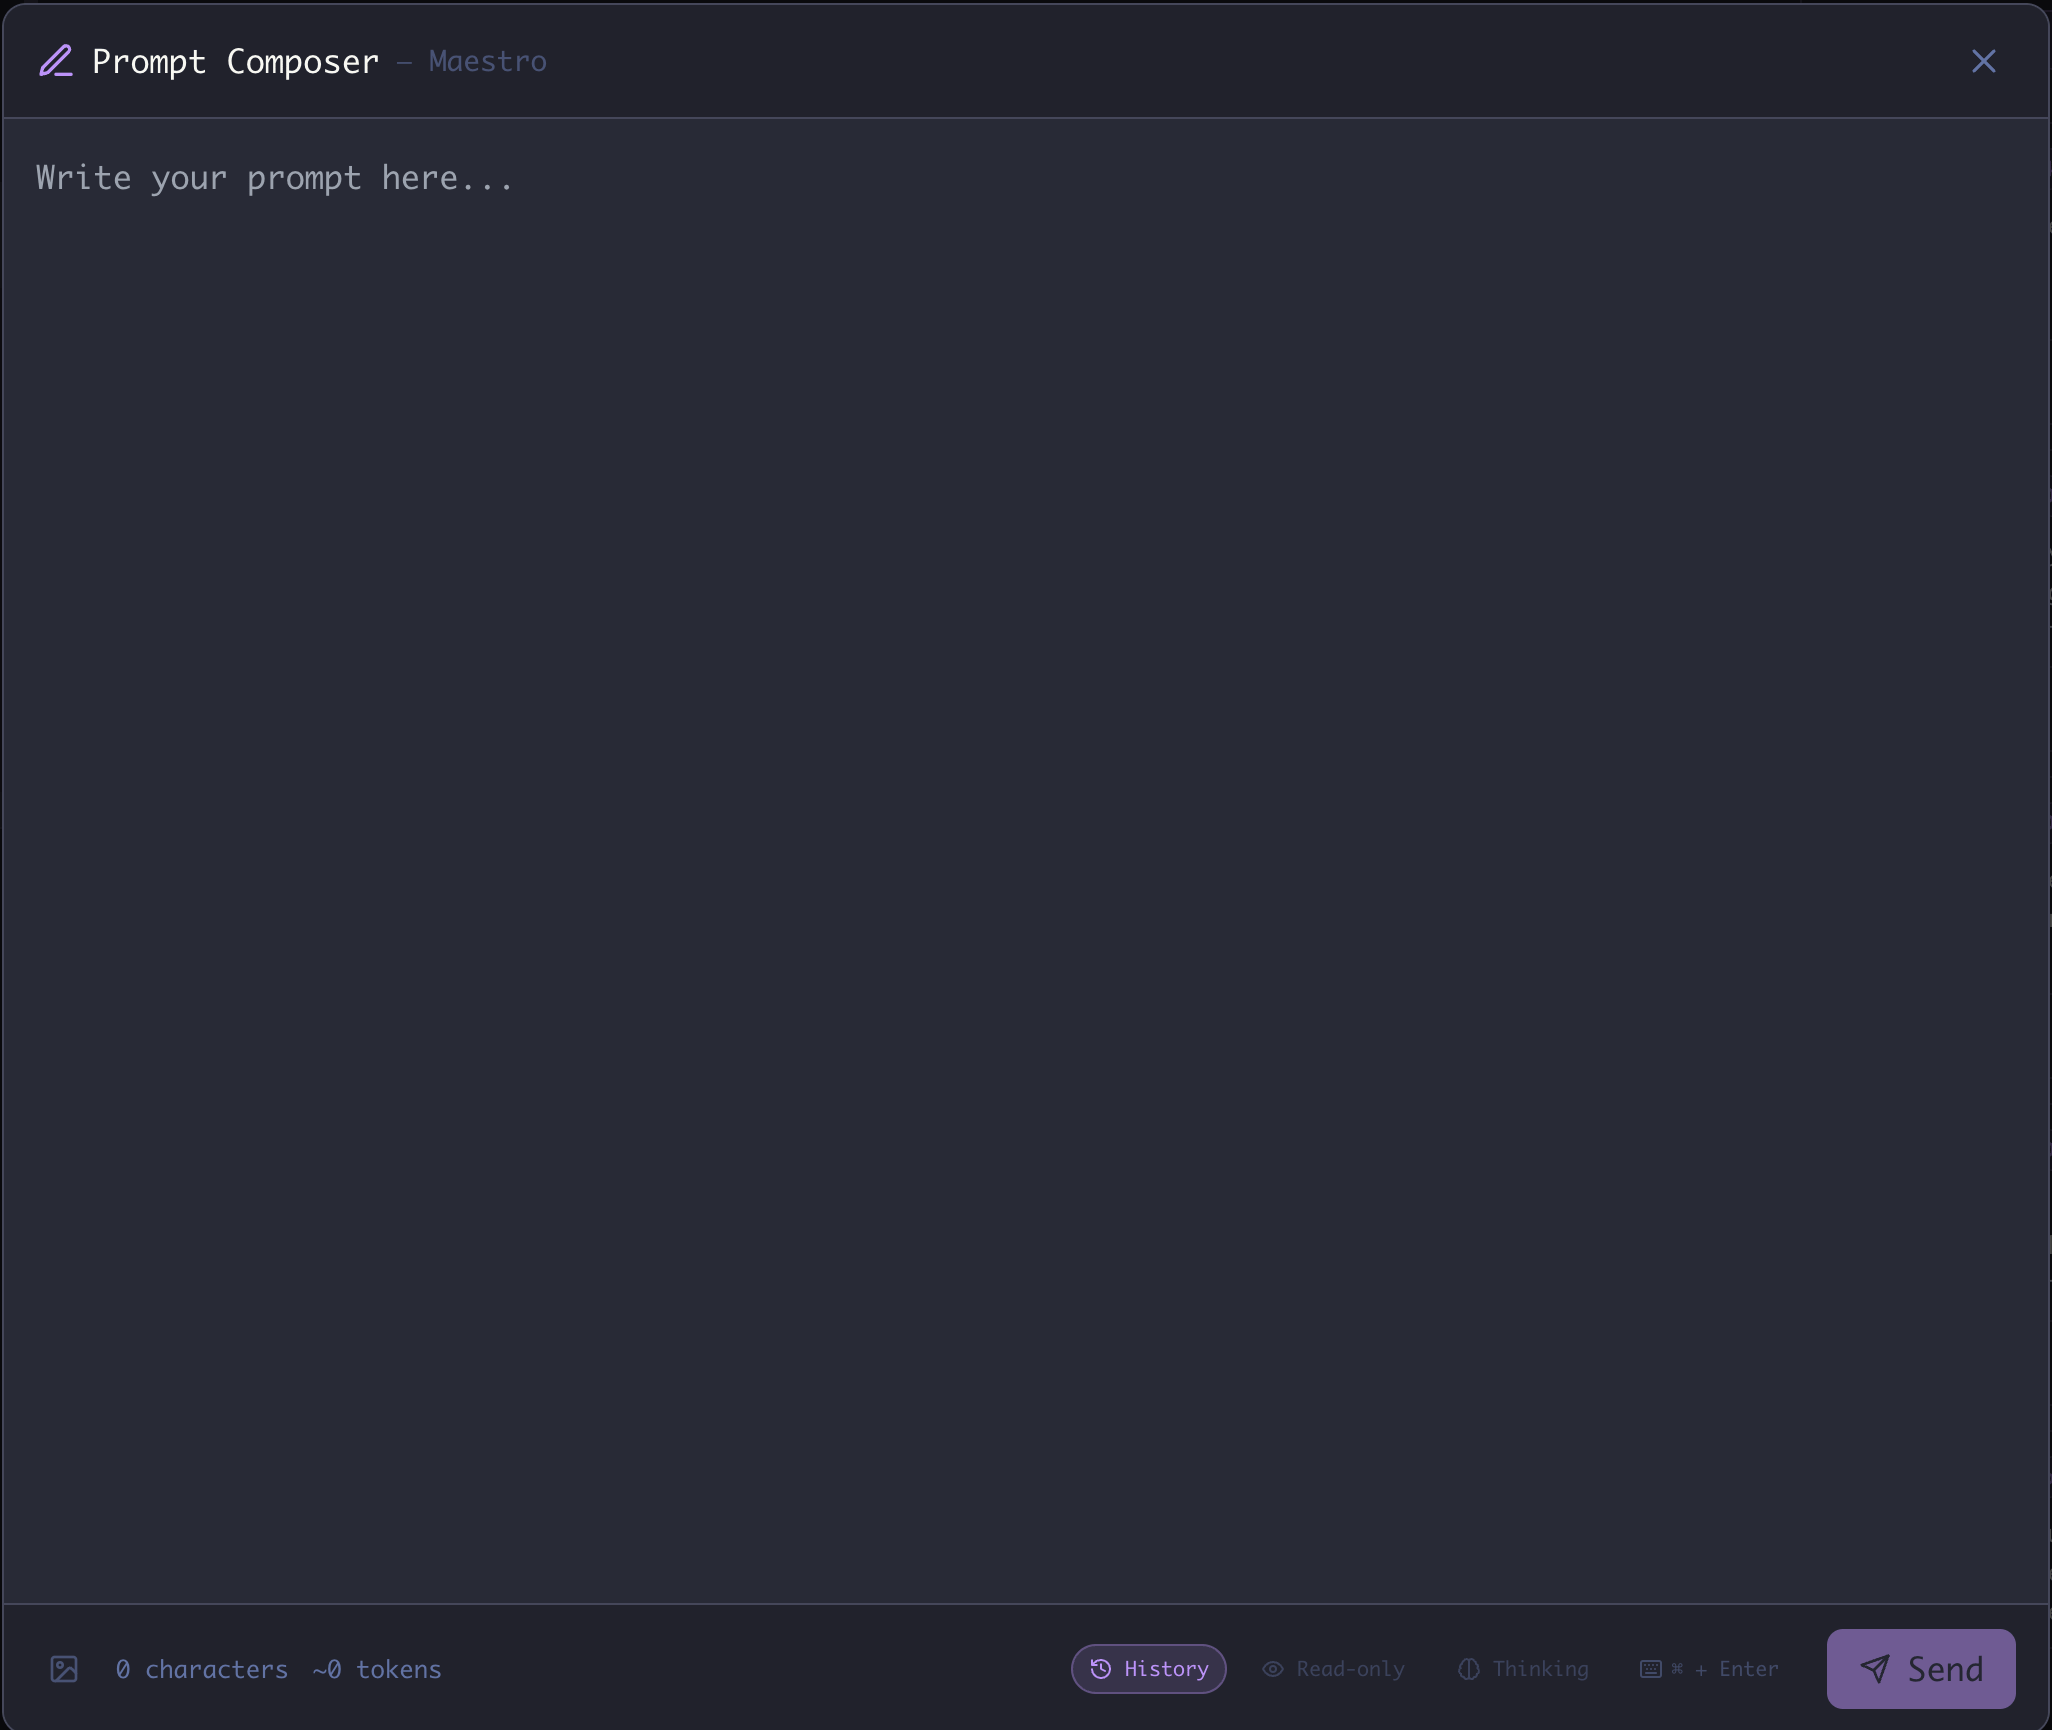
For complex prompts that need more editing space, use the Prompt Composer - a fullscreen editing modal. To open the Prompt Composer:- Press
Cmd+Shift+P/Ctrl+Shift+P, or - Click the pencil icon (✏️) in the bottom-left corner of the AI input box

- Full-screen editing space for complex, multi-paragraph prompts
- Character and token count displayed in the footer
- All input controls - History toggle, Read-only mode, Thinking toggle, and send shortcut indicator
- Image attachment support via the image icon in the footer
Message Queue
You never have to wait for an agent to finish before lining up your next thought. Any message (or slash command) you send while an agent is busy is added to that tab’s queue instead of being dropped, and dispatched automatically, in order, the moment the agent becomes ready. A QUEUED (n) separator appears in the transcript listing everything waiting to go. Each queued item has a row of controls (hover reveals them, and they stay visible while you work):
Editing is only offered for messages, not slash commands. Long messages are truncated with a Show all toggle so the queue stays compact, and attached images collapse behind a click-to-expand thumbnail strip (click a thumbnail to open it full-size in the carousel).
Force Send
When Forced Parallel Execution is enabled and another tab in the same agent is already working, a queued item gains a Force Send button. This dispatches that message immediately, running it in parallel instead of waiting its turn in the cross-tab queue. A confirmation lists which other tabs are currently busy before it sends.Execution Queue view
PressCmd+Shift+X / Ctrl+Shift+X (or click the queue indicator) to open the Execution Queue - a single view of everything queued across all of your agents. It offers the same per-item controls (edit, copy, hold/resume, reorder, remove) plus a jump-to-agent shortcut, so you can manage a busy fleet from one place. Items are processed sequentially per agent to keep concurrent file edits from colliding.
Input Toggles
The AI input box includes three toggle buttons that control session behavior:
Per-tab persistence: Each toggle state is saved per tab. If you enable Thinking on one tab, it stays enabled for that tab even when you switch away and back.
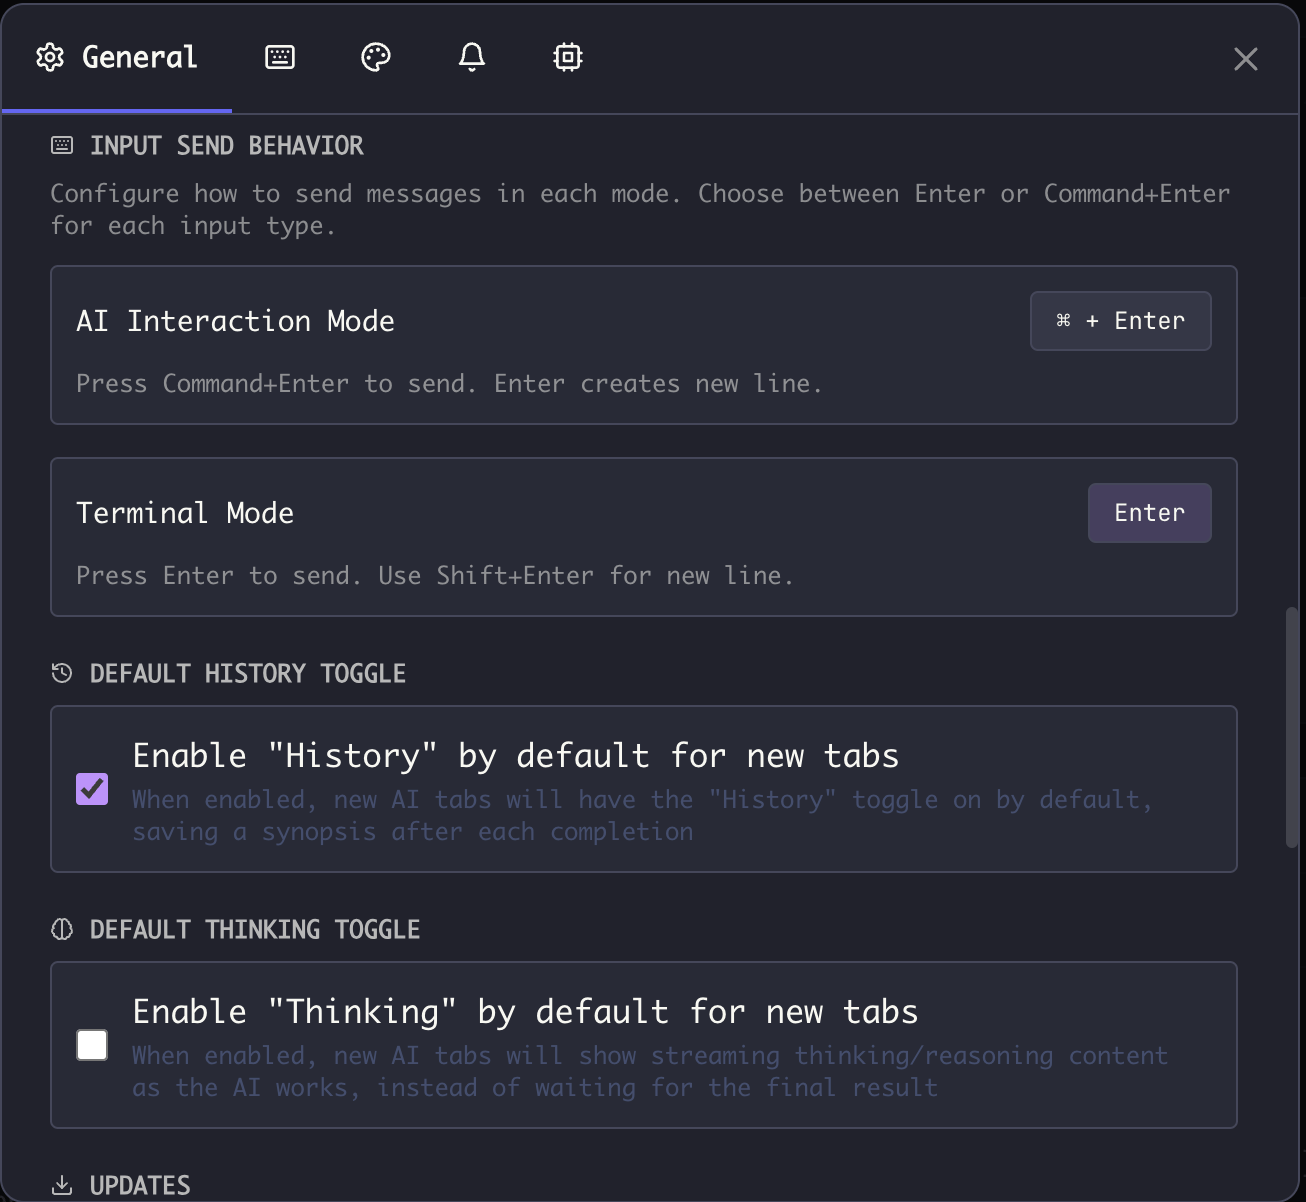
Configuring Defaults
Set the default state for new tabs in Settings (Cmd+, / Ctrl+,) → General:
Send Key Configuration
Configure how messages are sent in each mode:- When set to
Cmd+Enter/Ctrl+Enter, pressingEnteralone creates a new line (for multi-line input) - When set to
Enter, useShift+Enterfor new lines - The current send key is displayed in the input box (e.g., ”⌘ + Enter”)
- Per-tab override: Click the send key indicator in the input box to toggle between modes for that tab
Image Carousel
When working with image attachments, use the Image Carousel to view, manage, and remove images. To open the Image Carousel:- Press
Cmd+Y/Ctrl+Y, or - Click the image icon in the input box when images are attached
- Arrow keys - Navigate between images
- Delete or Backspace - Remove the currently selected image
- Click the X - Remove an image by clicking its remove button
- Esc - Close the carousel
Output Filtering
Filter and search through AI output to find specific content or hide noise.Global Filter
The global filter applies to all AI output in the current session. To open the global filter:- Click the filter icon in the output toolbar
- The filter bar appears at the top of the output area
Per-Response Filters
Each AI response has its own local filter. Hover over a response to reveal the filter icon, then click to open the filter bar for that specific response.Filter Modes
Click the mode icon to toggle between Include and Exclude.
Text vs Regex Matching
Click the indicator to toggle between plain text and regex mode.
Filter Controls
- Query input - Type your search term or regex pattern
- Esc - Clear the filter and close the filter bar
- Click outside - If the query is empty, the filter bar closes
Placeholders
The placeholder text updates to reflect the current mode:- “Include by keyword” / “Exclude by keyword” for plain text
- “Include by RegEx” / “Exclude by RegEx” for regex mode
Use Cases
Finding specific content:- Set to Include mode with plain text
- Type a keyword like “error” or “function”
- Only matching lines are shown
- Set to Exclude mode with plain text
- Type patterns like “debug” or “verbose”
- Matching lines are hidden from view
- Enable Regex mode
- Use patterns like
\berror\bfor word boundaries - Or
^\s*#to match comment lines
Command Interpreter
The command interpreter can be focused for a clean, terminal-only experience when you collapse the left panel.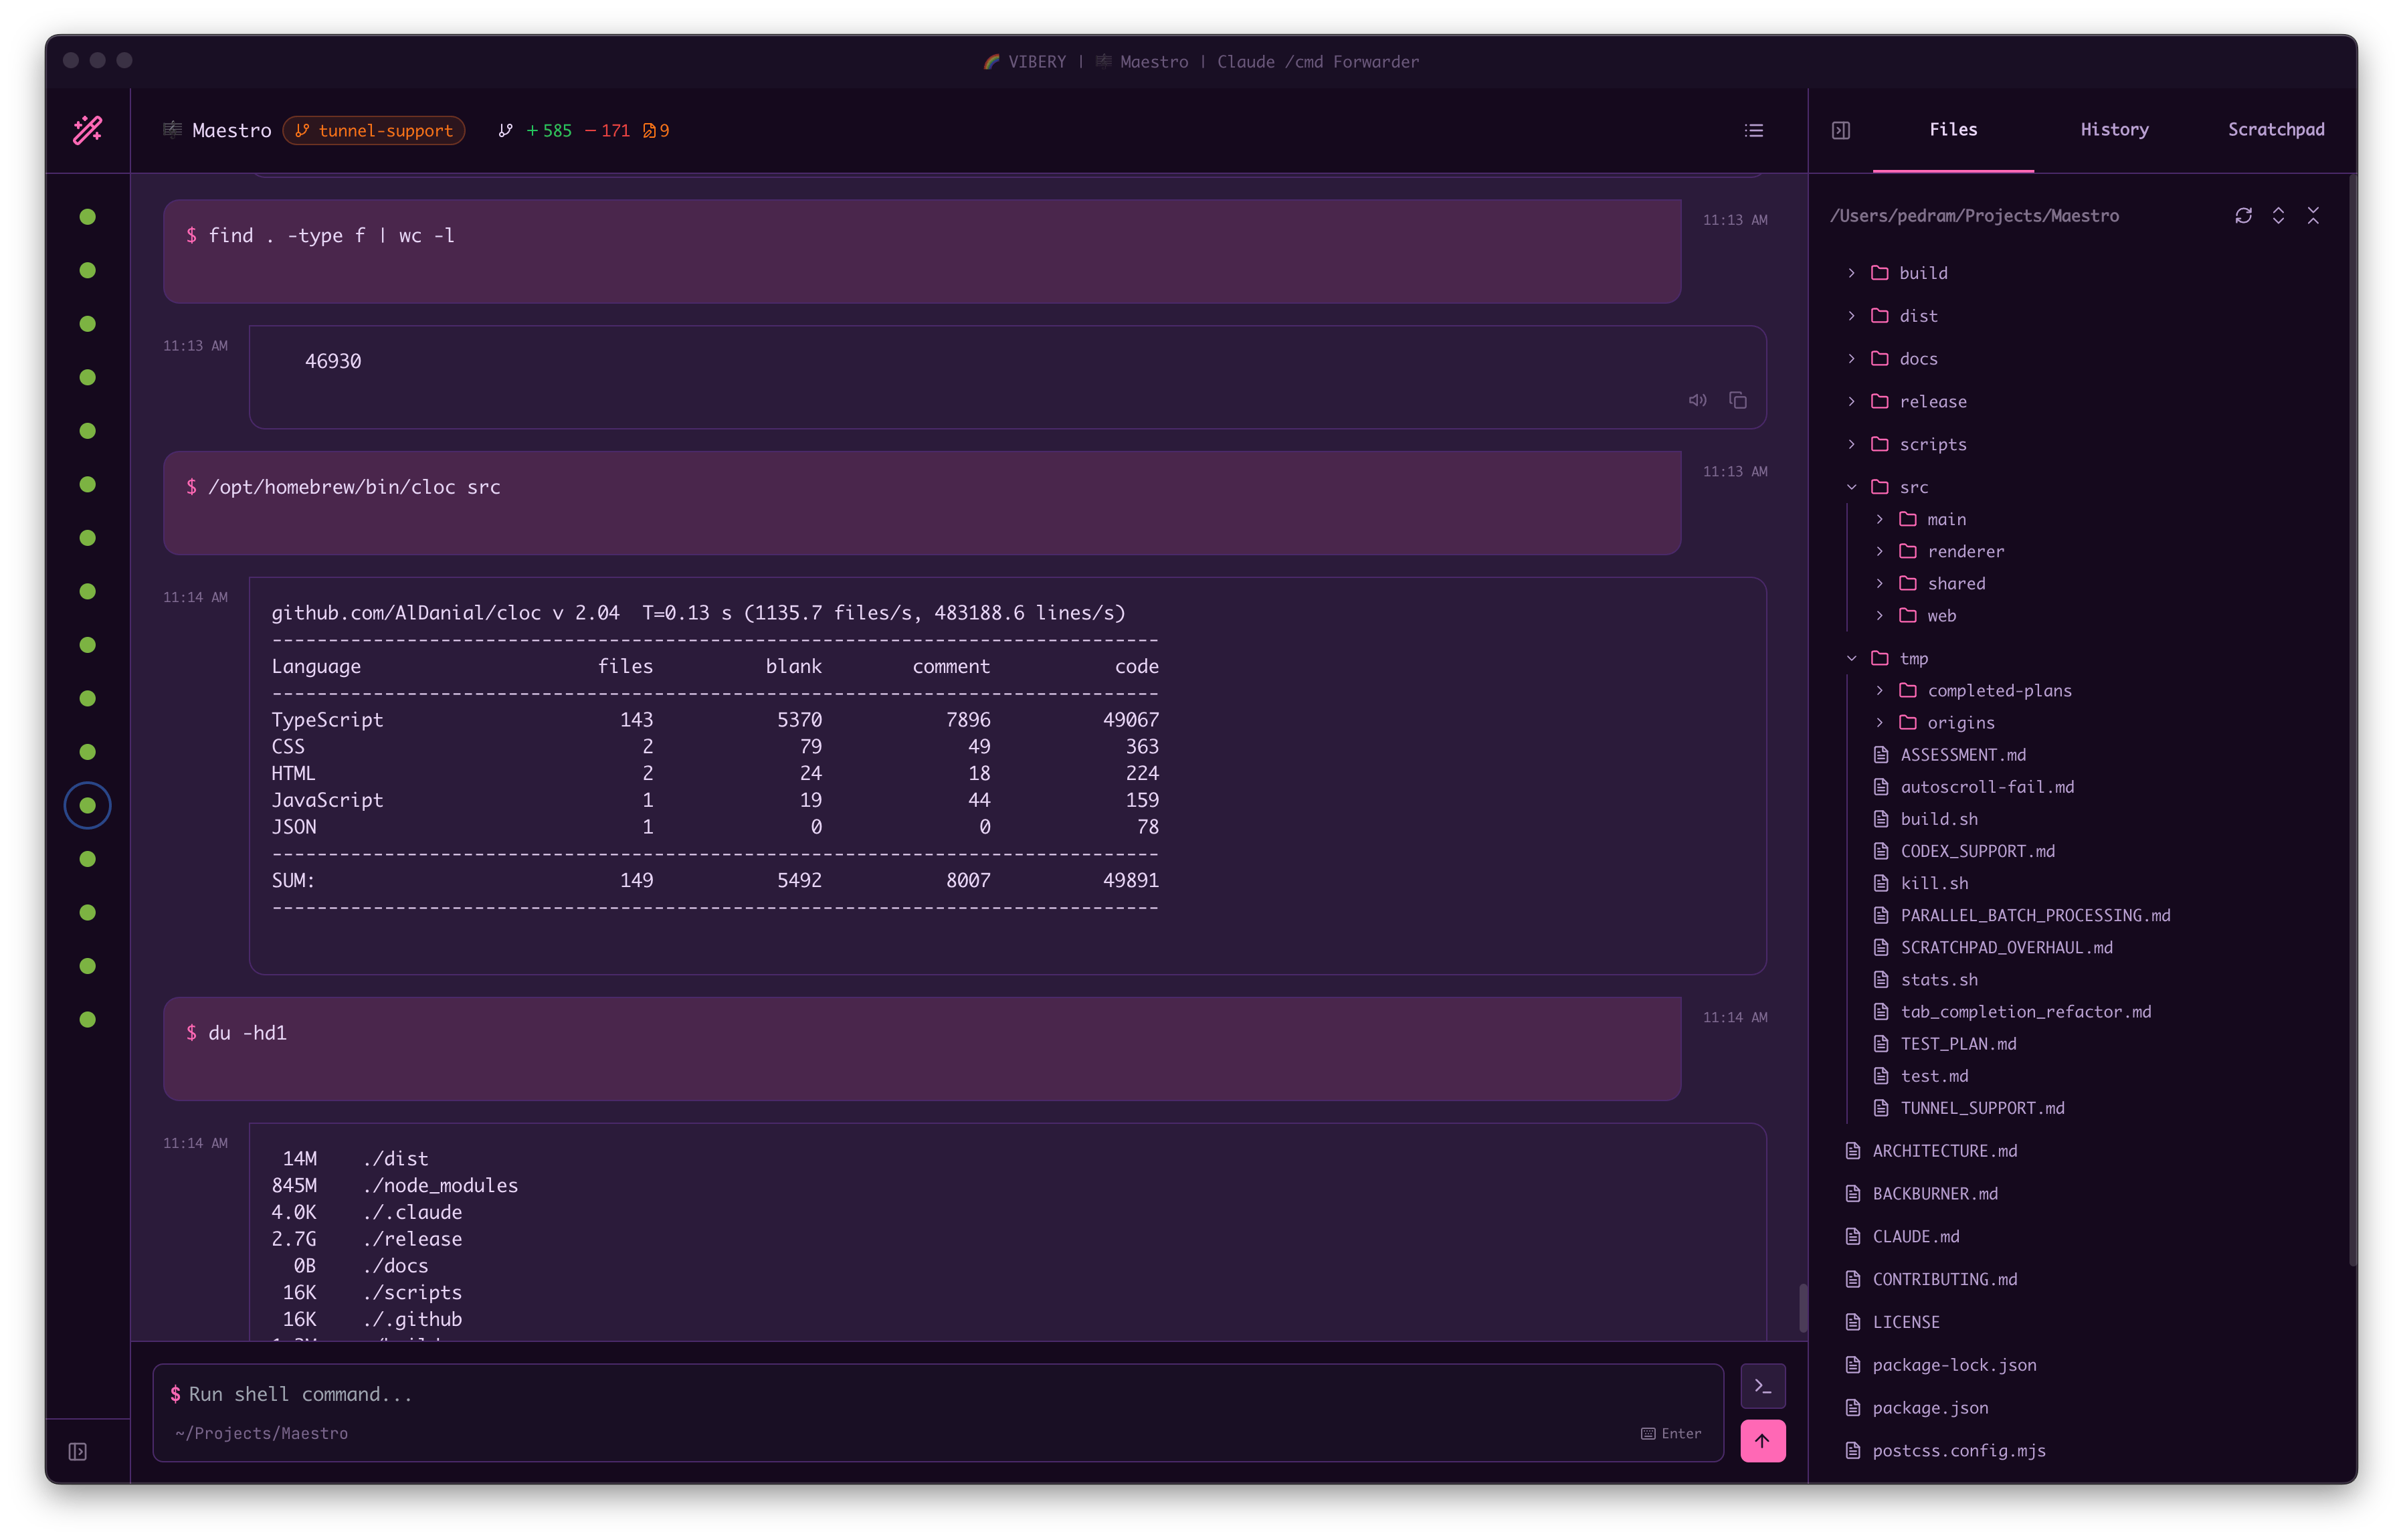
Command Terminal
Each agent has a Command Terminal alongside its AI Terminal - a real PTY shell scoped to the agent’s working directory. Switch between them withCmd+J / Ctrl+J. Open a new terminal tab with Ctrl+Shift+ + `; close, rename, and reorder it just like an AI tab. Right-click (or hover) a terminal tab to open its action menu.
Startup Command
Configure a command to run automatically every time a terminal tab’s shell is started - including after you quit and reopen Maestro. This is the simplest way to keep something likenpm run dev, a watcher, or a long-running log tail attached to a specific tab.
To configure:
- Hover the terminal tab and open its action menu.
- Click Startup Command… (right under Rename).
- Enter the command and, optionally, a working directory. The working directory defaults to the agent’s working directory if left blank.
- Click Save.
- The command runs each time the PTY for that tab is spawned. The most common trigger is launching Maestro after a quit - any open terminal tab is restored, its shell respawned, and the configured command executes.
- Configuring a command on an already-running shell does not retroactively run it. The next spawn (app restart, or close-and-reopen the tab) picks it up.
- The configured working directory becomes the shell’s spawn directory, so the command starts in the right place even if the tab’s last
cdwas somewhere else. - Leave the command field empty and save to disable the feature for that tab.
- Each terminal tab has its own startup command - one tab can run a dev server while another runs a log tail.
SSH agents: when the agent is configured to run on a remote host, the terminal tab also runs on that host, and the startup command executes remotely (the working directory must be a path on the remote machine).
Agent Management
Agents are the core of Maestro - each agent represents an AI coding assistant running in its own workspace.Creating Agents
To create a new agent:- Press
Cmd+N/Ctrl+N, or click the New Agent button in the bottom-left sidebar - Choose Manual Setup or Guided Setup (Wizard) - see Getting Started for details on each path
- For Manual Setup: select an available AI provider (Claude Code, Codex, OpenCode, or Factory Droid), choose a working directory, and optionally name the agent
- New Session Message - A hidden message prefixed to the first message whenever a new session (tab) is created. Use this for initial context, setup instructions, or persona definitions that should apply at the start of every conversation. Not visible in chat.
- Nudge Message - A hidden message appended to every interactive user message sent to the agent. This is useful for persistent instructions or reminders that guide the agent’s behavior across all conversations. Note: Nudge messages only apply to interactive AI messages - they are not included in Auto Run tasks.
- Custom Path - Override the default executable path
- Custom Arguments - Additional command-line arguments
- Environment Variables - Custom environment variables for the agent process
- Model Selection - Choose a specific model and (where supported) reasoning/effort level. This sets the default for new tabs in this agent. You can override the model or effort on any individual tab using the model/effort pill in the input bar - per-tab overrides only affect that tab and don’t change the agent default or any other tab.
Editing Agents
Right-click any agent in the left panel and select Edit Agent… to modify its configuration. You can change the name, new session message, nudge message, custom paths, arguments, environment variables, model, and effort. Model and effort set here apply as the default to new tabs; existing tabs that haven’t been overridden also follow this default. To override on a single tab without changing the agent-wide default, use the model/effort pill in that tab’s input bar.Deleting Agents
Right-click an agent and select Remove Agent to delete it. This removes the agent from Maestro but does not delete any files or AI session data.Agent Configuration via Quick Actions
UseCmd+K / Ctrl+K → “Edit Agent” to quickly access agent configuration for the current session.
Left Panel Operations
The left panel (sidebar) contains your agent list, groups, and navigation controls.Filtering and Search
PressCmd+F / Ctrl+F while the sidebar is focused to open the session filter. The filter:
- Searches agent names and AI tab names
- Automatically expands groups containing matches
- Shows matching bookmarked agents
- Searches worktree branch names
Bookmarks
Pin important agents to the top of the list:- Right-click an agent → Add Bookmark
- Or use the context menu to toggle bookmark status
Groups
Organize agents into groups for better project management: Creating groups:Cmd+K/Ctrl+K→ “Create Group”- Groups have a name and emoji for visual identification
- Right-click an agent → Move to Group → Select target group
- Or drag-and-drop agents between groups
- Click the group header to collapse or expand
- Groups remember their collapsed state
Drag and Drop
Rearrange agents by dragging them:- Drag agents between groups
- Drag to reorder within a group
- Drag to the “Ungrouped” section to remove from a group
Context Menu
Right-click any agent for quick actions:- Rename - Change the agent’s display name
- Edit Agent… - Open configuration modal
- Add/Remove Bookmark - Toggle bookmark status
- Move to Group - Organize into groups
- Create Worktree - Create a git worktree sub-agent (if configured)
- Configure Worktrees - Set up worktree configuration
- Remove Agent - Delete the agent from Maestro
Sidebar Width
Drag the right edge of the sidebar to resize it. The width is persisted across sessions.Collapsed Mode
Click the sidebar toggle (Opt+Cmd+Left / Alt+Ctrl+Left) to collapse the sidebar to icon-only mode. In collapsed mode:
- Agents show as icons with status indicators
- Hover for agent name tooltip
- Click to select an agent
Tab Management
Each agent session can have multiple tabs, allowing you to work on different tasks within the same project workspace.Automatic Tab Naming
When you send your first message to a new tab, Maestro automatically generates a descriptive name based on your request. This helps you identify tabs at a glance without manual renaming. How it works:- When you start a new conversation in a tab, your first message is analyzed
- An AI generates a concise, relevant name (2-5 words)
- The tab name updates automatically once the name is generated
- If you’ve already renamed the tab, automatic naming is skipped
Configuring automatic tab naming:
- Go to Settings (
Cmd+,/Ctrl+,) → General - Toggle Automatic Tab Naming on or off
- Default: Enabled
Automatic tab naming uses the same AI agent as your session, including SSH remote configurations. The naming request runs in parallel with your main prompt, so there’s no delay to your workflow.
Manual Tab Renaming
You can always rename tabs manually:- Right-click a tab → Rename Tab
- Or double-click the tab name to edit it directly
- Manual names take precedence over automatic naming
Session Management
Browse, star, rename, and resume past sessions. The Session Explorer (Cmd+Shift+L / Ctrl+Shift+L) shows all conversations for an agent with search, filtering, and quick actions.