<?xml version="1.0" encoding="utf-8"?><feed xmlns="http://www.w3.org/2005/Atom" ><generator uri="https://jekyllrb.com/" version="3.10.0">Jekyll</generator><link href="http://eisel.me/feed.xml" rel="self" type="application/atom+xml" /><link href="http://eisel.me/" rel="alternate" type="text/html" /><updated>2024-10-17T15:56:33+00:00</updated><id>http://eisel.me/feed.xml</id><title type="html">Michael Eisel’s Blog</title><subtitle></subtitle><author><name>Michael Eisel</name></author><entry><title type="html">Faster iOS Networking with Shared Dictionary Compression</title><link href="http://eisel.me/shared-dictionary-compression" rel="alternate" type="text/html" title="Faster iOS Networking with Shared Dictionary Compression" /><published>2024-10-16T01:45:46+00:00</published><updated>2024-10-16T01:45:46+00:00</updated><id>http://eisel.me/shared-dictionary-compression</id><content type="html" xml:base="http://eisel.me/shared-dictionary-compression"><![CDATA[<h2 id="introduction">Introduction</h2>

<p>Although iPhones are getting faster and faster with every release, networking delays remain a persistent thorn in the side of the user experience. Information remains limited by the speed of light in getting to its destination, and in many cases, there are additional slowdowns along the way (3G connections, subway tunnels, satellite internet, etc.). Driving down response sizes continues to yield benefits for users, and with that in mind, we’re going to look at a relatively new technique for it, “shared dictionary compression”. Although the technique has been used at places such as Google and Amazon for years, it has recently gained a lot of momentum in the larger developer community. That momentum is mostly on the browser side, but in this blog post, I’ll show how we can easily leverage shared dictionary compression for iOS apps.</p>

<h2 id="the-current-state-of-non-shared-dictionary-compression">The current state of (non-shared-dictionary) compression</h2>

<p>To understand shared dictionary compression, let’s first give a brief overview of its alternative. The iOS app (the “client”) and server agree on some compression library they both support and the server sends the response back compressed with that library. The two most popular compression libraries for this are probably gzip, the oldest and most widely supported library, and Brotli, a relative newcomer that is generally faster than gzip. For iOS apps, both have been supported by <code class="language-plaintext highlighter-rouge">URLSession</code> transparently since iOS 11 (and even older in the case of gzip). It’s important that developers get as much as they can out of this sort of compression before looking at shared dictionary compression, because it’s simpler to support and works for a broader scope of responses. It’s also important to understand the practical consequences of compression on responses. For example, using short keys in a JSON dictionary, like <code class="language-plaintext highlighter-rouge">"lc"</code> for <code class="language-plaintext highlighter-rouge">"like_count"</code>, won’t necessarily reduce the compressed response size by much. The compression library can (ideally) see that <code class="language-plaintext highlighter-rouge">"like_count"</code> is repeated throughout the JSON payload, only store the actual string once, and just refer to that reference for all of its occurrences. Another thing is that alternative data formats to JSON, such as Protobuf, don’t necessarily reduce response sizes very much once compression is factored in (and can even increase them!). This is because lots of wasteful looking stuff in JSON, like optional whitespace and quotes around strings, is repeated many times throughout responses, and repetitive data can be compressed really well. In short, compression allows developers to be more “lazy” and not worry as much about repetitive waste. For more information, and a case study of how Brotli can provide benefits over gzip, see <a href="https://tech.oyorooms.com/how-brotli-compression-gave-us-37-latency-improvement-14d41e50fee4">this article</a>.</p>

<p>And while we’re at it, consider <a href="https://developer.apple.com/videos/play/wwdc2021/10094/">switching to HTTP/3</a> if you haven’t, and going through a checklist like <a href="https://www.getyourguide.careers/posts/part-four-improving-user-experience-by-boosting-runtime-performance">this one</a> to make sure you’re already leveraging easier networking speedups before using shared dictionary compression. Now on to the fun stuff!</p>

<h2 id="what-is-shared-dictionary-compression">What is shared dictionary compression?</h2>

<p>Shared dictionary compression is where an iOS app and the server it’s communicating with each have a copy of some piece of data (the “dictionary”) that can be used to make a request smaller. For instance, if the client and server have both stored the previous day’s response for some public endpoint, and today’s response for that endpoint has only changed slightly, then the server could just return a diff between the two responses. Let’s suppose the endpoint is called <code class="language-plaintext highlighter-rouge">/latest_news</code>, and it returned the following response yesterday:</p>

<div class="language-plaintext highlighter-rouge"><div class="highlight"><pre class="highlight"><code>{
    "articles": [
        ...
        {
            "title": "Something new has happened",
            "description": "..."
        },
    ]
}
</code></pre></div></div>

<p>Now the client is asking for a new copy of <code class="language-plaintext highlighter-rouge">/latest_news</code> today, and the response is almost identical. Only one new article has been written since yesterday:</p>

<div class="language-plaintext highlighter-rouge"><div class="highlight"><pre class="highlight"><code>{
    "articles": [
        ...
        {
            "title": "Something new has happened",
            "description": "..."
        },
        {
            "title": "Something even newer has happened",
            "description": "..."
        }
    ]
}
</code></pre></div></div>

<p>With shared dictionary compression, the client and server could communicate that they each have a copy of yesterday’s response, and the server could use that as the dictionary just send a diff like:</p>

<div class="language-plaintext highlighter-rouge"><div class="highlight"><pre class="highlight"><code>@@ -200,1 +200,8 @@
-        }
+        },
+        {
+            "title": "Something even newer has happened",
+            "description": "..."
+        }
</code></pre></div></div>

<p>This strategy leads to a bigger and bigger reduction in payload size given a larger and larger number of other articles in the response. Furthermore, in practice, the two responses don’t need a simple diff like this for it to work. Modern compression libraries, like Brotli and Zstandard, can cleverly pick out snippets of the dictionary and basically say things like “at this point in the new response, use the characters from 435 to 526 in the previous response. Then add some new string ‘foo’. Then use the characters from 826 to 879 in the previous response”. The only thing that matters is that there’s some amount of commonality between the two responses. In fact, the dictionary doesn’t have to be a response at all. It could just be a collection of snippets that tend to show up in the <code class="language-plaintext highlighter-rouge">/latest_news</code> endpoint. For instance, it could look like <code class="language-plaintext highlighter-rouge">[" has happened", "\"\n        {\n            \"title\": "Something ", ...]</code> (see the <code class="language-plaintext highlighter-rouge">--train</code> flag for Zstandard’s <code class="language-plaintext highlighter-rouge">zstd</code> tool for an example of how these can be created).</p>

<h2 id="how-much-impact-can-it-have">How much impact can it have?</h2>

<h3 id="hint-its-more-than-you-might-think">Hint: it’s more than you might think</h3>

<p>Shared dictionary compression, being the more complicated compression alternative here, needs good results to justify itself. Measuring this with just back-of-the-napkin math is treacherous. It can be easy to look at a response payload that’s already 20 kilobytes compressed with Brotli and say, “most people’s WiFi and 4G devices have download speeds of at least 625 kilobytes/sec. 20 / 625 = 0.032, or 32ms, meaning shared dictionary compression has a ceiling of 32ms reduced, not much at all!”. However, this would be ignoring a few important factors. One is that small delays can have a surprisingly high impact on user behavior (an <a href="https://www.gigaspaces.com/blog/amazon-found-every-100ms-of-latency-cost-them-1-in-sales">Amazon study</a> found that every additional 100ms of latency cost them 1% in sales). Another is that bandwidth estimates largely concern the ideal case: a long-running download where the client and server have figured out how fast the connection is (and thus how fast to send data to the client), and have finished with initial formalities. A small 20Kb request on the other hand, can be dominated by costs like the server tentatively figuring out how fast to send bytes to the client, so it’s really not hitting the theoretical max. Here, the larger issue is often the round-trip time (RTT), the time it takes for data to go from the client to server and back. The round-trip time is limited by the speed of light, and sadly can only be so fast, unlike bandwidth which has increased substantially over time. In general, the details of this involve things like TCP slow start and changes in HTTP2, and can be so complicated that even web experts <a href="https://www.tunetheweb.com/blog/critical-resources-and-the-first-14kb/">don’t always agree on it</a>. Lastly, it’s easy to overestimate user’s speeds and forget how many exceptionally slow cases there are out there. For example: users in countries with slower internet speeds, users in a subway train where the connection is going in and out, and users in isolated areas where the internet is spotty.</p>

<p>I’ll end this with a quote from an unnamed Chromium dev (note that “SDCH” here refers to a specific shared dictionary compression algorithm):</p>
<blockquote>
  <p>Another change in the world is certainly that bandwidth has continued to rise”, even though (as I’ve stressed with [one internet protocol]), the speed of light has remained constant, and hence RTTs have not fallen.  When we look at geographic areas such as India or Russia, bandwidth might not be growing so fast, RTT times routinely approach 400ms, and worse yet, packet loss can routinely approach 15-20% &lt;gulp!!&gt;.  With such long RTTs, and the significant loss rates, the compression rate has an even larger impact on latency than mere “serialization” costs.  The more packets you send, the more likely one is to get lost, and the more likely an additional RTT (or 2+!!) will be required for payload delivery.  As a result, it is very unsurprising that Amazon sees big savings in the tail of the distribution, when using SDCH in such areas.  I’d expect that most any sites that were willing to make the effort of supporting SDCH (and have repeat visitors!!!) have a fine chance of seeing similar significant latency gains (and sites can estimate the compression rate for a given dictionary before wasting the time to ship the dictionary!).</p>
</blockquote>

<h3 id="measuring-the-impact-more-accurately">Measuring the impact more accurately</h3>

<p>Since we’ve seen how difficult it is to measure it with theoretical analysis, a more promising option is to measure things in production. One could do an A/B test where the experiment group has shared dictionary compression enabled. The developer can measure both the real-world change in response time as well as any changes in user engagement as a result.</p>

<h3 id="results-from-real-companies">Results from real companies</h3>

<p>It has been <a href="https://github.com/WICG/compression-dictionary-transport/blob/main/examples.md#static-resource-flow-results">shown</a> that various network requests for popular websites would be substantially reduced in size by using shared dictionary compression. And size wins like that translate into real results: Amazon <a href="https://groups.google.com/a/chromium.org/g/blink-dev/c/nQl0ORHy7sw/m/LkXwXcUtAgAJ">reported</a> a 10% reduction for the 90th percentile for page load times the US. On the mobile front, there’s a top 10 App Store app that uses shared dictionary compression. The gains depend on the app, but there’s a lot of potential for many apps.</p>

<h2 id="a-concrete-scheme">A concrete scheme</h2>

<p>Shared dictionary compression can be implemented using any number of schemes. The developer can choose how the client tells the server that it has a shared dictionary, how the client tells the server which decompression algorithms it supports, etc. However, there’s a <a href="https://datatracker.ietf.org/doc/draft-ietf-httpbis-compression-dictionary">draft spec</a> for an end-to-end solution with a lot of momentum. Although that spec is largely geared towards browsers, and has more bells and whistles than one may need, it’s a good starting point for mobile developers. Here’s a summary of the spec as it could be applied to iOS apps (note that “URL match pattern” in this section refers to <a href="https://developer.mozilla.org/en-US/docs/Web/API/URL_Pattern_API">this</a>):</p>
<ul>
  <li>How the server gets shared dictionaries to the client
    <ul>
      <li>The server can specify a shared dictionary to the client in one of two ways:
        <ul>
          <li>By adding a <code class="language-plaintext highlighter-rouge">Use-As-Dictionary: &lt;options&gt;</code> field in the response header. This header specifies that the response given should be used as a dictionary for future requests. It provides a URL match pattern as to which requests it’s eligible for (e.g. <code class="language-plaintext highlighter-rouge">match="/product/*"</code>), and can also optionally allow for an ID (e.g., <code class="language-plaintext highlighter-rouge">match="/product/*", id=foo1234</code>). Note that these relative URLs are referring to the same base URL as of the request.</li>
          <li>By specifying a <code class="language-plaintext highlighter-rouge">Link: &lt;url&gt;</code> header, which provides a URL for a dictionary that can be downloaded at the client’s leisure (e.g., in a background URL session task). The response from this URL should also include a <code class="language-plaintext highlighter-rouge">Use-As-Dictionary</code> header in the same format as above.</li>
        </ul>
      </li>
      <li>If the dictionary comes with cache controls, such as <code class="language-plaintext highlighter-rouge">Cache-Control: max-age=3600</code>, then the client should only try to use this shared dictionary while it would otherwise be eligible to use for caching (e.g., while it’s still “fresh”)</li>
    </ul>
  </li>
  <li>How the client sends a new request that works with shared dictionaries
    <ul>
      <li>For whichever compression schemes the client supports, the client adds those compression schemes to the <code class="language-plaintext highlighter-rouge">Accept-Encoding</code> header. For example, if a client supported Zstandard (regular non-shared-dictionary mode), Zstandard for shared dictionaries, and Brotli for shared dictionaries, then it would use <code class="language-plaintext highlighter-rouge">Accept-Encoding: zstd, dcz, dcb</code>. Note <code class="language-plaintext highlighter-rouge">dcz</code> is for Zstandard shared dictionary compression, and <code class="language-plaintext highlighter-rouge">dcb</code> is for Brotli shared dictionary compression. Technically, these are the “raw” variants of Zstandard and Brotli, but more info on that is outside the scope of this blog post, and can be found in 2.1.4 of the draft.
-If the client has one or more matching dictionaries for the request, it can select one of those dictionaries and notify the server that it has it. It should select the dictionary with the longest match or, in the event of a tie, the most recent one. It uses the following header: <code class="language-plaintext highlighter-rouge">Available-Dictionary: &lt;SHA-256 hash of dictionary&gt;</code></li>
      <li>If the <code class="language-plaintext highlighter-rouge">Use-As-Dictionary</code> options for that dictionary included an ID then it should also be included, with a <code class="language-plaintext highlighter-rouge">Dictionary-ID: &lt;id&gt;</code> header</li>
    </ul>
  </li>
  <li>How the server returns a response
    <ul>
      <li>If the server has the dictionary with that SHA and (if applicable) with that ID, and it supports one of the shared dictionary encodings that the client does, then it can return the response compressed with that dictionary and that encoding. It should set the <code class="language-plaintext highlighter-rouge">Content-Encoding: ...</code> header appropriately.</li>
    </ul>
  </li>
  <li>Security considerations
    <ul>
      <li>The dictionary must be treated as equally sensitive as the content, because a change to the dictionary can result in a change to the size and content of the decompressed response</li>
      <li>To prevent third parties from injecting compression dictionaries for sensitive first-party content, dictionaries should only be used for requests to the same domain that the dictionary was downloaded from</li>
      <li>See the security chapter of the draft for more details</li>
    </ul>
  </li>
  <li>Other things
    <ul>
      <li>Any caches between the client and server should support <code class="language-plaintext highlighter-rouge">Vary</code> for both the <code class="language-plaintext highlighter-rouge">Accept-Encoding</code> and <code class="language-plaintext highlighter-rouge">Available-Dictionary</code> headers. Otherwise, it can deliver corrupt data if it returns a cached response that uses a dictionary for a client that doesn’t have that dictionary.</li>
    </ul>
  </li>
</ul>

<p>Mobile developers aren’t constrained to what browsers support, and can roll their own networking conventions in a situation like this. However, it’s great to have the leading browser implementation in mind when doing it. If there’s interest in it, I can release my own reference Swift implementation, and decompression-only 70kb version of the Zstandard library.</p>

<h2 id="specific-use-cases">Specific use cases</h2>

<p>Although we’ve already shown an example for an articles endpoint that only changes slowly over time, here are a couple other examples:</p>
<ul>
  <li>A calendar app syncs its state with the server by downloading the user’s whole calendar whenever they open the app, including all of the events the user has scheduled, past, present, or future. This doesn’t scale with a growing number of events, and so things are getting slow for long-time power users. They could use complicated diffing logic to only send a diff of what the user already has, where the server keeps track of exactly what events the user has/hasn’t downloaded to each device. But what about using  “dumb” content-agnostic shared dictionary compression to get similar results with less effort and risk of bugs?</li>
  <li>A chat app wants to keep message payloads small for a user’s chats. Every so often, it provides an out-of-band (i.e. <code class="language-plaintext highlighter-rouge">Link:</code> header) compression dictionary for each active 1-on-1 chat, with a bit of history from that chat.</li>
</ul>

<h2 id="conclusion">Conclusion</h2>

<p>In summary, shared dictionary compression offers a powerful yet underutilized method for reducing payload sizes and improving network performance in iOS apps. By leveraging similarities between different responses, this technique can lead to significant improvements in load times, especially for users on slower or unreliable networks. While it may require some initial work, including measurement and server-side implementation, the benefits can be substantial. For more info, consider reading Chrome’s <a href="https://developer.chrome.com/blog/shared-dictionary-compression">blog post</a> on the subject.</p>]]></content><author><name>Michael Eisel</name></author><category term="jekyll" /><category term="update" /><summary type="html"><![CDATA[Introduction]]></summary></entry><entry><title type="html">Faster Apple Builds with the lld Linker</title><link href="http://eisel.me/lld" rel="alternate" type="text/html" title="Faster Apple Builds with the lld Linker" /><published>2022-12-20T01:45:46+00:00</published><updated>2022-12-20T01:45:46+00:00</updated><id>http://eisel.me/lld</id><content type="html" xml:base="http://eisel.me/lld"><![CDATA[<h3 id="update-with-the-release-of-ld-prime-the-new-default-linker-lld-is-no-longer-necessarily-the-fastest-option">Update: with the release of ld-prime, the new default linker, lld is no longer necessarily the fastest option</h3>

<p><strong>TL;DR: lld is a great choice for faster linking of iOS, macOS, etc. debug binaries. It takes 20-50% less time than ld64 and is now used by many large companies. Steps on how to integrate are in the <a href="#integrating-lld">section</a> below. zld has been archived in favor of lld.</strong></p>

<h2 id="introduction">Introduction</h2>

<p>Linking is one of the main bottlenecks for incremental builds. Thousands upon thousands of developer-hours are spent each year waiting on debug builds to link, and so linker optimization is a major topic. Linkers are complicated beasts that have to do intricate transformations on huge amounts of data at lightning speed, so it requires a lot of work. This blog post will discuss the past, present, and future of linker optimization for Apple platforms. It also includes a <a href="#integrating-lld">practical section</a> on how to integrate lld at present. If you aren’t familiar with linking, read about it <a href="https://stackoverflow.com/questions/3322911/what-do-linkers-do">here</a> and look for the linking step at the end of your build logs.</p>

<h2 id="a-history-of-linker-optimization-for-apple-platforms">A History of Linker Optimization for Apple Platforms</h2>

<h3 id="pre-2020">Pre-2020</h3>

<p>For years, there was only one linker in wide use, Apple’s standard linker known as ld64. Unfortunately, it didn’t receive that much attention in terms of speed. For example, when I mentioned to an Apple engineer in 2017 that a major app was taking 20 seconds to link, they seemed very surprised. Although the linker was undergoing active development, e.g. for Swift support, speed was not top-of-mind. Apple didn’t seem to view it as that big of a bottleneck for third-party developers.</p>

<h3 id="the-release-of-zld">The Release of zld</h3>

<p>In the spring of 2020, I released my own fork of ld64, called zld. It added a number of optimizations on top of ld64, such as using a faster hash map implementations in key spots. There were in fact many low-hanging fruit to pick, and it ended up being about 40% faster than ld64. Since there was no major funding for it, I could only work on it in my spare time, but nonetheless it delivered results. Its release marked the start of a new era of focus on linker speed.</p>

<h3 id="the-revamp-of-lld">The Revamp of lld</h3>

<p>Soon after the release of zld, more attention also started getting paid to another linker, lld. lld is a linker under the LLVM project that has been around for years, and supports both Apple and Linux platform. For Linux, it had long been a good choice to speed up linking, but prior to the spring of 2020 the support for Apple platforms was lacking. It didn’t support many of the newer additions to ld64, and would typically error when used to build new Swift or Objective-C projects. It seemed to be mostly used by Google and geared towards linking Chromium. However, just days after the release of zld, and possibly influenced by it, things changed. Facebook announced on the LLVM mailing lists that they would be devoting more resources to it and putting engineers on it. The goal was to make lld a viable drop-in replacement for ld64 like zld was, with the potential to be much faster. It had a long way to go, but it had a promising foundation.</p>

<p>Unlike zld, which was a fork of ld64, lld was written from scratch with speed as a top priority. For example, whereas ld64 would iterate over each of the binary’s symbols many times, once for each “pass”, lld tried to combine multiple passes in each iteration. When iterating over millions of symbols in a large binary, this can be a substantial win. lld could also rely on the LLVM project’s many <a href="https://llvm.org/docs/ProgrammersManual.html#picking-the-right-data-structure-for-a-task">optimized data structures</a>. Over the coming months, engineers from Facebook and Google, as well as others, improved it until it could efficiently link some of the largest apps out there. Around late 2021 and early 2022, lld became a production-ready linker for apps in general, with significantly better speed than both ld64 and zld. It is now the default linker for debug builds not just for Google and Facebook, but for a number of other large companies as well.</p>

<h3 id="apples-improvements-to-ld64">Apple’s Improvements to ld64</h3>

<p>Perhaps due to all the attention linker speed was now getting in the community, Apple started optimizing ld64 in 2021 and 2022. The team that owns ld64 had been previously busy with things like reducing the amount of time spent in the Apple’s portion of app startup time, but with the release of Xcode 14, there were a number of optimizations added to the linker. These optimizations are discussed in this <a href="https://developer.apple.com/videos/play/wwdc2022/110362/">WWDC video</a>. Now, even for developers that don’t opt to use a different linker, they can expect faster linking.</p>

<h2 id="present-status-of-zld">Present status of zld</h2>

<p>zld is in maintenance mode! With lld becoming a superior alternative, and with a tricky change in Xcode 14 that I <a href="https://github.com/michaeleisel/zld/issues/113">didn’t want to add support for</a>, I decided that it’s time to throw in the towel. zld had always been a largely unfunded project that I worked on in my spare time, and after two years of speeding up builds for developers, I could see that better-funded projects had caught up and surpassed it in 2022.</p>

<h2 id="integrating-lld">Integrating lld</h2>

<p>The <a href="https://lld.llvm.org/MachO/index.html">directions</a> in the LLVM documention explain how to properly integrate it. Note that the current official LLVM release lacks a couple key bug fixes, especially for those doing iOS builds and/or building with Xcode 14. To get a version with those fixes, download the latest one from <a href="https://github.com/keith/ld64.lld/releases">here</a>.</p>

<h2 id="should-lld-be-used-for-release-builds">Should lld be used for release builds?</h2>

<p>In my opinion, the answer is no, at least not right now. This is for a couple reasons:</p>
<ul>
  <li>lld lacks certain features that ld64 has. For example, ld64’s chained fixups, a feature that can improve startup time, is not yet well-tested for lld. In other words, by switching to lld, one’s startup time could get worse.</li>
  <li>ld64 is released in lockstep for each Xcode version with the other parts of the toolchain, such as clang and libLLVM. One’s copy of lld may rely on a different version of LLVM, and this could theoretically cause problems. For example, there may be issues when LTO code produced by clang is given to a mismatched version of lld.</li>
</ul>

<p>In general, lld lacks the testing and features for me to recommend it at scale. Personally, I’m not sure this is a bad thing. Release builds don’t need the same extreme speed of linking that debug builds do, and they have a greater requirement for being stable and standardized across apps. However, Google does use it for production builds, and lld could theoretically get new optimizations that ld64 lacks. It already can produce smaller binaries due to Identical Code Folding, so we’ll see what happens.</p>

<h2 id="conclusion">Conclusion</h2>

<p>There will always be more work to do on this, whether it’s optimizing these linkers further or supporting new features like chained fixups. The landscape may change, too. It remains to be seen if the up-and-coming paid linker <a href="https://github.com/bluewhalesystems/sold">sold</a>, which is currently faster than lld, becomes production-ready for large apps. Apple may also try to close the gap between ld64 and these faster linkers. But regardless of what happens in the future, it’s clear that linking speed is now getting the attention it deserves.</p>

<p>(Looking for more tips to speed up your build? Check out my <a href="https://eisel.me/signing">post</a> on how to speed up code signing)</p>

<blockquote>
  <p>“Live, Love, Link”<br />
– Martha Stewart</p>
</blockquote>

<p><em>Special thanks to Keith Smiley and Andrew Emil for their feedback on this blog post.</em></p>]]></content><author><name>Michael Eisel</name></author><category term="jekyll" /><category term="update" /><summary type="html"><![CDATA[Update: with the release of ld-prime, the new default linker, lld is no longer necessarily the fastest option]]></summary></entry><entry><title type="html">Faster Mac Dev Tools with Custom Allocators</title><link href="http://eisel.me/devtool-allocators" rel="alternate" type="text/html" title="Faster Mac Dev Tools with Custom Allocators" /><published>2021-10-27T01:45:46+00:00</published><updated>2021-10-27T01:45:46+00:00</updated><id>http://eisel.me/devtool-allocators</id><content type="html" xml:base="http://eisel.me/devtool-allocators"><![CDATA[<h2 id="introduction">Introduction</h2>

<p>When trying to speed up a dev tool, like the swift compiler or the linker, developers may try a few things. For example, they may look through the man page for flags to speed them up (like <code class="language-plaintext highlighter-rouge">-j8</code> to parallelize <code class="language-plaintext highlighter-rouge">make</code> tasks). Or, they may improvise some caching system on top of the tool to eliminate unnecessary work. But there’s another trick one can try: alternate allocators.</p>

<p>In a <a href="https://eisel.me/allocator">previous post</a>, I looked at what allocators are and how the default one for iOS (and really macOS) can be replaced at runtime. In this post, we’ll look at the practical applications of alternate allocators for speeding up dev tools. For many dev tools, this trick can bring at least a modest speedup.</p>

<h2 id="is-using-a-custom-allocator-safe">Is using a custom allocator safe?</h2>

<p>Allocators are low-level, complicated things, and if they break, very bad things can happen. On the other hand, jemalloc, for example, has been in use for decades, including as the default allocator for FreeBSD. It has also been used with success both for really big iOS apps as well as Mac CI pipelines for big companies.</p>

<h2 id="how-to-do-it">How to do it</h2>

<p>Fortunately, using a different allocator for a tool doesn’t require it to be rebuilt. Instead, for allocators that are designed to swap themselves in, one can just add the environment variable <code class="language-plaintext highlighter-rouge">DYLD_INSERT_LIBRARIES=/path/to/allocator.dylib</code>. One example is jemalloc, which can be built by downloading the <a href="https://github.com/jemalloc/jemalloc">jemalloc repo</a>, running <code class="language-plaintext highlighter-rouge">cd jemalloc &amp;&amp; ./autogen.sh &amp;&amp; make</code>, and using the resulting <code class="language-plaintext highlighter-rouge">lib/libjemalloc.dylib</code>.</p>

<p><strong>Note: for tools that are hardened to strip <code class="language-plaintext highlighter-rouge">DYLD_</code> environment variables or prevent libraries from being sideloaded, this technique won’t work.</strong></p>

<h2 id="example-compilers">Example: Compilers</h2>

<p>Objective-C, C++, and Swift compilation can be sped up by swapping out the allocator. The impact for Objective-C in debug builds can be smaller, but for Swift and C++, especially for builds with optimizations, it can reduce time taken by 10% or more. We can change the allocator for swift, for example, by creating a small shell script:</p>
<div class="language-plaintext highlighter-rouge"><div class="highlight"><pre class="highlight"><code>export DYLD_INSERT_LIBRARIES=/path/to/libalternate_malloc.dylib
# Just calling /usr/bin/swiftc doesn't seem to work (maybe /usr/bin/swiftc is hardened?), so instead call the actual swiftc binary in the toolchain
exec `xcode-select -p`/Toolchains/XcodeDefault.xctoolchain/usr/bin/swiftc "$@"
</code></pre></div></div>

<p>Then, set the Xcode build variable <code class="language-plaintext highlighter-rouge">SWIFT_EXEC = /path/to/my_swiftc.sh</code>, and it will have the swift compiler use this alternate allocator. Similarly, clang can be set with <code class="language-plaintext highlighter-rouge">CC = /path/to/my_clang.sh</code>.</p>

<h2 id="example-llvm-profdata">Example: llvm-profdata</h2>

<p>llvm-profdata is a tool that takes the code coverage results from different test runs and merges them together to get the overall code coverage for a test suite. At one company, this step was adding 40 seconds to CI time, but with jemalloc it was cut in half to 20 seconds.</p>

<h2 id="estimating-the-potential-performance-gain">Estimating the potential performance gain</h2>

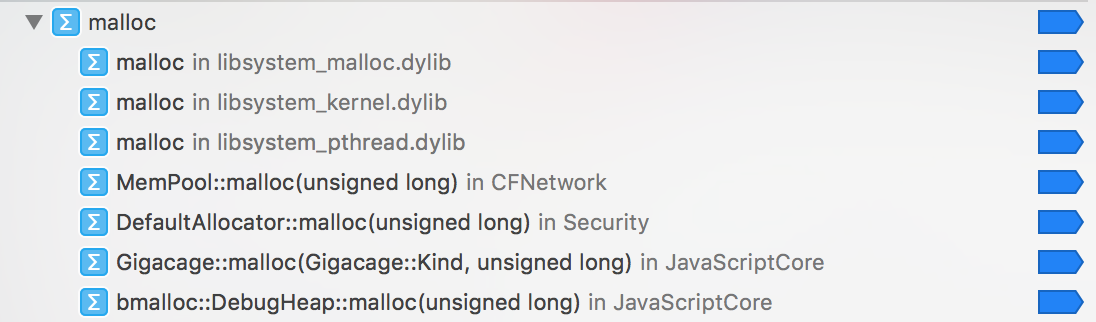
<p>One easy way to know if a tool could be sped up through a different allocator, aside from just timing it with/without a different one, is to profile that tool with the Time Profiler. Although it may surprise some, ordinary mac executables can be profiled in Instruments, even if they weren’t built by the developer themself. The executable can either be selected in Time Profiler and have its flags specified, or else a trace of all processes can be run while the executable is running. If a lot of time seems to be taken up by <code class="language-plaintext highlighter-rouge">malloc</code> and <code class="language-plaintext highlighter-rouge">free</code>, then there’s more potential gain by using a different allocator. Although the performance impact of allocation is a complicated beast, this is a good litmus test to decide if it’s worth trying.</p>

<h2 id="which-alternate-allocator-to-use">Which Alternate Allocator To Use?</h2>

<p>jemalloc is a great choice because of its speed and its level of support on macOS (probably the highest level for any alternate allocator out there). The only other one I’m aware of with solid macOS support, both for the allocator itself and for seamlessly inserting it as the default, is mimalloc. In my testing, jemalloc and mimalloc seemed to have pretty similar performance, so I’d just stick with jemalloc. I also tested a simple bump allocator that never frees any memory and just allocates forever, but it generally seemed slower.</p>

<h2 id="conclusion">Conclusion</h2>

<p>Apple’s default allocator is rock-solid and has some nice logging tools with it, but unfortunately it seems slower than other battle-tested allocators (please reach out if you know of exceptions). By replacing it in key places, one can reduce bottlenecks.</p>]]></content><author><name>Michael Eisel</name></author><category term="jekyll" /><category term="update" /><summary type="html"><![CDATA[Introduction]]></summary></entry><entry><title type="html">How to Cut the Size of .strings Files in Half</title><link href="http://eisel.me/localization" rel="alternate" type="text/html" title="How to Cut the Size of .strings Files in Half" /><published>2021-03-26T01:45:46+00:00</published><updated>2021-03-26T01:45:46+00:00</updated><id>http://eisel.me/localization</id><content type="html" xml:base="http://eisel.me/localization"><![CDATA[<h2 id="introduction">Introduction</h2>

<p>It’s important to minimize the app’s size, both to reduce its download time as well as reduce the space it takes up on disk. This trick helps with that specifically for .strings files.</p>

<h2 id="expected-gain">Expected Gain</h2>

<p>It reduces the size of localization strings, both compressed and uncompressed, by roughly 50%. The longer the keys are, and the more languages that have localization strings, the more it will reduce it. Typically, it’s best for very large apps, where the strings can take up several megabytes.</p>

<h2 id="explanation">Explanation</h2>

<p>Suppose an app has Localization.strings files for English and Spanish, each with the same two key-value pairs. Here’s the English one:</p>
<div class="language-plaintext highlighter-rouge"><div class="highlight"><pre class="highlight"><code>"SomeLongKey1" = "some thing";
"SomeLongKey2" = "other thing";
</code></pre></div></div>

<p>and the Spanish one:</p>

<div class="language-plaintext highlighter-rouge"><div class="highlight"><pre class="highlight"><code>"SomeLongKey1" = "alguna cosa";
"SomeLongKey2" = "otra cosa";
</code></pre></div></div>

<p>There’s some repetition here: <code class="language-plaintext highlighter-rouge">SomeLongKey1</code> and <code class="language-plaintext highlighter-rouge">SomeLongKey2</code> have to be included for each language. However, they could just be stored once, in a separate file. Then, each localization file only needs to store its values and not its keys, <em>as long as the order of each language’s values matches the keys</em>. So here, it could repackaged in JSON as:</p>

<p>keys.json</p>
<div class="language-plaintext highlighter-rouge"><div class="highlight"><pre class="highlight"><code>["SomeLongKey1", "SomeLongKey2"]
</code></pre></div></div>

<p>english.json</p>
<div class="language-plaintext highlighter-rouge"><div class="highlight"><pre class="highlight"><code>["some thing", "other thing"]
</code></pre></div></div>

<p>spanish.json</p>
<div class="language-plaintext highlighter-rouge"><div class="highlight"><pre class="highlight"><code>["alguna cosa", "otra cosa"]
</code></pre></div></div>

<p>Now the key-value pairs for any language can be reconstructed by zipping the global list of keys with that language’s values. Note that the list of keys must include any key that’s needed for at least one language. For languages that don’t have a value for a key needed by another language, there needs to be a placeholder. E.g., if Spanish didn’t have a value for <code class="language-plaintext highlighter-rouge">key2</code>, its JSON would be <code class="language-plaintext highlighter-rouge">["alguna cosa", null]</code></p>

<h2 id="a-new-strings-pipeline">A New Strings Pipeline</h2>

<p>This new structure doesn’t work with Apple’s existing <code class="language-plaintext highlighter-rouge">NSLocalizedString</code>/<code class="language-plaintext highlighter-rouge">localizedString(forKey key:, value:, table tableName:)</code> setup. Instead, it needs a new version of these functions. On the plus side, by creating a new pipeline, it makes further customizations easier in the future. Make sure Apple knows which localizations are supported, so it can display it in the App Store, by setting the <a href="https://developer.apple.com/documentation/bundleresources/information_property_list/cfbundlelocalizations">CFBundleLocalizations</a> key. Also, InfoPlist.strings must be left alone, as Apple expects it to be as it is.</p>

<p>Here’s a <a href="https://github.com/michaeleisel/MiniStrings">git repo</a> with an example of this pipeline.</p>

<h2 id="alternative-using-maps-with-compressed-keys">Alternative: Using Maps with Compressed Keys</h2>

<p>After recently poking around Instagram’s app, I saw they have an interesting alternative: they use the original map format of .strings files, but in JSON and with compressed keys. E.g.:</p>

<div class="language-plaintext highlighter-rouge"><div class="highlight"><pre class="highlight"><code>"1044mf": "some thing",
"105a9V": "other thing"
</code></pre></div></div>

<p>Then they can either rewrite the keys in the source code, meaning they don’t need a custom pipeline, or else have a separate map from long key to short key that the pipeline uses.</p>

<p>Benefits: Although this will result in a slightly larger app size, especially uncompressed, it has some wins. It eliminates the need for placeholder elements and it allows you to have a custom order for each file, theoretically resulting in a better compressed size if you can find a clever enough way to order it.</p>

<h2 id="pluralization-and-stringsdict">Pluralization and .stringsdict</h2>

<p>Including pluralized strings in a new pipeline is trickier because of the complexities inherent to it. In my experience, the strings that require pluralization are just a fraction of the overall strings, meaning it doesn’t matter much. If you do need support though, feel free to file an issue about it.</p>

<h2 id="post-install-compression">Post-install compression</h2>

<p>So far, the article has focused on reducing the app’s download size. However, the size of that the app’s data after installation is also important. Normally, .strings files (or their .json counterparts here) would just sit there uncompressed after installation. This takes up more space on disk than if they were compressed, and also(?) increases the app size that Apple reports in the App Store. To reduce disk space usage, the files can be zipped individually in the bundle. Then, each time the user opens up the app, lazily decompress the file for the language the user actually needs and cache it somewhere in an uncompressed format. There are other compressions options too besides zip, such as the speedy <a href="https://engineering.fb.com/2018/12/19/core-data/zstandard/">Zstandard</a>, which is what Instagram appears to use for their .strings files.</p>

<h2 id="conclusion">Conclusion</h2>

<p>This trick is one example of a larger theme: find a way to repackage some type of file in an app to be smaller, then replace Apple’s pipeline for accessing it with a custom one. For images, for instance, they could all be delivered in a small modern image format like AVIF (with just a slight loss of quality), then have .png files downloaded later.</p>]]></content><author><name>Michael Eisel</name></author><category term="jekyll" /><category term="update" /><summary type="html"><![CDATA[Introduction]]></summary></entry><entry><title type="html">Faster Builds with Code Signing Hacks</title><link href="http://eisel.me/signing" rel="alternate" type="text/html" title="Faster Builds with Code Signing Hacks" /><published>2020-08-07T01:45:46+00:00</published><updated>2020-08-07T01:45:46+00:00</updated><id>http://eisel.me/signing</id><content type="html" xml:base="http://eisel.me/signing"><![CDATA[<h2 id="introduction">Introduction</h2>

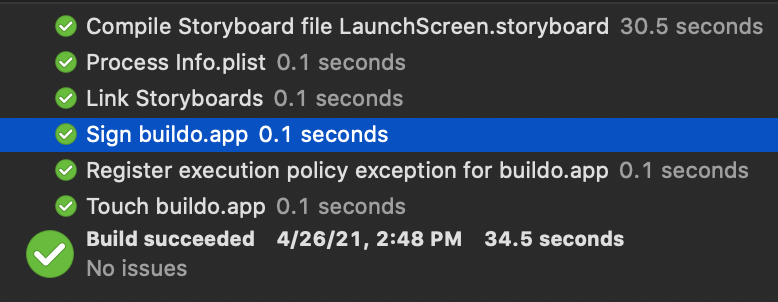
<p>Code signing is one of the few operations that takes just as long to do for an incremental build as for a clean build. It also takes more time the larger an app grows in size. As a result, it can become a bottleneck for incremental builds. Here are some tricks to reduce that time. They’re all technically undocumented and may break in the future, but they’re also used by large companies with no apparent downsides.</p>

<p><strong>Note</strong>: these tricks are for debug builds only.</p>

<p><strong>Note</strong>: see how much time code signing takes during builds, i.e. how much time you can actually save, and decide if that amount matters to you.</p>

<p><img src="http://eisel.me/assets/signing.png" alt="Xcode signing in build log" /></p>

<h2 id="speeding-up-code-signing">Speeding up code signing</h2>

<h4 id="faster-hashing">Faster hashing</h4>

<p>Changing the hash algorithm that code signing uses is the easiest, lowest-risk change of these. We can have it use SHA-1, which is faster than the default SHA-256, by adding <code class="language-plaintext highlighter-rouge">--digest-algorithm=sha1</code> to “Other Code Signing Flags” in the Xcode build settings. Isn’t SHA-1 insecure, you say? In some situations, yes, but here you probably wouldn’t care since it’s a personal debug build.</p>

<h4 id="resource-rules">Resource rules</h4>

<p>Now that we’ve made hashing faster, we’re going to reduce the amount of stuff we have to hash in the first place. Resource rules are rules, given in a plist, telling codesign what to sign and what not to. Since so much time of code signing is taken up by hashing files in the bundle besides the binary, and since Apple APIs seem only to care if the binary has been hashed, we can use resource rules to have Apple exclude everything but the binary. Here’s the plist:</p>

<figure class="highlight"><pre><code class="language-xml" data-lang="xml"><span class="cp">&lt;?xml version="1.0" encoding="UTF-8"?&gt;</span>
<span class="cp">&lt;!DOCTYPE plist PUBLIC "-//Apple//DTD PLIST 1.0//EN" "http://www.apple.com/DTDs/PropertyList-1.0.dtd"&gt;</span>
<span class="nt">&lt;plist</span> <span class="na">version=</span><span class="s">"1.0"</span><span class="nt">&gt;</span>
<span class="nt">&lt;dict&gt;</span>
       <span class="nt">&lt;key&gt;</span>rules<span class="nt">&lt;/key&gt;</span>
       <span class="nt">&lt;dict&gt;</span>
               <span class="nt">&lt;key&gt;</span>.*<span class="nt">&lt;/key&gt;</span>
               <span class="nt">&lt;false/&gt;</span>
       <span class="nt">&lt;/dict&gt;</span>
<span class="nt">&lt;/dict&gt;</span>
<span class="nt">&lt;/plist&gt;</span></code></pre></figure>

<p>Put that somewhere in your project and add <code class="language-plaintext highlighter-rouge">--resource-rules=&lt;path to the plist&gt;</code> to “Other Code Signing Flags” in the Xcode build settings. Although this flag was deprecated in iOS 7, it still seems to work on both Xcode 11 and 12. There’s also an alternative way to do this. It’s less recommended because it’s more work, but the one benefit is that it doesn’t require this old flag. For this, create an empty directory <code class="language-plaintext highlighter-rouge">MyApp.app</code> somewhere temporary move the binary, <code class="language-plaintext highlighter-rouge">MyApp</code>, to it. I.e., you have your normal app bundle now but with everything besides the binary removed. Now, codesign <em>that</em> bundle and then move the binary afterwards back to where it was. This will have only signed the binary and no other resources, since the bundle consisted of nothing but the binary.</p>

<h4 id="optional-hack-for-the-simulator">Optional hack for the simulator</h4>

<p>The above changes will reduce code signing time but still preserve functionality. However, for the simulator, there’s another shortcut. The only downside is that it will break app groups and possibly other entitlements (though most entitlements, such as keychain and sign in with Apple, will still work). If you do this change, undo the previous changes for simulator signing, as they won’t offer any benefits on top of this. Some background: the code signing process consists of both computing hashes and writing their results somewhere, as well as adding the entitlements plist to the binary. Since most APIs will only check if their entitlement is in the entitlements plist in the binary (if they check at all), and since the simulator otherwise doesn’t care if the binary is signed, we can just inject the plist into the binary ourselves.</p>

<p>How to inject entitlements like the code signing step does:</p>

<ul>
  <li>Use <code class="language-plaintext highlighter-rouge">xcrun segedit &lt;path to simulator binary&gt; -extract __TEXT __entitlements -</code> to see the actual entitlements plist that codesign puts in the binary.</li>
  <li>Compare those entitlements to the entitlements file you supplied to Xcode, and you should see how to go between the two (possibly just variable substitution with Xcode build environment variables).</li>
  <li>In a post-build phase, run a script doing that conversion.</li>
  <li>Add <code class="language-plaintext highlighter-rouge">-Wl,-sectcreate,__TEXT,__entitlements,&lt;the processed entitlements file path&gt;</code> to “Other Linker Flags”. This will instruct the linker to inject that entitlements file into a section called <code class="language-plaintext highlighter-rouge">__entitlements</code>, just like the code signing step would do.</li>
  <li>In an .xcconfig file, set <code class="language-plaintext highlighter-rouge">CODE_SIGNING_ALLOWED = NO</code> to disable Xcode’s code signing step.</li>
</ul>

<h2 id="conclusion">Conclusion</h2>

<p>By following these steps, you can improve the incremental build time for all debug builds. Since these are still hacks though, feel free to let me know on Twitter if anything didn’t work. Note that Apple’s code signing tools are woefully under-optimized, e.g. because they’re single-threaded, but hopefully in the future they or some open-source project will make a faster version. For a really deep dive into code signing, consider reading <em>MacOS and iOS Internals, Volume III</em>.</p>

<p><em>Special thanks to Milen Dzhumerov and Keith Smiley for their help with this post.</em></p>]]></content><author><name>Michael Eisel</name></author><category term="jekyll" /><category term="update" /><summary type="html"><![CDATA[Introduction]]></summary></entry><entry><title type="html">Quick Trick to Make Your App Snappier</title><link href="http://eisel.me/snappy" rel="alternate" type="text/html" title="Quick Trick to Make Your App Snappier" /><published>2019-02-13T01:45:46+00:00</published><updated>2019-02-13T01:45:46+00:00</updated><id>http://eisel.me/snappy</id><content type="html" xml:base="http://eisel.me/snappy"><![CDATA[<h4 id="reduce-lag-in-view-controller-transitions-by-75ms">Reduce lag in view controller transitions by 75ms</h4>

<h2 id="introduction">Introduction</h2>

<p>Whenever a new view controller is presented, there are delays for the user, both in waiting for views to get set up on the main thread, as well as for new data to get fetched from the server. With a little trick, you can reduce those delays by 75ms. It may not seem huge, but 75ms can have a <a href="https://blog.gigaspaces.com/amazon-found-every-100ms-of-latency-cost-them-1-in-sales/">big impact</a> on user engagement. This post is inspired by <a href="instant.page">instant.page</a>, which does roughly the same thing but for websites.</p>

<h2 id="introduction-1">Introduction</h2>

<p>It’s simple: when you have a UIButton that triggers a transition to a new view controller, you set the new VC up on touchDown, not touchUpInside. Roughly speaking, you go from:</p>

<figure class="highlight"><pre><code class="language-swift" data-lang="swift"><span class="kd">func</span> <span class="nf">didTouchUp</span><span class="p">()</span> <span class="p">{</span>
  <span class="k">let</span> <span class="nv">vc</span> <span class="o">=</span> <span class="kt">DestViewController</span><span class="p">()</span>
  <span class="nf">presentVC</span><span class="p">(</span><span class="n">vc</span><span class="p">)</span>
<span class="p">}</span></code></pre></figure>

<p>to:</p>

<figure class="highlight"><pre><code class="language-swift" data-lang="swift"><span class="kd">func</span> <span class="nf">didTouchDown</span><span class="p">()</span> <span class="p">{</span>
  <span class="k">self</span><span class="o">.</span><span class="n">vc</span> <span class="o">=</span> <span class="kt">DestViewController</span><span class="p">()</span>
<span class="p">}</span>

<span class="c1">// about 75ms elapses here...</span>
<span class="kd">func</span> <span class="nf">didTouchUp</span><span class="p">()</span> <span class="p">{</span>
  <span class="nf">presentVC</span><span class="p">(</span><span class="k">self</span><span class="o">.</span><span class="n">vc</span><span class="p">)</span>
<span class="p">}</span></code></pre></figure>

<p>75ms is the average delay I found between the two events (the range was about 50–100ms).</p>

<h2 id="in-depth">In Depth</h2>

<p>Here’s the full code:</p>

<figure class="highlight"><pre><code class="language-swift" data-lang="swift"><span class="kd">import</span> <span class="kt">UIKit</span>

<span class="kd">class</span> <span class="kt">MyViewController</span><span class="p">:</span> <span class="kt">UIViewController</span> <span class="p">{</span>
    <span class="kd">@IBOutlet</span> <span class="k">weak</span> <span class="k">var</span> <span class="nv">button</span><span class="p">:</span> <span class="kt">UIButton</span><span class="o">!</span>
    <span class="k">var</span> <span class="nv">vc</span><span class="p">:</span> <span class="kt">UIViewController</span><span class="p">?</span> <span class="o">=</span> <span class="kc">nil</span>

    <span class="k">override</span> <span class="kd">func</span> <span class="nf">viewDidLoad</span><span class="p">()</span> <span class="p">{</span>
        <span class="k">super</span><span class="o">.</span><span class="nf">viewDidLoad</span><span class="p">()</span>

        <span class="n">button</span><span class="o">.</span><span class="nf">addTarget</span><span class="p">(</span><span class="k">self</span><span class="p">,</span> <span class="nv">action</span><span class="p">:</span> <span class="kd">#selector(</span><span class="nf">down</span><span class="kd">)</span><span class="p">,</span> <span class="nv">for</span><span class="p">:</span> <span class="o">.</span><span class="n">touchDown</span><span class="p">)</span>

        <span class="c1">// If user generated touchDown and then didn't generate touchUpInside, we would have</span>
        <span class="c1">// set up a view controller that won't even be presented, which can cause problems,</span>
        <span class="c1">// e.g. with metrics.</span>
        <span class="c1">// Instead, run the .up() method for *every* possible outcome after touchDown:</span>
        <span class="c1">// touchUpInside, touchUpOutside, and touchCancel</span>
        <span class="n">button</span><span class="o">.</span><span class="nf">addTarget</span><span class="p">(</span><span class="k">self</span><span class="p">,</span> <span class="nv">action</span><span class="p">:</span> <span class="kd">#selector(</span><span class="nf">up</span><span class="kd">)</span><span class="p">,</span> <span class="nv">for</span><span class="p">:</span> <span class="o">.</span><span class="n">touchUpInside</span><span class="p">)</span>
        <span class="n">button</span><span class="o">.</span><span class="nf">addTarget</span><span class="p">(</span><span class="k">self</span><span class="p">,</span> <span class="nv">action</span><span class="p">:</span> <span class="kd">#selector(</span><span class="nf">up</span><span class="kd">)</span><span class="p">,</span> <span class="nv">for</span><span class="p">:</span> <span class="o">.</span><span class="n">touchUpOutside</span><span class="p">)</span>
        <span class="n">button</span><span class="o">.</span><span class="nf">addTarget</span><span class="p">(</span><span class="k">self</span><span class="p">,</span> <span class="nv">action</span><span class="p">:</span> <span class="kd">#selector(</span><span class="nf">up</span><span class="kd">)</span><span class="p">,</span> <span class="nv">for</span><span class="p">:</span> <span class="o">.</span><span class="n">touchCancel</span><span class="p">)</span>

        <span class="c1">// Don't let the user do anything else while they're pressing the button</span>
        <span class="n">button</span><span class="o">.</span><span class="n">isExclusiveTouch</span> <span class="o">=</span> <span class="kc">true</span>
    <span class="p">}</span>

    <span class="kd">@objc</span> <span class="kd">private</span> <span class="kd">func</span> <span class="nf">up</span><span class="p">()</span> <span class="p">{</span>
        <span class="k">if</span> <span class="k">let</span> <span class="nv">vc</span> <span class="o">=</span> <span class="n">vc</span> <span class="p">{</span>
            <span class="nf">present</span><span class="p">(</span><span class="n">vc</span><span class="p">,</span> <span class="nv">animated</span><span class="p">:</span> <span class="kc">true</span><span class="p">,</span> <span class="nv">completion</span><span class="p">:</span> <span class="kc">nil</span><span class="p">)</span>
        <span class="p">}</span> <span class="k">else</span> <span class="p">{</span>
            <span class="c1">// This else block would only happen in the (probably) impossible case when .async</span>
            <span class="c1">// is still enqueued from .down()</span>
        <span class="p">}</span>
        <span class="n">vc</span> <span class="o">=</span> <span class="kc">nil</span>
    <span class="p">}</span>

    <span class="kd">@objc</span> <span class="kd">private</span> <span class="kd">func</span> <span class="nf">down</span><span class="p">()</span> <span class="p">{</span>
        <span class="c1">// This .async call is necessary if the button has an animation that you want to run</span>
        <span class="c1">// while the main thread is blocked to set up the new VC.</span>
        <span class="c1">// You might think that blocking the main thread, even after the animation has just</span>
        <span class="c1">// begun, will still block the animation. But actually, once they've been started,</span>
        <span class="c1">// animations keep going even when the main thread is blocked</span>
        <span class="kt">DispatchQueue</span><span class="o">.</span><span class="n">main</span><span class="o">.</span><span class="k">async</span> <span class="p">{</span>
            <span class="k">let</span> <span class="nv">vc</span> <span class="o">=</span> <span class="kt">UIViewController</span><span class="p">()</span>
            <span class="k">let</span> <span class="nv">_</span> <span class="o">=</span> <span class="n">vc</span><span class="o">.</span><span class="n">view</span> <span class="c1">// Calling .view triggers viewDidLoad etc., so that more setup can occur</span>
            <span class="k">self</span><span class="o">.</span><span class="n">vc</span> <span class="o">=</span> <span class="n">vc</span>
        <span class="p">}</span>
    <span class="p">}</span>
<span class="p">}</span></code></pre></figure>

<p>This code ensures that once the user presses down on the button, the new view controller will eventually be presented no matter what, which can reduce bugs. Your requirements may vary.</p>

<h2 id="conclusion">Conclusion</h2>

<p>Although the actual work being done remains the same, the user will perceive it as occurring more quickly because it gets done further in advance. This will make your app feel more responsive!</p>]]></content><author><name>Michael Eisel</name></author><category term="jekyll" /><category term="update" /><summary type="html"><![CDATA[Reduce lag in view controller transitions by 75ms]]></summary></entry><entry><title type="html">Improving App Performance with Order Files</title><link href="http://eisel.me/order" rel="alternate" type="text/html" title="Improving App Performance with Order Files" /><published>2019-01-16T01:45:46+00:00</published><updated>2019-01-16T01:45:46+00:00</updated><id>http://eisel.me/order</id><content type="html" xml:base="http://eisel.me/order"><![CDATA[<h2 id="introduction">Introduction</h2>

<p>Binaries for iOS apps can be tens or even hundreds of megabytes. That much data takes time to load into memory, and is a hidden performance cost. Order files speed up the process of loading your app’s binary into memory, helping overall performance. To understand them, we must first look at paging.</p>

<h2 id="paging">Paging</h2>

<p>The OS loads data into memory in pages, i.e. fixed-size blocks (16 KB each for iPhones). Whenever a function is called or a piece of data is accessed from the binary, the OS will load the page(s) that contain it. Even if the function takes just a small fraction of a page, the OS will still load the whole page. So if there’s fragmentation, i.e. functions that are called together reside within many different pages, then there will be overhead to load the pages keep them in memory. Order files can reduce that fragmentation.</p>

<h2 id="whats-an-order-file">What’s an order file?</h2>

<p>An order file is a file given to the linker specifying the order that it should put all the functions and data within the binary. If you can group together functions that are typically called together (e.g., all the functions that get called on startup), then you can improve your app’s performance.</p>

<p><strong>Note</strong>: Messing with order files should only be done once you’ve picked all the low-hanging performance fruit. This is a more complicated optimization, and there’s no guarantee how much speedup you’ll get.</p>

<h2 id="determining-what-the-order-should-be">Determining what the order should be</h2>

<h4 id="overview">Overview</h4>

<p>A good way of ordering it is by the first time each function is called. So it will probably start with main, then -[AppDelegate applicationDidFinishLaunching:…], etc. To do this, we can use the coverage sanitizer, a compiler feature where every single function that gets compiled will call our global handler each time it is run. Then, the first time that our handler is called with any specific function, we’ll record it in a list, and later write that list out to a file.</p>

<h4 id="update-theres-a-newer-method-than-the-one-in-this-article-that-may-produce-better-results-clangs--forder-file-instrumentation-flag">UPDATE: there’s a newer method than the one in this article that may produce better results (clang’s <code class="language-plaintext highlighter-rouge">-forder-file-instrumentation</code> flag)</h4>

<h4 id="compiling-with-the-coverage-sanitizer">Compiling with the coverage sanitizer</h4>

<p>In your Xcode build settings, add <code class="language-plaintext highlighter-rouge">-fsanitize-coverage=func,trace-pc-guard</code> under “Other C flags”. If you are using Swift, also add <code class="language-plaintext highlighter-rouge">-sanitize-coverage=func</code> under “Other Swift flags” and turn on the address sanitizer (which can be done in your scheme settings). Make sure to include these flags for everything you’ll be linking into the main binary, such as Cocoapods.</p>

<h4 id="recording-at-runtime">Recording at runtime</h4>

<p>Insert <a href="https://gist.github.com/michaeleisel/111fed9bf8dc46d2c08a0a30b940171e">this code</a> and <a href="https://gist.github.com/michaeleisel/c1739427d8990752181110b508fd3cad">this header</a> into your app. Then, use the app as a user might and go through each feature, starting with the most popular one and ending with the least popular one. At the end, call <code class="language-plaintext highlighter-rouge">CLRCollectCalls()</code> and it will return a list of the functions called. Write this list out to a file, with each call on its own line, and change the “Order file” build setting to be the path to this file. Then, build the project again and verify that it has been reordered by comparing the list with <code class="language-plaintext highlighter-rouge">nm -j -p &lt;path to binary&gt;</code>. The two should match.</p>

<h4 id="conclusion">Conclusion</h4>

<p>Order files can reduce both memory consumption as well as CPU time. It may not be necessary or helpful for your app at the moment, but it is another tool that you can turn to when needed. This article only covered how to order functions in your binary, but if people request it, I can also discuss how to order data (e.g. constant strings) in your binary.</p>]]></content><author><name>Michael Eisel</name></author><category term="jekyll" /><category term="update" /><summary type="html"><![CDATA[Introduction]]></summary></entry><entry><title type="html">Runtime Linters</title><link href="http://eisel.me/linters" rel="alternate" type="text/html" title="Runtime Linters" /><published>2018-12-13T01:45:46+00:00</published><updated>2018-12-13T01:45:46+00:00</updated><id>http://eisel.me/linters</id><content type="html" xml:base="http://eisel.me/linters"><![CDATA[<h2 id="introduction">Introduction</h2>

<p>Although compile-time checking is the gold standard for preventing code mistakes, sometimes a check cannot feasibly be done at compile-time. To deal with this, we use runtime checks. assert is one common example, but there are many more. Apple provides the thread sanitizer to detect race conditions, the address sanitizer detects heap corruption, etc. These checkers are typically not for production users, but for internal users and developers. In this article, we’ll see how to add useful, strictly enforced checks for internal testing.</p>

<h2 id="enforcement">Enforcement</h2>

<p>A check should be rigorously enforced by crashing the app when it fails (or some other strict mechanism). This prevents the developer from ignoring it when it interrupts them running the app, causes UI tests to fail, and so on. All of the checkers mentioned in this post have the ability to crash the app (and run arbitrary code in general) if they detect an issue.</p>

<h2 id="uikit-checkers">UIKit checkers</h2>

<p>UIKit has lots of gotchas to avoid. By running through the view hierarchy periodically, e.g. once each second, you can catch these errors. Here’s a <a href="https://gist.github.com/michaeleisel/39f53b1f640f6533e4f0754b72ed862f">quick snippet</a> to go through the hierarchy for the currently displayed window.</p>

<h4 id="checking-that-uiviews-follow-the-theme-of-the-app">Checking that UIViews follow the theme of the app</h4>

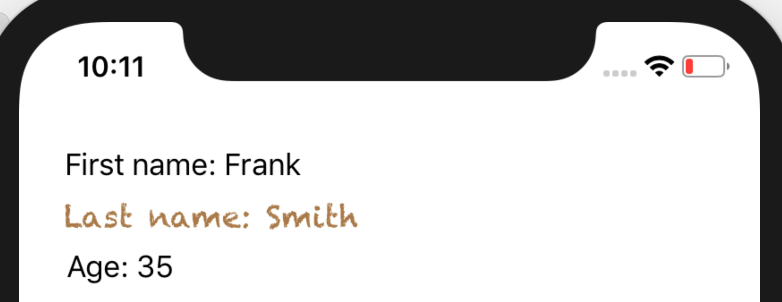
<p>Often, an app will stick to a certain set of graphical attributes, i.e. a theme. This could include the text colors, UIView background colors, tint colors, fonts, and more. For example, maybe all UILabels are supposed to use either Arial Bold or Arial Regular. For all the UILabels in your hierarchy, you can make sure that their font.fontName property equals one of those two fonts.</p>

<p><img src="http://eisel.me/assets/text_check.png" alt="" /></p>

<h4 id="checking-that-views-are-not-under-constrained">Checking that views are not under-constrained</h4>

<p>When a view is under-constrained, it will just silently be laid out in an unpredictable way. You can detect that by checking the hasAmbiguousLayout variable on each view in the hierarchy.</p>

<h4 id="checking-that-no-uiimages-are-being-resized">Checking that no UIImages are being resized</h4>

<p>If a UIImage has to be resized to fit a UIImageView, it will hurt image quality and performance. To test if this is happening, use the UIImageView’s frame combined with its contentMode to figure out if the image view is being resized (or just require all UIImageViews to have the same size as their UIImages).</p>

<p style="text-align: center;"><img src="http://eisel.me/assets/bad_aspect_ratio.png" alt="" /></p>

<h4 id="checking-that-views-are-aligned">Checking that views are aligned</h4>

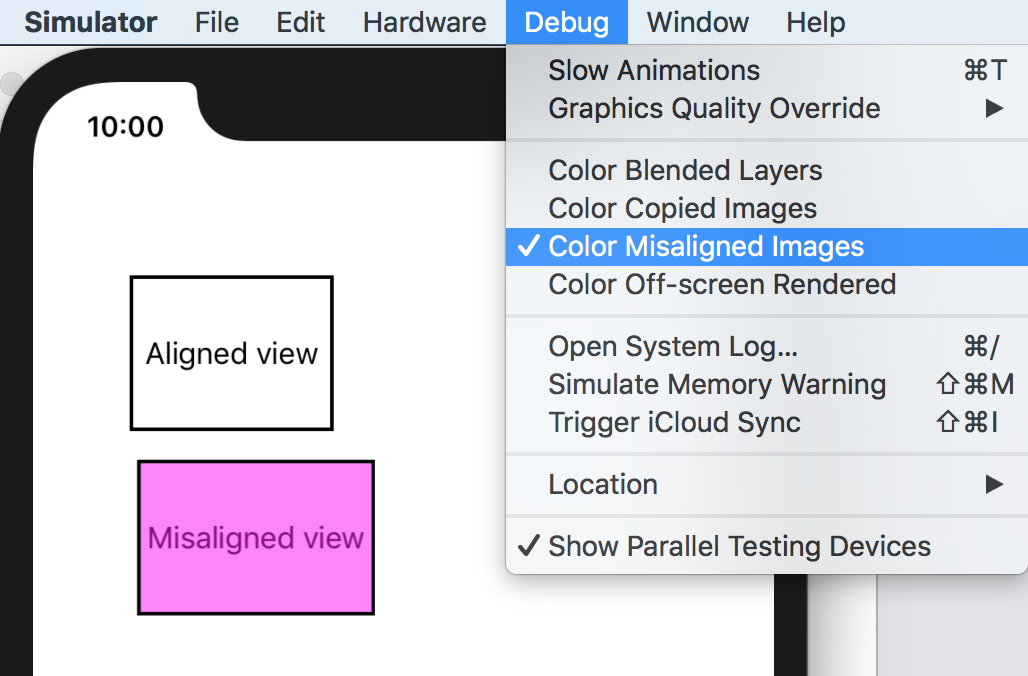
<p>When a view’s boundaries don’t match up with pixel boundaries, the GPU has to do extra work. For example, if a view’s height is 20.5 pixels instead of 20 or 21 pixels, then the GPU will have to do extra blending work for the top/bottom pixel rows where the view only encroaches partway. As discussed, there’s already a checker for this, but it‘s not very enforceable. You can test if a view is misaligned by calling view.frame.isAligned with these extensions. You could also swizzle -[UIView setFrame:] and do the test there, rather than doing it periodically (assuming that no subclasses override that method).</p>

<p><img src="http://eisel.me/assets/misaligned_view.png" alt="" /></p>

<h4 id="checking-that-views-are-added-to-a-uitableviewcells-contentview-and-not-the-cell-itself">Checking that views are added to a UITableViewCell’s contentView and not the cell itself</h4>

<p>One should never add subviews directly to a UITableViewCell instance. Instead, they should be added to its contentView. You can check to see if this is true by looking at each UITableViewCell in your hierarchy and seeing that its subviews are all either special ones made by the OS (like a separator, which could be a subclass of _UITableViewCellSeparatorView) or subviews of the contentView. The easiest way is to go through the view hierarchy and check this on each cell. You can also do this by swizzling addSubview and doing further runtime trickery.</p>

<h4 id="when-to-run-uikit-checkers">When to run UIKit checkers?</h4>

<p>These checkers could be run periodically, e.g. once per second, to catch all the many scrolls and other changes that could cause issues. Or, they can be called at certain key points, like right after any view controller’s view has finished laying out its subviews. There’s a tradeoff here between coverage and deterministic testing. For example, checkers that cause UI tests to fail should probably be more deterministic.</p>

<h2 id="checkers-that-intercept-system-error-messages">Checkers that intercept system error messages</h2>

<p>Sometimes, the only evidence that a best practice has been violated is from a call to NSLog from a system library. In this case, we’ll need to intercept the output to perform a check. Using <a href="https://gist.github.com/michaeleisel/8eddd0082b4fd7f2bd118d97e79bf12e">this helper gist</a>, we can “swizzle” the key functions that NSLog will use with our own, to check each log message before it’s written.</p>

<h4 id="over-constrained-layout">Over-constrained layout</h4>

<p>When a view is over-constrained, the console will print “Make a symbolic breakpoint at UIViewAlertForUnsatisfiableConstraints”. You can search for UIViewAlertForUnsatisfiableConstraints in writeWillOccur in the helper gist to catch it.</p>

<h4 id="malloc-issues">Malloc issues</h4>

<p>Some malloc issues (e.g. double free) are caught with the symbolic breakpoint at malloc_error_break, so you can search for that string in the helper gist.</p>

<h2 id="other">Other</h2>

<h4 id="app-not-responding-anr-detection">App Not Responding (ANR) detection</h4>

<p>If the main thread is blocked for some large amount of time, e.g. 5 seconds, you may want to just crash the app rather than leave the user waiting out a potentially infinite delay. To detect when this occurs, you can attempt to run a block once every second on the main thread, and then on a background thread check periodically to see if the time the last block was run was less than 5 seconds ago. If the main thread is blocked, then the block that’s enqueued will just sit there and not run, and once 5 seconds pass, a crash will occurs. <a href="https://gist.github.com/michaeleisel/77b8efc9bedab1444dbb71a5915dbd15">This class</a> allows you to do that.</p>

<h2 id="conclusion">Conclusion</h2>

<p>Hopefully some of these checks are useful to you and will provide inspiration for more checks of your own. Feel free to leave ideas for other checkers in the comments!</p>]]></content><author><name>Michael Eisel</name></author><category term="jekyll" /><category term="update" /><summary type="html"><![CDATA[Introduction]]></summary></entry><entry><title type="html">Measuring your iOS app’s true startup time in production</title><link href="http://eisel.me/startup" rel="alternate" type="text/html" title="Measuring your iOS app’s true startup time in production" /><published>2018-11-20T01:45:46+00:00</published><updated>2018-11-20T01:45:46+00:00</updated><id>http://eisel.me/startup</id><content type="html" xml:base="http://eisel.me/startup"><![CDATA[<h2 id="introduction">Introduction</h2>

<p>Before an app even runs <code class="language-plaintext highlighter-rouge">main</code> and <code class="language-plaintext highlighter-rouge">+applicationDidFinishLaunching</code>, a considerable amount of work is done, including setting up dylibs for use, running <code class="language-plaintext highlighter-rouge">+load</code> methods, and more. This can take 500ms or more. Blog posts like <a href="https://techblog.izotope.com/2018/03/08/improving-your-ios-apps-launch-time/">this one</a> show you how to measure it with the debugger, using <code class="language-plaintext highlighter-rouge">DYLD_PRINT_STATISTICS</code>, but it’s hard to find any help for measurement in the wild. Note the special handling for iOS 15’s pre-warming feature.</p>

<h2 id="how-to-do-it">How To Do It</h2>

<p>You can get the process start time with the following code:</p>

<figure class="highlight"><pre><code class="language-c" data-lang="c"><span class="cp">#import &lt;sys/sysctl.h&gt;
#import &lt;QuartzCore/QuartzCore.h&gt;
</span>
<span class="k">static</span> <span class="n">CFTimeInterval</span> <span class="nf">processStartTime</span><span class="p">()</span> <span class="p">{</span>
    <span class="kt">size_t</span> <span class="n">len</span> <span class="o">=</span> <span class="mi">4</span><span class="p">;</span>
    <span class="kt">int</span> <span class="n">mib</span><span class="p">[</span><span class="n">len</span><span class="p">];</span>
    <span class="k">struct</span> <span class="n">kinfo_proc</span> <span class="n">kp</span><span class="p">;</span>

    <span class="n">sysctlnametomib</span><span class="p">(</span><span class="s">"kern.proc.pid"</span><span class="p">,</span> <span class="n">mib</span><span class="p">,</span> <span class="o">&amp;</span><span class="n">len</span><span class="p">);</span>
    <span class="n">mib</span><span class="p">[</span><span class="mi">3</span><span class="p">]</span> <span class="o">=</span> <span class="n">getpid</span><span class="p">();</span>
    <span class="n">len</span> <span class="o">=</span> <span class="k">sizeof</span><span class="p">(</span><span class="n">kp</span><span class="p">);</span>
    <span class="n">sysctl</span><span class="p">(</span><span class="n">mib</span><span class="p">,</span> <span class="mi">4</span><span class="p">,</span> <span class="o">&amp;</span><span class="n">kp</span><span class="p">,</span> <span class="o">&amp;</span><span class="n">len</span><span class="p">,</span> <span class="nb">NULL</span><span class="p">,</span> <span class="mi">0</span><span class="p">);</span>

    <span class="k">struct</span> <span class="n">timeval</span> <span class="n">startTime</span> <span class="o">=</span> <span class="n">kp</span><span class="p">.</span><span class="n">kp_proc</span><span class="p">.</span><span class="n">p_un</span><span class="p">.</span><span class="n">__p_starttime</span><span class="p">;</span>
    <span class="k">return</span> <span class="n">startTime</span><span class="p">.</span><span class="n">tv_sec</span> <span class="o">+</span> <span class="n">startTime</span><span class="p">.</span><span class="n">tv_usec</span> <span class="o">/</span> <span class="mf">1e6</span><span class="p">;</span>
<span class="p">}</span>

<span class="k">static</span> <span class="n">CFTimeInterval</span> <span class="n">sTimeToInitializer</span> <span class="o">=</span> <span class="mi">0</span><span class="p">;</span>

<span class="c1">// With iOS 15 pre-warming, initializers and other pre-main steps are run preemptively, potentially hours before the</span>
<span class="c1">// app is started and main() is run. So, take the difference between process start time in pre-main initializer</span>
<span class="c1">// (which we control with this "constructor" attribute) and add that later with post-main time.</span>
<span class="c1">// NOTE: any initializers run after this will not have their startup time impact included, and the placement of this</span>
<span class="c1">// constructor function amongst the others is undefined</span>
<span class="n">__used</span> <span class="nf">__attribute__</span><span class="p">((</span><span class="n">constructor</span><span class="p">))</span> <span class="k">static</span> <span class="kt">void</span> <span class="n">recordProcessStartTime</span><span class="p">()</span> <span class="p">{</span>
    <span class="n">sTimeToInitializer</span> <span class="o">=</span> <span class="p">[</span><span class="n">NSDate</span> <span class="n">date</span><span class="p">].</span><span class="n">timeIntervalSince1970</span> <span class="o">-</span> <span class="n">processStartTime</span><span class="p">();</span>
<span class="p">}</span>

<span class="k">static</span> <span class="n">CFTimeInterval</span> <span class="n">sMainStartTime</span><span class="p">;</span>

<span class="kt">int</span> <span class="nf">main</span><span class="p">(</span><span class="kt">int</span> <span class="n">argc</span><span class="p">,</span> <span class="kt">char</span> <span class="o">*</span> <span class="n">argv</span><span class="p">[],</span> <span class="kt">char</span> <span class="o">**</span><span class="n">envp</span><span class="p">)</span> <span class="p">{</span>
    <span class="c1">// We're now in main, so pre-warming is done, begin recording time again. Any time before this line in main will not be included.</span>
    <span class="n">sMainStartTime</span> <span class="o">=</span> <span class="n">CACurrentMediaTime</span><span class="p">();</span>

    <span class="k">if</span> <span class="p">([[</span><span class="n">NSProcessInfo</span> <span class="n">processInfo</span><span class="p">].</span><span class="n">environment</span><span class="p">[</span><span class="err">@</span><span class="s">"ActivePrewarm"</span><span class="p">]</span> <span class="n">isEqual</span><span class="o">:</span><span class="err">@</span><span class="s">"1"</span><span class="p">])</span> <span class="p">{</span>
        <span class="c1">// The ActivePrewarm variable indicates whether the app was launched via pre-warming.</span>
        <span class="c1">// Based on this, for example, you can choose whether or not to include the pre-main time in your calculation based on that.</span>
    <span class="p">}</span>
    <span class="c1">// ...</span>
<span class="p">}</span>

<span class="c1">// Call this function when startup is done to get your final measurement</span>
<span class="n">CFTimeInterval</span> <span class="nf">timeFromStartToNow</span><span class="p">()</span> <span class="p">{</span>
    <span class="k">return</span> <span class="n">CACurrentMediaTime</span><span class="p">()</span> <span class="o">-</span> <span class="n">sMainStartTime</span> <span class="o">+</span> <span class="n">sTimeToInitializer</span><span class="p">;</span>
<span class="p">}</span></code></pre></figure>

<h4 id="caveat-absolute-timing">Caveat: absolute timing</h4>

<p>The process start time that we get from <code class="language-plaintext highlighter-rouge">processStartTime</code> is given in seconds since 1970. Unfortunately, this is not so great for timing because it can be changed, e.g. if the phone synchronizes its time with a server in between when the process starts and when we run <code class="language-plaintext highlighter-rouge">[NSDate date].timeIntervalSince1970</code> in <code class="language-plaintext highlighter-rouge">main()</code>. This would be a very rare case, but it should be kept in mind (you may want to remove negative and ridiculously large values from your results).</p>

<h4 id="main-thread-cpu-time">Main thread CPU Time</h4>

<p>You can also get the amount of CPU time the main thread has spent by running this code on the main thread:</p>

<figure class="highlight"><pre><code class="language-c" data-lang="c"><span class="k">struct</span> <span class="n">timespec</span> <span class="n">tp</span><span class="p">;</span>
<span class="n">clock_gettime</span><span class="p">(</span><span class="n">CLOCK_THREAD_CPUTIME_ID</span><span class="p">,</span> <span class="o">&amp;</span><span class="n">tp</span><span class="p">);</span>
<span class="n">CFTimeInterval</span> <span class="n">time</span> <span class="o">=</span> <span class="n">tp</span><span class="p">.</span><span class="n">tv_sec</span> <span class="o">+</span> <span class="n">tp</span><span class="p">.</span><span class="n">tv_nsec</span> <span class="o">/</span> <span class="mf">1e9</span><span class="p">;</span></code></pre></figure>

<p>This number represents the amount of time the main thread has spent doing work, but does not include the amount of time it was waiting, e.g. due to being preempted by another process or thread. In practice, it will be about the same as the time taken from the method in the gist (I measured it being consistently 7ms less). This number may be preferable if you don’t want to time anything that’s out of your control.</p>

<h2 id="conclusion">Conclusion</h2>

<p>The pre-main() time provides an important piece of information in understanding your overall launch time. By measuring from the very start of the process to when the app is actually interactive, you can gain insight into the actual experience for your users.</p>

<h2 id="links">Links</h2>

<p><a href="https://developer.apple.com/videos/play/wwdc2016/406/">Optimizing App Startup Time (WWDC)</a></p>

<p><a href="https://developer.apple.com/videos/play/wwdc2016/406/">App Startup Time: Past, Present, and Future (WWDC)</a></p>]]></content><author><name>Michael Eisel</name></author><category term="jekyll" /><category term="update" /><summary type="html"><![CDATA[Introduction]]></summary></entry><entry><title type="html">Replacing the system allocator on iOS for fun and profit</title><link href="http://eisel.me/allocator" rel="alternate" type="text/html" title="Replacing the system allocator on iOS for fun and profit" /><published>2018-10-30T01:45:46+00:00</published><updated>2018-10-30T01:45:46+00:00</updated><id>http://eisel.me/allocator</id><content type="html" xml:base="http://eisel.me/allocator"><![CDATA[<h4 id="a-lesser-known-optimization">A lesser-known optimization</h4>

<h2 id="tldr">TL;DR</h2>

<p>Allocators are a lesser-known, yet very important, part of any app’s performance. By choosing a different allocator for your app, you could potentially improve its performance and memory usage. You can replace your allocator using the methods outlined below.</p>

<h2 id="what-is-an-allocator">What is an allocator?</h2>

<p>An allocator is a collection of functions for allocating and freeing memory on the heap. On most platforms, including iOS, there will be a default one with a function to allocate memory (<code class="language-plaintext highlighter-rouge">malloc</code>) and a function to deallocate memory (<code class="language-plaintext highlighter-rouge">free</code>).</p>

<h2 id="allocation-the-hidden-performance-specter">Allocation: the hidden performance specter</h2>

<p>It may seem like allocating and deallocating memory on the heap is a simple and solved problem, but in fact it is not at all. <a href="https://www.facebook.com/notes/facebook-engineering/scalable-memory-allocation-using-jemalloc/480222803919/">Facebook reported more than double throughput</a> for web servers when using a different allocator instead the system’s default one. <a href="http://engineering.appfolio.com/appfolio-engineering/2018/2/1/benchmarking-rubys-heap-malloc-tcmalloc-jemalloc">Ruby benchmarks got an 11% speedup</a> by using a different allocator. <a href="https://instagram-engineering.com/dismissing-python-garbage-collection-at-instagram-4dca40b29172">Instagram web servers got a 10% speedup</a> by just leaking memory instead of freeing it.</p>

<h2 id="why-does-it-have-such-a-big-impact">Why does it have such a big impact?</h2>

<h4 id="cpu-impact">CPU Impact</h4>

<p>Almost every Objective-C object (and at least some Swift class instances) that you create will require one or more heap allocations, since objects are stored on the heap. This means that an allocator can impact the CPU because of the sheer number of calls made to it and all the bookkeeping that it does.
Another impact on performance, which is very subtle but impactful, is from where in the heap it decides to allocate each piece of memory. The <a href="https://www.bsdcan.org/2006/papers/jemalloc.pdf">details</a> are beyond the scope of this article.</p>

<h4 id="memory-impact">Memory Impact</h4>

<p>All allocators require at least a bit of memory overhead, if not a lot, due to fragmentation, bookkeeping, and more.</p>

<h2 id="different-allocators-already-used-on-ios">Different allocators already used on iOS</h2>

<p>There are many already being used on iOS. Here, we set a symbolic breakpoint on <code class="language-plaintext highlighter-rouge">malloc</code>, which then shows us all the different functions named <code class="language-plaintext highlighter-rouge">malloc</code> in libraries used by a simple app:</p>

<p><img src="http://eisel.me/assets/mallocs.png" alt="mallocs" /></p>

<p>We can see that, for example, the Javascript engine has at least two and CFNetwork has at least one. There are more than that that are just not caught by this breakpoint.</p>

<h2 id="is-it-worth-it-for-my-app">Is it worth it for my app?</h2>

<p>To be fair, it’s not the <em>first</em> thing you should do to make your app faster. You should only try it if:</p>

<ul>
  <li>You’ve solved all the low-hanging performance fruit</li>
  <li>You monitor high-level performance metrics, like app startup time, that you can look at to analyze the effectiveness of a different allocator</li>
  <li>You have good internal testing, so that any issues with stability from this will get caught before they reach production</li>
</ul>

<h2 id="i-thought-apple-was-pretty-good-about-handling-this-stuff-so-that-i-dont-have-to">I thought Apple was pretty good about handling this stuff, so that I don’t have to</h2>

<p>There’s no perfect allocator for every case, as you can see by the large number of allocators in the picture above. Good allocators let you tune a variety of tradeoffs, e.g. memory usage vs. CPU usage. Your app has its own unique workload that may benefit from a different allocator.</p>

<h2 id="how-do-i-know-whats-the-best-allocator-for-my-app">How do I know what’s the best allocator for my app?</h2>

<p>There are lots of allocators, and lots of ways to tune them, but the most popular third-party one right now is <em>jemalloc</em>, which is backed by Facebook and used for large-scale projects like FreeBSD and Mozilla. It’s a good starting point, and is the one that I’ve set up in this post for us to use.</p>

<h2 id="how-can-i-use-a-different-allocator-in-my-app">How can I use a different allocator in my app?</h2>

<h4 id="the-dyld-interposing-way">The dyld interposing way</h4>

<p>This is the original way that I recommended to make the allocator work. However, I’ve decided that the zone approach detailed below is a safer one. If you’re still curious, you can poke around the address sanitizer source code to see an example of dyld interposing for malloc.</p>

<h4 id="the-zone-way">The zone way</h4>

<p><img src="http://eisel.me/assets/malloc_options.png" alt="mallocs" /></p>

<p>Since everything goes through malloc, which then calls malloc_zone_malloc, we just have to override one of the two. The most successful, widely-used, and stable library that I’ve seen do this is jemalloc. It works by overriding some of the <a href="https://github.com/jemalloc/jemalloc/blob/dev/src/zone.c">internals</a> of malloc_zone_malloc, replacing function pointers with jemalloc versions. While it’s meant to work only for OSX, it also works pretty well on iOS, which makes sense because the internals between iOS and OSX are largely the same. Note that building for iOS takes a bit of work with <code class="language-plaintext highlighter-rouge">./configure</code>, for example I used, rougly, <code class="language-plaintext highlighter-rouge">./autogen.sh &amp;&amp; ./configure — — with-lg-page=14 — — host=#{triple} — — target=#{triple}</code> where #{triple} would be something like aarch64-apple-ios.</p>

<p><em>Warning: although there are no obvious issues with it, it’s not proven in production yet.</em> You decide if the risk is worth it. It could also break debug tools that mess with malloc, like Guard Malloc or the Address Sanitizer.</p>

<h5 id="update-jemalloc-is-being-used-in-production-with-performance-benefits-in-a-large-scale-ios-app-httpsgithubcomjemallocjemallocissues1322">Update: jemalloc is being used in production, with performance benefits, in a large-scale iOS app: https://github.com/jemalloc/jemalloc/issues/1322</h5>

<h4 id="the-less-evil-but-less-effective-cfallocator-way">The less evil, but less effective, CFAllocator way</h4>

<p>CFAllocator is a struct to represent an allocator, e.g. it has function pointers for malloc and free implementations. It is used by Apple for lots of things, e.g. for allocating the buffer that an NSString or NSArray uses. You can set the default one for Apple to use by creating your own CFAllocator and calling CFAllocatorSetDefault with it. Ideally, you should do this early in the app lifecycle to catch more allocations. Although it doesn’t cover all the cases that the previous way does, it is at least officially supported by Apple and thus safer. You can build jemalloc with the repo linked above, and add the –no-replace flag so that it will let you do the replacing yourself.</p>

<h2 id="measuring-results">Measuring results</h2>

<p>Microbenchmarks, like testing how long it takes to call malloc or free, are almost useless. Allocation is too complicated to test like that. Instead, look at high-level performance metrics for your app, like startup time.</p>

<h2 id="conclusion">Conclusion</h2>

<p>You now have a few ways of swapping out the default allocator for your own. See if it helps! Swapping out the system allocator is a common practice on other platforms, and it would be nice to see it for iOS. It could be that Apple’s allocator is the best for you, but by using these methods you can explore that for yourself.</p>]]></content><author><name>Michael Eisel</name></author><category term="jekyll" /><category term="update" /><summary type="html"><![CDATA[A lesser-known optimization]]></summary></entry></feed>