<?xml version="1.0" encoding="utf-8"?><feed xmlns="http://www.w3.org/2005/Atom" ><generator uri="https://jekyllrb.com/" version="3.10.0">Jekyll</generator><link href="https://jfumero.dev/feed.xml" rel="self" type="application/atom+xml" /><link href="https://jfumero.dev/" rel="alternate" type="text/html" /><updated>2026-06-11T09:15:24+01:00</updated><id>https://jfumero.dev/feed.xml</id><title type="html">Juan Fumero</title><subtitle>personal description</subtitle><author><name>Juan Fumero, PhD</name><email>juan@jfumero.dev</email></author><entry><title type="html">Exploiting GPU Tensor Cores from Java using Babylon</title><link href="https://jfumero.dev/posts/2026/06/11/hat-tensors" rel="alternate" type="text/html" title="Exploiting GPU Tensor Cores from Java using Babylon" /><published>2026-06-11T00:00:00+01:00</published><updated>2026-06-11T00:00:00+01:00</updated><id>https://jfumero.dev/posts/2026/06/11/hat-tensors</id><content type="html" xml:base="https://jfumero.dev/posts/2026/06/11/hat-tensors"><![CDATA[<p>I’ve just published a new technical article proposing an extension to OpenJDK Project Babylon and HAT. The post explores
how to unlock GPU Tensor Cores directly from Java for supported hardware, while ensuring cross-platform portability by
mapping tensors to loop-tiles for parallel processing on devices without explicit tensor instructions.</p>

<p>I also walk through the API choices, as well as compiler and runtime integration, showing how we go from high-level Java
straight to emitting explicit NVIDIA HMMA instructions. Besides, this article shows how Java applications can be tuned 
for GPUs by using the CUDA-generated code by HAT and the NVIDIA profilers. 🚀</p>

<p>📑 <strong>Link to the full article: <a href="https://openjdk.org/projects/babylon/articles/hat-tensors/hat-tensors">link</a></strong></p>

<h3 id="abstract">Abstract</h3>

<p>Tensor Cores are dedicated hardware on NVIDIA GPUs that can be programmed to accelerate matrix-multiply-accumulate (MMA)
operations. Running MMA operations on these cores can increase performance of specific applications dramatically.
However, NVIDIA tensor cores are only available for NVIDIA GPUs and exposed to the CUDA programming model through
low-level APIs.</p>

<p>Ideally, we would also like to make those operations accessible from Java to accelerate domain-specific workloads (e.g.,
LLMs), but those operations must be portable across accelerators. MMA capabilities are also available for other
computing platforms such as Apple devices using the Metal programming model, or Intel XPUs via the OpenCL and oneAPI
software stacks. However, these operations are not always achievable for other programming models such as OpenCL 1.2 (
the OpenCL version that Apple supports), which emphasizes the need for portability. This article tackles the
architectural specificity of NVIDIA Tensor Cores by exploring a portable approach to tensor operations across multiple
hardware accelerators that can be used from Java.</p>

<p>The goal of this article is twofold. First, we show that Java programs can reach close-to-native performance for
matrix-multiply computations on hardware with accelerated MMA support, such as NVIDIA GPUs. Second, we study how the
same Java Tensor API can be mapped across different parallel programming models and vendors while remaining portable for
both, source code and runtime scheduling parameters.</p>

<p>To support this approach, we extended the Heterogeneous Accelerator Toolkit (HAT), a parallel programming framework to
accelerate data-parallel workloads on hardware accelerators, with a tensor-aware API and a set of code transformations
using the code reflection API from the OpenJDK Project Babylon.</p>

<p>Finally, we evaluate the performance of the system using the HAT Tensor API from Java in the context of two GPU
platforms, an Apple M4 Max GPU and an NVIDIA Ampere A10 GPU. We show that, by enabling tensor cores on supported
hardware (NVIDIA), we can speed up the naïve matrix multiplication kernel from 240 GFLOP/s to 7.3 TFLOP/s, while the
application remains portable to run on Apple M4 GPU via OpenCL 1.2, where with some parameter tuning, we can increase
performance by 8x over the naïve matrix-multiplication.</p>

<h3 id="current-status">Current Status</h3>

<p>This article shows an approach to extend the HAT programming model with an API for explicit tensor-core programming.
Furthermore, it shows how to make this approach generic to be able to process computations expressed with the proposed
HAT tensor core API on accelerators without explicit tensor instructions. While this article shows a complete approach,
the final integration into the HAT programming model is under discussion.</p>]]></content><author><name>Juan Fumero, PhD</name><email>juan@jfumero.dev</email></author><category term="Babylon" /><category term="GPU" /><category term="HAT" /><category term="Java" /><category term="OpenJDK" /><summary type="html"><![CDATA[Proof of concept enabling Tensor Core Programming from Java]]></summary></entry><entry><title type="html">Building the Latest OpenJDK from Source with Docker</title><link href="https://jfumero.dev/posts/2026/05/15/openjdk-build-docker" rel="alternate" type="text/html" title="Building the Latest OpenJDK from Source with Docker" /><published>2026-05-19T00:00:00+01:00</published><updated>2026-05-19T00:00:00+01:00</updated><id>https://jfumero.dev/posts/2026/05/15/openjdk-build-in-docker</id><content type="html" xml:base="https://jfumero.dev/posts/2026/05/15/openjdk-build-docker"><![CDATA[<p>The following <code class="language-plaintext highlighter-rouge">Dockerfile</code> builds the latest JDK 27 from source using OpenJDK 26 as base JDK.</p>

<div class="language-Dockerfile highlighter-rouge"><div class="highlight"><pre class="highlight"><code><span class="k">FROM</span><span class="s"> ubuntu:26.04</span>

<span class="k">RUN </span>apt-get update <span class="nt">-q</span> <span class="o">&amp;&amp;</span> apt <span class="nb">install</span> <span class="nt">-qy</span> <span class="se">\
</span>        build-essential git cmake vim maven curl bash unzip zip wget

<span class="k">WORKDIR</span><span class="s"> /opt/openjdk/</span>
<span class="c">## Use JDK 26 as base</span>
<span class="k">RUN </span>wget https://download.java.net/java/GA/jdk26.0.1/458fda22e4c54d5ba572ab8d2b22eb83/8/GPL/openjdk-26.0.1_linux-x64_bin.tar.gz
<span class="k">RUN </span><span class="nb">tar </span>xvzf openjdk-26.0.1_linux-x64_bin.tar.gz
<span class="k">ENV</span><span class="s"> PATH=$JAVA_HOME/bin:$PATH</span>
<span class="k">ENV</span><span class="s"> JAVA_HOME=/opt/openjdk/jdk-26.0.1</span>

<span class="c">## Install OpenJDK Dependencies</span>
<span class="k">RUN </span>apt-get update <span class="nt">-y</span>
<span class="k">RUN </span>apt-get <span class="nb">install</span> <span class="nt">-y</span> autoconf libfreetype6-dev
<span class="k">RUN </span>apt-get <span class="nb">install</span> <span class="nt">-y</span> file
<span class="k">RUN </span>apt-get <span class="nb">install</span> <span class="nt">-y</span> libasound2-dev
<span class="k">RUN </span>apt-get <span class="nb">install</span> <span class="nt">-y</span> libcups2-dev
<span class="k">RUN </span>apt-get <span class="nb">install</span> <span class="nt">-y</span> libfontconfig1-dev
<span class="k">RUN </span>apt-get <span class="nb">install</span> <span class="nt">-y</span> libx11-dev libxext-dev libxrender-dev libxrandr-dev libxtst-dev libxt-dev

<span class="c">## Configure OpenJDK from source </span>
<span class="k">RUN </span>git clone <span class="nt">--depth</span> 1 https://github.com/openjdk/jdk
<span class="k">WORKDIR</span><span class="s"> /opt/openjdk/jdk</span>
<span class="k">RUN </span>bash configure <span class="nt">--with-boot-jdk</span><span class="o">=</span><span class="k">${</span><span class="nv">JAVA_HOME</span><span class="k">}</span>
<span class="k">RUN </span>make clean
<span class="k">RUN </span>make images

<span class="c">## Update PATH and JAVA_HOME</span>
<span class="k">ENV</span><span class="s"> PATH=/opt/openjdk/jdk/build/linux-x86_64-server-release/jdk/bin/:$PATH</span>
<span class="k">ENV</span><span class="s"> JAVA_HOME=/opt/openjdk/jdk/build/linux-x86_64-server-release/jdk</span>

<span class="c">## Expose a volume to pass files in the local directory</span>
<span class="k">WORKDIR</span><span class="s"> /opt/openjdk/jdk/</span>
<span class="k">VOLUME</span><span class="s"> ["/data"]</span>
</code></pre></div></div>

<p>To build the image:</p>

<div class="language-bash highlighter-rouge"><div class="highlight"><pre class="highlight"><code>docker build <span class="nb">.</span> <span class="nt">-t</span> openjdk
</code></pre></div></div>

<p>If successful, then we can run the built <code class="language-plaintext highlighter-rouge">Java</code> as follows:</p>

<div class="language-bash highlighter-rouge"><div class="highlight"><pre class="highlight"><code><span class="nv">$ </span>docker run <span class="nt">-it</span> openjdk java <span class="nt">--version</span> 
openjdk 27-internal 2026-09-15
OpenJDK Runtime Environment <span class="o">(</span>build 27-internal-adhoc.root.jdk<span class="o">)</span>
OpenJDK 64-Bit Server VM <span class="o">(</span>build 27-internal-adhoc.root.jdk, mixed mode<span class="o">)</span>
</code></pre></div></div>

<p>We can also run any Java program using the volume <code class="language-plaintext highlighter-rouge">data</code> configured in the image:</p>

<div class="language-bash highlighter-rouge"><div class="highlight"><pre class="highlight"><code>docker run <span class="nt">-it</span> <span class="nt">-v</span> <span class="nv">$PWD</span>:/data <span class="nt">-w</span> /data openjdk java MyProgram.java 
</code></pre></div></div>]]></content><author><name>Juan Fumero, PhD</name><email>juan@jfumero.dev</email></author><category term="OpenJDK" /><category term="Build" /><category term="Docker" /><summary type="html"><![CDATA[How to build OpenJDK from source in a Docker Container]]></summary></entry><entry><title type="html">How to fix ccache error when building OpenJDK from source</title><link href="https://jfumero.dev/posts/2026/05/15/openjdk-compilation-ccache" rel="alternate" type="text/html" title="How to fix ccache error when building OpenJDK from source" /><published>2026-05-15T00:00:00+01:00</published><updated>2026-05-15T00:00:00+01:00</updated><id>https://jfumero.dev/posts/2026/05/15/openjdk-compilation-ccache</id><content type="html" xml:base="https://jfumero.dev/posts/2026/05/15/openjdk-compilation-ccache"><![CDATA[<p>When compiling OpenJDK from source and have <a href="https://ccache.dev/"><code class="language-plaintext highlighter-rouge">ccache</code></a> enabled, we might get the following error:</p>

<div class="language-bash highlighter-rouge"><div class="highlight"><pre class="highlight"><code>configure: Using default toolchain gcc <span class="o">(</span>GNU Compiler Collection<span class="o">)</span>
checking <span class="k">for </span>gcc... /usr/lib64/ccache/gcc
checking resolved symbolic links <span class="k">for </span>CC... /usr/bin/ccache
configure: Please use <span class="nt">--enable-ccache</span> instead of providing a wrapped compiler.
configure: error: /usr/lib64/ccache/gcc is a symbolic <span class="nb">link </span>to ccache. This is not supported.
configure exiting with result code 1
</code></pre></div></div>

<p>This usually happens when the <code class="language-plaintext highlighter-rouge">gcc</code> found in your <code class="language-plaintext highlighter-rouge">PATH</code> is not the actual GCC binary, but a <code class="language-plaintext highlighter-rouge">ccache</code> wrapper:</p>

<div class="language-bash highlighter-rouge"><div class="highlight"><pre class="highlight"><code><span class="nv">$ </span>which gcc
/usr/lib64/ccache/gcc

<span class="nv">$ </span>ll /usr/lib64/ccache/gcc
lrwxrwxrwx. 1 root root 16 May 12 15:27 /usr/lib64/ccache/gcc -&gt; ../../bin/ccache
</code></pre></div></div>

<p>In this case, <code class="language-plaintext highlighter-rouge">/usr/lib64/ccache/gcc</code> is a symbolic link to the <code class="language-plaintext highlighter-rouge">ccache</code> executable. OpenJDK’s build system does not support passing a wrapped compiler directly.</p>

<p>A possible solution to this <a href="https://ccache.dev/manual/4.13.6.html#_run_modes">without manipulating the system files</a> is to set the <code class="language-plaintext highlighter-rouge">CC</code> and <code class="language-plaintext highlighter-rouge">CXX</code> env variables with the right location for the C/C++ binaries:</p>

<div class="language-bash highlighter-rouge"><div class="highlight"><pre class="highlight"><code>bash configure <span class="se">\</span>
  <span class="nv">CC</span><span class="o">=</span>/usr/bin/gcc <span class="se">\</span>
  <span class="nv">CXX</span><span class="o">=</span>/usr/bin/g++ <span class="se">\</span>
  <span class="nt">--with-boot-jdk</span><span class="o">=</span><span class="nv">$JAVA_HOME</span> <span class="se">\</span>
  <span class="nt">--with-jtreg</span><span class="o">=</span><span class="nv">$JTREG_HOME</span>
</code></pre></div></div>

<p>Furthermore, we can also enable <code class="language-plaintext highlighter-rouge">ccache</code> with the <code class="language-plaintext highlighter-rouge">--enable-ccache</code> in combination with the <code class="language-plaintext highlighter-rouge">CC</code> and <code class="language-plaintext highlighter-rouge">CXX</code> env variables:</p>

<div class="language-bash highlighter-rouge"><div class="highlight"><pre class="highlight"><code>bash configure <span class="se">\</span>
  <span class="nv">CC</span><span class="o">=</span>/usr/bin/gcc <span class="se">\</span>
  <span class="nv">CXX</span><span class="o">=</span>/usr/bin/g++ <span class="se">\</span>
  <span class="nt">--enable-ccache</span> <span class="se">\</span>
  <span class="nt">--with-boot-jdk</span><span class="o">=</span><span class="nv">$JAVA_HOME</span> <span class="se">\</span>
  <span class="nt">--with-jtreg</span><span class="o">=</span><span class="nv">$JTREG_HOME</span>
</code></pre></div></div>

<h3 id="links">Links</h3>

<ul>
  <li><a href="https://mail.openjdk.org/archives/list/build-dev@openjdk.org/message/AHTW4GBHWOSWC5U2TMXDA4OCPUUL5HDG/">Mail.jdk thread</a></li>
</ul>]]></content><author><name>Juan Fumero, PhD</name><email>juan@jfumero.dev</email></author><category term="OpenJDK" /><category term="Build" /><summary type="html"><![CDATA[Provide CC and CXX env variables to the OpenJDK build with the --enable-ccache option.]]></summary></entry><entry><title type="html">Docker Compose for SonarQube: A Simple YAML Template</title><link href="https://jfumero.dev/posts/2026/02/14/sonar-docker-compose" rel="alternate" type="text/html" title="Docker Compose for SonarQube: A Simple YAML Template" /><published>2026-02-14T00:00:00+00:00</published><updated>2026-02-14T00:00:00+00:00</updated><id>https://jfumero.dev/posts/2026/02/14/sonar-docker-compose</id><content type="html" xml:base="https://jfumero.dev/posts/2026/02/14/sonar-docker-compose"><![CDATA[<h2 id="docker-compose-for-sonarqube-community">Docker Compose for SonarQube Community</h2>

<div class="language-yml highlighter-rouge"><div class="highlight"><pre class="highlight"><code><span class="na">services</span><span class="pi">:</span>
  <span class="na">sonarqube</span><span class="pi">:</span>
    <span class="na">image</span><span class="pi">:</span> <span class="s">sonarqube:community</span>
    <span class="na">restart</span><span class="pi">:</span> <span class="s">unless-stopped</span>
    <span class="na">depends_on</span><span class="pi">:</span>
      <span class="pi">-</span> <span class="s">db</span>
    <span class="na">environment</span><span class="pi">:</span>
      <span class="pi">-</span> <span class="s">SONAR_JDBC_URL=jdbc:postgresql://db:5432/sonar</span>
      <span class="pi">-</span> <span class="s">SONAR_JDBC_USERNAME=sonar</span>
      <span class="pi">-</span> <span class="s">SONAR_JDBC_PASSWORD=sonar</span>
    <span class="na">volumes</span><span class="pi">:</span>
      <span class="pi">-</span> <span class="s">sonarqube_data:/opt/sonarqube/data</span>
      <span class="pi">-</span> <span class="s">sonarqube_extensions:/opt/sonarqube/extensions</span>
      <span class="pi">-</span> <span class="s">sonarqube_logs:/opt/sonarqube/logs</span>
    <span class="na">ports</span><span class="pi">:</span>
      <span class="pi">-</span> <span class="s2">"</span><span class="s">9000:9000"</span>
    <span class="na">networks</span><span class="pi">:</span>
      <span class="pi">-</span> <span class="s">sonarnet</span>

  <span class="na">db</span><span class="pi">:</span>
    <span class="na">image</span><span class="pi">:</span> <span class="s">postgres:15</span>
    <span class="na">restart</span><span class="pi">:</span> <span class="s">unless-stopped</span>
    <span class="na">environment</span><span class="pi">:</span>
      <span class="pi">-</span> <span class="s">POSTGRES_USER=sonar</span>
      <span class="pi">-</span> <span class="s">POSTGRES_PASSWORD=sonar</span>
      <span class="pi">-</span> <span class="s">POSTGRES_DB=sonar</span>
    <span class="na">volumes</span><span class="pi">:</span>
      <span class="pi">-</span> <span class="s">postgresql_data:/var/lib/postgresql/data</span>
    <span class="na">networks</span><span class="pi">:</span>
      <span class="pi">-</span> <span class="s">sonarnet</span>

<span class="na">networks</span><span class="pi">:</span>
  <span class="na">sonarnet</span><span class="pi">:</span>

<span class="na">volumes</span><span class="pi">:</span>
  <span class="na">sonarqube_data</span><span class="pi">:</span>
  <span class="na">sonarqube_extensions</span><span class="pi">:</span>
  <span class="na">sonarqube_logs</span><span class="pi">:</span>
  <span class="na">postgresql_data</span><span class="pi">:</span>
</code></pre></div></div>

<p>Then, we pull the images:</p>

<div class="language-bash highlighter-rouge"><div class="highlight"><pre class="highlight"><code>docker compose pull
</code></pre></div></div>

<p>And run the server:</p>

<div class="language-bash highlighter-rouge"><div class="highlight"><pre class="highlight"><code>docker compose up <span class="nt">-d</span>
</code></pre></div></div>

<p>To setup Sonar, we access to <code class="language-plaintext highlighter-rouge">&lt;ip&gt;:9000</code> and update the password. 
The default is:</p>
<ul>
  <li>User: <code class="language-plaintext highlighter-rouge">admin</code></li>
  <li>Password: <code class="language-plaintext highlighter-rouge">admin</code></li>
</ul>

<h2 id="update-the-docker-image-for-sonar">Update the docker image for Sonar</h2>

<div class="language-bash highlighter-rouge"><div class="highlight"><pre class="highlight"><code>docker compose down
docker compose pull 
docker compose up <span class="nt">-d</span>   
</code></pre></div></div>

<h2 id="links">Links:</h2>

<ul>
  <li><a href="https://docs.sonarsource.com/sonarqube-server/server-installation/from-docker-image/set-up-and-start-container">https://docs.sonarsource.com/sonarqube-server/server-installation/from-docker-image/set-up-and-start-container</a></li>
</ul>]]></content><author><name>Juan Fumero, PhD</name><email>juan@jfumero.dev</email></author><category term="Docker" /><category term="SonarQube" /><summary type="html"><![CDATA[Basic yaml file for Docker Compose to run SonarQube.]]></summary></entry><entry><title type="html">Building The Regression Test Harness for the OpenJDK (jtreg) from Source</title><link href="https://jfumero.dev/posts/2026/02/05/jdk-jtreg-build" rel="alternate" type="text/html" title="Building The Regression Test Harness for the OpenJDK (jtreg) from Source" /><published>2026-02-05T00:00:00+00:00</published><updated>2026-02-05T00:00:00+00:00</updated><id>https://jfumero.dev/posts/2026/02/05/jtreg-build</id><content type="html" xml:base="https://jfumero.dev/posts/2026/02/05/jdk-jtreg-build"><![CDATA[<h2 id="build-jtreg">Build JTREG</h2>

<p>As in February 2026, to build <code class="language-plaintext highlighter-rouge">jtreg</code> from source, we need to use JDK 25.</p>

<div class="language-bash highlighter-rouge"><div class="highlight"><pre class="highlight"><code>git clone https://github.com/openjdk/jtreg/
<span class="nb">cd </span>jtreg


<span class="c">## Use JDK 25 (e.g., Oracle JDK). We can use sdkman to </span>
<span class="c">## obtain the desired JDK version</span>
sdk use java 25.0.1-oracle

<span class="c">## Build jtreg</span>
sh ./make/build.sh

<span class="c">## Check</span>
<span class="nv">$ </span>./build/images/jtreg/bin/jtreg <span class="nt">-version</span> 

jtreg 8.3-dev+0
Installed <span class="k">in</span> /home/juan/bin/jtreg/build/images/jtreg/lib/jtreg.jar
Running on platform version 25.0.1 from /home/juan/.sdkman/candidates/java/25.0.1-oracle.
Built with Java<span class="o">(</span>TM<span class="o">)</span> 2 SDK, Version 25.0.1+8-LTS-27 on February 04, 2026.
JT Harness, version 6.0 ea b24 <span class="o">(</span>January 21, 2026<span class="o">)</span>
Java Assembler Tools, version 9.1 ea 01 <span class="o">(</span>January 21, 2026<span class="o">)</span>
TestNG: testng-7.3.0.jar, guice-5.1.0.jar, jcommander-1.82.jar
JUnit: junit-platform-console-standalone-1.14.2.jar
</code></pre></div></div>

<p>To make <code class="language-plaintext highlighter-rouge">jtreg</code> easily accessible, it is convenient to declare the <code class="language-plaintext highlighter-rouge">JTREG_HOME</code> and update your <code class="language-plaintext highlighter-rouge">PATH</code> variable.</p>

<div class="language-bash highlighter-rouge"><div class="highlight"><pre class="highlight"><code><span class="c">#JTREG_HOME</span>
<span class="nb">export </span><span class="nv">JTREG_HOME</span><span class="o">=</span>&lt;path-to&gt;/jtreg/build/images/jtreg
<span class="nb">export </span><span class="nv">PATH</span><span class="o">=</span>&lt;path-to&gt;/jtreg/build/images/jtreg/bin:<span class="nv">$PATH</span>
</code></pre></div></div>

<h2 id="build-idea-plugin-for-jtreg">Build IDEA Plugin for JTREG</h2>

<p>The <code class="language-plaintext highlighter-rouge">jtreg</code> repository also contains source code for an IntelliJ IDEA plugin.</p>

<div class="language-bash highlighter-rouge"><div class="highlight"><pre class="highlight"><code><span class="nb">cd</span> ./plugins/idea
</code></pre></div></div>

<p>Update the file <code class="language-plaintext highlighter-rouge">gradle.properties</code> with the <code class="language-plaintext highlighter-rouge">jtregHome</code> path pointing to the <code class="language-plaintext highlighter-rouge">JTREG_HOME</code> we just built.</p>

<div class="language-gradle highlighter-rouge"><div class="highlight"><pre class="highlight"><code><span class="n">jtregHome</span> <span class="o">=</span> <span class="o">..</span><span class="s">/../</span><span class="n">build</span><span class="s">/images/</span><span class="n">jtreg</span>
</code></pre></div></div>

<p>To build the plugin, we need JDK 21.</p>

<div class="language-bash highlighter-rouge"><div class="highlight"><pre class="highlight"><code>sdk use java 21.0.9-oracle

sh gradlew clean build
</code></pre></div></div>

<p>The plugin is located at <code class="language-plaintext highlighter-rouge">plugins/idea/build/distributions/jtreg-plugin-1.19.zip</code>.</p>

<p>To install it in IntelliJ IDEA:</p>

<ol>
  <li>Go to Settings &gt; Plugins.</li>
  <li>Click the Gear Icon ⚙️ and select “Install Plugin from Disk…”.</li>
  <li>Select the generated .zip file.</li>
  <li>Restart your IDE.</li>
</ol>]]></content><author><name>Juan Fumero, PhD</name><email>juan@jfumero.dev</email></author><category term="JDK" /><category term="jtreg" /><category term="testing" /><category term="Build" /><summary type="html"><![CDATA[Build JTREG]]></summary></entry><entry><title type="html">How to Install NVIDIA Drivers and CUDA Toolkit on Oracle Linux 10</title><link href="https://jfumero.dev/posts/2025/08/15/nvidia-drivers-and-toolkit-oracle-linux10" rel="alternate" type="text/html" title="How to Install NVIDIA Drivers and CUDA Toolkit on Oracle Linux 10" /><published>2025-08-15T00:00:00+01:00</published><updated>2025-08-15T00:00:00+01:00</updated><id>https://jfumero.dev/posts/2025/08/15/nvidia-drivers-oracle-linux10</id><content type="html" xml:base="https://jfumero.dev/posts/2025/08/15/nvidia-drivers-and-toolkit-oracle-linux10"><![CDATA[<p>For any developer or power user who’s ever tried to install NVIDIA drivers on Linux, the process can feel less like a straightforward task. While most mainstream distributions have streamlined the process, trying to get NVIDIA drivers working on Oracle Linux for a desktop setup is a unique challenge. The available documentation is often sparse, focusing on server-side GPU acceleration rather than desktop graphics, leaving a trail of broken dependencies and black screens in its wake (<em>and that just happened to me while I was trying to install the drivers as well</em> 😢).</p>

<p>This guide aims to fill that gap. We’ll walk through the process step-by-step, demystifying the installation of NVIDIA drivers on the latest Oracle Linux 10 for desktop setups. Note, for data centers, <a href="https://docs.nvidia.com/datacenter/tesla/driver-installation-guide/">NVIDIA guidelines</a> covers how to install and configure the NVIDIA driver for servers.</p>

<p>In addition, this post also shows how to configure CUDA 13.0 SDK to compile and run our CUDA programs on NVIDIA GPUs.</p>

<h3 id="1-update-the-system">1. Update the system</h3>

<p>First of all, we need to update the system. This installation guideline assumes a fresh installation of the Oracle Linux 10 with Gnome 47.4.</p>

<div class="language-bash highlighter-rouge"><div class="highlight"><pre class="highlight"><code><span class="nb">sudo </span>dnf update
reboot
</code></pre></div></div>

<p>At the time of writing this post, this the the latest Linux Kernel available for Oracle Linux 10:</p>

<div class="language-bash highlighter-rouge"><div class="highlight"><pre class="highlight"><code><span class="nv">$ </span><span class="nb">uname</span> <span class="nt">-a</span>
Linux oraclelinux 6.12.0-101.33.4.3.el10uek.x86_64 <span class="c">#1 SMP PREEMPT_DYNAMIC Mon Jul 14 18:29:21 PDT 2025 x86_64 GNU/Linux</span>
</code></pre></div></div>

<p>So, keep in mind we are using a <a href="https://docs.oracle.com/en/operating-systems/uek/">UEK</a> (Unbreakable Enterprise Kernel) Linux kernel. 
This is a Linux Kernel developed by Oracle for the Oracle Linux distribution that is optimized for the Oracle Cloud. <strong>Thus, when we install the kernel pre-requisites for the NVIDIA drivers, we need 
to install also the UEK versions.</strong></p>

<h3 id="2-download-the-latest-nvidia-driver">2. Download the latest NVIDIA Driver</h3>

<p>Visit the <a href="https://www.nvidia.com/en-us/drivers/">NVIDIA website</a> to download the latest NVIDIA driver. 
At the time of writing this post, the latest version is <code class="language-plaintext highlighter-rouge">580.76.05</code>.</p>

<p>Download the file and give execution permisions:</p>

<div class="language-bash highlighter-rouge"><div class="highlight"><pre class="highlight"><code><span class="nb">chmod</span> +x NVIDIA-Linux-x86_64-580.76.05.run
</code></pre></div></div>

<h3 id="3-installing-the-dependencies">3. Installing the dependencies</h3>

<p>Enable epel Oracle Epel Repo:</p>

<div class="language-bash highlighter-rouge"><div class="highlight"><pre class="highlight"><code><span class="nb">sudo </span>dnf <span class="nb">install </span>oracle-epel-release-el10-1.0-2.el10.x86_64
</code></pre></div></div>

<p>Install the dependencies:</p>

<div class="language-bash highlighter-rouge"><div class="highlight"><pre class="highlight"><code><span class="nb">sudo </span>dnf <span class="nb">install </span>kernel-uek-devel gcc make acpid libglvnd-glx libglvnd-opengl libglvnd-devel pkgconfig xorg-x11-server-Xwayland libxcb egl-wayland
</code></pre></div></div>

<h3 id="4-disable-nouveau-and-nova-core">4. Disable Nouveau and NOVA Core</h3>

<p>Access as root:</p>

<div class="language-bash highlighter-rouge"><div class="highlight"><pre class="highlight"><code><span class="nb">sudo </span>su -
</code></pre></div></div>

<p>Then disable the <code class="language-plaintext highlighter-rouge">nouveau</code> and <code class="language-plaintext highlighter-rouge">nova_core</code> drivers:</p>

<div class="language-bash highlighter-rouge"><div class="highlight"><pre class="highlight"><code><span class="nb">echo</span> <span class="s2">"blacklist nouveau"</span> <span class="o">&gt;&gt;</span> /etc/modprobe.d/blacklist.conf
<span class="nb">echo</span> <span class="s2">"blacklist nova_core"</span> <span class="o">&gt;&gt;</span> /etc/modprobe.d/blacklist.conf
<span class="nb">echo</span> <span class="s2">"options nvidia NVreg_PreserveVideoMemoryAllocations=1"</span> <span class="o">&gt;&gt;</span> /etc/modprobe.d/nvidia.conf
<span class="nb">echo</span> <span class="s2">"options nvidia-drm modeset=1 fbdev=0"</span> <span class="o">&gt;&gt;</span> /etc/modprobe.d/nvidia.conf
</code></pre></div></div>

<h3 id="5-update-the-grub2-configuration">5. Update the grub2 configuration</h3>

<p>As described in the excellent <a href="https://www.if-not-true-then-false.com/2015/fedora-nvidia-guide/">if-not-true-then-false</a> blog, we then need to update the <code class="language-plaintext highlighter-rouge">grub2</code> con configuration and create a new image.</p>

<div class="language-bash highlighter-rouge"><div class="highlight"><pre class="highlight"><code>grub2-mkconfig <span class="nt">-o</span> /boot/grub2/grub.cfg
grub2-mkconfig <span class="nt">-o</span> /boot/efi/EFI/redhat/grub.cfg
</code></pre></div></div>

<div class="language-bash highlighter-rouge"><div class="highlight"><pre class="highlight"><code><span class="nb">mv</span> /boot/initramfs-<span class="si">$(</span><span class="nb">uname</span> <span class="nt">-r</span><span class="si">)</span>.img /boot/initramfs-<span class="si">$(</span><span class="nb">uname</span> <span class="nt">-r</span><span class="si">)</span><span class="nt">-nouveau-nova</span>.img
dracut /boot/initramfs-<span class="si">$(</span><span class="nb">uname</span> <span class="nt">-r</span><span class="si">)</span>.img <span class="si">$(</span><span class="nb">uname</span> <span class="nt">-r</span><span class="si">)</span>
</code></pre></div></div>

<h3 id="6-install-the-nvidia-driver">6. Install the NVIDIA Driver</h3>

<p>Disable the graphical interface to install the NVIDIA Driver. 
We will enable it again once the installation is done.</p>

<div class="language-bash highlighter-rouge"><div class="highlight"><pre class="highlight"><code>systemctl set-default multi-user.target
</code></pre></div></div>

<p>Then we can reboot:</p>

<div class="language-bash highlighter-rouge"><div class="highlight"><pre class="highlight"><code>reboot
</code></pre></div></div>

<p>To install the NVIDIA driver, just run the following script, and follow the instructions:</p>

<div class="language-bash highlighter-rouge"><div class="highlight"><pre class="highlight"><code><span class="nb">sudo</span> ./NVIDIA-Linux-x86_64-580.76.05.run
</code></pre></div></div>

<p>Once the installation is done, enable enable the graphics interface:</p>

<div class="language-bash highlighter-rouge"><div class="highlight"><pre class="highlight"><code>systemctl set-default graphical.target
reboot
</code></pre></div></div>

<p>Check with the <code class="language-plaintext highlighter-rouge">nvidia-smi</code> command:</p>

<div class="language-bash highlighter-rouge"><div class="highlight"><pre class="highlight"><code>Fri Aug 15 08:52:12 2025
+-----------------------------------------------------------------------------------------+
| NVIDIA-SMI 580.76.05              Driver Version: 580.76.05      CUDA Version: 13.0     |
+-----------------------------------------+------------------------+----------------------+
| GPU  Name                 Persistence-M | Bus-Id          Disp.A | Volatile Uncorr. ECC |
| Fan  Temp   Perf          Pwr:Usage/Cap |           Memory-Usage | GPU-Util  Compute M. |
|                                         |                        |               MIG M. |
|<span class="o">=========================================</span>+<span class="o">========================</span>+<span class="o">======================</span>|
|   0  NVIDIA GeForce RTX 2060 ...    Off |   00000000:01:00.0 Off |                  N/A |
| N/A   40C    P8              2W /   65W |       4MiB /   6144MiB |      0%      Default |
|                                         |                        |                  N/A |
+-----------------------------------------+------------------------+----------------------+

+-----------------------------------------------------------------------------------------+
| Processes:                                                                              |
|  GPU   GI   CI              PID   Type   Process name                        GPU Memory |
|        ID   ID                                                               Usage      |
|<span class="o">=========================================================================================</span>|
|    0   N/A  N/A            2744      G   /usr/bin/gnome-shell                      1MiB |
+-----------------------------------------------------------------------------------------+
</code></pre></div></div>

<p>Great, installation is done! Now, let’s compile and run some CUDA programs on the GPU.
To do that, we need to install the CUDA Toolkit.</p>

<h3 id="7-install-cuda-130-toolkit">7. Install CUDA 13.0 Toolkit</h3>

<div class="language-bash highlighter-rouge"><div class="highlight"><pre class="highlight"><code>wget https://developer.download.nvidia.com/compute/cuda/13.0.0/local_installers/cuda-repo-rhel9-13-0-local-13.0.0_580.65.06-1.x86_64.rpm
<span class="nb">sudo </span>rpm <span class="nt">-i</span> cuda-repo-rhel9-13-0-local-13.0.0_580.65.06-1.x86_64.rpm
<span class="nb">sudo </span>dnf clean all
<span class="nb">sudo </span>dnf <span class="nt">-y</span> <span class="nb">install </span>cuda-toolkit-13-0
</code></pre></div></div>

<p>Now we can run CUDA. Update the <code class="language-plaintext highlighter-rouge">PATH</code> and the <code class="language-plaintext highlighter-rouge">CPLUS_INCLUDE_PATH</code> to include the CUDA libraries and CUDA compiler. You can add the following lines in your <code class="language-plaintext highlighter-rouge">~/.bashrc</code>:</p>

<div class="language-bash highlighter-rouge"><div class="highlight"><pre class="highlight"><code><span class="nb">export </span><span class="nv">CPLUS_INCLUDE_PATH</span><span class="o">=</span>/usr/local/cuda/include
<span class="nb">export </span><span class="nv">LD_LIBRARY_PATH</span><span class="o">=</span>/usr/local/cuda/lib64
<span class="nb">export </span><span class="nv">PATH</span><span class="o">=</span>/usr/local/cuda/bin/:<span class="nv">$PATH</span>
</code></pre></div></div>

<p>And done!</p>

<p>Let’s try a few examples:</p>

<h3 id="8-download-cuda-sample-suite">8. Download CUDA Sample Suite</h3>

<div class="language-bash highlighter-rouge"><div class="highlight"><pre class="highlight"><code>git clone https://github.com/NVIDIA/cuda-samples
<span class="nb">cd </span>cuda-samples
<span class="nb">cd </span>Samples/0_Introduction/matrixMul/
<span class="nb">mkdir </span>build
<span class="nb">cd </span>build
cmake ..
make
</code></pre></div></div>

<p>Now we can run the example:</p>

<div class="language-bash highlighter-rouge"><div class="highlight"><pre class="highlight"><code>./matrixMul
<span class="o">[</span>Matrix Multiply Using CUDA] - Starting...
GPU Device 0: <span class="s2">"Turing"</span> with compute capability 7.5

MatrixA<span class="o">(</span>320,320<span class="o">)</span>, MatrixB<span class="o">(</span>640,320<span class="o">)</span>
Computing result using CUDA Kernel...
<span class="k">done
</span><span class="nv">Performance</span><span class="o">=</span> 382.48 GFlop/s, <span class="nv">Time</span><span class="o">=</span> 0.343 msec, <span class="nv">Size</span><span class="o">=</span> 131072000 Ops, <span class="nv">WorkgroupSize</span><span class="o">=</span> 1024 threads/block
Checking computed result <span class="k">for </span>correctness: Result <span class="o">=</span> PASS

NOTE: The CUDA Samples are not meant <span class="k">for </span>performance measurements. Results may vary when GPU Boost is enabled.
</code></pre></div></div>

<h3 id="references">References</h3>

<p>[1] <a href="https://www.if-not-true-then-false.com/2015/fedora-nvidia-guide/">https://www.if-not-true-then-false.com/2015/fedora-nvidia-guide/</a></p>

<p>[2] <a href="https://docs.nvidia.com/datacenter/tesla/driver-installation-guide/">https://docs.nvidia.com/datacenter/tesla/driver-installation-guide/</a></p>]]></content><author><name>Juan Fumero, PhD</name><email>juan@jfumero.dev</email></author><category term="CUDA Toolkit" /><category term="Drivers" /><category term="Installation" /><category term="Linux" /><category term="NVIDIA" /><category term="Oracle Linux 10" /><summary type="html"><![CDATA[How to install NVIDIA 580 Drivers and CUDA 13.0 Toolkit on Oracle Linux 10]]></summary></entry><entry><title type="html">How to enable NVIDIA Nsight Compute CLI in Fedora</title><link href="https://jfumero.dev/posts/2025/07/04/nvidia-ncu-enable-fedora" rel="alternate" type="text/html" title="How to enable NVIDIA Nsight Compute CLI in Fedora" /><published>2025-07-04T00:00:00+01:00</published><updated>2025-07-04T00:00:00+01:00</updated><id>https://jfumero.dev/posts/2025/07/04/nvidia-ncu-enable-fedora</id><content type="html" xml:base="https://jfumero.dev/posts/2025/07/04/nvidia-ncu-enable-fedora"><![CDATA[<p>When working with CUDA, <a href="https://docs.nvidia.com/nsight-compute/NsightComputeCli/index.html">NVIDIA’s Nsight Compute CLI</a> (<code class="language-plaintext highlighter-rouge">ncu</code>) is an indispensable command-line tool for profiling your CUDA applications. It lets you peek under the hood to see exactly how your code is performing on the GPU.</p>

<p>For instance, you can easily profile a CUDA application with a command like this:</p>

<div class="language-bash highlighter-rouge"><div class="highlight"><pre class="highlight"><code>ncu <span class="nt">-o</span> myProfileData <span class="nt">--set</span> full ./cuda_sample
</code></pre></div></div>

<p>The command above generates a file <code class="language-plaintext highlighter-rouge">myProfileData.ncu-rep</code> which we can inspect with NVIDIA Nsight GUI to see all the profiled data.</p>

<p>However, to set it up in Linux can be a bit tricky.</p>

<h2 id="setting-it-up-on-linux">Setting It Up on Linux</h2>

<p>The first time you use <code class="language-plaintext highlighter-rouge">ncu</code>, you might get the following error:</p>

<blockquote>
  <p>The user does not have permission to access NVIDIA GPU Performance Counters on the target device 0. For instructions on enabling permissions and to get more information see https://developer.nvidia.com/ERR_NVGPUCTRPERM</p>
</blockquote>

<p>Don’t worry, this is a common setup issue and it’s easy to fix! It means you need to grant users permission to access the GPU’s performance counters.</p>

<p>What you need to do is to add a new line in the <code class="language-plaintext highlighter-rouge">/etc/modprobe.d/nvidia.conf</code> with the following content:</p>

<div class="language-bash highlighter-rouge"><div class="highlight"><pre class="highlight"><code>options nvidia <span class="nv">NVreg_RestrictProfilingToAdminUsers</span><span class="o">=</span>0
</code></pre></div></div>

<p>Then, you need to reboot the machine. Now you should be able to run the <code class="language-plaintext highlighter-rouge">ncu</code> command and profiler our CUDA programs.</p>

<h2 id="a-note-for-fedora-and-similar-systems">A Note for Fedora and Similar Systems</h2>

<p>Following the <a href="https://developer.nvidia.com/nvidia-development-tools-solutions-err_nvgpuctrperm-permission-issue-performance-counters">NVIDIA guidelines</a>,
in some Linux distributions like Fedora, you might need to rebuild the <code class="language-plaintext highlighter-rouge">initrd</code>.
If the reboot alone doesn’t do the trick, you’ll need to rebuild it.</p>

<div class="language-bash highlighter-rouge"><div class="highlight"><pre class="highlight"><code>dracut <span class="nt">--regenerate-all</span> <span class="nt">-f</span>
</code></pre></div></div>

<h3 id="links">Links:</h3>

<ul>
  <li>
    <p><a href="https://developer.nvidia.com/nvidia-development-tools-solutions-err_nvgpuctrperm-permission-issue-performance-counters">developer.nvidia</a></p>
  </li>
  <li>
    <p><a href="https://hychiang.info/blog/2024/nsight-compute-permission-error/">https://hychiang.info/blog/2024/nsight-compute-permission-error</a></p>
  </li>
</ul>]]></content><author><name>Juan Fumero, PhD</name><email>juan@jfumero.dev</email></author><category term="Fedora" /><category term="NVIDIA Nsight Compute CLI" /><category term="Linux" /><summary type="html"><![CDATA[How to enable NVIDIA Nsight Compute CLI in Fedora]]></summary></entry><entry><title type="html">How to disable auto-update in Fedora</title><link href="https://jfumero.dev/posts/2025/06/25/fedora-disable-autoupdate" rel="alternate" type="text/html" title="How to disable auto-update in Fedora" /><published>2025-06-25T00:00:00+01:00</published><updated>2025-06-25T00:00:00+01:00</updated><id>https://jfumero.dev/posts/2025/06/25/fedora-disable-autoupdate</id><content type="html" xml:base="https://jfumero.dev/posts/2025/06/25/fedora-disable-autoupdate"><![CDATA[<p>To disable the automatic updates at restart run the following command:</p>

<div class="language-bash highlighter-rouge"><div class="highlight"><pre class="highlight"><code>gsettings <span class="nb">set </span>org.gnome.software download-updates <span class="nb">false</span>
</code></pre></div></div>

<p>You can still update manually using <code class="language-plaintext highlighter-rouge">dnf</code>. This previous command disables the option.
This is important, especially if you have enabled/configured custom kernels, or third party modules (e.g., NVIDIA Drivers).</p>

<h4 id="disable-kernel-updates">Disable Kernel Updates</h4>

<p>If you have installed a custom kernel or installed a third party kernel module, you can disable updates for the kernel.</p>

<p>To do so, edit the file <code class="language-plaintext highlighter-rouge">/etc/dnf/dnf.conf</code> within the <code class="language-plaintext highlighter-rouge">[main]</code> section, and add the following line:</p>

<div class="language-bash highlighter-rouge"><div class="highlight"><pre class="highlight"><code><span class="nv">exclude</span><span class="o">=</span>kernel<span class="k">*</span>
</code></pre></div></div>]]></content><author><name>Juan Fumero, PhD</name><email>juan@jfumero.dev</email></author><category term="Fedora" /><category term="Linux" /><summary type="html"><![CDATA[Linux command to disable Fedora's automatic updates at restart]]></summary></entry><entry><title type="html">Configuring Unsloth on Linux for LLM Fine Tuning</title><link href="https://jfumero.dev/posts/2025/04/17/unsloth-linux-install" rel="alternate" type="text/html" title="Configuring Unsloth on Linux for LLM Fine Tuning" /><published>2025-04-17T00:00:00+01:00</published><updated>2025-04-17T00:00:00+01:00</updated><id>https://jfumero.dev/posts/2025/04/17/unsloth-linux-install</id><content type="html" xml:base="https://jfumero.dev/posts/2025/04/17/unsloth-linux-install"><![CDATA[<h2 id="what-is-unsloth">What is <code class="language-plaintext highlighter-rouge">unsloth</code>?</h2>

<p><a href="https://unsloth.ai/">Unsloth</a> is a Python framework focused on optimizing the fine-tuning of Large Language Models (LLMs) specifically for NVIDIA GPUs on both Linux and Windows. It leverages existing LLM frameworks for training and fine-tuning, such as the Hugging Face 🤗 Transformers library.</p>

<p>It’s important to understand that <code class="language-plaintext highlighter-rouge">unsloth</code> is not a complete fine-tuning framework itself. Instead, it acts as an optimization layer, providing low-level utilities for quantization and performance enhancements to accelerate the fine-tuning process.</p>

<p>Despite the comprehensive documentation available on the <a href="https://docs.unsloth.ai/get-started/beginner-start-here">Unsloth website</a>, the installation steps weren’t entirely straightforward for me. To help others facing the same, this guide details the configuration of Unsloth with an NVIDIA GPU on Fedora 41/42 and Ubuntu WSL systems.</p>

<h2 id="installing-unsloth-locally">Installing Unsloth Locally</h2>

<p>At the time of writing this post, <code class="language-plaintext highlighter-rouge">unsloth</code> requires <code class="language-plaintext highlighter-rouge">Python &gt;= 3.9</code> and <code class="language-plaintext highlighter-rouge">&lt;= 3.13</code>. Systems such as Fedora 41/42 and Ubuntu 24 come with a newer version of Python, so we need to set up an older version.</p>

<h3 id="installing-spack">Installing <code class="language-plaintext highlighter-rouge">spack</code></h3>

<p>Hopefully, this is an easy process with the help of <a href="https://spack.io/"><code class="language-plaintext highlighter-rouge">spack</code></a>, a manager software tool for Linux.</p>

<div class="language-bash highlighter-rouge"><div class="highlight"><pre class="highlight"><code>git clone <span class="nt">-c</span> feature.manyFiles<span class="o">=</span><span class="nb">true</span> <span class="nt">--depth</span><span class="o">=</span>2 https://github.com/spack/spack.git

<span class="nb">.</span> spack/share/spack/setup-env.sh
</code></pre></div></div>

<h3 id="installing-python-312x">Installing Python 3.12.X</h3>

<p>Then, we can install Python 3.12.7. Check all versions available with <code class="language-plaintext highlighter-rouge">spack</code>: <a href="https://packages.spack.io/package.html?name=python">https://packages.spack.io/package.html?name=python</a>.</p>

<div class="language-bash highlighter-rouge"><div class="highlight"><pre class="highlight"><code>spack <span class="nb">install </span>python@3.12.7
</code></pre></div></div>

<h3 id="configure-a-new-environment-for-python">Configure a new environment for Python</h3>

<div class="language-bash highlighter-rouge"><div class="highlight"><pre class="highlight"><code>spack load python@3.12.7

python <span class="nt">-m</span> venv ~/bin/venv/
</code></pre></div></div>

<h3 id="installing-pytorch">Installing PyTorch</h3>

<p>Next, we can install PyTorch. Note that, at the time of writing this post (April 2025), <code class="language-plaintext highlighter-rouge">unsloth</code> supports PyTorch 2.5.0 and 2.4.0.</p>

<div class="language-bash highlighter-rouge"><div class="highlight"><pre class="highlight"><code>pip <span class="nb">install </span><span class="nv">torch</span><span class="o">==</span>2.5.0 <span class="nv">torchvision</span><span class="o">==</span>0.20.0 <span class="nv">torchaudio</span><span class="o">==</span>2.5.0
</code></pre></div></div>

<h3 id="installing-unsloth">Installing <code class="language-plaintext highlighter-rouge">unsloth</code></h3>

<p>Finally, we can install <code class="language-plaintext highlighter-rouge">unsloth</code>:</p>

<div class="language-bash highlighter-rouge"><div class="highlight"><pre class="highlight"><code>pip3 <span class="nb">install</span> <span class="s2">"unsloth[cu124-torch250] @ git+https://github.com/unslothai/unsloth.git"</span>
</code></pre></div></div>

<p>We also need to install a few libraries to store llama-based models:</p>

<h3 id="some-extra-packages">Some extra packages</h3>

<p>We also need to install a few libraries to store llama-based models:</p>

<p>Fedora 41/42:</p>

<div class="language-bash highlighter-rouge"><div class="highlight"><pre class="highlight"><code><span class="nb">sudo </span>dnf <span class="nb">install </span>ccache curl-devel
</code></pre></div></div>

<p>Ubuntu 24 WSL:</p>

<div class="language-bash highlighter-rouge"><div class="highlight"><pre class="highlight"><code><span class="nb">sudo </span>apt-get <span class="nb">install </span>cmake ccache libcurl4-gnutls-dev 
</code></pre></div></div>

<h2 id="how-to-update-unsloth">How to update <code class="language-plaintext highlighter-rouge">unsloth</code>?</h2>

<div class="language-bash highlighter-rouge"><div class="highlight"><pre class="highlight"><code>pip <span class="nb">install</span> <span class="nt">--upgrade</span> unsloth unsloth_zo
</code></pre></div></div>

<p>Now we have all tools available to create new fine-tuned models in our machines.</p>

<h2 id="whats-next">What’s next?</h2>

<p>You can start develop your own Python programs to build new LLM fine-tuned models based on LLama, Mistral, etc. The <code class="language-plaintext highlighter-rouge">unsloth</code> documentation covers a wide range of use-cases:</p>

<p><a href="https://docs.unsloth.ai/get-started/all-our-models">https://docs.unsloth.ai/get-started/all-our-models</a></p>]]></content><author><name>Juan Fumero, PhD</name><email>juan@jfumero.dev</email></author><category term="unsloth" /><category term="LLM" /><category term="finetuning" /><summary type="html"><![CDATA[This guide details the configuration of Unsloth to build fine-tuned LLM models on NVIDIA GPUs on Linux systems.]]></summary></entry><entry><title type="html">Accelerating Java programs on RISC-V CPUs with Vector Instructions</title><link href="https://jfumero.dev/posts/2025/05/05/riscv-java-acceleration" rel="alternate" type="text/html" title="Accelerating Java programs on RISC-V CPUs with Vector Instructions" /><published>2025-04-04T00:00:00+01:00</published><updated>2025-04-04T00:00:00+01:00</updated><id>https://jfumero.dev/posts/2025/05/05/riscv-java-acceleration</id><content type="html" xml:base="https://jfumero.dev/posts/2025/05/05/riscv-java-acceleration"><![CDATA[<p>This article provides a high-level overview of the RISC-V instruction set architecture, illustrating its modular design through the examination of specific processor implementations. 
Besides, it discusses the current support for Java on RISC-V. 
Finally, this article explores the acceleration of Java data-parallel applications on RISC-V CPUs utilizing vector instructions. 
Specifically, I describe how frameworks like TornadoVM and the oneAPI Construction Kit enable significant performance gains compared to standard Java execution, 
showcasing the potential of RISC-V for data parallel workloads.</p>

<p>This post is based on a recent paper, <a href="https://pure.manchester.ac.uk/ws/portalfiles/portal/361946410/main.pdf"><em>Leveraging RISC-V Vectorization: Accelerating Java Programs with TornadoVM and OCK at the RISC-V EU Summit 2025</em></a>, 
and it is a collaboration between The University of Manchester and Codeplay Software Ltd. through the <a href="https://aero-project.eu/">AERO European Project</a>.</p>

<p>My goal with this article is to expand, in more detail, about the technique and the technologies involved to achieve hardware acceleration on these niche processors. 
Hopefully, by the end of this article, you will have a better understanding of the RISC-V ecosystem, the status of Java for RISC-V, 
and a possible approach to enable RISC-V CPUs as hardware accelerators for Java programs.</p>

<h2 id="high-level-overview-of-risc-v">High-Level Overview of RISC-V</h2>

<p>RISC-V is an open standard and royalty-free Instruction Set Architecture (ISA) based on the Reduced Instruction Set Computing (RISC) principles. 
It is designed to provide an open alternative to proprietary ISAs, enabling both academia and industry to innovate and craft custom processor designs without licensing fees.</p>

<p>In my view, a key strength of the RISC-V (apart from the open designs) is its modularity and extensibility. 
RISC-V is built upon modular designs, enabling CPU architects and developers to tailor processors to their specific needs. 
For instance, a RISC-V 32/64-bit integer base design can be extended with modules for multiply-divide operations, floating-point arithmetic, 
and vector processing, each meticulously defined within the RISC-V specification.</p>

<p>Furthermore, it allows CPU hardware implementers to pick and choose the modules they need. 
For instance, If a design doesn’t necessitate FP64 (double-precision floating-point) computations, the ‘D’ extension can be omitted, 
streamlining the hardware and reducing complexity.</p>

<p>To support the ongoing evolution and maintenance of the RISC-V specification and its ecosystem, RISC-V International (formerly the RISC-V Foundation) was established. 
This organization plays a crucial role in ensuring the standardization and growth of this architecture through various activities and working groups.</p>

<p>As follows, we will investigate how Java can be used with RISC-V processors, and how it can utilize parallel functional units (such as the vector units) 
to process data much faster with the help of TornadoVM and the oneAPI Construction Kit.</p>

<h2 id="what-options-are-available-for-risc-v-hardware-in-2025">What options are available for RISC-V hardware in 2025?</h2>

<p>RISC-V hardware presents exciting possibilities, but acquiring units was challenging in the past. 
When I began exploring RISC-V in 2018, hardware availability was extremely limited. Obtaining even a single board was difficult. 
At that time, Sifive was one of the key players, showcasing a prototype capable of running <a href="https://web.archive.org/web/20181005225710/https://www.sifive.com/chip-designer#fu540">Linux on a RISC-V64 SoC</a>.</p>

<p>Since then, many companies have emerged supporting and building on RISC-V. 
As of 2025, I see many Single Board Computers (SBCs) appearing in the market, 
such as the <a href="https://wiki.banana-pi.org/Banana_Pi_BPI-F3">Banana PI BPI-F3</a>, and <a href="https://sipeed.com/licheepi3a">Lichee PI 3A</a>. 
Those are the boards I am using for this blogspot. These two boards are available on Amazon and Aliexpress, 
and they cost around 150-200 euros each, depending on the internal capacity of the eMMC flash storage and RAM size.</p>

<p>These two SBCs have the same CPU processor, a Spacemit K1 processor that implements a RISCV64 GCVB - RVA22 Profile. Each letter represents an extension, or a group of extensions over the base RISC-V 64 CPU. Let’s break down these numbers mean:</p>

<ul>
  <li>G represents a group of several extensions: It contains:</li>
  <li>I: Integer base</li>
  <li>M: Integer multiplication and division</li>
  <li>A: Atomic instructions</li>
  <li>F: Single-precision floating point instructions</li>
  <li>D: Double-precision floating point instructions</li>
</ul>

<p>In addition, this RISC-V implements CVB:</p>

<ul>
  <li>C: Compressed instructions</li>
  <li>V: Vector instructions. These are the ones we are interested in for the acceleration part with TornadoVM and OCK. More on this later.</li>
  <li>B: Bit manipulation instructions</li>
</ul>

<p>As you can see, RISC-V’s modular design allows processors to be highly customized. 
A processor’s capabilities are determined by the specific extensions it includes. To simplify software development for these varying configurations, 
RISC-V defines standardized profiles. 
These profiles group common extensions together, providing a target platform for general-purpose processors and making it easier for developers to 
create compatible applications.For the Spacemit K1 processor, the profile implemented is RVA22:</p>

<p><a href="https://github.com/riscv/riscv-profiles/blob/main/src/profiles.adoc#rva22-profiles">https://github.com/riscv/riscv-profiles/blob/main/src/profiles.adoc#rva22-profiles</a></p>

<p>In this way, it will be easier for software developers to build and support applications running on these architectures.</p>

<h2 id="what-kind-of-operating-system-can-you-run">What kind of Operating System can you run?</h2>

<p>The Banana PI F3 and Lichee PI3 SBCs support <a href="https://bianbu.spacemit.com/en">Bianbu OS</a>, 
a customized Ubuntu-based distribution for RISC-V developed by Bit-Brick (https://www.bit-brick.com/about-us/). 
While Bianbu was my primary option, other distributions like Debian, ARMbian, and Fedora can also be used, 
though I haven’t tested them myself.</p>

<p>Installation instructions for Bianbu on the SBC can be found at:</p>

<p><a href="https://wiki.banana-pi.org/Banana_Pi_BPI-F3#System_Image">https://wiki.banana-pi.org/Banana_Pi_BPI-F3#System_Image</a></p>

<p>For better performance, I recommend installing the OS on the internal eMMC memory using the provided <a href="https://docs.banana-pi.org/en/BPI-F3/BananaPi_BPI-F3#_tools">Titan Tools</a>. 
This significantly improves speed compared to running the OS from an SD card. Here are the read throughput benchmarks for the internal SSD.</p>

<p>The difference in read throughput performance is shown in the following examples:</p>

<div class="language-bash highlighter-rouge"><div class="highlight"><pre class="highlight"><code><span class="c">## SD card</span>
<span class="nb">sudo </span>hdparm <span class="nt">-t</span> <span class="nt">--direct</span> /dev/mmcblk0
/dev/mmcblk0:
 Timing O_DIRECT disk reads: 240 MB <span class="k">in  </span>3.01 seconds <span class="o">=</span>  79.69 MB/sec
</code></pre></div></div>

<p>While the read speeds for the internal eMMC storage (where the OS is installed):</p>

<div class="language-bash highlighter-rouge"><div class="highlight"><pre class="highlight"><code><span class="c">## Internal SSD</span>
<span class="nv">$ </span><span class="nb">sudo </span>hdparm <span class="nt">-t</span> <span class="nt">--direct</span> /dev/mmcblk2    
/dev/mmcblk2:  
Timing O_DIRECT disk reads: 580 MB <span class="k">in  </span>3.00 seconds <span class="o">=</span> 193.31 MB/sec 
</code></pre></div></div>

<p>For even faster performance, I also recommend installing an SSD and working with your files in this space.</p>

<div class="language-bash highlighter-rouge"><div class="highlight"><pre class="highlight"><code><span class="nb">sudo </span>hdparm <span class="nt">-t</span> <span class="nt">--direct</span> /dev/nvme0n1    
/dev/nvme0n1:  
Timing O_DIRECT disk reads: 1898 MB <span class="k">in  </span>3.00 seconds <span class="o">=</span> 632.25 MB/sec
</code></pre></div></div>

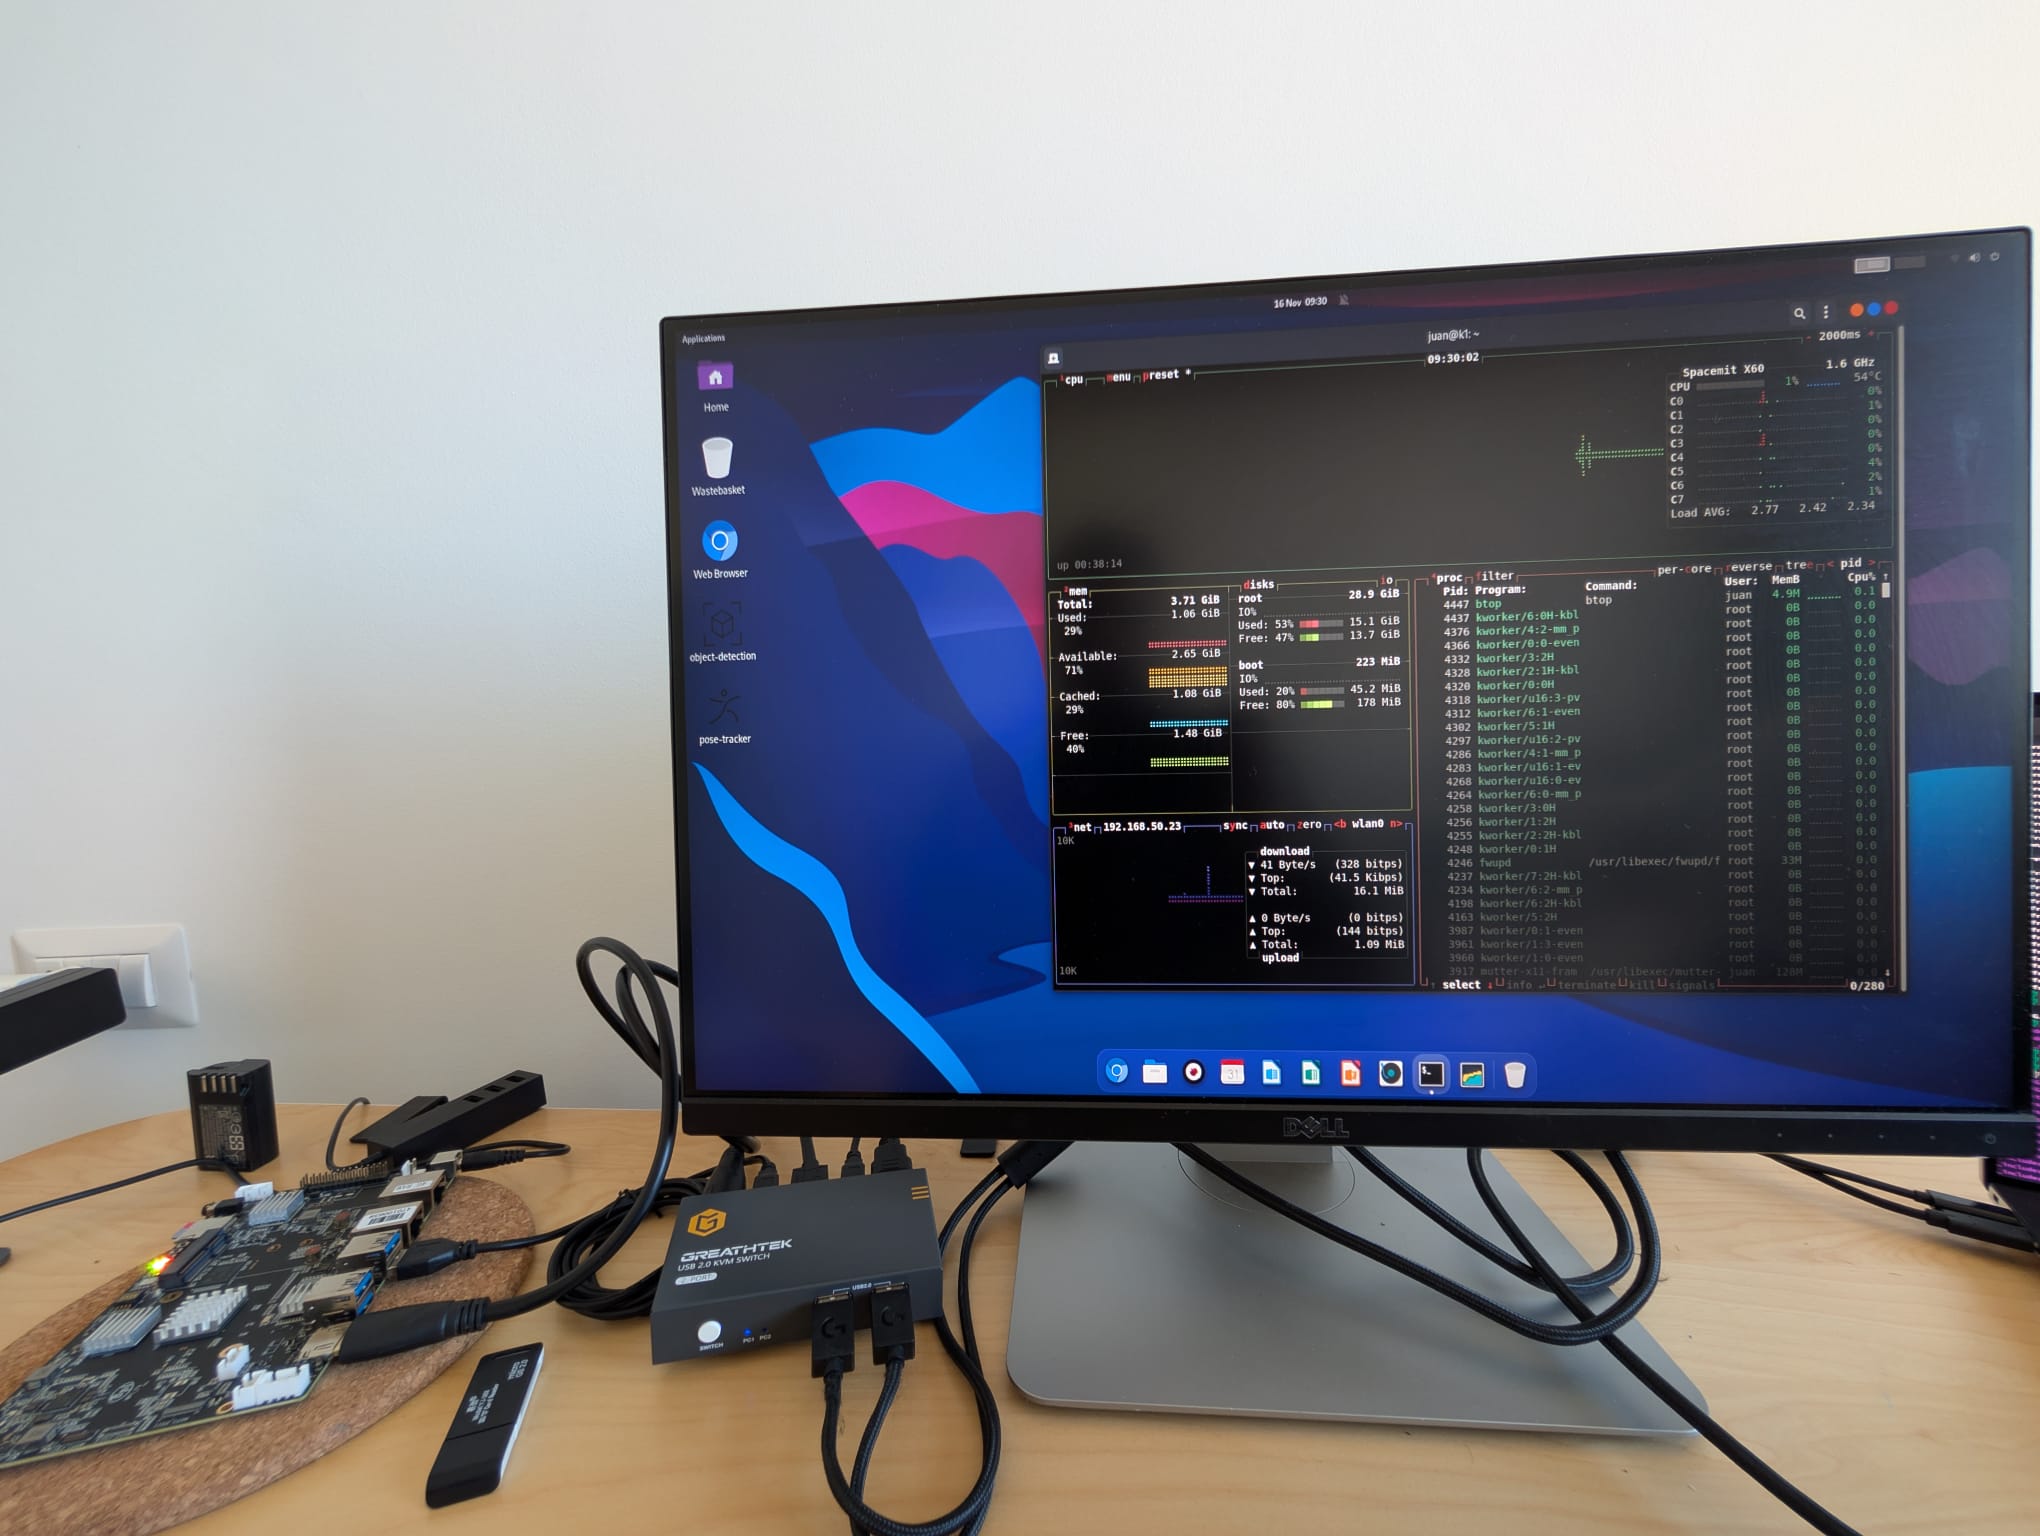
<p>The following image shows the Banana PI F3 running Bianbu OS 1.0.5. The Banana PI F3 is located on the left-hand side.</p>

<p><img src="https://raw.githubusercontent.com/jjfumero/jjfumero.github.io/refs/heads/master/files/blog/25-04-riscv/setup1.jpeg" alt="Alt text" /></p>

<p>Before discussing the entire software stack to run TornadoVM on these SBCs, let’s briefly discuss the processor and the features of each SBC.</p>

<p>As I mentioned, the CPU present in the BananaPI F3 and the Lichee PI 3 from SiPEED is the same, the Spacemit K1 processor, 
which contains 8 RISC-V cores able to run vector instructions compliant with the RVV 1.0. 
This is important, for me at least, since the software dependencies for TornadoVM to run on this hardware generate RISC-V RVV 1.0 instructions. 
There are other RISC-V boards on the market (e.g., the <a href="https://milkv.io/pioneer">Milk-V Pioneer</a>, but it implements RISC-V RVV 0.7 instead).</p>

<div class="language-bash highlighter-rouge"><div class="highlight"><pre class="highlight"><code><span class="nv">$ </span>lscpu 
Architecture:          riscv64
  Byte Order:          Little Endian
CPU<span class="o">(</span>s<span class="o">)</span>:                8
  On-line CPU<span class="o">(</span>s<span class="o">)</span> list: 0-7
Model name:            Spacemit<span class="o">(</span>R<span class="o">)</span> X60
  Thread<span class="o">(</span>s<span class="o">)</span> per core:  1
  Core<span class="o">(</span>s<span class="o">)</span> per socket:  8
  Socket<span class="o">(</span>s<span class="o">)</span>:           1
  CPU<span class="o">(</span>s<span class="o">)</span> scaling MHz:  100%
  CPU max MHz:         1600.0000
  CPU min MHz:         614.4000
Caches <span class="o">(</span><span class="nb">sum </span>of all<span class="o">)</span>:   
  L1d:                 256 KiB <span class="o">(</span>8 instances<span class="o">)</span>
  L1i:                 256 KiB <span class="o">(</span>8 instances<span class="o">)</span>
  L2:                  1 MiB <span class="o">(</span>2 instances<span class="o">)</span>
</code></pre></div></div>

<p>The Banana PI F3 that I got has 4GB of RAM, which, as we will see, can be very limiting when it comes to the installation of some of the software dependencies. 
At a later stage of the development for TornadoVM, my lab bought the Lichee PI 3 from SiPEED, which has the same processor but 16GB of RAM and 32GB of eMMC flash storage, 
which makes compilation of LLVM much easier.</p>

<p>So far, we have discussed general aspects of the RISC-V architectures, some real hardware and the OS. Now it is time to run Java.</p>

<h2 id="is-java-available-for-risc-v">Is Java available for RISC-V?</h2>

<p>Since TornadoVM accelerates Java programs, we need to run Java applications on RISC-V. 
But, is Java ready for this new CPU architecture?</p>

<p>The first port for RISC-V is <a href="https://openjdk.org/jeps/422">JEP 422</a> which supports RISC-V RV64GV (and by now, we know what these letters mean). 
This RISC-V port was originally provided by Huawei, and followed up by Alibaba, Rivos, ISCAS and Syntacore. 
It was merged for JDK 19, and it contains <a href="https://jcp.org/aboutJava/communityprocess/ec-public/materials/2024-04-24/JCP-State_of_OpenJDK_on_RISC-V.pdf">the port for the template interpreter, the C1 and C2 compilers, and all mainline GCs</a>.</p>

<p>Since TornadoVM currently uses JDK 21, <a href="https://devops.com/what-is-risc-v-and-why-has-it-become-important-for-java-2/">the RISC-V port is already included</a>, which is great news!</p>

<p>The one I am currently using is from <a href="https://bell-sw.com/pages/downloads/#jdk-21-lts">BellSoft</a>:</p>

<div class="language-bash highlighter-rouge"><div class="highlight"><pre class="highlight"><code><span class="nv">$ </span>java <span class="nt">--version</span>
openjdk 21.0.6 2025-01-21 LTS
OpenJDK Runtime Environment <span class="o">(</span>build 21.0.6+10-LTS<span class="o">)</span>
OpenJDK 64-Bit Server VM <span class="o">(</span>build 21.0.6+10-LTS, mixed mode<span class="o">)</span>
</code></pre></div></div>

<h2 id="so-can-we-run-tornadovm">So, can we run TornadoVM?</h2>

<p>TornadoVM depends on the implementation of low-level parallel programming models such as OpenCL, Level Zero or CUDA PTX. 
As far as I know, there are no Level Zero or CUDA PTX implementations for the RISC-V architecture. However, we can find some implementations for OpenCL.</p>

<p>The oneAPI Construction Kit (OCK for short), and it is defined as a framework to implement open standards for new hardware accelerators. 
OCK includes a runtime for CPUs to run OpenCL C programs as well as dispatch SPIR-V kernels. 
And this is exactly what TornadoVM needs in order to accelerate Java methods on new hardware.</p>

<p>But, not only that, OCK can also auto-vectorize OpenCL and SPIR-V programs to run on RISC-V with RVV 1.0 vector instructions, 
which can potentially increase performance of our data parallel Java methods. 
Let’s explore what vectorization means, and how it can be enabled before we start running some experiments on this platform.</p>

<h2 id="vectorization">Vectorization</h2>

<p><a href="https://ieeexplore.ieee.org/document/10812086">Vectorization</a> is a parallel computing technique that performs the same arithmetic operation on multiple data elements at a time. 
The number of elements processed in parallel depends on the processor’s vector unit capabilities, typically handling 2, 4, 8, 16, or more data items at once. 
This technique is widely used to accelerate multimedia and data-parallel applications, including LLMs these days!</p>

<p>For example, modern Intel CPUs implement <a href="https://www.intel.com/content/www/us/en/developer/articles/technical/intel-avx-512-instructions.html">AVX and AVX512</a> instructructions, 
which can compute up to 32 FP32 floats at a time.</p>

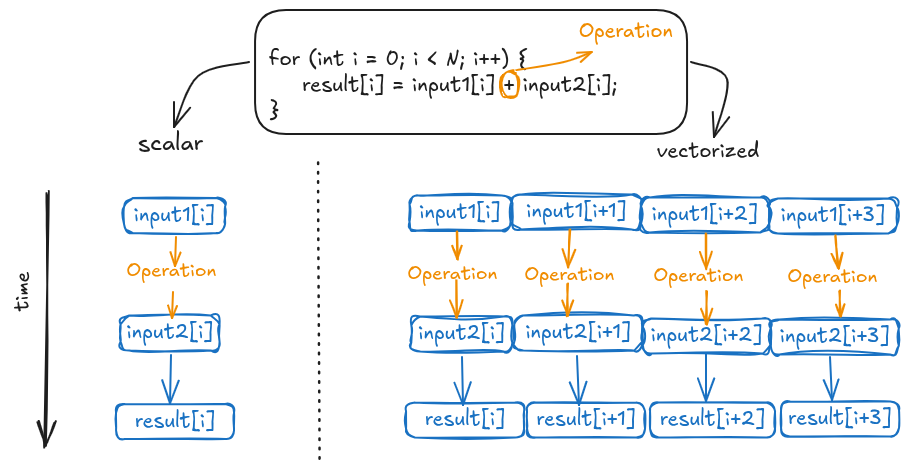
<p>The following Figure shows a high-level representation of vectorization. 
Consider a for loop performing vector addition. 
In a scalar execution, each iteration processes a single element from each array, performing the addition, and storing the result in the corresponding position.</p>

<p><img src="https://raw.githubusercontent.com/jjfumero/jjfumero.github.io/refs/heads/master/files/blog/25-04-riscv/vectorization.png" alt="Alt text" /></p>

<p>Unlike scalar operations, vectorization, as shown in the figure’s right-hand side, enables simultaneous processing of multiple data elements. 
The figure exemplifies this with a four-element operation. For illustrative purposes, we assume a single CPU clock cycle per operation, 
acknowledging that actual cycle counts depend on the operation and CPU architecture. 
However, this simplification effectively highlights the performance benefits of parallel computation. 
This speedup is achieved through replicated functional units in CPUs equipped with vector instructions.</p>

<p><strong>But how do you write vector code?</strong> There are few approaches: 
a) via libraries, what is called explicit vectorization; 
b) via constructs in a programming language or a parallel programming model (e.g., the <a href="https://cilkplus.github.io/">CilkPlus programming</a> model using the array notation); 
and c) auto-vectorization, in which compilers can generate vector code from a scalar code.</p>

<p>Each approach has its pros and cons. But the auto-vectorization approach is ideal and probably the hardest to achieve. 
Modern compilers, such as the Java C2 compiler, can auto-vectorize code for x64 and ARM64.
However, explicit use of vector units via the Java Vector API can yield to higher performance, as shown in <a href="https://dl.acm.org/doi/10.1145/3578360.3580265">this paper</a>.</p>

<p>But, what about auto-vectorization of OpenCL programs? How does it compare? The rest of the post I am going to explore this.</p>

<h2 id="workflow-for-auto-vectorization-in-tornadovm-with-ock">Workflow for auto-vectorization in TornadoVM with OCK</h2>

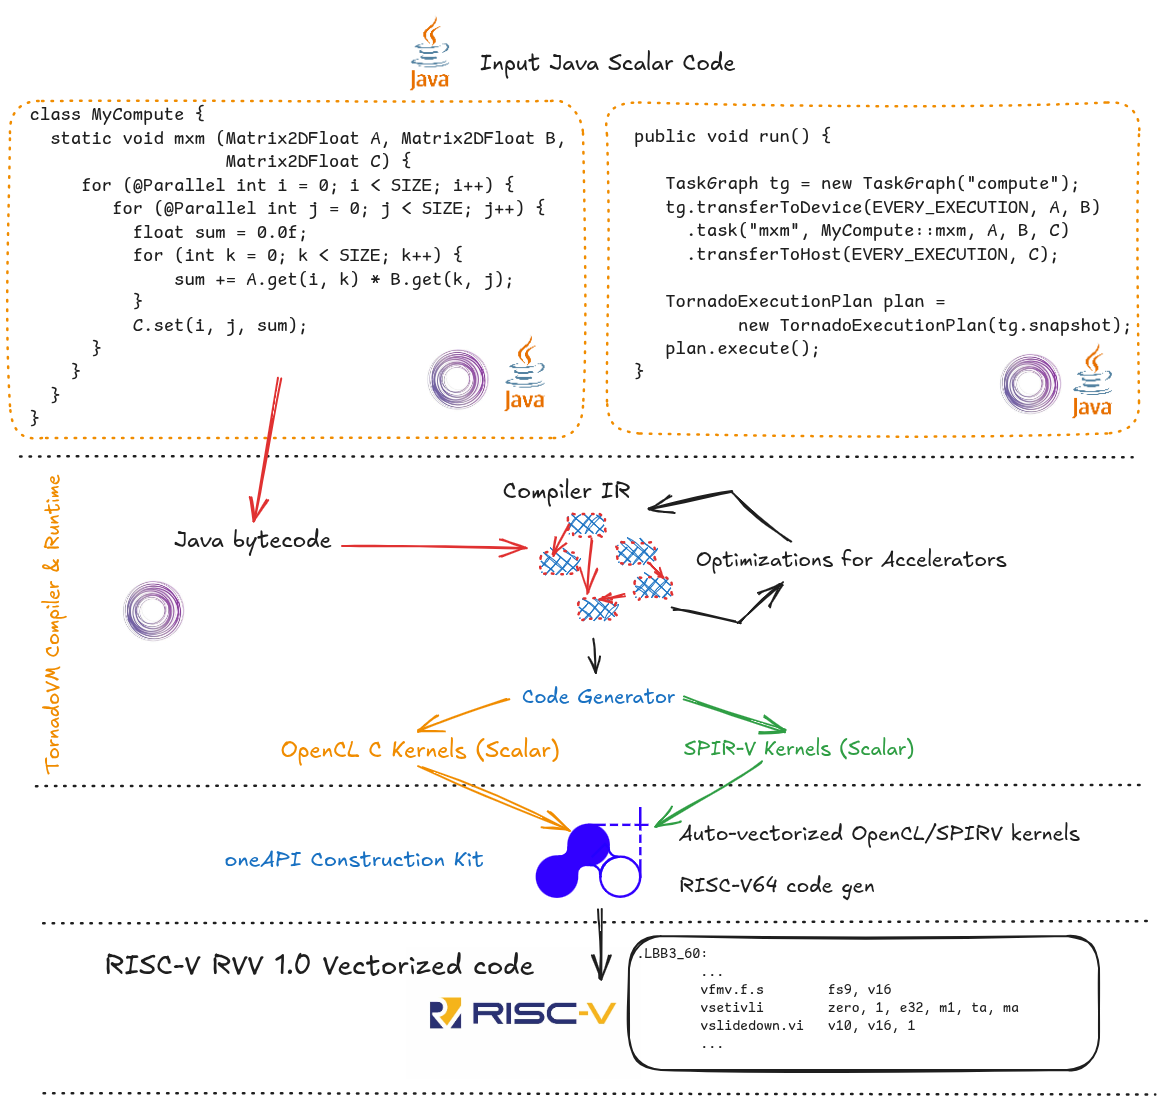
<p>TornadoVM compiles Java methods from the Java bytecode to OpenCL C, and SPIR-V binary. 
Then, the resulting optimized OpenCL/SPIR-V code is dispatched via the OpenCL runtime.</p>

<p>The compilation process is shown in the Figure below. The input application is written using the TornadoVM APIs and it contains three main parts:</p>

<ol>
  <li>Identify the parallel loops (using the @Parallel) annotation, as we can see in the left-hand side of the Figure. Note that the example represents a parallel version for the matrix multiplication, and it operates on scalar types.</li>
  <li>Task-Graph build: then we build a task graph, which contains the definition of the methods to offload, and the data involved (e.g., arrays and matrices we want to send to the accelerator).</li>
  <li>Finally, we create an execution plan from the task-graph, and execute it.</li>
</ol>

<p>This overview provides a high-level description of the TornadoVM programming model. For a more detailed exploration, including application development guidelines, please refer to one of my previous <a href="https://jjfumero.github.io/posts/2024/23/tornadovm-programming-model">posts</a>.</p>

<p>The primary objective of this article is to illustrate the compilation and execution process of TornadoVM on RISC-V, with a specific focus on auto-vectorization.</p>

<p><img src="https://raw.githubusercontent.com/jjfumero/jjfumero.github.io/refs/heads/master/files/blog/25-04-riscv/flow.png" alt="Alt text" /></p>

<p>At runtime, TornadoVM builds a graph (it is actually the Graal IR that represents all methods to offload), and optimizes the code. 
TornadoVM has a pipeline of many compiler optimizations that are interleaved with current Graal compiler optimizations. 
Some examples are loop interchange, <a href="https://www.youtube.com/watch?v=xj8Te517Wtc">data parallel loops transformations, intrinsics exploration, etc</a>.</p>

<p>Once the code has been optimized, TornadoVM generates the corresponding OpenCL C/SPIR-V codes. 
Note that the generated code is still scalar code. No auto-vectorization is applied, just yet.</p>

<p>After the code generation, TornadoVM builds the generated program via the OpenCL runtime using the <code class="language-plaintext highlighter-rouge">clBuildProgram</code>. 
In this step, the generated code is further compiled to the target selected platform. In this case, is the RISC-V 64 CPU platform using OCK.</p>

<p>OCK also contains a JIT compiler to optimize the OpenCL C/SPIR-V code for the RISC-V 64 CPU. 
In this step, the code is actually auto-vectorized. 
Thus, from the input Java scalar code, we have reached, hopefully, a vectorized code optimized for RISC-V 64. How cool is this?</p>

<p>Ok, enough talk. Let’s see this in action. 
The rest of the post I will explain how to compile LLVM, OCK and TornadoVM to run on RISC-V, and show some performance analysis of the traditional Matrix Multiplication application running on this CPU.</p>

<h2 id="building-llvm-and-ock-from-source">Building LLVM and OCK from source</h2>

<p>At the time of writing this post (April 2025), there are no prebuilts of OCK for RISC-V 64.Thus, we need to build OCK from source. 
The OCK source code is an open-source project under the <a href="https://uxlfoundation.org/">UXL Accelerated Foundation</a>, and it depends on LLVM 19, so we are going to build LLVM from source as well.</p>

<p>Configure the dependencies for LLVM and OCK:</p>

<div class="language-bash highlighter-rouge"><div class="highlight"><pre class="highlight"><code><span class="nb">sudo </span>apt <span class="nb">install </span>python3-virtualenv python3-psutil
<span class="nb">sudo </span>apt <span class="nb">install</span> <span class="nt">-y</span> build-essential git cmake libtinfo-dev python3
<span class="nb">sudo </span>apt-get <span class="nt">-y</span> <span class="nb">install </span>gcc-riscv64-linux-gnu
<span class="nb">sudo </span>apt-get <span class="nb">install </span>spirv-tools
</code></pre></div></div>

<p>Build LLVM:</p>

<div class="language-bash highlighter-rouge"><div class="highlight"><pre class="highlight"><code>git clone <span class="nt">--depth</span> 1 <span class="nt">--branch</span><span class="o">=</span>release/19.x git@github.com:llvm/llvm-project.git llvm 
git clone <span class="nt">--depth</span> 1 git@github.com:uxlfoundation/oneapi-construction-kit.git 
</code></pre></div></div>

<div class="language-bash highlighter-rouge"><div class="highlight"><pre class="highlight"><code>cmake llvm <span class="se">\</span>
<span class="nt">-Bbuild</span> <span class="nt">-GNinja</span> <span class="se">\</span>
<span class="nt">-DLLVM_ENABLE_DIA_SDK</span><span class="o">=</span>OFF <span class="se">\</span>
<span class="nt">-DCMAKE_INSTALL_PREFIX</span><span class="o">=</span>llvm_install <span class="se">\</span>
<span class="nt">-DLLVM_ENABLE_ZLIB</span><span class="o">=</span>FALSE <span class="se">\</span>
<span class="nt">-DLLVM_ENABLE_ZSTD</span><span class="o">=</span>FALSE <span class="se">\</span>
<span class="nt">-DLLVM_ENABLE_Z3_SOLVER</span><span class="o">=</span>FALSE <span class="se">\</span>
<span class="nt">-DLLVM_ENABLE_PROJECTS</span><span class="o">=</span><span class="s2">"clang;lld"</span> <span class="se">\</span>
<span class="nt">-DLLVM_TARGETS_TO_BUILD</span><span class="o">=</span><span class="s2">"RISCV"</span> <span class="se">\</span>
<span class="nt">-DCMAKE_BUILD_TYPE</span><span class="o">=</span>Release <span class="se">\</span>
<span class="nt">-DLLVM_ENABLE_ASSERTIONS</span><span class="o">=</span>ON <span class="se">\ </span><span class="nt">-DCMAKE_TOOLCHAIN_FILE</span><span class="o">=</span>/mnt/data/ock/oneapi-construction-kit/platform/riscv64-linux/riscv64-gcc-toolchain.cmake <span class="se">\</span>
<span class="nt">-DLLVM_HOST_TRIPLE</span><span class="o">=</span>riscv64-unknown-linux-gnu <span class="se">\</span>
<span class="nt">-DLLVM_BUILD_LLVM_DYLIB</span><span class="o">=</span>ON <span class="se">\</span>
<span class="nt">-DLLVM_LINK_LLVM_DYLIB</span><span class="o">=</span>ON
</code></pre></div></div>

<p>Note that the <code class="language-plaintext highlighter-rouge">-DCMAKE_TOOLCHAIN</code> needs to be pointed to the cmake file provided by OCK:</p>

<div class="language-bash highlighter-rouge"><div class="highlight"><pre class="highlight"><code><span class="nt">-DCMAKE_TOOLCHAIN_FILE</span><span class="o">=</span>/path/to/oneapi-construction-kit/platform/riscv64-linux/riscv64-gcc-toolchain.cmake 
</code></pre></div></div>

<p>Then:</p>

<div class="language-bash highlighter-rouge"><div class="highlight"><pre class="highlight"><code>ninja <span class="nt">-C</span> build <span class="nb">install</span>
</code></pre></div></div>

<h2 id="keep-an-eye-on-ram-swapping-and-thermals">Keep an eye on RAM, Swapping and Thermals</h2>

<p>If you compile LLVM on a board with only 4GB of RAM, you might end up swapping quickly. 
That was my case when I first built LLVM on the Banana PI F3 4GB. 
To avoid swapping, you can tell LLVM to build with 1 or 2 threads by adding these two flags in the configure:</p>

<div class="language-bash highlighter-rouge"><div class="highlight"><pre class="highlight"><code><span class="nt">-DLLVM_PARALLEL_LINK_JOBS</span><span class="o">=</span>1 <span class="nt">-DLLVM_PARALLEL_COMPILE_JOBS</span><span class="o">=</span>2
</code></pre></div></div>

<p>Then:</p>

<div class="language-bash highlighter-rouge"><div class="highlight"><pre class="highlight"><code><span class="nb">export </span><span class="nv">CMAKE_BUILD_PARALLEL_LEVEL</span><span class="o">=</span>1
cmake <span class="nt">--build</span> build <span class="nt">--target</span> <span class="nb">install</span>
</code></pre></div></div>

<p>Note that compilation may take some time. In fact, in my case, back and forth with some parameter tuning took ~4 days. So, be patient!</p>

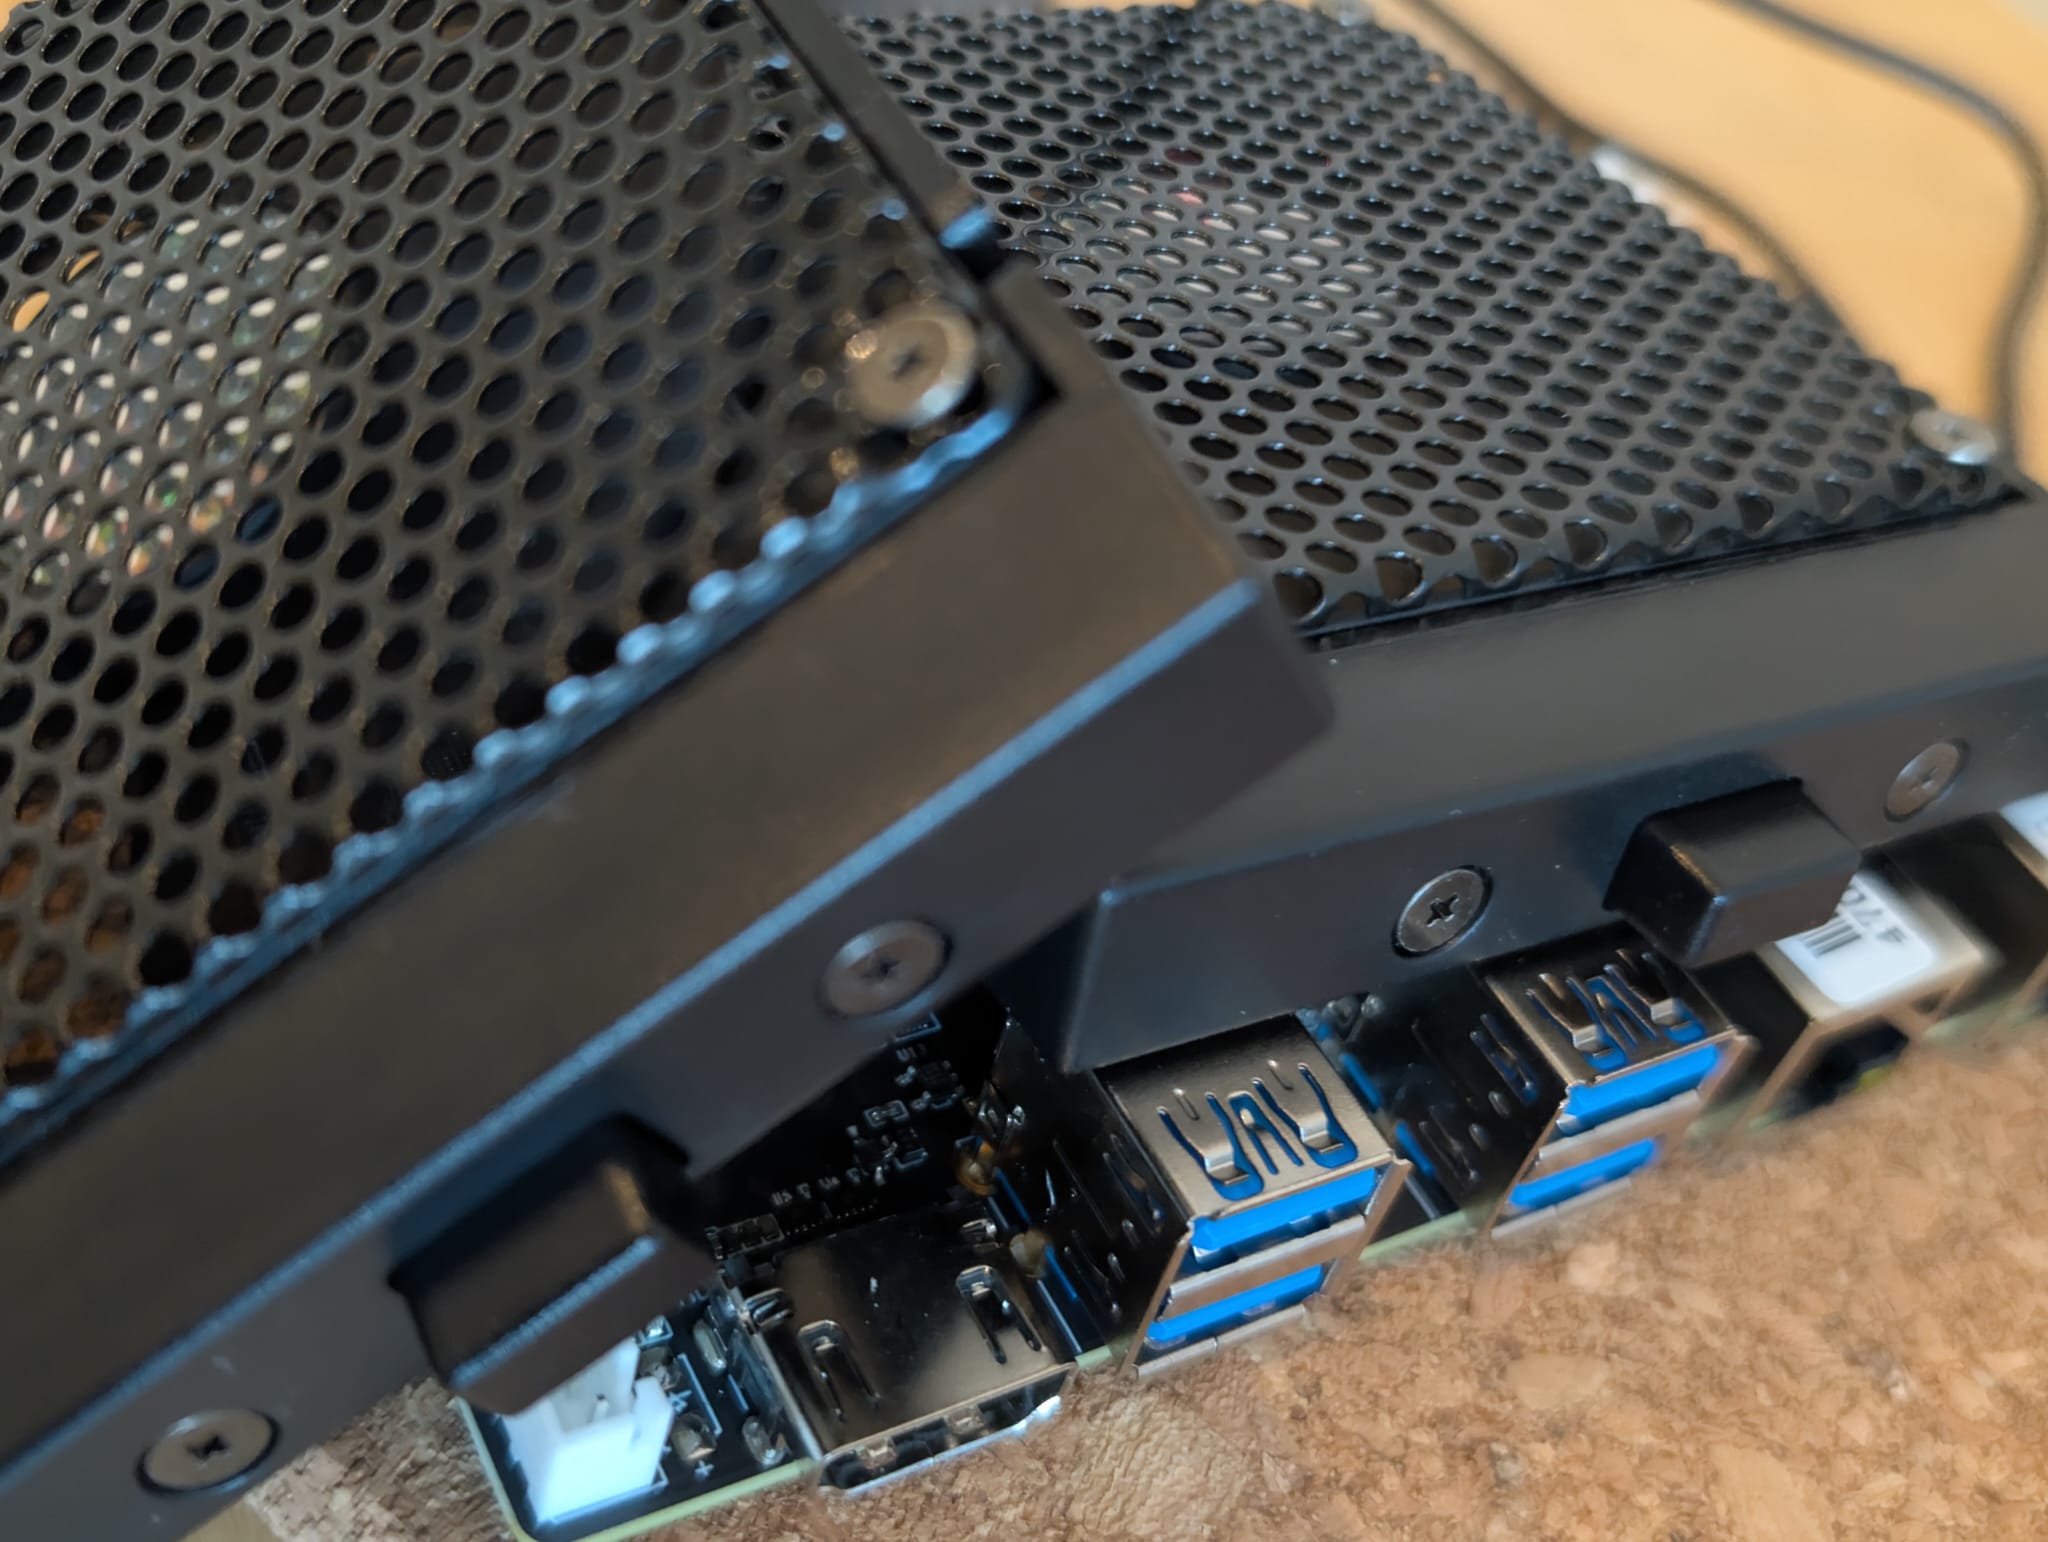
<p>Another thing to consider when compiling LLVM is temperature.
In my case, the Banana PI F3 did not come with active cooling. With the passive cooling and normal use, it is ok. 
However, compiling LLVM is another story, and I ended up using an old fan from a laptop just for the time it took to compile LLVM:</p>

<p><img src="https://raw.githubusercontent.com/jjfumero/jjfumero.github.io/refs/heads/master/files/blog/25-04-riscv/setup2.jpeg" alt="Alt text" /></p>

<h2 id="compiling-ock-for-risc-v">Compiling OCK for RISC-V</h2>

<div class="language-bash highlighter-rouge"><div class="highlight"><pre class="highlight"><code>cmake <span class="nt">-GNinja</span> <span class="nt">-Bbuild-riscv-hw-vector</span> <span class="se">\</span>
<span class="nt">-DCA_ENABLE_DEBUG_SUPPORT</span><span class="o">=</span>ON <span class="se">\</span>
<span class="nt">-DCA_LLVM_INSTALL_DIR</span><span class="o">=</span>/mnt/data/ock/llvm/llvm_install <span class="se">\</span>
<span class="nt">-DCA_ENABLE_HOST_IMAGE_SUPPORT</span><span class="o">=</span>OFF <span class="se">\</span>
<span class="nt">-DCA_ENABLE_API</span><span class="o">=</span>cl <span class="se">\</span>
<span class="nt">-DCA_CL_ENABLE_ICD_LOADER</span><span class="o">=</span>ON <span class="se">\</span>
<span class="nt">-DCMAKE_INSTALL_PREFIX</span><span class="o">=</span><span class="nv">$PWD</span>/build-riscv-hw-vector/install <span class="se">\</span>
<span class="nt">-DCA_HOST_TARGET_RISCV64_FEATURES</span><span class="o">=</span><span class="s2">"+v"</span> 

ninja <span class="nt">-C</span> build-riscv-hw-vector <span class="nb">install</span>
</code></pre></div></div>

<p>Alternatively, to build in a single thread:</p>

<div class="language-bash highlighter-rouge"><div class="highlight"><pre class="highlight"><code><span class="nb">export </span><span class="nv">CMAKE_BUILD_PARALLEL_LEVEL</span><span class="o">=</span>1
cmake <span class="nt">--build</span> build-riscv-hw-vector <span class="nt">--target</span> <span class="nb">install</span>
</code></pre></div></div>

<h2 id="final-configuration-for-opencl">Final Configuration for OpenCL</h2>

<div class="language-bash highlighter-rouge"><div class="highlight"><pre class="highlight"><code><span class="nv">$ </span><span class="nb">sudo </span>apt-get <span class="nb">install </span>clinfo 
<span class="nv">$ </span><span class="nb">cd</span> /usr/lib/riscv64-linux-gnu/
<span class="nv">$ </span><span class="nb">sudo ln</span> <span class="nt">-s</span> libOpenCL.so.1 libOpenCL.so
</code></pre></div></div>

<p>Additionally, create a new file under <code class="language-plaintext highlighter-rouge">/etc/OpenCL/vendors/</code> with the path to the <code class="language-plaintext highlighter-rouge">libCL.so</code> that OCK generates.</p>

<div class="language-bash highlighter-rouge"><div class="highlight"><pre class="highlight"><code><span class="nb">cat</span> /etc/OpenCL/vendors/ock.icd 
/mnt/data/ock/oneapi-construction-kit/build-riscv-hw-vector/install/lib/libCL.so
</code></pre></div></div>

<p>Now we can run OpenCL!</p>

<div class="language-bash highlighter-rouge"><div class="highlight"><pre class="highlight"><code><span class="nv">$ </span>clinfo                         
Number of platforms                               1
  Platform Name                                   ComputeAorta
  Platform Vendor                                 Codeplay Software Ltd.
  Platform Version                                OpenCL 3.0 ComputeAorta 4.0.0 Linux riscv64 <span class="o">(</span>Release, 08207aa8<span class="o">)</span>
  Platform Profile                                FULL_PROFILE
  Platform Extensions                             cl_codeplay_kernel_exec_info cl_codeplay_soft_math cl_khr_create_command_queue cl_khr_icd cl_codeplay_extra_build_options
  Platform Extensions with Version                cl_codeplay_kernel_exec_info                                       0x1000 <span class="o">(</span>0.1.0<span class="o">)</span>
                                                  cl_codeplay_soft_math                                              0x1000 <span class="o">(</span>0.1.0<span class="o">)</span>
                                                  cl_khr_create_command_queue                                      0x400000 <span class="o">(</span>1.0.0<span class="o">)</span>
                                                  cl_khr_icd                                                       0x400000 <span class="o">(</span>1.0.0<span class="o">)</span>
                                                  cl_codeplay_extra_build_options                                    0x6000 <span class="o">(</span>0.6.0<span class="o">)</span>
  Platform Numeric Version                        0xc00000 <span class="o">(</span>3.0.0<span class="o">)</span>
  Platform Extensions <span class="k">function </span>suffix             CODEPLAY
  Platform Host timer resolution                  0ns
</code></pre></div></div>

<p>Now we are ready to build TornadoVM for RISC-V.</p>

<h2 id="build-tornadovm-for-risc-v">Build TornadoVM for RISC-V</h2>

<p>Although TornadoVM is just a Java program, it contains some dependencies that are not fully ported to RISC-V. 
However, with a small patch, TornadoVM can be installed on RISC-V systems. 
TornadoVM provides an automatic script to download and patch the code for RISC-V.</p>

<p>First, create a new Python environment:</p>

<div class="language-bash highlighter-rouge"><div class="highlight"><pre class="highlight"><code><span class="nv">$ </span>python3 <span class="nt">-m</span> venv /mnt/data/python-env 
<span class="nv">$ </span><span class="nb">source</span> /mnt/data/python-env/bin/activate
<span class="nv">$ </span>pip3 <span class="nb">install </span>lit
</code></pre></div></div>

<p>Then, clone TornadoVM and build it with the patch for RISC-V (updated for TornadoVM <code class="language-plaintext highlighter-rouge">v1.1.1-dev</code>).</p>

<div class="language-bash highlighter-rouge"><div class="highlight"><pre class="highlight"><code><span class="c">## Clone TornadoVM Repo</span>
<span class="nv">$ </span>git clone https://github.com/beehive-lab/TornadoVM.git

<span class="c">## Clone TornadoVM patch repo: </span>
<span class="nv">$ </span>git clone https://github.com/beehive-lab/tornadovm-riscv-patch.git

<span class="c">## Build for OpenCL only</span>
<span class="nv">$ </span>bash tornadovm-riscv-patch/apply-riscv-patch-opencl.sh 

<span class="c">## Build for OpenCL and SPIR-V </span>
<span class="nv">$ </span>bash tornadovm-riscv-patch/apply-riscv-patch-spirv.sh 

<span class="nv">$ </span><span class="nb">source </span>setvars.sh 
</code></pre></div></div>

<div class="language-bash highlighter-rouge"><div class="highlight"><pre class="highlight"><code>tornado <span class="nt">--devices</span>

Number of Tornado drivers: 1
Driver: OpenCL1
  Total number of OpenCL devices  : 1
  Tornado <span class="nv">device</span><span class="o">=</span>0:0  <span class="o">(</span>DEFAULT<span class="o">)</span>
        OPENCL <span class="nt">--</span>  <span class="o">[</span>ComputeAorta] <span class="nt">--</span> ComputeAorta riscv64
                Global Memory Size: 3.9 GB
                Local Memory Size: 32.0 KB
                Workgroup Dimensions: 3
                Total Number of Block Threads: <span class="o">[</span>1024]
                Max WorkGroup Configuration: <span class="o">[</span>1024, 1024, 1024]
                Device OpenCL C version: OpenCL C 1.2 Clang 19.1.7
</code></pre></div></div>

<p><strong>Congratulations!</strong> TornadoVM running on RISC-V with OCK. Now, we can run a few experiments and check some performance.</p>

<h2 id="checking-vector-instructions-for-risc-v">Checking Vector Instructions for RISC-V</h2>

<p>We can generate the assembly that the OCK generates from the OpenCL C kernel that TornadoVM generates by enabling the following env variable:</p>

<div class="language-bash highlighter-rouge"><div class="highlight"><pre class="highlight"><code><span class="nb">export </span><span class="nv">CA_HOST_DUMP_ASM</span><span class="o">=</span>1
</code></pre></div></div>

<p>Then, we can run any example with TornadoVM, and we will see the generated RISC-V assembly code. For example:</p>

<div class="language-bash highlighter-rouge"><div class="highlight"><pre class="highlight"><code>tornado <span class="nt">-m</span> tornado.examples/uk.ac.manchester.tornado.examples.compute.MatrixMultiplication2D 256
</code></pre></div></div>

<p>The RISC-V generated code can be very large. But we can see that in some parts of the code vector instructions are used:</p>

<div class="language-bash highlighter-rouge"><div class="highlight"><pre class="highlight"><code>.LBB3_33:
        add     t5, a4, a5
        add     t5, t5, s4
        vsetvli zero, zero, e64, m8, ta, ma
        vadd.vx v24, v8, t5
        vsetvli zero, zero, e32, m4, ta, ma
        vnsrl.wi        v20, v24, 0
        vmslt.vx        v0, v20, s8
        vsetvli zero, zero, e16, m2, ta, ma
        vmv.x.s a1, v0
        slli    a1, a1, 48
        beqz    a1, .LBB3_32
        vsetvli zero, zero, e64, m8, ta, ma
        li      a1, 32
        vsll.vx v24, v24, a1
        vsra.vx v24, v24, a1
        j       .LBB3_36
.LBB3_35:
        vsetvli zero, zero, e64, m8, ta, ma
        vadd.vx v24, v24, s2
        vmslt.vx        v20, v24, s8
        vmand.mm        v0, v20, v0
        vsetvli zero, zero, e16, m2, ta, ma
        vmv.x.s a1, v0
        slli    a1, a1, 48
        add     t5, t5, s2
        beqz    a1, .LBB3_32
</code></pre></div></div>

<p>Let’s see how this can impact performance.</p>

<h2 id="preliminary-results-on-risc-v">Preliminary Results on RISC-V</h2>

<p>Let’s run an experiment and see the performance we get by enabling auto-vectorization with TornadoVM and OCK. 
We are going to run the Matrix Multiplication, a common algorithm widely used these days for AI and LLMs.</p>

<p>I run this Benchmark on the RISC-V Banana PI F3 with 4GB of RAM. The OS is Bianbu 1.0.5, TornadoVM 1.0.10 and OCK commit <code class="language-plaintext highlighter-rouge">65036b8</code>. 
LLVM 19.1.5 and GCC 13.2. The OpenJDK used is 21.0.5.</p>

<p>You can obtain the benchmark from the GitHub repository:</p>

<div class="language-bash highlighter-rouge"><div class="highlight"><pre class="highlight"><code><span class="nv">$ </span>git clone https://github.com/beehive-lab/tornadovm-benchmarks
<span class="nv">$ </span><span class="nb">cd </span>tornado-benchmarks
<span class="nv">$ </span>./build.sh
</code></pre></div></div>

<p>To run, you need to copy the <code class="language-plaintext highlighter-rouge">setvars.sh</code> from the TornadoVM installation:</p>

<div class="language-bash highlighter-rouge"><div class="highlight"><pre class="highlight"><code><span class="nb">cp</span> /path/to/tornadovm/setvars.sh <span class="nb">.</span> 
<span class="nb">source </span>setvars.sh
./run.sh mxm 
</code></pre></div></div>

<p>The following plot shows the run-time distribution for the 100 runs. 
Note that TornadoVM compiles the Java code in the first iteration, and then it runs directly with the compiled code.</p>

<p>The performance plot is read as follows. 
The x axis shows different data sizes for the matrix multiplication. 
Each size was evaluated with Java single threaded, Java with parallel streams, and then TornadoVM using the OpenCL backend and TornadoVM using the SPIR-V backend. The y-axis shows runtime in nanoseconds. 
Thus, the lower, the better.</p>

<p><img src="https://raw.githubusercontent.com/jjfumero/jjfumero.github.io/refs/heads/master/files/blog/25-04-riscv/results.png" alt="Alt text" /></p>

<p>For small matrices, the Java sequential version performs very well. 
The cost of multi-threading and runtime thread-scheduling are not worth it for small data sizes. 
There is no auto-vectorization for the Java code, as in April 2025. 
The Java streams version performs up to 8x in this 8-core machine.</p>

<p>However, for <strong>TornadoVM, performance is even higher, up to 32x faster than Java Sequential, and up to 4x faster than Java Streams</strong> for the same CPU. 
This is the effect of the auto-vectorizer and the multi-threaded execution. 
Another highlight is that, for large matrix sizes (e.g., 512 and 1024) even the first iteration (which includes optimization and compilation) runs faster than the parallel stream execution.</p>

<h2 id="conclusions">Conclusions</h2>

<p>This post has shown a general introduction to RISC-V, the modularity of RISC-V processors and a high-level overview of how ready is Java to run on RISC-V. 
Additionally, this post has shown how to increase performance of data parallel applications written in Java using TornadoVM and the oneAPI Construction Kit to exploit auto-vectorization in RISC-V processors.</p>

<p>The preliminary results from the Matrix Multiplication benchmark show a substantial speedup with TornadoVM compared to sequential Java and Java streams, highlighting the effectiveness of auto-vectorization and multi-threaded execution on RISC-V. 
While challenges exist, such as the need to build software from source and manage limited resources, the advancements in hardware availability and software support make RISC-V a very appealing platform for many developers, including Java developers.</p>

<h2 id="discussions">Discussions</h2>

<p>If you are interested, let’s keep the discussions active:</p>

<p><a href="https://github.com/jjfumero/jjfumero.github.io/discussions/15">https://github.com/jjfumero/jjfumero.github.io/discussions/15</a></p>

<h2 id="appendix">Appendix</h2>

<p>When using LLVM 19.1.7, I noticed an error in a duplicated definition. The error is as follows:</p>

<div class="language-bash highlighter-rouge"><div class="highlight"><pre class="highlight"><code>/mnt/data/ock/oneapi-construction-kit/modules/compiler/builtins/source/builtins.cl:10675:27: error: conflicting types <span class="k">for</span> <span class="s1">'printf'</span>
 10675 | int __attribute__<span class="o">((</span>weak<span class="o">))</span> <span class="nb">printf</span><span class="o">(</span>const constant char <span class="k">*</span>const restrict <span class="nb">fmt</span>, ...<span class="o">)</span><span class="p">;</span>
       |                           ^
/mnt/data/ock/oneapi-construction-kit/modules/compiler/builtins/include/builtins/builtins.h:16367:27: note: previous declaration is here
 16367 | int __attribute__<span class="o">((</span>weak<span class="o">))</span> <span class="nb">printf</span><span class="o">(</span>const constant char<span class="k">*</span> const restrict <span class="nb">fmt</span>, ...<span class="o">)</span><span class="p">;</span>
       |                           ^
1 error generated.
<span class="o">[</span>6/4830] Building CXX object modules/compiler/compiler_pipeline/CMakeFiles/compiler-pipeline.dir/source/define_mux_dma_pass.cpp.o^C
</code></pre></div></div>

<p>By removing one of these definitions, you can build OCK:</p>

<div class="language-diff highlighter-rouge"><div class="highlight"><pre class="highlight"><code><span class="gh">diff --git a/modules/compiler/builtins/source/builtins.cl b/modules/compiler/builtins/source/builtins.cl
index 1c96f2d1..2ef30343 100644
</span><span class="gd">--- a/modules/compiler/builtins/source/builtins.cl
</span><span class="gi">+++ b/modules/compiler/builtins/source/builtins.cl
</span><span class="p">@@ -10672,7 +10672,7 @@</span> void __CL_BUILTIN_ATTRIBUTES prefetch(const global double16 *pointer,
 
 /*-=-=-=-=-=-=-=-=-=-=-=-=-=-=-=-=-=-=-=-=-=-=-*/
 
<span class="gd">-int __attribute__((weak)) printf(const constant char *const restrict fmt, ...);
</span><span class="gi">+//int __attribute__((weak)) printf(const constant char *const restrict fmt, ...);
</span> 
 /*-=-=-=-=-=-=-=-=-=-=-=-=-=-=-=-=-=-=-=-=-=-=-*/
</code></pre></div></div>

<p>Compile again:</p>

<div class="language-bash highlighter-rouge"><div class="highlight"><pre class="highlight"><code>ninja <span class="nt">-C</span> build <span class="nb">install</span>
</code></pre></div></div>]]></content><author><name>Juan Fumero, PhD</name><email>juan@jfumero.dev</email></author><category term="RISCV" /><category term="Java" /><category term="OCK" /><category term="TornadoVM" /><category term="Vectorization" /><category term="Performance" /><summary type="html"><![CDATA[Learn how to accelerate performance on RISC-V CPUs using TornadoVM & vector instructions]]></summary></entry></feed>