Showing posts with label pattern. Show all posts

Sunday, September 24, 2023

Transparendo Sewalong - Week Three

 Image


Hi everyone and thanks for joining us today. Here we are again to share with you the third week of our sewalong. Over the next 15 weeks, Verena from einfach bunt Quilts are here to support our quilting community with tips and tricks and well as soon good old fashioned quilting fun with our Transparendo Sewalong (#transaprendosal). Are you looking forward to it? We are too! 

 This week's hashtag is #transparendosalw3 for Week Three. 

 Please sign up for our newsletters to keep on top of the sewalong.
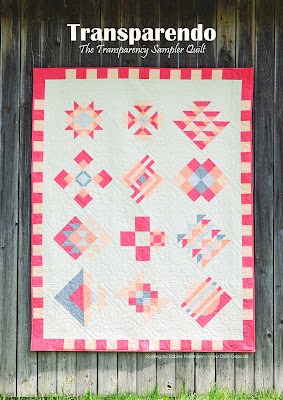
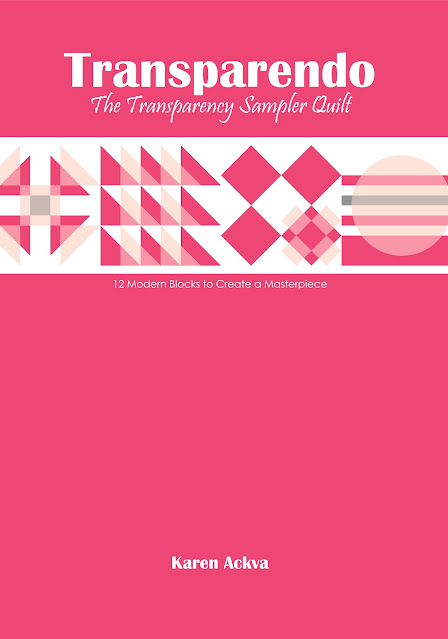
Image

The Pattern Book

Today is our third week of the sewalong. If you don't have the pattern, you can order from my Etsy webshop - Transparendo The Transparency Sampler Quilt from Karen Ackva - Etsy.de. If you live in Germany, you can also pick up some great coordinated fabrics packs especially curated by Verena for the sewalong - einfach bunt Quilts. We highly encourage you to get the book! There a lot of helpful ideas listed including coloring pages to color your own design.

Image

Digital Alternative

If you don't want to purchase the softcover version of the book, you can pick up the digital version split into 15 sections. After purchasing the sewalong subscription pattern, look forward to receiving one section (15 sections in total) each week for the duration of the sewalong. It is a fun way to know exactly what to be working on for the next seven days. Receive a new assignment each week!


Image


Sewalong Schedule

What is in store for you over the next fifteen weeks? Take a look at our line up. Each week there is a fun, new assignment to complete. The blocks accelerate in skill level with each new block and build upon previous blocks. Learn all types of new skills such as flying geese, nesting and twisting seams, and cutting extra-large pieces of fabric for squares and triangles.

Image


Post your progress on Instagram with the hashtags: #transparendosal and the week -  #transparendosalw1 (week one, etc.) for your chance to be entered into a drawing. If you don't have instagram, you can send me a photo with your fabric selection at 72 dpi with a resolution of 800 pixels or less. The following Sunday, one lucky recipient will be chosen at random. Our sewalong is open internationally, so get out those sewing machines ladies (and gents)!

Weekly Prizes

In Week Three, we have a set of Taylor Seville Magic Pins, 1 x Fork Pins and 1 x Extra-ong Pins sponsored by Steidl & Becker (Wholesale Distributor) 
 
 
Image

and one crib-sized, cotton batting sponsored by Quilter's Dream Batting. You pick which one you want from the ones shown below!

Image


Last week we would talked about auditioning your fabric selections for contrast and interest. The original pattern uses a two-colorway selection of pinks and grays in a range of light, medium and dark as shown below. I chose to use a color value range of petrol, turquoise, pink, yellow and a low volume white. The background color I chose as a tone-on-tone gray.  Read more about the use of color and color value in the Transparendo book.  


Image

I really wanted to see how these two fabric selections would work together, so I mocked up the colors with EQ8 - the quilt designing and planning software from the Electric Quilt Company.

Image

EQ8 Lesson

Before we get started, I was asked if the EQ8 file could be sent to those who have purchased the Trasparendo book. My challenge to you, is to open your EQ8 program (if you have one) and design the blocks yourself to exercise your own skills. If you don't have the program, use technical drawing paper.
 
Most of the blocks in this series are rather simple using a nine patch grid. Design and add each of the blocks week for week. 

Let's design Block Two - Hovering Hawks together in EQ8.

Open your EQ8 program. Start a new file. Name it Transparendo Lessons. 

1. Click on the Block Worktable.
2. Click on NEW BLOCK.
3. Click on EASY DRAW.
 
Image

Now we want to create the 16-patch block or a 4 x 4 grid.

4. Click on GRID.
5. Enter COLUMNS as 4 and ROWS as 4.
6. Left-Mouse-Click, hold and drag the cursor from the upper left corner of the block on the block worktable.
 
Image
 
Drag and hold all the way down to the bottom right corner. Release the left mouse button to get the 4 x 4 grid. You can color this block for Block One - Love Birds in your color scheme. Add the color scheme to the + PROJECT SKETCHBOOK.

Image
 
Let's make the Hovering Hawks block.

7. Make sure only the SNAPPING OPTIONS is turned on to SNAP GRIDS TO POINTS ON WORKTABLE only. The other two options should be click off and not on.
8. Click on the PENCIL (LINE) to draw.
9. Hover your starting point, left-mouse-click the point, drag to the bottom right corner, release.

Image

If you are wondering why there is already a block in there, I imported it to trace the image. You won't actually see that image on the worktable. It is easier for me to trace the block than reference from the book. 
 
After all lines for the block are drawn, COLOR your block.
 
10. Click on the COLOR tab.
11. Click on the PAINTBRUSH tool. This tool allows you to paint one patch at a time.
12. Click on the COLOR or FABRIC you wish to use.
13. Click on the patch on the drawn block. Tip: If you make a mistake, click ALT + y (German keyboard: STRG + z) to undo.

Image

Add the block to the Project Sketchbook.
 
14. Click on the + PROJECT SKETCHBOOK.

 
Image

The first two blocks from the Transparendo Sewalong are now in your sketchbook. You can add to the quilt layout in the program or draw them by hand using technical drawing or gridded sketch paper.
 
 
If you don't have either one of those, you can use the included coloring sheet provided in the book. Add your own fabric swatches to the right side of the page to keep your project organized. 

Remember, you should have adequate amounts of contrast in color value to achieve the block transparency effects. This is achieved through the light, medium and dark fabrics as well as a contrast in color. Read all about that in the Transparency book

Week 3 - Hovering Hawks

This block can get a little tricky due to the half-square-triangles. I prefer to make the HSTs larger and cut them down to-size afterwards. It makes for a better patch. The pressing directions are listed in the pattern. I recommend always pressing the HSTs open and then working from there. The rows can be pressed in any direction that best accentuates the points.

Image


Here is the breakdown of the fabric placement using those five fabrics plus one background fabric.
 
 
Image


Do you see the transparency in this block? I created a quick animated illustration of different color schemes to enhance the design. Do you recognize your block with your color scheme?

Image

Hovering Hawks - Block Two in Transparendo Sewalong - #transparendosalw3


The fun thing about this block, is that when you turn it on it's side a new design is created, the hawks start to jump out even more to represent a typical Aztec design. 
 

This Week's Tip

Don't iron or even press your fabric with every new sewn seam. Press with your finger or fingernail. This sames time and energy! Some quilters use a super cool tool for pressing such as a clapper or a wooden flat stick. Use what works best for you. 

After the block is completely sewn together, then it is time to carefully set the seams. Too much ironing will stretch your fabric and distort it.

Sponsors

We've been working really hard behind the scenes to bring some amazing prizes to our participants. We are so happy to announce our fabulous sponsors!

Gold Sponsors:


Image

Image
Image


Platinum Sponsor


The wonderful folks at the Electric Quilt Company are sponsoring our Finale Prize of one full version of EQ8 at the end of the sewalong Week 15. To enter your finished quilt top with all blocks and borders, photograph and forward to me or post on Instagram. If you would like to purchase the program, we have a PROMOTIONAL CODE to receive 25% off the software. Enter EASYPATCHWORK25 at checkout. If you live outside of the US, you will be sent a physical item in the mail. After you receive the package, you will be informed how to download and install the software on your system. Please follow the Electric Quilt Company on Instagram and subscribe to their newsletter for other great deals. 


Image


The winner of this week's drawing is Martina! You will be contacted shortly about how to collect your prize. Thank to all for participating. We look forward to seeing your beautiful blocks next week as well.

Please participate in next week's drawing. Take a photo and post for all of us to see on Instagram or send to me [email protected] with a resolution of 72 dpi no larger than 800 pixels. One lucky participant will be chosen at random. The giveaway is open internationally. Void where prohibited. Open to quilters 18 years of age and older. Good luck to all. Thanks for joining us!

Preview

Next week we will be working on Block Four - Jewelry Box.

Image


Please leave a comment below about anything you would like to share with us. We would love to hear your thoughts. Take care of yourself and keep on sewing happy. We look forward to seeing you next week!

Monday, July 10, 2023

TRANSPARENDO - The Transparency Sampler Quilt

Hi everyone! I am so excited to share with you something I have been working on for the past FIVE MONTHS! I would like to introduce you to Transparendo - The Transparency Sampler Quilt, 12 Modern Blocks to Create a Masterpiece. This is my first official book with IBSNs. I can't believe it. I finally wrote a book and published it myself. I learned so much in the process too such as creating my own publishing company, being receptive to feedback, learning how to design cover artwork, and marketing my book. Are you curious? 

Would you like to see the book cover?

Here it is! I really had a lot of fun designing the book cover too. At first, I wanted to put photos of the up-close beautiful quilting, but decided this looked like a more professional book cover. Are you interested and want to see more? Read on.

Image
ISBN 978-3-98255760-1
Image

As you might notice, the book is all about transparency. Each block is carefully illustrated with step-by-step instructions walking you through the process of creating transparency. You only need five fabrics plus a background fabric to create all of the stunning blocks in the pattern book. 

How many pages does the book have?

The book has 78 pages and is professionally printed all in color.

What is included?

Cutting charts for each block, quick cutting chart for setting blocks and borders, coloring sheets for blocks and quilt, colorway ideas for your own quilt, three beautiful colorways with fabric requirements for each, beautiful photography and illustrations, three additional bonus blocks, pressing directions, and helpful tips and tricks are included.

What does the sampler look like?

Glad you asked that question. Here it is! This is the sampler featured in the book using the Sunrise colorway with Kona Cotton Solids. All of the fabric names are listed in the book.

Image


Where can you get a copy of the book?

The book is available in my Etsy shop. Click here or on one of the images above to go there. I would be delighted to personally dedicate your book. Just leave your first name when ordering when asked for a dedication.

The book is also available in Germany at einfach bunt Quilts at Verena's online quilt shop. If you live outside of Germany, we are working on digital and print-on-demand editions that will be available in the fall 2023.

If you are a bookstore or patchwork store, feel free to buy wholesale books directly from the publisher. Write to [email protected].

What does the book cost?

The book cost 34,95€ and is protected under the "Buchpreisbindunggesetz." That means, no one is allowed to sell the book in Germany cheaper than the stated price, not even me. This is to protect smaller book and patchwork stores from being undersold by other bookstores. All stores are treated equal.

That is just way too much to pay! I'll sit this one out.

I get you. I really do. A lot of time and effort went into writing this book and that is a lot of money! More than five months went into writing the book. It is professionally printed. It was tested twice by me. The book was published by me which means, I am carrying the entire cost of printing and distributing the book. Let's hope it is a pure success story. 

Additionally, six really amazing talented and professional quilters helped testing and proofing each of the blocks as well as the entire quilt. So, each block has been ceritified including perfect pressing instructions. It really is a true joy to read, look at, and to sew. The instructions are easy and the blocks are fun!

What's in it for you?

And, we have a couple of "treats" lined-up. We, Verena from einfach bunt Quilts, and I will be running a sewalong in the fall. That means, it is probably better to get your book now and start mapping out fabrics and blocks you would like to sew. Check out her online webshop for fabrics listed in the pattern!

Image

Image


How about a sewing day in Germany?

We've got you covered here as well. We have a sewing day planned on October 21, 2023 in Kloster-Roggenburg in Southern Germany! If you are interested, please contact Verena or me ([email protected]) with a short email reserving your seat.

We currently have 18 seats available for one fun-filled day starting at 10am until 6pm. 

What awaits you on the sewing day?

Look forward to an awesome day of casual sewing, a full buffet-style lunch, afternoon coffee and cake and unlimted non-alcoholic refreshments. This will be an informal sewing day. If you want help with Transparendo, we will provide our expertise, tips and tricks but will not have an actual course on how to sew each block. It is more important that we are there to help you personally with any questions you may have about quilting and patchwork. The price for all of the fun will be 75€ per individual. An optional shared dinner after the event in the Kloster-Biergarten is not included. 

Image


Seats will fill up soon, so book today. Look forward to seeing you there. 

Thanks for dropping by.

Sunday, November 14, 2021

Generations - Clara

Hi there and thanks for joining us today. I would like to present the newest figure in the Generations Paper Dolls series featuring 6" x 12" historical foundation paper pieced figures spanning centuries of inspirational female heritage. 

Clara is the newest figure in our series. She is one of my favorite figures with her wrapped and belted shawl. Her delicate hands are folded in front waiting as if she is reflecting on life and its tiny little challenges. She wears a full sized bonnet. This figure resemebles a 18th century figure, don't you agree?

Image

Includes Two Versions of FPP

All of the figures in this series are at an intermediate sewing level (beginner, intermediate, advanced). The hardest part of this figure is the shawl collar and the shawl front. Other than that, the figure is rather easy. There is an additional, simpler foundation pattern included for the shawl. It allows an offset of matching seams. I found the above version a little tricky and wanted you to have an option for an easier, forgiving version.

Image

You could also imagine she is a pilgrim helping out with a large village Thanksgiving celebration. She and grace would make lovely friends for a festive fall wallhanging or table runner. The two together would make up a 12" block.

Image

18" Pillow Idea

If you would like to sew the figures in this series, you can find the patterns on Etsy. Here is a design idea for a pillow. Simply add borders to the outside to get the size pillow you desire. This one measures about 18" when finished. It has two additional borders - the first at 1" finished and the second at 2" finished. Don't forget to add additional measurements for seam allowance. The fabrics used in the illustration below come from the Tilda Collection.


Image

Thanks for dropping by. Another Generations Paper Doll will be introduced on December 15, 2021. Please check back for more information and bi-weekly blog posts.

Friday, January 31, 2020

welcome 2020

Hi everyone! Thank you for joining us today. I would like to welcome everyone into the new year 2020! May you all be safe, happy, healthy and prosper in your endeavours in the new year and the new decade.

We rounded off 2019 with a second sew along - The Enchanted Paper Doll Fall Sew Along. I hope you were able to follow along and soak in the beautiful angels, fairies and princesses made by all of the participants in our sew along on Instagram. A great big, wonderful thank you to all who did. I enjoy seeing your creations. Please keep sending them to me.

The winners were:
Dagmar @mamamoose for her radiating Eva for the cutest ever and Jenny @jennymakesstuff for her best use of mix and match templates. Anna @annakroche won honorable mention for her beautiful creations. Thank you so, sew much ladies for participating!

I worked on another fairy quilt block shortly before the holiday. I wanted to show my appreciation to all who participated in the sew along. Each received the free block pattern below. The pattern is now available on Etsy for purchase if you wish to make this fun 16" block for a pillow, quilt or other small design.

https://www.etsy.com/listing/752200512/16-fairy-of-good-fortune-foundation

Here are the quick stats:

Block Size: 16" Finished
Method of Piecing: Foundation Paper Piecing
Skill Level: Experienced
Pattern Document: PDF Instant Digital Download
Page Size: DIN A4
Number of Pages: 8 Instructions, 8 Templates
Templates: Full Size, 100%, No Scaling
Mix and Match Options: One figure with two outfits
Hashtags: #eppaperdollsmarissa, #enchantedpaperdolls

https://www.etsy.com/listing/752200512/16-fairy-of-good-fortune-foundation

Your personal fairy of good fortune is here to help you celebrate the new year. Pattern contains templates for one 16" fairy, Marissa. Designed as a stand alone quilt block with segments that can be mixed and matched. 16-pages of instructions including 8 pages of foundation (FPP) templates to print at home for one 16" x 16" FPP quilt block. Use your favorite foundation piecing method. Instructions for foundation piecing method is not included. Instructions for segment construction, pressing directions, inserting the y-seam and coloring sketches are included. Skill level: Experienced

Copyright © 2020 Karen Ackva | All designs, sketches and templates are protected under copyright laws and may NOT be photocopied, duplicated, digitalized or reproduced in any form other than by the original purchaser for personal, private use. May NOT be used as teaching material nor used in sellable items. Please respect the laws to allow small businesses to survive and thrive.


You can make an oversized pillow for the angel in your life.This design uses the Sunkissed Cross blocks (found in the hardcopy only pattern) in the corners. Can you still recognize them with the change up in fabrics? The finished size of the pillow is ~ 22" x 22". Fabrics from Mystical Land by Maureen Cracknell for Art Gallery Fabrics.

Image

When I originally designed the 16", Marissa fairy, I thought about how you could integrate her into an arrangement with the 12 other 12" angels, fairies and princesses from the sew along. This design layout appealed to me the most. (Designed in EQ8, of course). I removed the Sunkissed Cross blocks in this design which brought Marissa into the forefront. Marissa is framed with a three finished borders of 1", 2" and 1". This would be a ~63" x 63" quilt.

Image

Today, I was feeling a little creative, so I whipped up a virtual quilt with Marissa. The fabrics I chose for the mock up quilt are from the Midsommer collection from Pippa Shaw for Figo fabrics available now. 

I used up the original layout with the 3" Sunkissed Cross blocks found in the original Enchanted Paper Dolls Pattern. Instead of a 3 x 4 grid and 12" blocks, I used a 3 x 3 grid with 16" blocks. This would have a 5" print border and 3/8" binding. The finished quilt size would be about 70" x 70". 

Image


For a 4 x 4 grid you would have a large sized quilt measuring ~ 92" x 92". 

With a 2 x 3 grid you would get a large throw quilt measuring 54" x 73" (138 x 185cm).  This would be a great size for a single bed. You can always add a little more to the border (10" cut borders) as shown below for a 63" x 82" (160 x 208 cm) quilt.

Image

Thank you for joining today. I hope I have sparked your creative interest to sew something beautiful. Please share you makes with us.


DISCLAIMER

I have not been compensated by any company to promote their products in this post. Company names have been mentioned to properly identify the use of their information, products, and/or services. All of the designs shown within this blogpost are my own designs and may not be copied, downloaded, reposted, digitalized or used for any purpose of promoting your business or any other commercial intent. By doing so, you infringe upon international copyright laws. This includes but is not limited to social media.

Sunday, November 24, 2019

enchanted sal - hailey

Good morning everyone! It's Sunday morning for me and just getting to writing our weekly post. While my family is spoiling me with our traditional (American) Sunday breakfast, I get to take a few minutes to write our post. I have exactly fifteen minutes, because my goal was to post before 9am GMT.

Image

Today marks the eighth week of our Enchanted Sew Along. Every week a new figure from the Enchanted Mix and Match Series will be highlighted. This week we are celebrating Hailey.

Image

Before we get into the blog post, I would like to share with you again one of our sponsors. Gütermann, the German thread and fabric company, kindly offered two sets of quilting thread and premium cotton fabrics for our giveaway. Two lucky participants will each receive one set. It looks like three 1/2 meter cuts in those bundles too. I hope to show the rest of the loot next Sunday. : )

Image

And here she is, our Hailey! I created her with the lightest skin tone I found in my Sediments Solids fabric pack from Robert Kaufman's Kona solids. I used a saffron color for her hair. She is very light skinned and pale, but I wanted to make all of the girls using different skin tones and hair colors. #Diversity is beautiful! We all should celebrate our own beauty and not compare ourselves to other.

Image

If you already have the pattern, you will know there is a secret to Hailey. If you were wondering how to create her hair as shown in the pattern with her bangs to the side, it is actually a flip face/hair of Lilly yet to come.

Image

Hailey is really a straight forward sew. Once again, there are just a couple of critical points that need to match up like the wrists and feet. Other than that, she is seems to be easier than the other figures.

Here is Hailey from the original quilt featured in the pattern. Don't you just love the dark hair and skin tones? I do! As you can see, her hands have been flipped over. You can mix and match everything in this pattern. If you would like to purchase the individual PDF or paper book with all 12 figures, you can find all of them in my Etsy shop or at your local quilt store such as einfach bunt quilts or Niemanns-Land.

Image

Thank you for joinging us today. Happy sewing.

- - - - - - - - - - - - - - - - - - - - - - - - - - - - - - - - - - - - - - - - - - - - - - - -
Take a look at previous posts and see the other figures. 

Sunday, October 13, 2019

enchanted sal - babette


Hi everyone! Thanks for joining us for another Sunday edition of our Enchanted Sew Along. Are you excited? I certainly am! I truly love sewing together the enchanted figures. This week is one of my favorites - Babette. Babette is French and means - my God is plentiful. It is a very fitting name for the second angel in our series. If you have purchased the pattern, you may have realized that the figures are alphabetized with Agatha and end with Lilly. Each of the figures has her own little story too.That surprise is awaiting you in the pattern booklet and PDF pattern. You can purchase both here on Etsy. Please keep in mind, if you purchase the PDF individual pattern, you do not need to buy the booklet unless you absolutely want to have the convenience of printing the pattern templates directly from your computer. You have the choice.

Image 


Before we take a look at Babette, I went ahead and made my Sunkissed Cross blocks and my sashing strips. I got a little confused when looking at my quilt layout. I thought I only needed 20 sashing strips. Following the advice of my friend, Katrin, I made a total of 31 sashing strips. You can get three sashing sets from one WOF strip. If you are making the quilt below, you will need to cut a minimum of 20 white and 10 purple strips. These will make 30 sashing strips. Use a leftover strip to make the last remaining sashing strip.

Image

Are you just joining for the first time? That's wonderful! We are sewing along together. Each week a new figure from the Enchanted Paper Dolls booklet is highlighted and shown.

Image

I proceeded to make the Sunkissed Cross blocks. These are REALLY fun to make. Directions for quick and easy strip piecing are in the booklet. When I square them up, I line up the 1 3/4" mark with the triangle point on the center on the first two adjoining sides that I will be trimming. I trim two sides - one right after the other to ensure it is square. In the worst case, it will be a parallelogram. I received those nifty little diamond stickers from a friend in a swap. Normally you can just write on your acrylic cutting rulers with an erasable marker, but these are good when showing in demonstrations.

Image

I definitely had some leftover scraps from making the sashing strips and Sunkissed Cross blocks - my own design and creation. I might do a little Seminole piecing with them for the back of the quilt. I am still undecided if I want to make a mini of just Sunkissed Cross blocks.

This time I was right about the amount I needed. There are 20 Sunkissed Crosses.

Image


Now onto Babette. I started making Babette and parts of Celeste as well. When I mocked them up in the quilt, I designed them both with the same dress and wing fabrics. This makes for easy mix and match options with the two figures when their skin colors are the same as well as the wing segments. I made a quick little video showing how you can mix and match the segments. We'll get that up and running soon.

Designing FPP

There is something I would like to mention about designing foundation paper patterns and templates. When sewing Babette together, I kept wondering why I chose the hair construction as shown below on the left side. [Please take a look at the yellow lines.] It started to disturb me when looking at the finished angel wing and using a fairly large print. The fabrics were almost too wild and stood out showing the construction of the block. If I had used the construction on the right (yellow line), the wing segment would have been one complete piece of floral fabric making for a nicer design.

Image

So, I went back to the computer to figure out why I chose this method of sewing the templates. (This might be too too theoretical for you. If you fpp on a regular basis or even write patterns with fpp construction, you might know what I am talking about.) Anyway, the problem comes at the top of the head. Those two little patches of background fabric giving Babette a nice rounded head wouldn't have been possible without excess fpp segments. I couldn't see a way to reduce the amount of segments without having one or two single patches. When I design fpp templates, I try to place at least two patches of fabric on one segment. I try to narrow down the amount of segments as well.

AND this only stands out if you are using some type of large scale print or directional fabric which I mentioned in the beginning, you should not use! I did not follow my own advice! ; ) So I accepted the construction and moved on. What some may not even know, is how much time and thought that is put into designing fpp especially mix and match segments. Sometimes, I think I make it especially harder on myself, because I think about the littlest of details (and problems) and maximum amount of solutions just like those hair segments. I even think about how the "construction" of a block will change the look of the block. Two adjacent fabrics will create a line that will pull your eye into the frame. This may or may not be intentional. It may or may not look good.


* * * * * * * * * * * * * * *

There is a line on Babette's wing that you can omit if you prefer. It is line between segment P4/P8 on the templates. I left this segment in just in case you were mixing with another figure and wanted the extra design element in. (Strong wink). Feel free to skip and add one whole patch of fabric for the upper wing. That is explained in the instructions when extending hair lengths.

The difficulty with this figure will be the lining up on the last section - Wings to the main section. You will have to match up three points - wing top, wrists and wing bottom. To ensure those three points lined up, I basted with larger stitches (2,5) , verified the accuracy, and then sewed with the shorter stitch length (1,5) over the entire seam when they lined up correctly. 

https://www.etsy.com/de/shop/easypatchworkSHOP?ref=search_shop_redirect

All in all, I am extremely happy with Babette. I love her frilly dress and pretty halo. The construction also allows you to fussy cut the main section of her gown. I do love to fussy cut when FPP. Don't by shy and tell us if you discover more fussy cutting patches.

If you would like to make Babette or any other figure, please link up below or on the corresponding post with the figure you have sewn. We all would love to see your version. Feel free to mix and match with the other figures, because that is truly the fun part about these dolls - you can mix and match the segments!

- - - - - - - - - - - - - - - - - - - - - - - - - - - - - - - - - - - - - - - - - - - - - - - -
Take a look at previous posts and see the other figures. 


Do you remember I said I was thinking about some prizes? We are going to narrow it down to two prizes:
  1. Cutest Ever
  2. Most Unique or Best Use of Mix & Match Templates
We'll talk more about that later. For now, you can link up your Babette below. I look forward to showing you my Celeste next week and seeing yours as well!

Happy quilting!

* * * * * * * * * * * * * *
Looking for the patterns? Click here.

You are invited to the Inlinkz link party!
Click here to enter