Crafty Weekend Project #8:  Ways With Trays

Crafty Weekend Project #8: Ways With Trays

Crafty Weekend Project #8: Ways With Trays

There’s something special about serving life on a tray. It gathers the moment, sets the tone, and makes even the simplest parts of the day feel intentional. This “Ways With Trays” flow carries you from morning espresso to bedtime tea.  Five trays, one gentle rhythm for the day.

☕ Espresso Breakfast Tray

Begin the morning with a soft start. An espresso cup and saucer, a spoon, a napkin, and a few coffee treats create a cozy wake-up moment. Add chocolate-covered espresso beans, biscotti, or a citrus accent for brightness.

This tray is perfect for a bedside table, kitchen counter, or craft table before you pick up your yarn. It’s not about a big breakfast.  It’s about a peaceful beginning.

🧀 Charcuterie Lunch Tray

By midday, gather simple bites. A lunch charcuterie tray can include grapes, cheeses, crackers, and a refreshing drink. Add a small board and knife for slicing and a neatly folded napkin for style.

This tray works for a quiet lunch, a shared snack, or a creative work break. It invites you to pause, nibble, and enjoy color and texture.

🍤 Seafood Appetizer Tray

As afternoon turns to evening, bring in something special. A seafood appetizer tray with shrimp, lemon slices, small forks, and crackers feels fresh and festive. Add a chilled drink or citrus water for a bright touch.

It’s perfect for weekends, small gatherings, or simply elevating your day. Keep it simple and easy to enjoy.

🍝 Pasta Dinner Tray

Dinner on a tray is comfort made easy. A pasta bowl, bread or salad, utensils, and a drink create a complete and cozy meal. Add a sprinkle of parmesan, a jar of herbs, or a folded napkin to finish the look.

This tray is ideal for relaxed evenings, movie nights, or studio dinners when you want everything in one place.

🌙 Bedtime Chamomile & Wind-Down Tray

End the day gently. A bedtime tray with chamomile tea, chocolate-covered strawberries, and bath essentials turns night into a ritual. Add a crochet washcloth, facial bloom, or soap for a calming touch.

This tray signals rest. Warm tea, a sweet treat, and a moment of care before sleep.

The Heart of It All

Trays help us slow down and savor the day, morning to night, one moment at a time. They turn everyday routines into small celebrations and remind us that beauty can live in the details.

At Loop After Loop, creativity isn’t only in yarn, it’s in how we live, gather, and serve.

From espresso mornings to chamomile nights, it’s all styled loop by loop, day by day.

Which tray would you start with first?
Crafty Weekend Project #7: Jingle Bell Jars

Crafty Weekend Project #7: Jingle Bell Jars

Crafty Weekend Project #7: Jingle Bell Jars

Because even the smallest glow can light up the season.

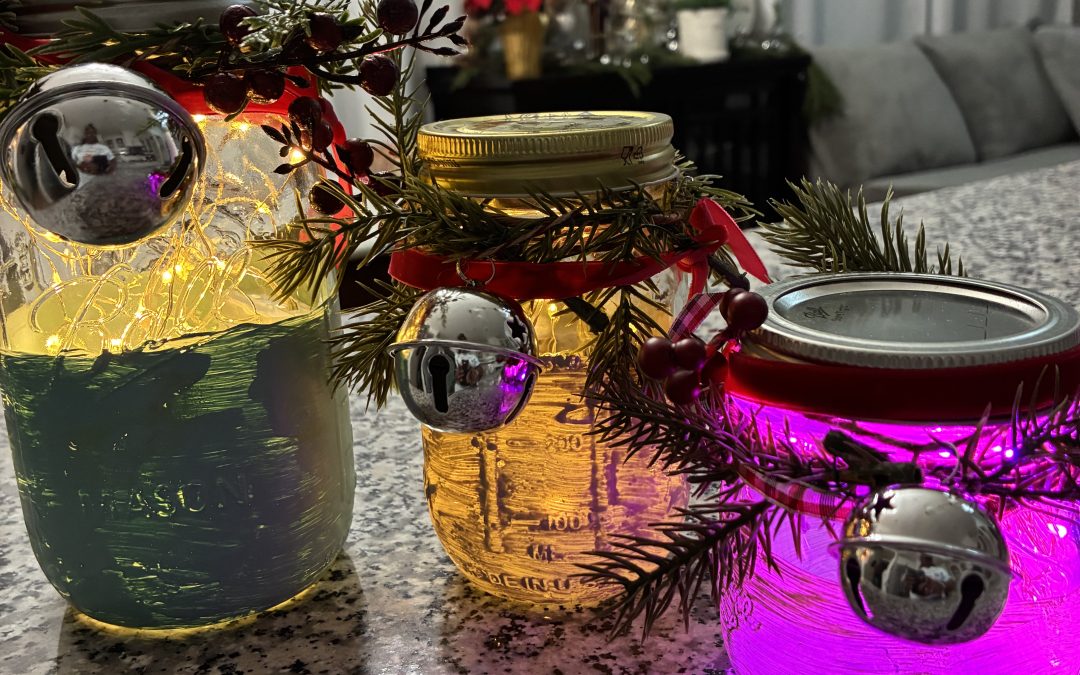
There’s something peaceful and meaningful about crafting during the holidays—the warm lights, the simple tools, and the joy of making something with your own hands. These Jingle Bell Jars are the perfect little project: quick, cozy, and full of holiday charm. Perfect for your Cottage Table, gift-giving, or adding sparkle to your Christmas décor.

Let’s make one together.

✨ What You’ll Need

  • Mason jars
  • Chalk paint (white, cream, or soft neutral)
  • Brown thick floral craft wire (to wrap neck of jar)
  • Thin brown twine (to attach jingle bells)
  • Floral wire
  • Ribbon
  • Battery-operated lights
  • Jingle bells
  • Green spruce sprigs
  • Red berries
  • Scissors

✨ Step 1: Paint the Bottom Half of Your Jar

Brush chalk paint starting at the bottom of the mason jar, working upward until you reach the halfway point.

Leave the top half completely clear for that frosted, dipped-in-snow cottage look.

Let it dry fully.

✨ Step 2: Add Your Winter Glow

Coil your battery-operated fairy lights and place them gently inside the jar.

Hide the battery pack at the bottom or along the back.

The painted base will catch and soften the light beautifully.

✨ Step 3: Wrap the Neck With Brown Thick Floral Craft Wire

Take your brown thick floral craft wire and wrap it around the neck of the jar several times.

Twist the ends to secure it tightly.

This wire wrap becomes your anchor for all the festive details.

✨ Step 4: Attach Your Jingle Bells With Thin Brown Twine

Cut a piece of thin brown twine and string your jingle bells onto it.

Tie the twine securely around the front of the wrapped floral wire so the bells hang freely.

This gives your bells a natural, rustic, handcrafted look—warm and perfectly holiday.

✨ Step 5: Add Greenery & Berries

Tuck a small green spruce sprig and a cluster of red berries behind the wrapped wire.

Use a small piece of floral wire to secure them if needed.

This adds that fresh, festive holiday pop of color.

✨ Step 6: Tie a Ribbon Bow

Choose a ribbon—gold, cream, plaid, red, lace, periwinkle, or white—and tie a small bow.

Place it near your bells or slightly off-center for a soft, layered cottage finish.

This step brings the entire jar to life.

✨ A Simple Craft With a Warm Glow

And just like that, your Jingle Bell Jar is complete—glowing, joyful, and full of handmade holiday magic.

It’s the perfect blend of cozy, simple, and festive… a little reminder that beauty doesn’t need to be complicated.

Loop by loop, craft by craft, day by day—your Cottage shines brighter with every creation.

Crafty Weekend Project #6: How to Make a Christmas Countdown Calendar

Crafty Weekend Project #6: How to Make a Christmas Countdown Calendar

Crafty Weekend Project #6: How to Make a Christmas Countdown Calendar

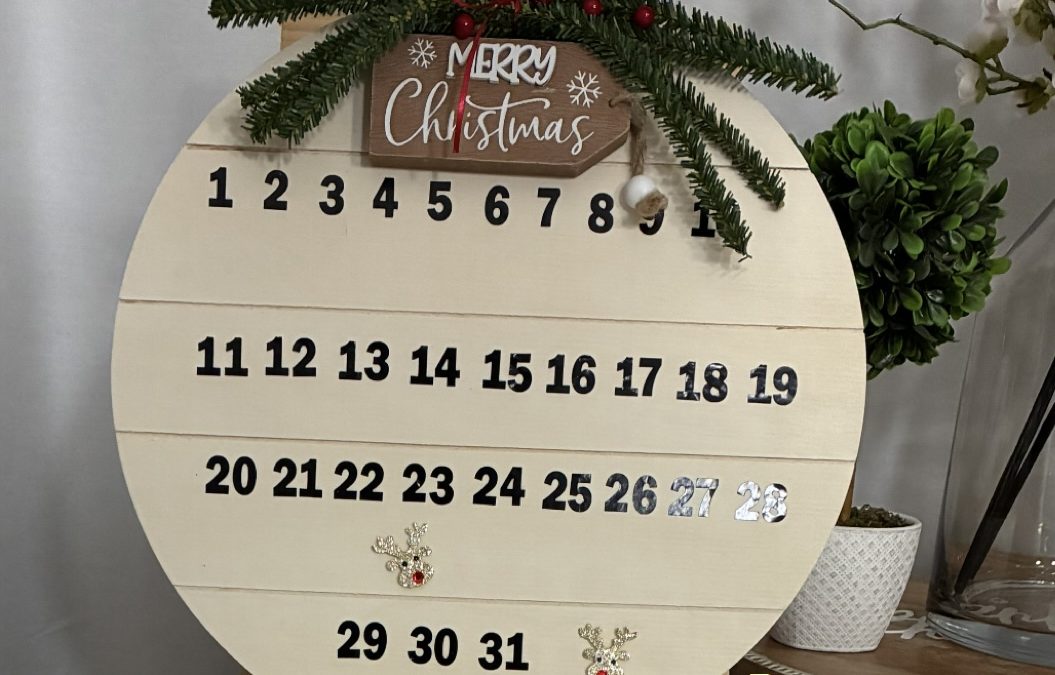
There’s something magical about counting down the days to Christmas and this easy DIY project brings that charm right into your home! For Crafty Weekend 6, we’re creating a handmade Christmas Countdown Calendar that’s festive, simple, and perfect for crafters of all levels.

What You’ll Need

  • Wooden countdown board or wooden sign
  • Number stickers or stencils
  • Small holiday embellishments (reindeer stickers, bells, ribbon, etc.)
  • Mini sign topper (like “Merry Christmas”)
  • Tacky Glue
  • Pine greenery, berries, or decorative picks
  • Marker or paint (optional for extra details)

Step-by-Step Instructions

  1. Prepare Your Board

Start with a clean wooden board or pre-cut countdown shape. If you want a polished look, give it a quick coat of paint or leave it natural for a rustic feel.

  1. Add the Numbers

Use stickers or stencils to place numbers 1–31 (or 1–25) in clean rows. Keep your spacing even as this is the foundation of your calendar!

  1. Create the Topper

Choose a small wooden sign that sets the tone — something simple like “Merry Christmas.” Attach greenery, berries, or ribbon to the top using tacky glue. This gives your countdown a beautiful holiday touch.

  1. Attach Your Topper to the Board

Secure the decorated topper to the top of your countdown board. Make sure it’s centered and firmly glued.

  1. Add a “Marker”

Use a small embellishment — like a glittery reindeer head to mark each day as Christmas gets closer. Simply move it along the numbers each day.

  1. Add Extra Festive Touches

Feel free to glue on additional accents such as bells, bows, more greenery, or sparkling stickers to personalize your piece.

Your Countdown Is Ready!

Hang it in your home and enjoy the excitement each day brings. This simple DIY is the perfect holiday warm-up project, charming, creative, and full of Christmas spirit!

Crafty Weekend Project #5: Create With What You Have — A Charcuterie Twist!

Crafty Weekend Project #5: Create With What You Have — A Charcuterie Twist!

Crafty Weekend Project #5: Create With What You Have — A Charcuterie Twist!

Sometimes creativity starts right inside your fridge. 🌿

For this Crafty Weekend #5, we’re doing something simple but full of heart — Create With What You Have.

No fancy grocery trips, no shopping lists — just open your fridge and pantry, gather what’s there, and make it beautiful.

🥕 

My Cottage Charcuterie Board

I began with what I had on hand and made a colorful, cozy charcuterie board perfect for any weekend gathering. Here’s what made it onto mine:

  • Fresh baby carrots and celery sticks
  • Cucumbers sliced with a ruffled edge
  • Yellow and green peppers for a pop of color
  • Grape tomatoes and blueberries
  • Mild white Monterey Jack cheese, cubed
  • Rice crackers for crunch
  • A few dill pickles and Calamata olives for tang
  • Genoa salami for a savory touch
  • Sweet notes of cranberries, peach preserves, pomegranate cashews, and maple pecans

I arranged everything on a round wooden board — a mix of bright, earthy colors that felt like comfort and creativity on display.

🍇 

The Loop After Loop Touch

Like every Crafty Weekend, this one is about slowing down and appreciating the small things — colors, textures, and flavors that remind us to live creatively and gratefully.

Charcuterie doesn’t have to be extravagant; it can be a form of everyday art.

A board of textures and tastes that tells a story — just like our crafts, stitches, and handmade creations.

This weekend, try it for yourself. Open your pantry, grab a few things that spark joy, and create something beautiful from what you already have.

💛 

Creative Reflection

God gives us everything we need to create, right where we are.

This week, I challenge you to look around your home, your kitchen, your craft basket — and see possibility, not limitation.

Because sometimes, the best things aren’t bought.

They’re assembled, arranged, and appreciated.

Crafty Weekend Project #4: DIY Samplers

Crafty Weekend Project #4: DIY Samplers

Crafty Weekend Project #4: DIY Samplers

Faith • Fun • Food

Welcome to Crafty Weekend 4 — where small samplers become meaningful standards in your everyday life.

🌸 Faith

Build your faith sampler with little daily inspirations — like The Prayer of Jabez, Secrets of the Vine, or a scripture-filled calendar. Keep small cards or notes to remind you that big blessings often start with small beginnings.

✍️ Fun

Create a journal sampler of your dreams, goals, and prayers. Then design a mini vision board you can see each day — a simple way to stay inspired and focused on what matters most.

🍲 Food.

Try making sample bean soups in mason jars or spice samplers in tiny jars or glass tubes. Let your creations fill your kitchen and remind you that tasting, trying, and trusting the process leads to lasting joy.

Start small. Stay faithful. Keep creating.

Loop by loop. Day by day.

— Deb at Loop After Loop Cottage


Crafty Weekend Project #3: Washi Tape Magic

Crafty Weekend Project #3: Washi Tape Magic

Crafty Weekend Project #3: Washi Tape Magic

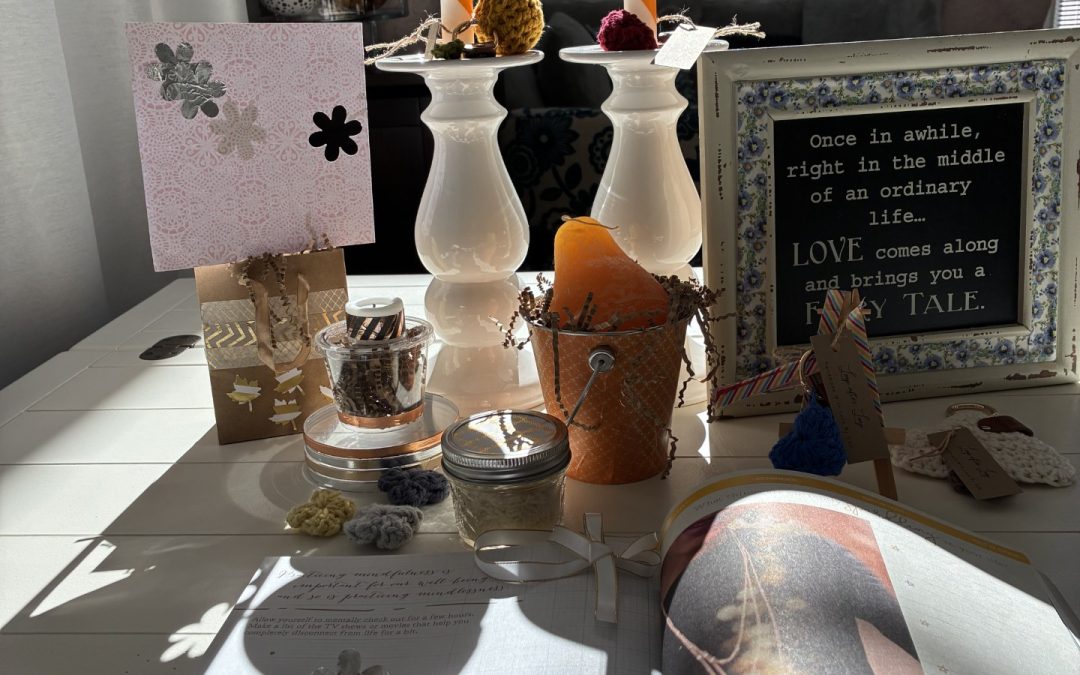
Who knew a little roll of washi tape could transform everyday items into something so fun and beautiful? For Crafty Weekend 3, we used bold stripes, metallic accents, and pops of color to give simple home items an autumn-ready makeover. The best part—this is quick, affordable, and you can personalize it any way you like!

Here’s how you can re-create the look and make your own set of Washi Tape treasures.

🕯️ Tapers & Candles

Take plain white taper candles and wrap strips of orange washi tape around them. You can go diagonal for a candy cane stripe (perfect for fall) or keep it straight for a clean, modern look.


✨ Tealights

Battery-operated tealights get a whole new life when you wrap a strip of washi tape around the outside. Choose metallic, patterned, or even holiday designs—suddenly your tealights look boutique-ready.

🫙 Small Mason Jar

Gift-giving made easy! Cut a round cardstock disc to fit inside the lid of a mason jar. Fill the jar with your favorite snack, seasoning, or rice. Add a tiny ribbon bow for that extra sweet touch.

📎 Wooden Clothespins & Easel

Dress up wooden clothespins and a mini easel with matching washi tape. Use them to clip photos, display small notes, or hold ornaments.

🪣 Tin Bucket

Wrap a tin bucket completely with a wide roll of washi tape. Fill with decorative shreds and tuck in a candle, pinecone, or seasonal filler. A lovely table centerpiece!

🛍️ Paper Bags

Punch out a favorite shape or motif, paste it onto both sides of a kraft bag, and embellish with metallic or foiled washi tape flowers.

☕ Coasters

Add washi tape around the rims of plain coasters for a next-level chic update.

📓 Journal

Add a strip of washi tape along the edge of your pages or covers as a playful reminder.

🥤 Plastic Container

Upgrade extra condiment containers or small desk organizers by wrapping washi tape around the bottom. Layer patterns for a stacked effect.

🖼️ Wall Picture

Frame the edges or corners of a picture with washi tape to bring a vintage look alive and make your wall art pop.

💌 Cardstock Creations

By using cardstock and craft punchers, you can change the look of just about anything! Create your own special sentimental cards for friends and family—personal notes that feel handmade and heartfelt.

Wrap-Up

This week’s Crafty Weekend was all about proving how versatile one little supply can be. Washi tape is affordable, easy to use, and the possibilities are endless. From candles to cards, it transforms the ordinary into something meaningful and handmade.

So grab a roll (or five!) of washi tape, some cardstock, and your favorite punchers—then let your imagination flow. Can’t wait to see what you create for your own Crafty Weekend!

Â