Image

Crowdsourcing An Investigation Into Coil Whine

If you’ve heard the high-pitched whine or buzz from an electronic device when a current-carrying inductor is vibrating, you’ll know how unpleasant it can be. It’s common in all kinds of equipment, but it’s become a particular annoyance of late in hardware like PC power supplies, GPUs, and cooling pumps. There is plenty of hearsay on the web about which parts whine and which don’t, and [Lowell Wood] wants to get to the bottom of it. 

To track the issue, [Lowell] has put together the Coil Whine Database. It accepts user reports on hardware, regarding the level at which coil whine is present. A score of 0 is given to a part that is inaudible in a quiet room, with higher scores representing higher sound levels. A part scored at 2 is audible working at a desk with the computer under load; a part scored at 4 is audible even when the machine or device is at idle.

For now, the database is largely empty—[Lowell] has just opened submissions, adding a report on their own ROG Astral RTX 5080 card for good measure. If you want to submit a report on a unit, either silent or noisy, that’s simple enough—just fill in the coil whine report form. Over time, submissions will hopefully grow, and it will be easier to get a good idea of what equipment whines and what is likely to operate silently out of the box.

The database aims to present a guide to what parts whine, and how much, noting that any given population of devices tends to vary. To that end, any given device won’t be reported on publicly until it receives at least 5 reports. To counter bias, reports of silent parts will be weighted higher, since it’s unlikely that people happy with their quiet hardware will be rushing to research this issue or report it to a database. Relevant files to the project are available on GitHub for the curious.

This database could be a great boon to the brigade of PC builders out there who like their machines to be as silent as possible. If that sort of thing appeals to you, it’s probably time you started researching passive cooling as well…

Image

New Controller Makes Heavy Machinery Intuitive

As children, many of us looked wistfully into the cockpits of heavy machinery, wondering just how the series of knobs and levers would do something like operate a bulldozer, crane, or excavator. The nature of these myriad of hydraulic and electronic controls for equipment like this is often inscrutable to adults as well; it takes a considerable amount of training to be able to competently operate most of these machines. But this new controller from MIT may help shorten that training time.

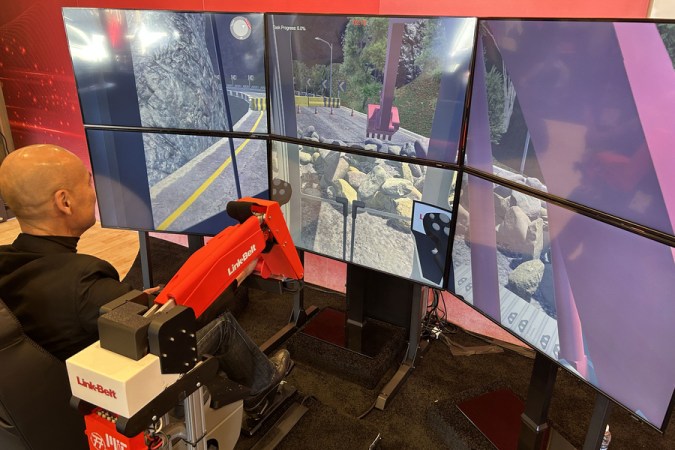
The controller is specifically meant for excavators. In a standard excavator, a pair of joysticks is typically used, with one controlling the swing and the boom and the other controlling the stick and the bucket. Getting used to this combination can take practice, so instead the group of researchers replaced them with a model excavator arm that the operator controls directly with their own arm. The new controller is more intuitive to use as it translates the movements of the model to that of either a real excavator or a training simulation.

The researchers plan to include haptic feedback in future versions, which will hopefully further increase the ease of which new operators can get a feel for using these machines. For those not working towards a new career or an ambitious weekend with rental equipment, there are some other ways of learning how to operate excavators and other pieces of heavy machinery.

A man's hand is shown holding brass-colored tweezers. In the tweezers are held the inner race and the ball cage of a ball bearing, with half of the outer race lying below them on a table.

Splitting A Ball Bearing To Cut Out Backlash

Gears are usually the biggest contributors to backlash in a mechanical system, but they’re far from the only culprits. Ball bearings are a less obvious source of imprecision, since any gaps between the balls and the races can lead to axial wobble. Precision mechanisms can eliminate this by pairing two ball bearings, holding the outer races fixed, and applying a preload force to the inner traces. [Chronova Engineering], however, has a different solution, for which he split a ball bearing in half.

Besides taking up more room, thermal expansion also means that it’s difficult to apply a consistent preload force between two ball bearings. Instead, to make a self-contained preloaded bearing, [Chronova Engineering] first disassembled a single ball bearing. The most difficult part of this is taking apart the ball cage; the two parts of this are normally riveted together, but he managed to find a crimped cage and pry it apart. After taking the bearing completely apart, he cut the outer trace in half along the circumference, then reassembled the bearing. The split outer trace makes it possible to press the two halves together, preloading it and removing slop.

To see how well this worked, [Chronova Engineering] replaced the the ball bearing supporting one end of the feed screw for a milling machine with this new bearing. Before the replacement, it had a backlash of 0.1 to 0.2 millimeters; after the modification, it dropped to 30 to 40 microns. This kind of bearing is already known in the machining world – four-point-contact bearings use a very similar principle – but they don’t seem to be well known.

For more about these common yet remarkable rotary mechanisms, check out our article on bearings. If, on the other hard, precision isn’t a priority, you can always 3D print ball bearings.

Image

Behold The Most Beautifully Ambitious Starship Simulator Yet

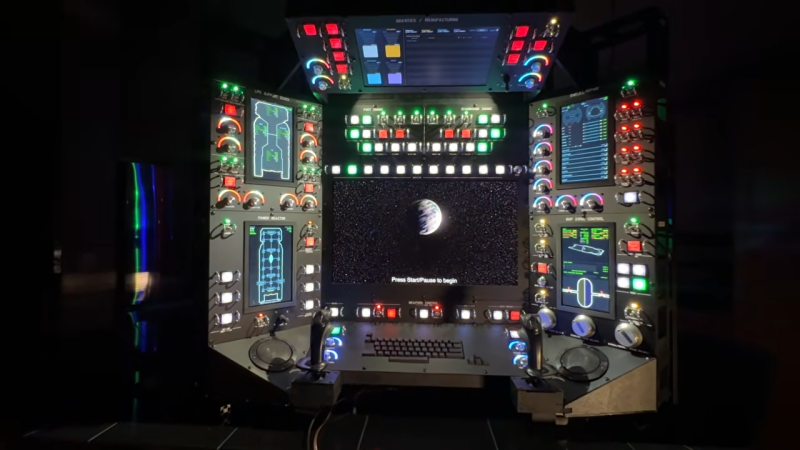
[Kevin Kelm] created something wondrous: Halcyon Dawn, an utterly unique and desperately challenging game that is equal parts intricate starship simulator, imposing hardware console, video game, and love letter to John Scalzi’s Old Man’s War book series. Grab a beverage for this one, because it’s chock-full of detail.

First, how is it played? The simulator represents the ship Halcyon Dawn, a stolen and renamed vessel, and the player representing its sole crew member. The ship’s new mission is to establish a home for its payload of genetically-engineered unfortunates, escaping a cruel sort of indentured military servitude. The former masters of course have a very different view of the whole situation, throwing around terms like “treason” and “theft” and in general preferring the version of the desperate protagonist they had the most control over.

Image
Aluminum extrusion, laser-cut panels, and custom PCBs for interfacing physical controls and displays make up the bulk of the build.

As the player is meant to be operating the ship on their own, the cockpit is imposing. All 152 controls and six screens are meaningful and will be needed to pilot the Halcyon Dawn, survive hostile actions, repel boarding attempts, mine and refine vast amounts of raw materials, and in general keep the ship running and intact until an autofactory can be deployed in orbit of a suitable planet to create a new home.

All easier said than done. It’s one thing to pilot and tweak a temperamental ship, but doing so while also performing damage control and thwarting a boarding attempt by manipulating life support is quite another. Want more details? Gameplay is documented here and the physical controls have their own library.

The product of a year of focused work, [Kevin] – now retired – pointed his decades of hardware and software experience at Halcyon Dawn after realizing one night that everything he needed to create it already existed. How this whole project came to be is also a tribute to the amazing tools and equipment that hobbyists and hackers of all kinds now have to turn an idea into something that actually exists in the world. Even so, it was a load of work he is not keen to repeat. Don’t miss the technical deep-dive and photo gallery of the build.

While the game itself — being a fan-made derivative of Scalzi’s work (and useless without the custom-made hardware console) — isn’t being released, [Kevin] has shared the underlying hardware framework it is built on. Enigma is an ESP32-based set of input and output PCBs made for integrating switches, knobs, displays, relays, and more with a Python library to make them easy to work with.

Starship simulators are a wonderful subset of projects, and every one is different from the last. Something about physical builds really works for them, and while we’ve seen a camper trailer converted to starship simulator [Kevin]’s project focuses the whole experience beautifully into the single-person console you see here. Watch a video of Halcyon Dawn running in an arcade-like “attract” mode embedded just below.

Continue reading “Behold The Most Beautifully Ambitious Starship Simulator Yet”

Scanwheel

Scanwheel: A Pocket-Sized POV TV

When you hear the word TV, you probably think of a big LED screen, maybe even the old CRT TVs, but in either case it’s something large and fairly complicated. However, thanks to the persistence of vision, it doesn’t have to be. In this handheld-sized project from [Ancient], the Scanwheel is born, a miniature mechanical TV that uses a spinning disk and some LEDs to produce an image.

The electronics of the Scanwheel are pretty straightforward. The smarts come from a Raspberry Pi Pico, an A4988 motor driver, a couple of LEDs, and a small 21-02485 stepper motor. The Raspberry Pi Pico is used to command the motor speed as well as coordinate the LEDs to turn on at the right time. The case is 3D printed; the base includes space for the various support electronics as well as some small light baffles to ensure the LEDs don’t bleed over outside their intended area. The top of the case is a disk that includes 20 small holes spaced evenly around the perimeter at varying heights, allowing light to only leave the disk when one of these holes is in front of the LEDs.

When you put all these pieces together, spin the motor up to roughly 900 RPM, and turn the LEDs on in a precise order, you end up with a really cool result: a miniature TV. And due to the five different LEDs in this build, you actually have a color 20×20 pixel display in the center and, on either side of that, two more 20×20 black-and-white displays capable of showing different images. Thanks [Ancient] for sharing this awesome build that takes advantage of the persistence of vision effect to create a unique display. Be sure to check out the video below as well as the instructions on how to build your own. And if you enjoy this sort of thing, check out some of our other persistence-of-vision projects as well.

Continue reading “Scanwheel: A Pocket-Sized POV TV”

Image

Building A 2-Way Holographic Display

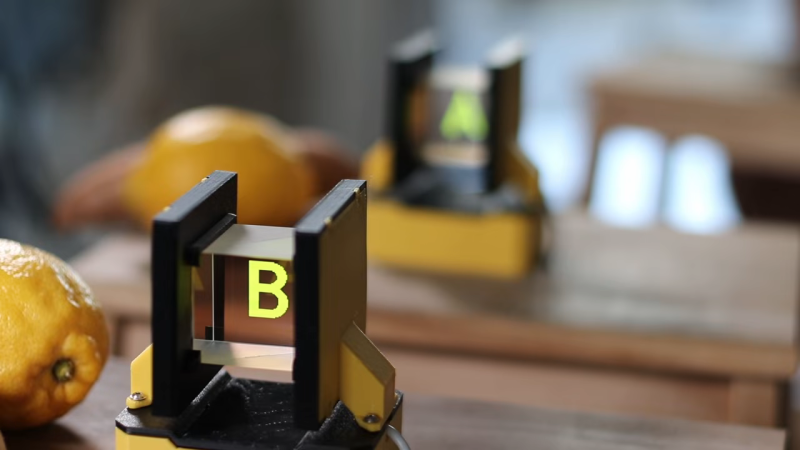
Holographic displays sound very fancy but you can build various simple types yourself at home. [Julius Makes] whipped up a neat design that shows a different image depending on the position from which you view it. 

Running the show is a Wemos D1 devboard equipped with the ESP8266 microcontroller. It’s hooked up to a pair of OLED displays over I2C. The displays are placed in a 3D printed assembly that aims each one at a beam-splitter cube. This bounces light projected into one face through 90 degrees, and out another face. By leveraging this, it’s possible to aim each display at one face and bounce it out another, such that looking at either side of the beamsplitter cube shows a different image. Since the beamsplitter cube also allows some light to be transmitted directly through as well, the image from each display appears to float in space.

[Julius] notes that this setup is being used in a puzzle box game, while wondering whether there’s any other fun ways to leverage this technique. We’ve seen some other neat holographic displays before, too, like this neat Holochess build.

Continue reading “Building A 2-Way Holographic Display”

Image

How The 2020s Chip Crisis Led To A Buggy Saleae Analyzer In 2026

For those of us old enough to remember the harrowing days of the early 2020s, alongside another major kerfuffle there was a complete breakdown in global supply chains that led to the 2020-2023 global chip shortage. Unsurprisingly, this pushed many hardware manufacturers into less orthodox approaches, massive BOM changes, and hurried redesigns. One of the results of this era found its way into the hands of the bloke over at the [Playduino] YouTube channel, who was mystified to find two bodge wires in his fancy Saleae logic analyzer.

The reason for popping open the LA was crosstalk between two channels, which was bad enough that it made the unit quite unusable for the intended task. After seeing the cut traces and bodge wires he initially assumed that since he bought it used that the previous owner had modified it, but said person denied having opened it since purchasing it from an official retailer.

This was when he emailed Saleae support to see whether they knew anything. Initially they denied knowing anything about such a modification, but then the CTO emailed back with a long and very detailed confession. As explained in the video, during the aforementioned chip crisis Saleae was forced to rapidly redesign their LAs to use whatever FPGAs and other parts they could still get their hands on.

An initial prototype unit passed their internal tests, so they had a first batch manufactured using PCBs from a different supplier. Despite sending the same Gerber files, the resulting PCBs had ground fill issues that necessitated the observed rework, but due to insufficient testing for crosstalk a total of 406 units made it into the wild.

Sadly he had to return the defective unit for a replacement, making it somewhat hard to let go of such a piece of history. That said, if you want to know whether you’re also one of the lucky remaining 405 LA owners, the CTO provided the affected serial number range: 00200026245 to 00200026675 are affected.

Continue reading “How The 2020s Chip Crisis Led To A Buggy Saleae Analyzer In 2026”