Resources
Quick Guides
View this post on Instagram
Kit Guide
Finishing guide
Stitch Guide
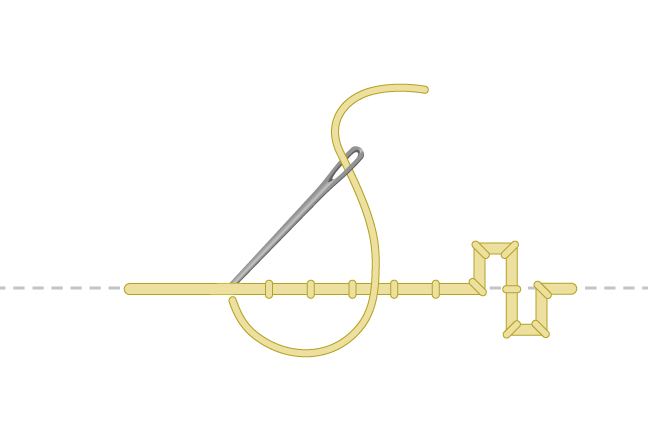
Back Stitch
Back stitch has you moving your needle backwards to go forward! Start by making one single straight stitch, then bring the needle up through the fabric then back down behind the thread of the previous stitch; repeat, connecting each stitch. Backstitch is used in many designs, like the jeans outline in Sweater Weather.
Chain Stitch
Bring the needle up through the fabric and back down at the same spot and make a small loop (sometimes it can be easier to hold the loop in place with your thumb while working this stitch). Then bring the needle back up through the fabric near the top of the loop you are holding. Once the thread is through the loop again, you can move your thumb and repeat.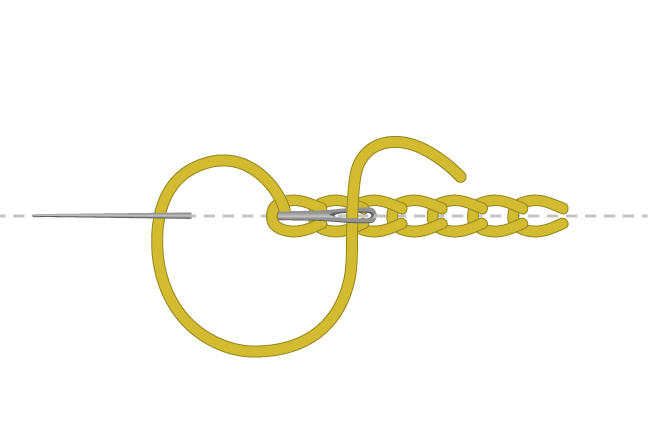
Couching Stitch
Couching Stitch is when you have one thread floating on top of the fabric, with small stitches overtop holding it into place. Start by placing the thread that is ‘being couched’ along the line in the design. This stitch is used in the yarn bowl in The Wooliest Season, so you would do four big straight stitches along each side of the yarn bowl, and then go back and ‘couch’ over those long floats to secure them into the right place. When working the small stitches overtop the longer ones, try to stitch as close as possible to the top and bottom of the thread that you are stitching into place.
French Knot
This was the trickiest stitch for me to learn, but once you get the hang of it you’ll use it all the time. I recommend practicing it on a scrap of fabric first to get the hang of it, before working a key detail like the eyes of Barnaby the cat, or the pom pom and details on Cozy Winter. I actually made a video of how I work my French knots on the Cozy Winter guide page, if you want to see it in action.
To begin, wrap your thread around the needle twice, then pierce the fabric where you want the french knot to go and pull thread through. For a smaller knot, wrap the thread around the needle once instead.

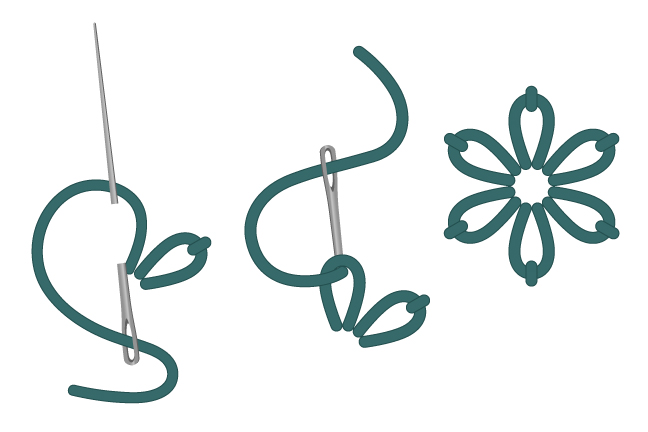
Lazy Daisy Stitch
Lazy Daisy Stitch is very similar to Chain Stitch, only instead of making a chain, each link stands on its own.
Bring the thread up into your fabric and then back down through the same hole Or very close by it), while holding the loop of thread above your fabric with your thumb. Then bring your needle up from underneath close to the inside of the loop you have just made, and make a short stitch tot he other side of the loop to secure it. This is a great stitch for flower petals and small leaves.
Two-Colour Daisy Stitch
Here’s a video showing how to work two-colour daisy stitch, where the tips of the petals are a different colour floss than the rest of the petal:
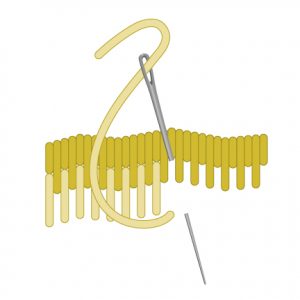
Long and Short Stitch
The long and short stitch is a lot like painting with thread. When beginning long and short stitch, Start at the top and work the long stitches (like a straight stitch), leaving a thread’s space in between. Then work the short stitch in the spaces in between the long stitch. For the next level down, you’ll keep staggering the length of your stitches so that it fills the area.
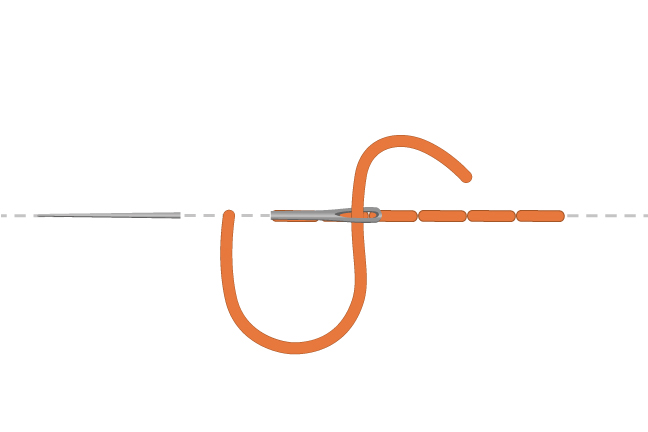
Running Stitch
RUnning stitch produces a line or a curve of dashed stitches that have spaces in between them. To work a running stitch, weave the needle in and out of the fabric a few times before pulling the needle through.Your spaces between the stitches should be equal in length to the stitches themselves, or smaller. 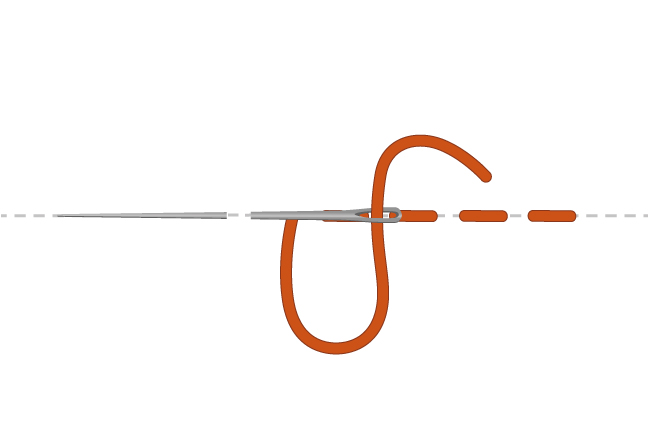
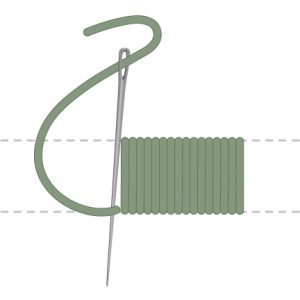
Satin Stitch
Satin stitch is made with a series of even, straight stitches made very close together with no fabric showing between the thread. To work satin stitch, bring the needle up through the fabric and back down at a space, then up close to the first stitch and back down again close to the second. Tip: The less twisted your embroidery thread, the smoother and more satin-like the appearance.
Split Stitch
This stitch is used in the sweater outlines for Sweater Weather and If I Sits, I Knits.
This stitch needs to be worked with at least 2 strands of floss in the needle. Begin by making a straight stitch, then when brging your needle up again, bring it up through the stitch you just worked, ‘splitting’ the previous stitch. Continue working this stitch by brgining the needle up and splitting the previous stitch. Repeat until you finish the line, ending with a straight stitch.
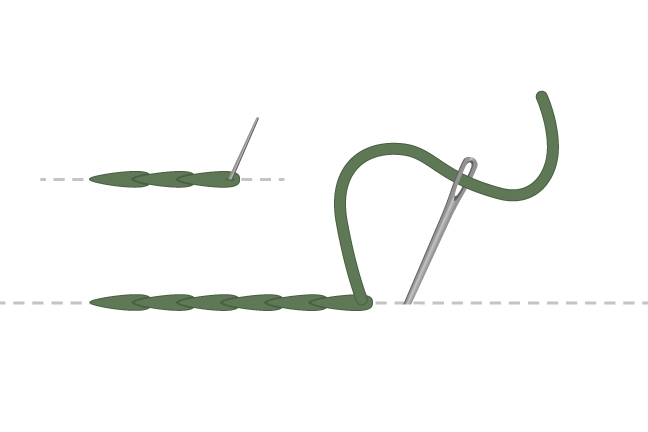
Stem Stitch
Stem stitch is worked by angling the stitches so that they appear to overlap slightly, and often have a rope-like appearance as you stitch it. To work stem stitch, bring the needle up through the fabric and down at a slight angle, then back up about halfway along the previous stitch. Continue in this way until you have completed the section as desired. 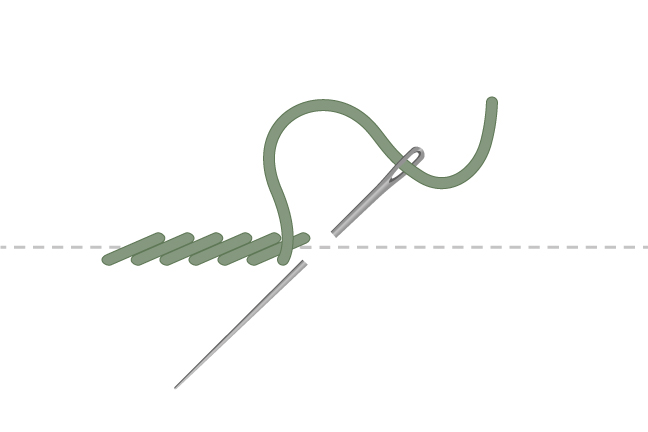
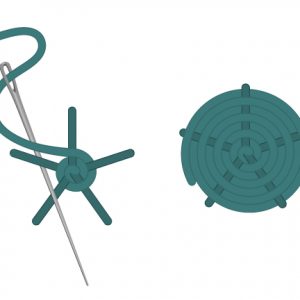
Wagon Wheel Stitch (aka Woven Wheel Stitch)
This is a great stitch for flowers (like the roses in Laundry Day)
Though elaborate in appearance, this stitch is made in two simple steps. To work a woven wheel, make a five-pointed star of straight stitches, and then weave your thread over and under the spokes as the circle of your woven thread builds to the edges of the original star. Keep going until it is difficult to clearly see the spokes of the star underneath your stitches.