
Laravel-swoole
208 / 12 / 创建于 5年前
 PHP_LHF 的个人博客
使用laravel-swoole时查找各种资料发现写的都不完整,写的不是服务器端怎么安装swoole扩展,要不就是写的不完整。
首先分析使用swoole需要用到的各种扩展。
一: 服务器端安装PHP swoole 扩展
执行命令
pecl install swoole
修改php.ini 配置文件
在最后添加这句
extension=swoole.so
!!!注意 重启PHP 如果无法启动,找到PHP的目录下执行
sudo service php7.3-fpm restart
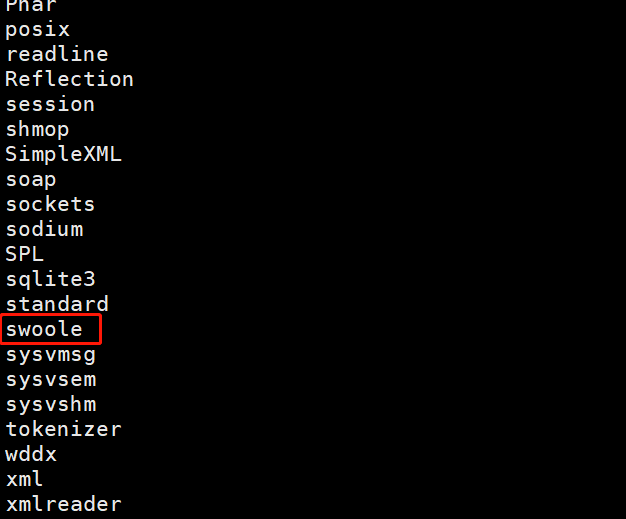
然后在虚拟机上执行命令
php -m
看到如下图表示swoole扩展装好了
二:安装laraveltw/laravel-swoole
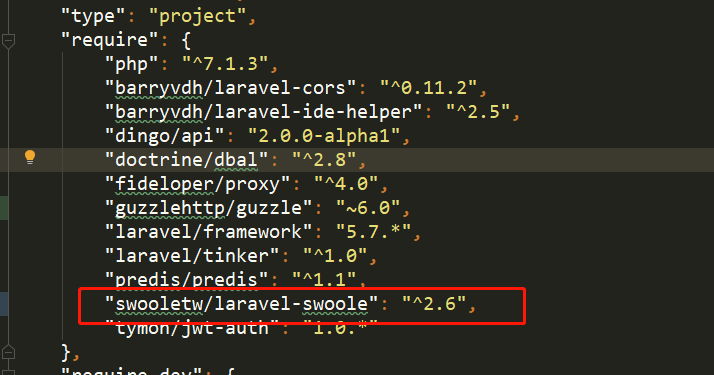
在项目根目录下使用 composer require swooletw/laravel-swoole -vvv安装,最好加上 -vvv参数,因为安装很慢,会给人一种没有安装被卡主的感觉(自己就经历过)。最好别再本地执行或者在PHPstorm中执行。因为windows不支持laravel-swoole,会有各种问题。可以在虚拟机的项目根目录下执行(安装时需要耐心)。
当在composer.josn中看到下图标识的表示安装成功
自定义命令
使用laravel自带的方法artisan(真的很好用)
创建swoole命令 执行
php artisan make:command Swoole
会在app\Console\Command\目录下生成Swoole文件
<?php

namespace App\Console\Commands;

use Illuminate\Console\Command;
use swoole_websocket_server;

class Swoole extends Command
{
    /**
     * The name and signature of the console command.
     *
     * @var string
     */
    protected $signature = 'swoole {action}';

    /**
     * The console command description.
     *
     * @var string
     */
    protected $description = 'Command description';

    /**
     * Create a new command instance.
     *
     * @return void
     */
    public function __construct()
    {
        parent::__construct();
    }

    /**
     * Execute the console command.
     * 这个方法中的逻辑需要自己写
     * @return mixed
     */
    public function handle()
    {
        $action = $this->argument('action');
        switch ($action) {
            case 'close':
                break;
            default:
                $this->start();
                break;
        }
    }

    /**
     * 这个方法是自己新增的
     * 具体可参考 https://wiki.swoole.com/#/start/start_tcp_server
     */
    public function start()
    {
        // 这里是监听的服务端口号
        $this->ws = new swoole_websocket_server("0.0.0.0", 9502);
        //监听WebSocket连接打开事件
        $this->ws->on('open', function ($ws, $request) {

        });
        //监听WebSocket消息事件
        $this->ws->on('message', function ($ws, $frame) {
            $this->info("client is SendMessage4545\n" . $frame);
        });
        //监听WebSocket主动推送消息事件
        $this->ws->on('request', function ($request, $response) {
            $scene = $request->post['scene'];
            foreach ($this->ws->connections as $fd) {
                if ($this->ws->isEstablished($fd)) {
                    $this->ws->push($fd, $scene);
                }
            }
        });
        //监听WebSocket连接关闭事件
        $this->ws->on('close', function ($ws, $fd) {
            $this->info("client is close\n");
        });
        $this->ws->start();
    }
}
在 Kernel.php文件中注册这个Swoole类,
<?php

namespace App\Console;

use Illuminate\Console\Scheduling\Schedule;
use Illuminate\Foundation\Console\Kernel as ConsoleKernel;

class Kernel extends ConsoleKernel
{
    /**
     * The Artisan commands provided by your application.
     *
     * @var array
     */
    protected $commands = [
        //
        \App\Console\Commands\RedisSubscribe::class,
        \App\Console\Commands\Swoole::class,
    ];

    /**
     * Define the application's command schedule.
     *
     * @param  \Illuminate\Console\Scheduling\Schedule  $schedule
     * @return void
     */
    protected function schedule(Schedule $schedule)
    {
        // $schedule->command('inspire')
        //          ->hourly();
    }

    /**
     * Register the commands for the application.
     *
     * @return void
     */
    protected function commands()
    {
        $this->load(__DIR__.'/Commands');

        require base_path('routes/console.php');
    }
}
在虚拟机的根目录下执行 php artisan swoole start 就会开启一个长起进程
到这里服务器和后端代码完成
现在需要一个前端页来实现长链接,前端代码很简单
<!doctype html>
<html>

<head>
    <title>测试WebSocket</title>
</head>
    <div id="WebSocket"></div>
<body>
    <script>
    var ws = new WebSocket("ws://test.in:9502");
    ws.onopen = function(event) {
        console.log("客户端已连接上!");
        ws.send("hello server,this is client!"); //客户端给服务端推送消息
    };
    ws.onmessage = function(event) {
        var parent = document.getElementById('WebSocket');
        var div = document.createElement("div");
        div.innerHTML = event.data
        parent.appendChild(div);
        console.log("服务器传过来的数据是:" + event.data);
    }

    ws.onclose = function(event) {
        console.log("连接已关闭");
    };
    </script>
</body>
websocket 检测的是端口只要通过这个端口发送数据都会获取到。到此,larave-swoole前后端长链接实现。希望可以帮到大家。
本作品采用《CC 协议》,转载必须注明作者和本文链接


 关于 LearnKu


 粤公网安备 44030502004330号
其实吧,限制laravle+swoole发展的并不是环境配置问题。而是变量污染的发现、处理的一系列思路和方法,仅凭目前已知的有的扩展和文档来看只有少数人能解决这些问题,而且整个排查、制定方案、处理的流程也没有达到文档级别的参考。 大部分程序员搞不定这些东西就注定成不了主流。 就目前Laravel团队的态度来看,基本上都不打算拿正眼看swoole
比较详细,前来支持!
有个问题不明白,请教一下,如果在swoole中要使用jwt认证用户,如何操作呢??
你这个跟laravel-swoole没关系吧,就是原生开发嘛