The Woorise WordPress plugin makes it easy to display your campaigns directly on your WordPress site and WooCommerce store without editing any code. You can add a campaign to a single page using the Woorise block, or show it automatically across multiple pages or site-wide using conditions. Alternatively, if you prefer not to use the plugin, you can manually embed your campaign using the provided embed code from your Woorise dashboard.
Add your campaign using the Woorise plugin
First, install the Woorise plugin directly from your WordPress dashboard by going to Plugins → Add New, searching for Woorise, and clicking Install Now. Once activated, you can add your campaigns in two main ways — to a single page using the Woorise block, or across multiple pages or site-wide using display conditions. This lets you automatically show different campaign types such as popups, popovers, contact forms, or promotional bars based on where and how you want them to appear.
Add to a single page
- In your WordPress dashboard click on the Block Inserter + icon in the top toolbar in the WordPress block editor.
- You can scroll down the list to find the Woorise block or use the search.
- Add the Woorise block where you want the campaign to appear.
- In your Woorise dashboard, select the campaign you want and navigate to the Share page.
- Copy the Embed ID and paste it in the Woorise block in the WordPress editor.
If you’re using the Classic Editor, go to your Woorise dashboard and open the Share page of your campaign. Copy the campaign’s URL from there and paste it into the Text tab of any post or page — it will automatically embed the campaign. Alternatively, you can use the shortcode below, replacing the id value with your campaign’s Embed ID from the Share page:
[woorise id="ABC123456"]Add to multiple pages
You can also automatically display your Woorise campaigns across your site without adding them manually to each page. This method is ideal for showing campaigns such as popups, popovers, or promotional bars site-wide or under specific display conditions. You can set conditions to control where your campaign appears — for example, only for logged-in users, specific post types, categories, or across the entire site.
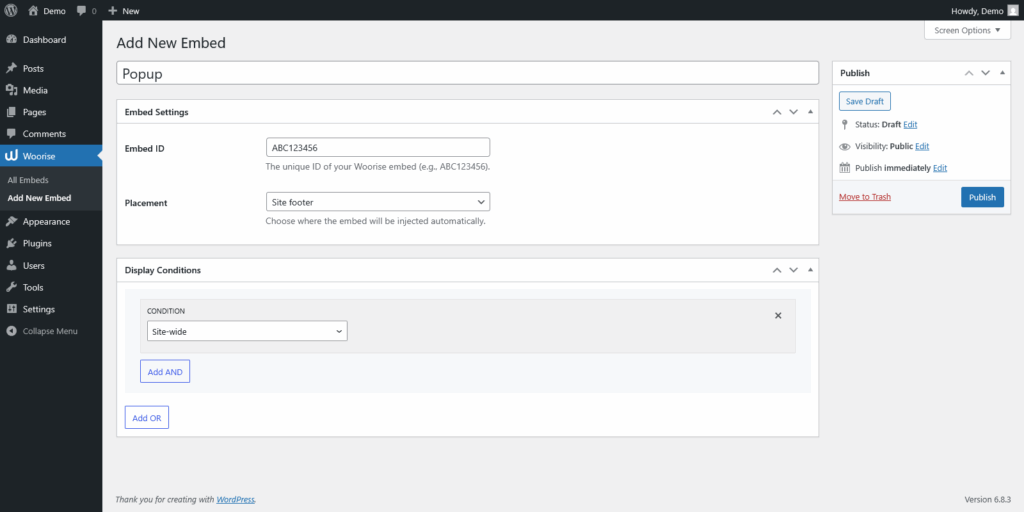
- After installing the Woorise plugin, go to your WordPress dashboard and select Woorise → Add New Embed from the main menu.
- Give your embed a clear title for internal reference.
- Next, open your Woorise dashboard, select the campaign you want to display, and go to its Share page. Copy the Embed ID and paste it into the Embed ID field in your WordPress dashboard.
- Under the Placement setting, choose where the campaign should be inserted on the page. The Site footer option is selected by default and works best in most cases. Other placement options include Site head, Before content, or After content, depending on where you want the embed to appear.
- Then, configure your Display Conditions to control where your campaign will be shown.
- Any design customization or visibility timing (e.g., triggers or delays) can be managed directly from the Embed Settings in your Woorise dashboard.
Display conditions
Display conditions let you control where your campaign appears across your website. You can combine multiple rules using AND and OR logic to create flexible targeting — for example, display a popup only for logged-in users AND on WooCommerce checkout pages.
- Site-wide: Displays the campaign everywhere on your site.
- Singular: Shows the campaign on individual posts, pages, or custom post types.
- Archives: Targets category, tag, author, or date archive pages.
- User: Displays based on user status, such as logged-in or logged-out.
- Pages: Targets specific pages or posts by their IDs. You can enter multiple IDs separated by commas.
- URL: Displays the campaign when the current page URL matches specific keywords or patterns.
- WooCommerce: Targets WooCommerce pages such as Shop, Cart, Checkout, or My Account. This condition appears only if WooCommerce is installed and activated.
Another way to display your campaigns is by adding the Woorise block directly to specific templates in the WordPress block editor. For example, if your theme supports block-based templates, you can insert the Woorise block into templates such as “Single Post,” “Page,” or “Product” to automatically show your campaign across all posts, pages, or WooCommerce products that use that template.
Add your campaign manually
You also have the option to manually embed your Woorise campaign on a WordPress page or post using the provided embed code. Once embedded, any updates you make to your campaign or its embed settings in Woorise will automatically appear on your WordPress site without needing to replace the code.
- From the Pages main menu, select the campaign you want and Navigate to the Share tab.
- In the Embed section configure the Embed Settings and copy the provided embed code.
- Open the WordPress Editor to the page where you’d like to embed the campaign. Add a block and choose the Custom HTML option.
- Paste the Woorise embed code and click Save. Once you have copied your embed code, you won’t have to copy the code again, simply update the embed settings and your embed will be updated.
Woorise plugin changelog
1.5.0 – 11/11/2025
- Added a new way to display Woorise campaigns across multiple pages or site-wide using conditional rules
- Woorise block and shortcode now uses the Embed ID instead of the campaign’s URL
- Update iframe resizer script
1.4.0 – 12/2/2025
- Fixes a conflict with URL parameters when previewing the campaign
- Update iframe resizer script
1.3.9 – 31/7/2024
- Update iframe resizer script in the block editor
1.3.8 – 30/7/2024
- Update iframe resizer script
1.3.7 – 10/4/2024
- Pass the current URL in the block preview
- Update iframe resizer script
1.3.6 – 5/11/2022
- Fix block alignment
- Allow iframe to be cached
1.3.5 – 20/3/2022
- Better load inline scripts
1.3.4 – 3/8/2021
- Run inline script after the document has been completely loaded
1.3.3 – 23/6/2021
- Update the way URL parameters are passed to iframe
1.3.2 – 22/6/2021
- Pass URL parameters to iframe
1.3.1 – 17/6/2021
- Fixes a bug when previewing campaigns with the default permalink settings
1.3.0 – 17/6/2021
- Introducing campaign preview in block editor
1.2.3 – 19/5/2021
- Prevent browser from caching iframe
- Update iframe resizer script
- Code refactor
1.2.2 – 14/1/2020
- Pass embedded URL to iframe
1.2.1 – 5/1/2020
- Added a selector to avoid conflicts with other iframes
- Update iframe resizer script
1.2.0 – 30/7/2019
- Introducing Woorise block
1.1.0 – 3/7/2019
- Allow multiple campaigns on the same post/page
- Update iframe resizer script
1.0.3 – 4/11/2018
- Update iframe resizer script
1.0.2 – 12/9/2018
- Update URL validation
1.0.1 – 20/11/2017
- Tested up to WordPress 4.9
1.0 – 14/11/2017
- Initial release