
2026-04-11 09:29 - General
I have the good fortune to currently be living very inexpensively in a home that's been in the family for seventy years or so. An older, barely-post-war, home. I don't know for sure but I suspect that thermal insulation is minimal to nonexistent. In looking for my own more permanent home, concentrating on an at least slightly newer one, guessing that more insulation will be one of the things that implies, has been on my mind. But how much of an issue is that really?
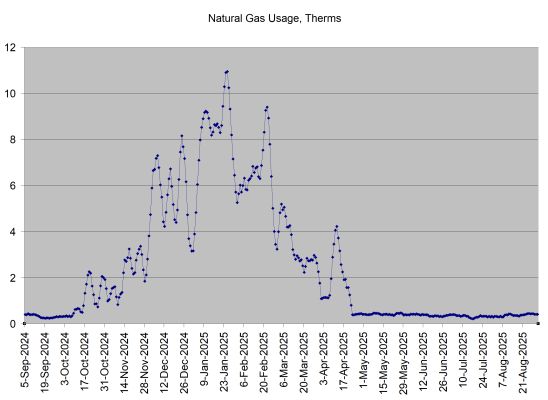
Here's my actual natural gas usage from September 2024 through August 2025. (Actually, a 5 day moving average for a slightly less spiky graph.) You can clearly see that in May through September usage is both very low and very flat: this is just the hot water heater, stove/oven, and clothes dryer. This non-heating period averages 0.354 therms per day. We can also clearly see on the graph, starting gradually in October and lasting through April, a much higher usage over the winter, when the house is being heated. This year, the peak was on the 25th of January, 10.93 therms used in one day — almost exactly a non-heating-month's usage!
On my most recent bill natural gas cost $1.51 per therm. If I subtract the average non-heating daily usage, then sum each day's usage for the month, then factor in this dollar cost, I can find out my actual heating cost:
| Month |
Therms |
Dollars |
| October |
19.87 |
$29.99 |
| November |
52.54 |
$79.26 |
| December |
164.25 |
$247.78 |
| January |
240.62 |
$362.97 |
| February |
171.91 |
$259.32 |
| March |
91.19 |
$137.57 |
| April |
37.78 |
$57.00 |
Or: $1,174 to heat this 1,300-ish square foot house for one season. From what I can look up pretty quickly, this isn't too far out from typical for the region. Perhaps I need to adjust my expectations. Either way, it's nice to have this one real, carefully gathered, data point. These 778 therms used compare to the 2025-2026 season (so far) at 768. Distributed differently month-to-month but very similar overall.
2026-04-10 21:43 - Making
I'm not totally sure where and when I first got it, but I know I've got a DYMO LabelManager Plug N Play Label Maker. A nifty device; unlike your typical label maker with a low quality built in keyboard and tiny display, this is a small and sleek unit with neither. But it does have a USB port (original USB A, i.e. "printer USB") for plugging into the computer. Do so and it presents as a USB drive with the simple and portable software to control it.
For some reason however, just like a more typical/portable label maker it uses batteries. A built in, rechargeable, lithium battery. And they go bad
. I know in the past, I had problems with mine. Plug it in and it would say the battery was too low to use, but charging. It never charged, though, almost. If I tried several times I could get it to work. Now however, it never worked. I had the realization that I could do something about that though!
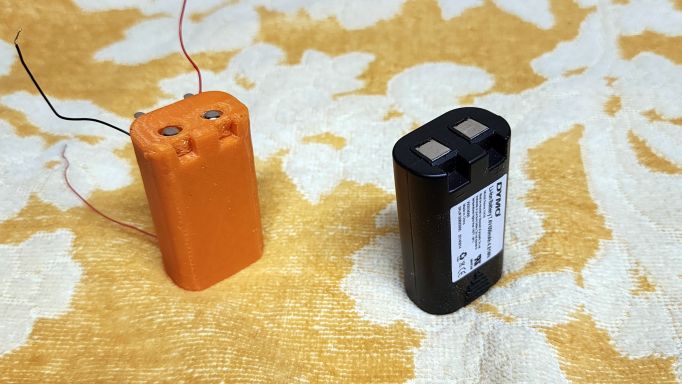
Not only do I have a 3D printer, I've got a collection of "street lithium". Even disposable "e-cigs" have rechargeable lithium batteries in them, plus they end up littering the streets just like cigarette butts. People like me will gather and harvest these battery cells. The original pack I'm replacing says it's "4.81Wh" on the side (and 7.4V which means it's made up of two cells internally), and I found a pair of 2.4Wh cells of appropriate size. First, I crudely connected these bare cells to the label maker with alligator clips. And it worked!
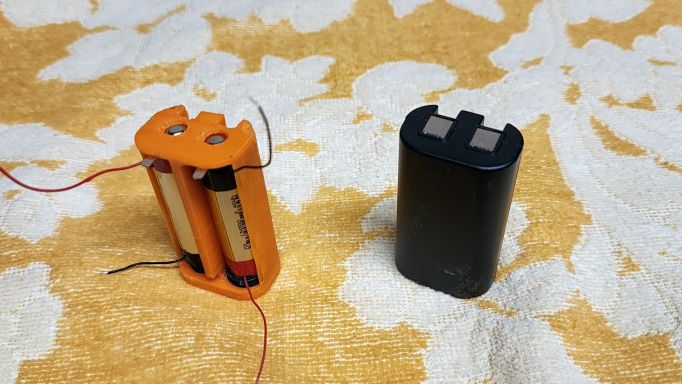
So I designed, more quickly than I expected, a compatible shell to fit in the same space. It's the same overall shape, plus critically two things: it's got notches to mate with a tab in the device (for polarity protection), and it's exactly the right length to snap in against the spring terminals. It doesn't look great; I've been tuning and tweaking the 3D printer and finding the edges of how fast I can drive it. Not quite this fast, for a high quality result. And that was mostly it! But once I got this far I decided to go a smidge further.
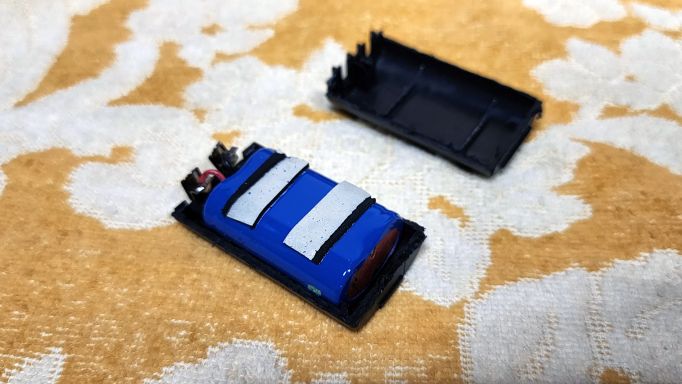

I manually hooked the original battery pack up to both charge and discharge it. Via experimentation I noticed that the pack would cut itself off under most charging conditions; this really seemed to be triggering over voltage protection. If I charged very gently I could get it to a sort-of reasonable voltage, but discharging it from this point gave roughly 7mAh &emdash; far less than the 650mAh advertised on the side. I decided I had nothing to lose and started cutting the pack open. Inside as expected I found two cells (though of different dimensions than I expected) and, under their outer wrapper layer, a BMS (battery management system) board, which is of course meant for a two cell pack like this. I harvested it for my replacement. After installing this, which fit in the slight spare space I had already left, I wrapped the replacement in just enough polyimide tape to keep things tucked in neatly.
When I put this replacement pack in, the software says not charging. But that's because, as the display shows, it knows this pack is already fully charged! It fully works as a replacement. With the added layer of tape at least, it's a smidge big, and takes some effort to remove. I'm not going to store this replacement inside the unit. I don't know what kills the batteries, but that might contribute.
So why the battery at all? Well, your more typical label maker will run off of six alkaline cells: nine volts nominal, closer to six and a half as they're nearly empty. This lithium cell will provide around nine to six and a half volts or so, nearly the same range. So it will work. But of course, the thing is designed to plug in via USB, and can't work otherwise. And to charge this battery via the USB connection! I think the hint is the full size USB A style plug. I this device seems to be from 2010, i.e. before the "smart" "phone" market really changed USB. Back when you might only get half a watt, possibly 2.5 watts, from a USB port. Potentially not enough to drive the motors and thermal printer head? So a very low powered boost circuit will slowly charge the battery, and the battery will definitely have the power to run the printer when that's needed. And the software will monitor the battery, refusing to print when it's low. That's my theory.
2026-03-10 17:39 - Making
Back in 2016 I got my first 3D printer. It's a minor hobby for me, but I keep using it every once in a while. It came with, as was very typical at the time (and not unusual still today) a version of Marlin for its controller software. In fact, part of the assembly/installation instructions involved downloading the source for it, tweaking the source, and compiling it. As far as I can tell, from a comment in configuration.h it was Marlin version 1.0.3 — but there is no such version? The vendor patched version was probably based on 1.0.2, from 2015. This is fine. But is fine good enough? In the middle of 2024 I looked into newer Marlin releases. Apparently I ended up with 2.1.1.2. There were a variety of new things. I especially appreciated additional controls available with the built-in screen, and overall I liked the result. For a while. It took me a long time to figure it out, but there was a serious problem.
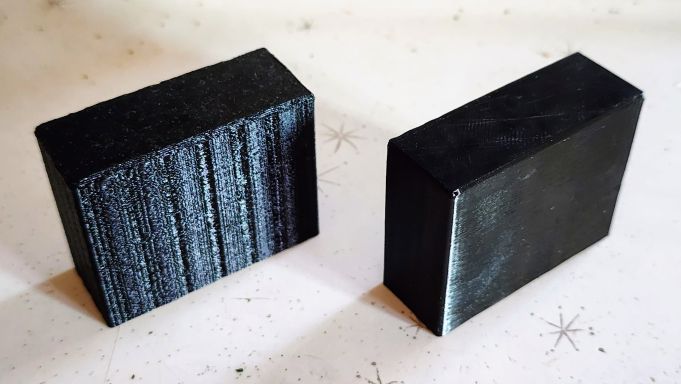
Pictured above is the very same simple box shaped object (a spacer for my silverware tray, so that each utensil fits neatly into the space available, rather than rattling around in empty space). On the left is one I printed while Marlin 2 was running on my printer. This printer uses a GT2560 control board, with the main processor running at 16MHz. Despite being a supported target, something about all the nearly ten years of changes between versions was too much: Marlin did not run well enough on my printer. When making probably any, but especially noticable in long straight moves like the faces of these boxes it would jitter periodically, where the X/Y translation motion would speed up briefly, go slower for a while, and repeat. This leaves very obviously visible artifacts in the objects being printed.
It actually took me quite a while to connect the dots and figure out that it was the Marlin upgrade that was the problem. I think I had generally smaller objects without such long straight lines, where this problem was most visible, for a while. But eventually figure it out I did. Despite it not directly supporting my model of printer (with going back to the original Marlin version as the backup plan), I took the leap of trying out a different type of printer control software: Klipper.
Like mentioned above, Marlin does a lot of complex math inside the printer and the newer software was (it seems) trying to do more than my printer could handle. Klipper splits this in two: the computer built into the printer essentially only does the direct controls of the hardware, the minimum possible. The complex math involved in deciding exactly when to (e.g.) turn which motors happens elsewhere: on another computer. This is almost definitely a more powerful computer. And since it's a regular computer, it's much easier to build and try features into this software.
It took some time, starting in October 2025, to build up a Klipper configuration from scratch for my unsupported printer. I could thankfully leverage other GT2560-based printers as a base. Then the most useful thing for me: Klipper has a lot more features for tuning and tweaking built in. I used them to find the mechanical limits of what my printer could do. Once tuned, it worked at least as well as ever, probably even much better than new.
I used it this way for a while with a small renaissance for me, it was new and exciting again, at least a little bit. Eventually, however, things took a rough turn again. The printer would randomly crash and cut out. Powering off and on would make it work again, usually. Then even that didn't seem to help again. After a short while I finally started looking into it. At first I checked the power supply, but it was outputting a perfect twelve volts the whole time. Then I looked at the control board for the printer and rapidly found the issue: the power connector. It was terribly black and charred. I think it wasn't quite good enough. Close but not quite, so with too much contact resistance it slowly built up heat over time until it failed too far. Once I replaced that connector the machine again was good as new. Maybe better? Long ago I added some LED strips, to make things bright enough to monitor with a camera. As best I can recall they would always dim when the heaters, especially the large heated bed, kicked in. Now that I've replaced the power connector they don't dim anymore — or so little that it's hardly perceptible.
This was a bit of a roller coaster. I had noticed the problem just before holiday season, and didn't figure it out for a month or two simply due to the timing of when I even tried to. Something about fixing it made me happy and I put a few extra dollars in: I upgraded to a magnetic flexible build plate. Which by the way was a great improvement! And to celebrate this I took the time, like I had long intended, to design an organizer insert for my primary toolbox. Before, somehow the tool I needed seemed to always be on the bottom.
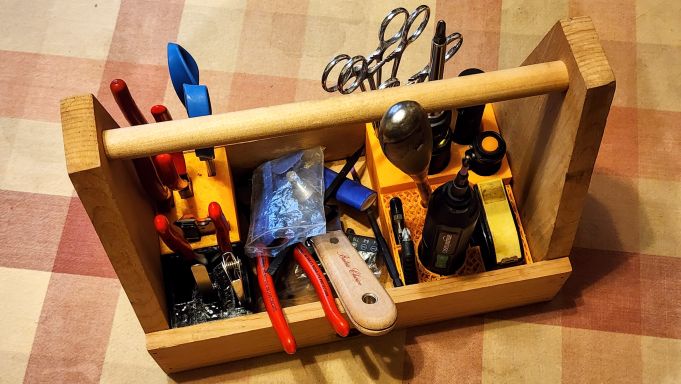
Here's the result of that. I split the design into four parts, one for each corner. Primarily because the 200 mm diameter print area of my delta printer definitely didn't fit the whole thing as one piece, and possibly not two. Turns out to have been a good thing: the first piece I printed, in black, used up the last of that roll of filament. One of the other corners (bottom right in this picture) was a failed print: a kink in the filament made it stop feeding, 80 or 90 percent of the way through. And then after finishing the fourth quarter, I again almost perfectly used up that roll of filament, the last I had on hand.
Somehow very shortly after that I was browsing Marketplace, as I sometimes do for curiosity and entertainment. I found not one but two very reasonably priced 3D printers. Both around an hour drive away, but very near each other. I reached out to both sellers and very quickly was setting up appointments with both of them!
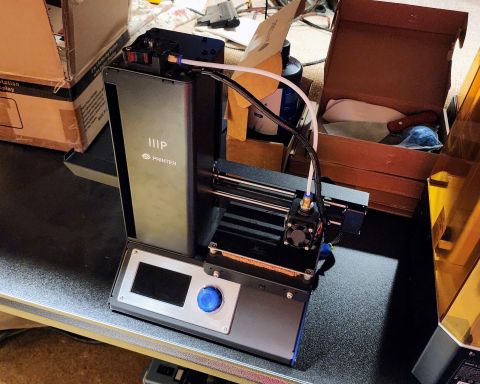
First was a Monoprice Select Mini 3D Printer V2. A rather famous early inexpensive model. I didn't want this terribly much, but it came bundled with five mostly full rolls of filament, including a glow-in-the-dark roll and a flexible material roll. Just the filament was nearly worth the $65 asking price. I've given it some attention and it's definitely working, though I might try to resell it, as it doesn't do much my other printers don't, if anything.
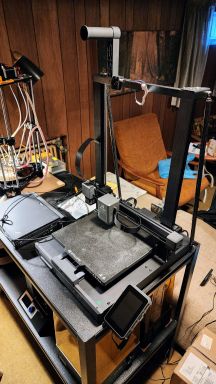
Next up was an Artillery Sidewinder X3 Plus. Much like my original printer, this is a nearly-no-name brand that offers good price vs. performance. It's a large format printer, fitting 300x300 mm on the bed and going up to 400mm high. It's quite new by comparison, having been originally released in 2023 (I don't know about when this particular one was made but I'm the 3rd owner, so probably not super recently!). It went for $60. It did not work when I first got it home, and I suspect the seller knew this. But, after a bit of looking around, unplugging and re-plugging things: now it works great! I've made a few real prints with it and I'm very happy with it for what I spent. In fact, it can print big enough things that I might redo my toolbox organizer as one big piece! I also should redo the wiring repair from the previous owner, with the sloppy white tape visible near the top.
I haven't yet decided if I'll switch one or both of these new printers to Klipper, yet. It should improve their performance. And there's some value to having the same control and interface for them all. But both of these new (to me) printers have nice built in interfaces, which Klipper would not use at all. So I'll live with them as is for a while, and think about it again later.
2025-12-30 14:31 - General
Almost exactly three years ago I was moving and needed a vehicle. I was interested in getting an EV but not excited about paying new vehicle prices, and unsure if I could expect (post move) reliable access to charging, so an EV as my only vehicle might be a risky prospect. I eventually decided on a used plug-in hybrid, with a bit of EV only range but also a regular gasoline engine for longer trips. Overall, this has worked out great for me so far.
Not too long after getting it, with the ability to go both full EV and traditional gasoline powered, I started to wonder: what's the cost efficiency of driving on battery power vs. gasoline power? I've got some notes based on documented average data (not my car) that gives a ratio of 1.89: gasoline being almost twice as expensive as electricity per mile. I also know I carefully measured my own vehicle, but I think I did a 100% to 0% EV only trip and recorded the distance and electricity in, and I also did a significant fraction of a full gas tank, in that 0% (i.e. hybrid-only) battery state. I wrote the numbers down on paper and remember a very similar two-to-one ratio (but don't have that piece of paper anymore). So I've been charging at every opportunity, and driving EV only whenever practical ever since.
A comment online was claiming very different numbers, but in a vague hand-wavy sense. I thought it must be wrong, can't be so different from what I've measured, so I tried to prepare some actual documented numbers from my own vehicle and experience... and found that indeed, the numbers are very different today!
I might not have taken things like charge/conversion efficiency into account, or I don't know what else. But I've decided to throw together a quick tool to help me figure this out once and for all. Put in: your (marginal) electrical cost per kWh, your cost of gasoline, plus your capacity and distance values. If you've typed in one cost (per unit) and not the other, that other will be calculated as the equivalent cut-off rate. So e.g. because electrical costs are more stable than gasoline: fill in all numbers besides your cost for gasoline and it will tell you the cutoff cost. When gasoline costs less than this, it's cheaper to drive on gasoline than electricity!
If possible, you should give the full amount of electricity consumed. (I have a charger (EVSE) that will report the total energy delivered in a charging session.) There are delivery, conversion, and charging losses and you pay for all the energy lost at each step. Unit labels are for my convenience. If you'd rather type in liters or kilometers or anything else, just ignore the unit labels.
At the time I write this: local gasoline was $2.499/gal while electricity was 22.966¢/kWh. Two years ago electricity was 17.219¢/kWh (so it's gone up by 33%) while gasoline was $3.019 (so it's gone down by 21%). With the most reliable distance/capacity numbers I can look up easily (it takes a time and just the right trips to gather really accurate ones): the energy cost of electricity today is about 38% more than gasoline, to drive the same distance. Quite a difference from the 50% less I calculated a while ago, probably with some bad assumptions or rounding making that number even further off.
2025-11-23 10:49 - Making
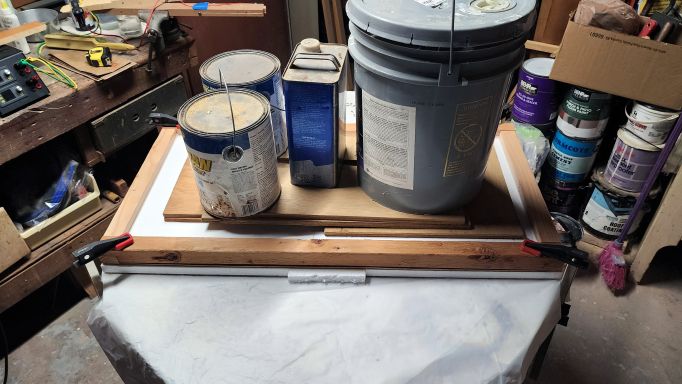
I just posted about my stray cat friend Marmalade. It's getting to be winter time and it's really too bad Marmalade has to stay outside in the cold. People sometimes make little shelters, a cathouse, for outdoor cats to stay in over the winter. Last trash day some across-the-street neighbors were throwing out a ruined old chest of drawers. I snagged it to be raw material for making one of my own.
The most common design seems to be based around a plastic storage container. When looking for more inspiration I found a commercial product, the Feralvilla and I like its design. The bottom-entry seems like it will do a great job keeping out the worst of the wind. Of course, using salvaged material means I have to tweak the design to work with what I've got. It's all particleboard, but the top and sides are ⅝" material.
So here's my design. The Feralvilla's walls go all the way to the ground, with entries cut out and a wind baffle. My material isn't big enough for that, so I put a wind baffle "hallway" inside. All the walls and floor are the mentioned boards. The roof is a frame of 2x2 with two layers of the thin hardboard backer from the drawers. I started breaking down the chest of drawers and coming up with this design Sunday night, and finished that Monday morning, and started building.
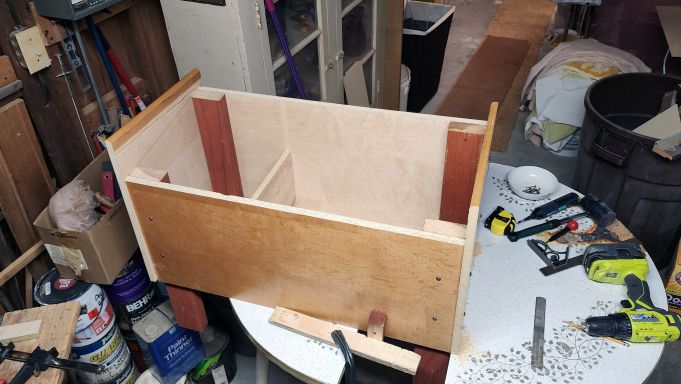
The first and second day saw much of the main structure cut and rough assembled, with screws (also salvaged!). You can see that I'm doing my best to cut-to-size, rather than to plan, with the angled sides. They're fit with the screws so I can see how big they really need to be, possibly accounting for minor errors in the other pieces. I'm also using the table and some shims (cut for this purpose) as clamps: this is wider than my 12 inch F clamps. Happily, I got the dado (cut with a router) to line up great, for fitting the "hallway" wall inside. One piece of it is floating in the slot here, to confirm.
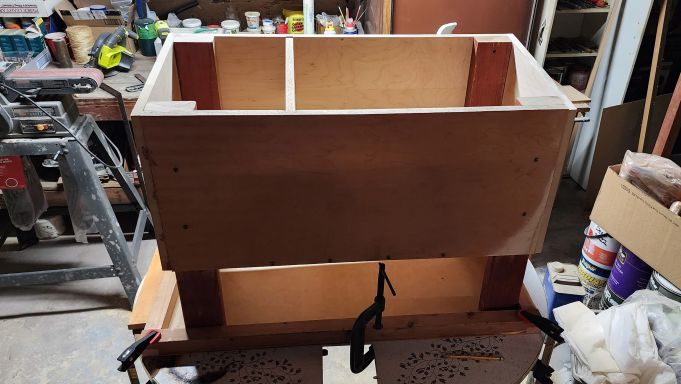
Next on Wednesday I finalized the main structure, mostly cutting the sides to the proper size. Some aggressive sanding and "glue and sawdust" wood filler got those in place pretty well, and things got glued together. Screws functioned as clamps here. Then I got the first part of the roof assembled: Some 2x4s were cut down to 2x2 and half-lapped, then glued to the first layer of ⅛" hardboard. A clamp at each corner and the middle of each long side did great here.
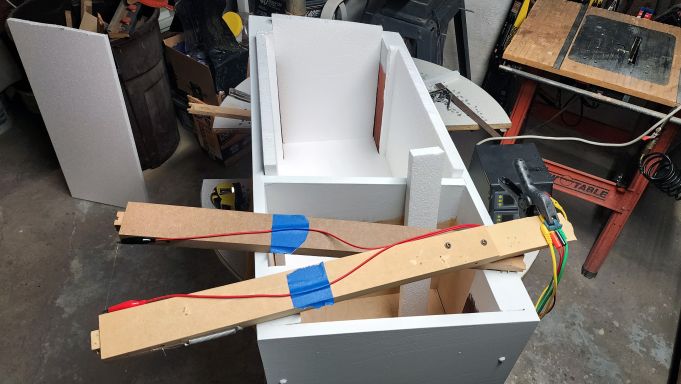
With the rest of Wednesday and most of Thursday I painted. And painted and painted. Being particleboard, the paint is extra important for weatherproofing. I got five thin layers or so on everything, though I didn't keep count carefully. With the paint dry I started insulating. About the cheapest material I could find was also pretty perfect: ¾" foam boards, precut for 16 inch stud bays, and I needed 13 to 15 inch widths. For this I threw together a hot wire cutter. (I had the wire originally for the plastic bending part of the power supply project, in the back of this picture powering the cutter!) The hot wire goes through the foam quick, and especially important leaves a clean edge without bits going everywhere.
Now we're on to Friday. The main structure is mostly done and I'm finishing the roof. I had the material so I put two layers of insulation on the roof: one inside plus one outside between the two ⅛" structural layers. This came out pleasantly strong; especially because it only needs to hold itself up. For the main structure I let the walls' insulation come ⅛" up above them, with the inner foam layer on the roof this should form a decent seal. Here again, some foam pieces are left rough cut, trimmed to fit after assembly is complete. These layers were all glued together, and you can see traditional clamps working together with gravity clamps in this setup.
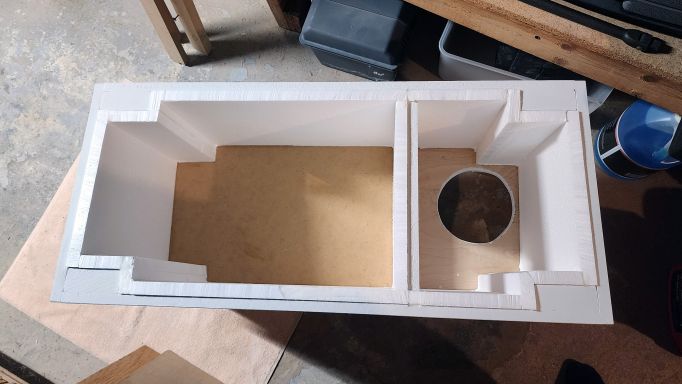
Also on Friday, here you can see the main structure, finished. Look closely and you'll notice the main floor on the right, with entry hole. On the left you can't see a layer of insulation on the floor, beneath another ⅛" hardboard layer protecting that. All the joints are caulked for air sealing (plus to help hold the insulation in place). A second view reveals the "hallway" and doorway.
Saturday saw final assembly of the roof. First the whole thing was wrapped in a layer of tar paper. I ended up leaving this exposed down the edges of the roof panel. The shingles and tar paper are also both salvaged, this time from the shed. The shingles have a proper starter course, and then are stapled (where covered) and glued (with more caulk) down onto the tar paper, also glued onto the roof. Unfortunately the shingles were only barely wider than the roof itself so I couldn't stagger the joints very much. There's never fewer than two layers anywhere though, so it would probably still be fine even if the joints in the tabs were all aligned.
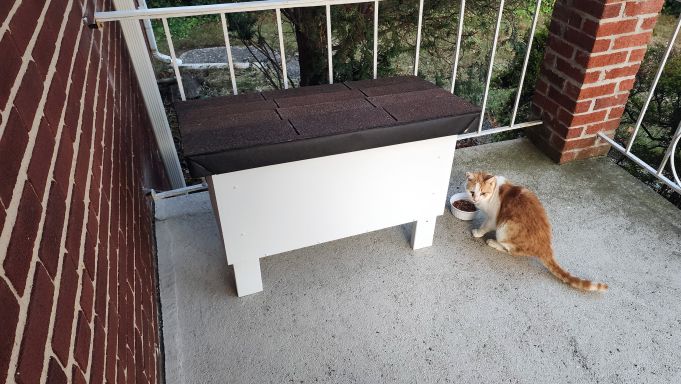
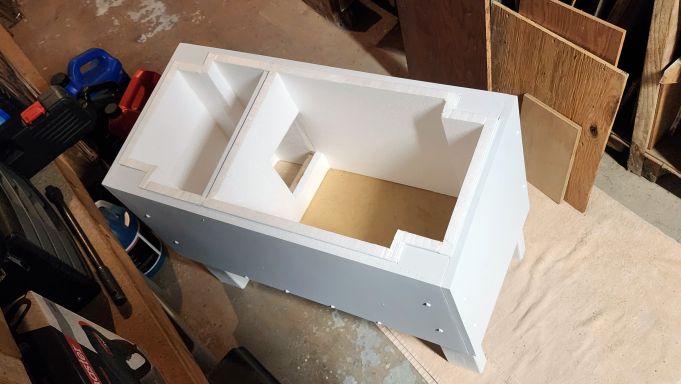
And finally here it is, installed on the porch. This is where Marmalade has been having breakfast for some time. With the bottom entry, it looks quite unassuming: just flat white walls on all sides. (The exterior paint was also salvaged. Bright white wouldn't be my first choice, but that's the only exterior paint that was freely available.) All the roof joints are caulked. It's hard to tell in this picture, but they are properly lapping so that water shouldn't run in anyway, but extra sealant can't hurt.
Only time will tell if Marmalade will figure out that there's a nice insulated bedroom to hang out in now! The bedroom ended up around 13x18 inches, and over 12 inches tall at the lowest side. Pretty close to ideal size for a single cat. A small insulated space can be warmed by the cat's own body heat. Not pictured: there's a layer of straw bedding on the floor there. Research strongly suggested straw as the only/best option here. I couldn't find any for a while, but then discovered that Tractor Supply had some nearby and in stock.
2025-11-22 22:02 - General


Back in early June I was reading a book on the porch. At some point, a cat wandered into the yard. Thanks to another cat I had run into a few times not long before (this a lost cat, chipped, returned to owner via county shelter) I had some cat food on hand. I popped inside and made up a bowl of food and was happy to see that the cat was still around when I came back out. I scared it away as I approached to set the bowl down.
Luckily again it didn't run too far away. I retreated and watched, and it came back and ate some food. From that point forward I fed it very often, usually just leaving food out to be available. I definitely saw a bunch of birds going at it now and again. The cat very slowly grew more comfortable around me. Eventually I could start guessing when it would be around; at first if I just barely opened the door it would immediately run away. Then it would just retreat to the far side of the porch. Then it didn't even retreat very much.
It's orange and white. As you can see in the first photo (from the very first day we met) it's got an issue with its face/eyes. There's usually some bloody seeming goop at the corners of the eyes. The second more recent picture shows that it sometimes manages to clean itself up pretty well, though. At first I had assumed the face was injured, some sort of battle scar. I'm less confident of that now.
For some time now, and definitely almost every day this month, it's been sitting on the porch waiting for me in the morning and I've been giving it breakfast. Very slowly and carefully (over the course of months) I managed to get it to accept some gentle petting. Before long after that it even responded to pets by turning around and rubbing up against me. These days I easily spend ten or fifteen minutes hanging out in the morning and even get to hear a little bit of a purr now and again.
Somewhere in here I decided to give the cat a name. I don't feel very creative so I decided to use an AI to help. I provided a description and asked for a long whimsical name. Among the options that came back was: Captain Marmalade Farsight. So that's the name, though in practice it's just "Marmalade".
Final note: it took until quite recently while Marmalade was comfortable being close, but now I'm pretty sure this is a TNR community cat. It's more subtle than the example pictures I find online and always possible that it's actually an injury, but I see one normal ear and one that's more truncated along a suspiciously flat line.
Either way Marmalade has become a nice friend.
2025-09-25 10:37 - Making
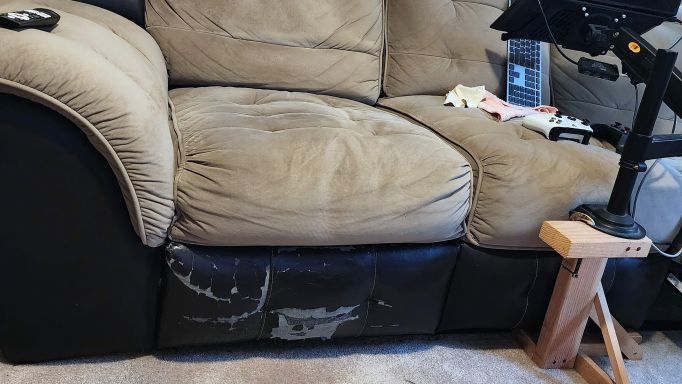
This is my old couch. I got it when I moved into Manhattan and it's followed me here to Maryland. I've already decided it's not going to move with me again. It was cheap when it was new, and it hasn't aged well. I really like the wide arm rests: good for arms, and leaning against, and resting objects on. But since the outside seats are recliners, they don't have a lot to attach to and have sagged after years of that usage. More obviously: the pleather surface of the footrests have worn away. I've wanted to improve this for a while but never got around to it.
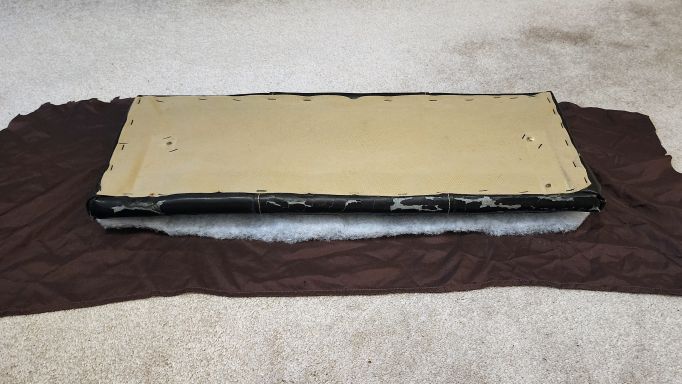
Yesterday I finally got off my butt. At a local thrift store, I found a brown sheet for only a few bucks. This morning, I started work in earnest. For some reason I started by imagining a sewn cover, and wasted a lot of effort measuring and trying to lay out something that I could sew. I was hoping to leverage the built in elastic (this being a fitted sheet) to make it naturally "stick" to the footrest. Before too long I realized I'm doing upholstery so I simply got out the staple gun, and things went much quicker.
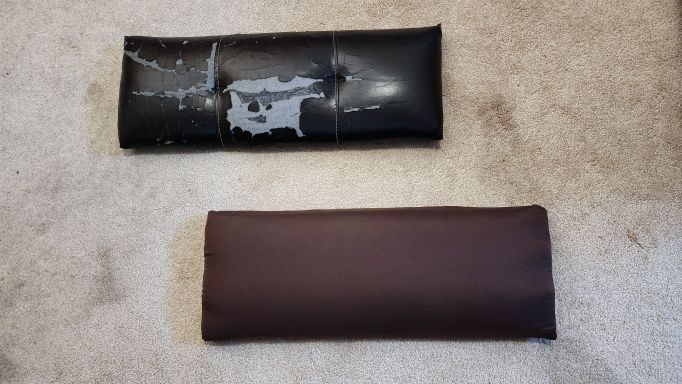
Each footrest got a piece of batting cut just smaller than it (can't add any thickness around the edges, or it won't fold back into the couch correctly) plus a piece of the sheet. This was stapled around the edges, then reattached. Look closely and you can see where I colored in (with black marker) the bright fabric backing, where the pleather part had worn off, a few years ago. And the much wider section of what has worn off now.
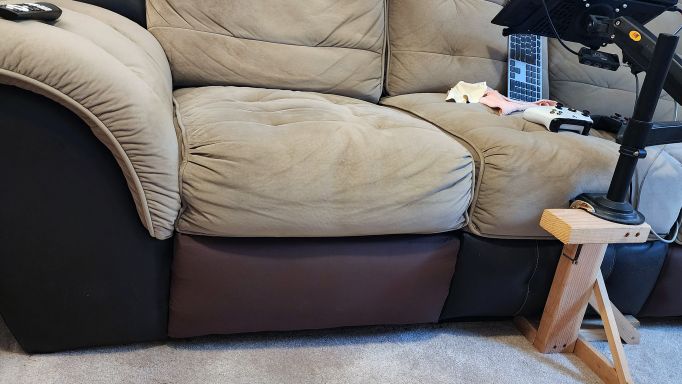
Here it is in place. The color certainly isn't a perfect match, but on the other hand it looks way better than the flaking broken surface underneath! The batting helps smooth out that roughness. A simple and cheap repair, but it will probably last as long as I need it to.
2025-09-10 12:40 - General
When I bought my (used) car in late 2022, it had two minor problems: a couple small chips in the windshield, and the wiper blades hit each other. It's got opposed wipers, which sweep both from the center out (as opposed to the more typical parallel arrangement). The passenger side wiper is a bit lower, and would rise too quickly, striking the other blade during operation. But just barely. I didn't know why, and for a quick "fix" originally, I trimmed down the length of the wiper. It's got "beam" style blades, which made this practical. I kept making small adjustments, and I could see it getting better. But by the time it was no longer hitting anymore, I had removed four or five inches from that side.
The windshield chips were just cosmetic, and out of the way enough to not be a big deal. But at some point with a significant (ten or fifteen percent) discount via a credit card, I opted for repairs. I was warned that there's a chance for them to cause further damage, but I figured: it's just two tiny cosmetic chips, they don't even go all the way through the glass. It'll be fine. It wasn't. Ironically, the smaller of the two did fixes did end up causing a crack in the windshield. Just cosmetic, and the further out of the way one. And for about a year it was small, still minor. Then one day, overnight, the crack jumped all the way from the out of the way origin on the passenger side, right across the primary line of sight the whole way to the drivers' side. So I got the windshield replaced. I had avoided that originally because: The car has rain detectors to automatically control the wiper, and replacement glass might be worse, and because I fear how well the rear view mirror would be attached. But that all worked out alright in the end. (And I wish I went for replacement to begin with: not only would it have saved hassle, but it wasn't as expensive as I expected!) The installer complained that they had trouble aligning the wiper blades! (I think they could have just been folded out of the way on the hinges built into the arms, but apparently they were taken off!) And also commented that the nut holding one of the wiper arms on was incorrect. (Foreshadowing!)
Fast forward a while. I've still got the wiper weirdness, and I've also observed that the washer fluid filler neck is very loose: I think it makes space that the fluid easily evaporates out of, over time. I get far less usage out of it than I expect, between refills. The local junk yard alerted me that they got a C-Max in, so I went and I got two wiper arms to experiment with, and a washer fluid reservoir. I expected to bend one of the wiper arms, tilting the blade so it's less likely to interfere.
Well I got home with the extra blades and realized I didn't take note of which was which: left/right or driver/passenger side. The process of figuring it out made me realize: On my car, they're installed backwards! They've got bends and angles from the factory, and one is longer than the other. So I've now reversed them, and they operate perfectly, and with plenty of space between them during operation! (The spare junkyard arms had blades installed, no worse than what I've got now, so I took a full-length one from there, and still no interference!) Would have been an easy fix if I knew about it! Plus I think it will be a minor aerodynamic improvement: the old layout had one wiper sticking up higher than it should have, into the air stream.
As far as the washer fluid goes: the extra junkyard replacement is just as loose as mine. It sure seems like there's supposed to be a rubber gasket between the tank and the fill neck, which are separate pieces. I think I'll try to figure out a good way to make such a gasket. On the replacement parts, easy to work on outside of the car.
2025-06-20 15:50 - Gaming
This was originally (at the date stamp above) a post that started when I used my PS3 for the first time in a while, and realized that its trophies were a record of my otherwise lost gaming history. Then I took some more effort to find equivalent data sets and gathered them together. Now I'm hoping to keep this up to date as a living document.
| 2008 |
December | PS3 | Grand Theft Auto IV |
|---|
| 2009 |
February | PS3 | LittleBigPlanet |
|---|
| | March | PS3 | Mirror's Edge |
| | May | PS3 | Prince of Persia |
| | May | PS3 | The Elder Scrolls IV: Oblivion |
| | July | PS3 | Fallout 3 |
| | November | DS | Scribblenauts |
| | November | DS | Chrono Trigger |
| | November | DS | Professor Layton and The Diabolical Box |
| | December | PS3 | Valkyria Chronicles |
| 2010 |
March | PS3 | God of War |
|---|
| | May | PS3 | God of War II |
| | August | PS3 | Rock Band 2 |
| 2011 |
April | PS3 | Gran Turismo 5 |
|---|
| 2012 |
April | PS3 | Lego Rock Band |
|---|
| | May | PS3 | Red Dead Redemption |
| | June | PS3 | inFamous |
| | July | PS3 | Skyrim |
| 2013 |
June | PS3 | Fallout: New Vegas |
|---|
| | June | PS3 | Catherine |
| | September | PS3 | Grand Theft Auto V |
| | November | PS3 | Final Fantasy XIII |
| | December | PS3 | Gran Turismo 6 |
| 2014 |
February | PS3 | Heavy Rain |
|---|
| | March | PS3 | Dragon Age: Origins |
| | March | PS3 | Tom Clancy's Splinter Cell HD |
| | April | PS3 | Metal Gear Solid V: Ground Zeroes |
| | April | PS3 | Uncharted: Drake's Fortune |
| | April | PS3 | Tom Clancy's Splinter Cell Pandora Tomorrow HD |
| | May | PS3 | Uncharted 2: Among Thieves |
| | May | PS3 | Tom Clancy's Splinter Cell Chaos Theory HD |
| | June | PS3 | Uncharted 3: Drake's Deception |
| | July | PS3 | Deus Ex: Human Revolution |
| 2015 |
April | PS3 | The Last of Us |
|---|
| | December | PS4 | Metal Gear Solid V: The Phantom Pain (100%) |
| 2016 |
February | PS4 | Fallout 4 (100%) |
|---|
| | April | PS3 | Metal Gear Solid Peace Walker HD |
| | August | SNES | Super Mario RPG |
| 2017 |
February | PS4 | Life Is Strange |
|---|
| | March | PS4 | Mirror's Edge: Catalyst |
| | September | Wii U | New Super Mario Bros. U |
| | September | PS3 | Persona 5 |
| | October | PS4 | The Last Guardian |
| | December | 3DS | Samus Returns |
| 2018 |
May | Switch | Super Mario Odyssey |
|---|
| | June | PS3 | L.A. Noire |
| | November | Switch | The Legend of Zelda: Breath of the Wild |
| 2019 |
January | Switch | Inside |
|---|
| | July | PS1 | Chrono Cross |
| | July | PS3 | Bioshock Infinite |
| | July | PS3 | Assassin's Creed: Brotherhood |
| | November | Switch | Hollow Knight |
| | November | Switch | Puyo Puyo Tetris |
| | November | Switch | Stardew Valley |
| | November | Switch | SteamWorld Dig |
| | November | Switch | SteamWorld Dig 2 |
| | November | Switch | Super Smash Bros. Ultimate |
| | November | Switch | SteamWorld Heist |
| | December | Switch | Untitled Goose Game |
| | December | Switch | Gorogoa |
| | December | Switch | Death Squared |
| 2020 |
January | Switch | Snake Pass |
|---|
| | May | Switch | Dead Cells |
| | June | Switch | What the Golf? |
| | June | Switch | Picross S |
| | August | Switch | The Turing Test |
| | August | Switch | Picross S2 |
| | August | Switch | Mr. Driller DrillLand |
| | August | Switch | Invisible Inc. |
| | September | Switch | Civilization VI |
| | September | Switch | A Short Hike |
| | September | Switch | The Great Perhaps |
| | September | Switch | Borderlands: GOTY |
| 2021 |
May | Switch | Bowser's Fury |
|---|
| | June | Switch | Blue Fire |
| | June | Switch | Mew Super Mario Bros. U Deluxe |
| | July | Switch | Picross S3 |
| | September | Switch | Human: Fall Flat |
| | September | Switch | Baba Is You |
| | September | GBA | Mario vs. Donkey Kong |
| | October | Switch | Picross S4 |
| | December | Switch | Mini Metro |
| | December | Switch | Boxboy! + Boxgirl! |
| 2022 |
July | PS5 | Astro's Playroom |
|---|
| | July | PS5 | Gran Turismo 7 |
| 2023 |
May | Switch | The Legend of Zelda: Tears of the Kingdom |
|---|
| | July | PC | Portal |
| | July | PC | Portal 2 |
| | July | PC | Portal Stories: Mel |
| | July | PC | Portal Reloaded |
| | July | PC | Kerbal Space Program |
| | October | Switch | Good Job! |
| | October | Switch | Picross S5 |
| | October | Switch | Super Mario Bros. Wonder |
| | October | PC | The Talos Principle |
| | December | PS3 | inFamous 2 |
| 2024 |
February | PC | Cities: Skylines |
|---|
| | February | Switch | Pikuniku |
| | February | Switch | Phoenx Wright: Ace Attorney Trilogy |
| | March | PC | Factorio |
| | March | Switch | Blossom Tales |
| | April | Switch | Oceanhorn |
| | May | Switch | Bastion |
| | May | PC | Alba: A Wildlife Adventure |
| | May | PC | Her Story |
| | May | PS3 | [Prototype] |
| | May | PC | Slay the Spire |
| | June | PC | Fallout Shelter |
| | July | PS3 | Ratchet & Clank |
| | July | PS3 | Beoynd: Two Souls |
| | October | Switch | Subnautica Below Zero |
| | October | Switch | Layton's Mystery Journey: Katrielle and the Millionaire's Conspiracy - Deluxe Edition |
| | October | PC | Superhot |
| | November | PC | eWorlds |
| | November | Switch | Picross S6 |
| | December | PC | Balatro |
| 2025 |
February | PS4 | Red Dead Redemption II |
|---|
| | March | PC | Antimatter Dimensions |
| | April | Switch | Yoshi's Crafted World |
| | May | PC | BitBurner |
| | June | PC | Tandem: A Tale of Shadows |
| | June | PS3 | Flow, Flower, Journey |
| | July | PS4 | Fallout 4 (replay w/ all DLC) |
| | August | PC | Braid |
| | August | PC | Firewatch |
| | August | PS5 | Horizon: Forbidden West |
| | September | PC | Half-Life |
| | September | PC | Half-Life 2 |
| | September | PC | Half-Life 2: Episode One |
| | September | PC | Two Point Hospital |
| | October | PC | Turnip Boy Commits Tax Evasion |
| | October | Switch | Timespinner |
| | October | PC | Escape Academy |
| | November | PC | Train Valley 2 |
| | December | PS4 | Project CARS |
| | December | PC | TOEM |
| | December | NES | Metroid |
| | December | NES | The Legend of Zelda |
| | December | PC | Tharsis |
| 2026 |
January | GBA | Advance Wars |
|---|
| | January | Switch | Piczle Lines DX |
| | January | PS4 | The Last of Us II |
| | Februrary | Switch | Picross: Lord of the Nazarick |
| | Februrary | PS4 | Kingdom Hearts Final Mix |
| | March | NES | Super Mario Bros. |
| | March | NES | Super Mario Bros. 2 (J) |
| | March | NES | Super Mario Bros. 2 |
| | March | NES | Super Mario Bros. 3 |
| | March | SNES | Super Mario World |
| | March | N64 | Super Mario 64 |


