Showing posts with label zakka. Show all posts

February 28, 2014

Skinny Pinnie - Received!

We are closing out our 
By now, everyone should be mailing
and receiving their finished pinnies.

As the "swap mama" I had the luxury
of choosing my partner,
and I selected the lovely and talented
Beverly, of golfingbev on Flickr.

Look what came in the mail for me,
courtesy of Beverly!

Image

There is so much goodness in here,
starring the most adorable...
and petite...skinny pinnie,
composed of teeny tiny hexagons!

Image

See that needle book in the background?
It's made to match the pinnie,
that I must try someday soon.

{Sigh...}

Image
{Photo by golfingbev on Flickr}
There are little treasures I'd never seen before,
such as Japanese zippers...
with French sayings...


Image

Or little cherry zip pulls!


Image

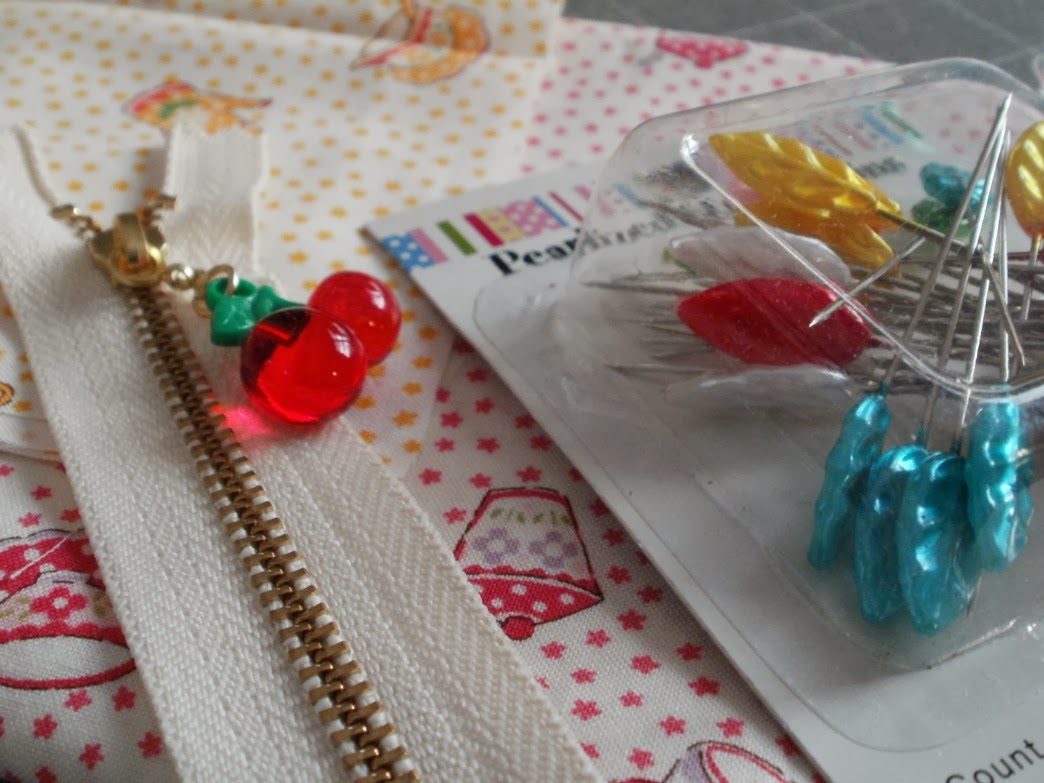
There are Japanese sewing and crafting goodies galore
in this little stack of sweetness.
I love each one to bits!

{Everything was all bundled up with bits of Washi tape!}


Image

There was something old...vintage feedsacks!

Image

And something new...this handy Seam-Fix
seam ripper with a little thing on top
for picking up the snips of thread.

{Of course I may never need to try that tool, since I'm such a perfect stitcher. Ahem...}


Image

There are more fabric samples, too...
little teapot prints I had admired on Bev's Flickr site...


Image


and even a Glamping mini charm pack!

{Can you find it, among all of the treasures?}


Image

And look at this darling little tag!


Image

I first noticed Beverly's sewing talents
during the Zakka Along 2.0 Patchwork, Please sew along.
Beverly has a distinctive style,
mixing bits of fabric to create detailed treasures
that leave me breathless.

Check out her photostream, and you will see what I mean!

Image
Beverly's Patchwork Please Apron - Polka Dot Cafe
Thank you, Beverly, for spoiling me rotten!

{I will be able to trace my new Japanese sewing fixation to this magic moment.}


Image Pin It

October 9, 2013

Prettified Pincushion

This week marks the grand finale
of the Patchwork Please Zakka 2.0 Sew Along.
Debbie from A Quilter's Table
has done a magnificent job of
hosting the last half of the sew along!

Image


They say you can't judge a book by its cover,
but as soon as I saw those Prettified Pincushions
on the front of the book,
I knew I wanted to have a copy!

For my version,
I chose lots of sunny yellow prints
from my fabric stash.
I used linen, to mimic the samples in the book.

Image

There is just something about the texture
of the linen, paired with
smooth quilting cottons...so touchable.

Image

The neutral linen also serves
as a calming backdrop,
enhancing the brightness of the yellows...
so exciting!

Image

I made my pincushion quite a while ago,
but I remembered to make some notes about
my progress,
for my "likes" and "dislikes" section.

Dislikes are always first...
If you haven't made your {first}
prettified pincushion already,
make sure you add a 1/2" for the seam allowance
{1/4" on each side}
to your template piece!!!

{This is just sooooo important. The finished pieced block will be 2 1/2" square.} 

The instructions don't say when to remove
the paper from the block.
I recommend waiting until all of the 4 blocks
have been stitched together.

One more criticism I have is regarding the 
size recommendations for the scraps
used in the paper piecing.
I am stone serious when I say that
I wrote in my journal,
"You will CRY, unless you cut the pieces LARGER
than the book recommends!"

I used pieces at least this size:
4 Prints: 2 1/2" x 3"
Background Linen:  (4) 1 1/4" x 2"
(4) 2 1/2" x 2 1/2"
(8) 1 3/4" x 2 3/4"

And now for my "likes"...

I really enjoy paper-piecing once in a while,
and this was really a rewarding project
to make with that technique.
I think it would be a great project
to make, even if you've never tried it before.

Another great thing about making this project
is that you end up with a
very functional and stylish item.
The size is just right,
and it is the perfect way to explain
what is meant by "zakka".

Image

My greatest "like" is the finished result.
I mean...just look at how CUTE it is!
The covered button adds so much charm!

{And I'm not just talking about MINE...I haven't seen one I didn't love,
as they have popped up all over the internet and blogland.}

If you've got this book,
I guarantee you will be happy
with the pincushion you prettify
from this design.

Image

 I think I'm going to have to prettify some more pincushions!
Image Pin It

June 11, 2013

Week #2 - Zakka 2.0 Let's Do Lunch!

All over blogland,
sweet peppers have been popping up,
thanks to the Patchwork, Please Zakka 2.0 sew along!

Even though this was a fairly straightforward project,
I was amazed at the variety and innovation
people put into it.

{Hop on over to Lindsey's blog, and then to the Flickr group, and you'll see what I mean!}

Image
My photo even made Explore on Flickr!
I can't wait to see what happens this week,
with the Breakfast, Lunch and Dinner towels.

{Here's my contribution:  LUNCH!}

Image

My sister Susie gifted me with a piece of cotton toweling
by Moda, finished off on the side edges
with a pretty vintage green stripe.

Image
Source:  Quilter Studio
I just knew it was perfect for this project!
I chose some 30's repro scraps and a few other favorites
and went to work.

The pattern calls for enlarging the letters in the words,
but my toweling was only 16" wide,
so didn't enlarge any of the templates,
including the adorable salt and pepper shakers.

I followed the directions provided, with success.
When the salt and pepper shakers were done,
they looked a wee bit like girls in dresses, to me.
Luckily, I had some text prints on hand,
for the finishing touch!

{Ta-da!}

Image

Now, you may know I love me some ricrac!
Ayumi added such a darling detail, using ricrac
for a little hanger up in the corner of the towel.

Instead, I decided to use a 2" x 6 1/2" scrap of
my precious sunshine yellow
Recipe for Friendship fabric,
to make my little hanger.

Image

I used the same print for the towel binding.
I only had to finish the top and bottom edges of my towel,
so this was a really quick and fun project,
and it used minimal fabric.

Image

Now for my likes and dislikes...dislikes are first:

Let me just reveal to you now that I'm a tightwad
when it comes to fabric...and everything else, I guess.
There is just no way I'm going to use
the amount of LINEN that is suggested,
for making even one towel.

{Much as I love the look, I just can't do that!}

Not only that,
I prefer using cotton tea towels, except for drying glassware.
If I hadn't had this awesome piece of Moda toweling,
I would have used one of the cotton towels

{They come in all different colors, and would be great 
for this project...and not so expensive.}

Image

And my "likes" are numerous this week...
I just love this project in general, 
for its gift potential and versatility.  
I can visualize these vintage-style shapes decorating
lots of other kitchen items, too!

{How about some hot pads with the salt and pepper shakers?}

Image

Fusible applique is such a fun and useful technique,
and I always feel a sense of success using this method,
even in shapes and letters with sharp curves.
The way these tiny scraps can add up to something so pretty
never ceases to amaze me.

I especially loved the method Ayumi described for attaching the binding.
I had no problems securing the edging neatly.

Image


My new LUNCH towel is so sweet and sentimental.
It reminds me of all the special kitchens of my childhood...
all of my grandmas and my great-grandmother
were fabulous cooks.

Image

I'm pretty sure I'm going to have to buy some more toweling
and finish the set!

Image

Image Pin It

June 5, 2013

Bell Pepper Coasters...Zakka 2.0 Sew Along - Week 1

Have you joined yet?
The Zakka 2.0 Sew Along has begun!
All you need is a copy of Patchwork Please! by Ayumi Takahashi
and a desire to have fun, sewing cool projects!

Image

I know, I know, I know...
I need another sew along like I need another yard of fabric.

{Well, not like that.  I legitimately always need another yard of fabric.}

I just could not resist joining Lindsey and Debbie,
since I have met so many amazing bloggers through the original
Zakka Style Sew Along!

Let's get going, with week #1's project:
Bell Pepper Coasters!

Image

I am delighted to report that this project is quick and easy.
That didn't stop me from messing up the first pepper I made.
I forgot to put the batting inside, before I stitched the front and back
pieces together!!!

{It kind of looks more like an apple at this point...I think I'll do something with it later.  Watch for it!}

Image

Anyway, I got it right the next try.

Image

Look how cute the back looks, too!

{BTW...I used fusible fleece instead of regular batting.  No shifting or bunching while I stitched the layers together.}

Image

Then I got smart, and made the other 3 coasters
all at the same time, assembly line style.
I cut all of my scrap pieces out,
and I used freezer paper to create my templates.

Image

That way I could just stitch along the edges of the templates,
instead of drawing the patterns on the fabric.

Image

I trimmed very near the edge,
and it was easy to press the pieces flat.

Image

Here is a great tip to use, whenever you are leaving openings for turning:
In addition to backstitching at the starting and stopping points,
sew a few stitches from the seamline to the edge of the fabric.

{Backstitch those stitches, too.}

Image

I used that tip to make a minor adjustment to the pepper instructions.
The pattern says to sew a seam to connect two of the prints,
then use a seam ripper to partially open the seam.

Instead, I just left part of the seam open, for turning later.

Image

I enjoyed making a whole set of four coasters, one from each color:
red, orange, yellow and green.

Image

I'm going to sum up my "likes" and "dislikes"
for each project I complete for the sew along:

Dislikes are first...

*I had some trouble understanding the very first step
of the instructions, possibly
because I didn't know what the goal was.
Once I realized that this technique was similar to one
used by Eleanor Burns, for applique,
I could picture what was supposed to happen.

A diagram would have been very helpful here.

{This comment may reappear in subsequent posts.}

*This is not truly a dislike,
but I found it easier to just make simple curves
for the templates.  The detailed lines in the pattern
were too fine to show up once the pieces were sewn and pressed.

Image

And the likes...

*This project was perfect for small scraps!
In fact, I adjusted my cutting measurements
to be just a bit larger than the templates.
It's fun to use favorite bits of fabrics in small projects like this.

Image

*I spent almost no time making the last three coasters.
As soon as I understood the process,
they practically made themselves.

Image

*They are just as cute on the back as on the front,
if you ask me!

Image

*The best like of all the "likes"...
if you head over to Penny's post at Sew Take A Hike,
she has easy directions to convert this project into
the most awesome matching hotpad!!!

I got busy and put my own hotpad together in no time.
It's just like a mommy to my little baby green coaster.

Image

And the back shows a nice view of some Heather Bailey fabric.

Image


I'm a bit worried that some of the other projects
 in the book will be much more involved.
At the pace of one project per week,
I'll just be joining in whenever it suits me.

{I'm so glad it suits me this week.}

Image

No pressure.
Won't you join, too?

Image

Image Pin It