Showing posts with label Tutorial. Show all posts

Thursday, April 16, 2015

#TBT #ThrowbackThursday #StampinUp - Soot Stamping and Modified Kissing Technique Heritage Card Tutorial

I wrote quite a few tutorials back in the day for my growing downlines since I found it challenging otherwise to continue all my own creative and administrative duties for my own Stampin Up business in addition to supporting my down lines properly with project ideas and technique demos.

I remember attending the SU Regionals Convention in Vegas in July 2003 with my downline Valerie when I saw a soot technique card available for swap!! I was so grateful to the SU Demo who swapped her card with me even though I'm sure my swap card was no where near as cool or innovative as her's.  I was DYING to try this when I got home, so I drove to my good friend, and downline, Eva's house so we could play together, which is how this tutorial with pictures was possible at the time.

{I apologize that this tutorial I'm about to share is textual.  Back in 2000-2005, capturing digital images alone and being able to resize them were about as technologically geeky as I got! I had just purchased a digital video camera was hoping to learn how to use it. Thank goodness for smartphones and video editing apps these days!}

Image


Ok, on with the Soot Stamping with Modified Kissing Technique Tutorial!

Lesson Plan #1
Instructions by Ching Tan 
Level (1-5) - 4 High Intermediate Difficulty
Created on 7/28/03 by Ching Tan and Eva Dobilas

Materials List:


Stamps:
  • SU Days Gone By
  • SU French Script
  • SU Autumn (“thanks” stamp)
Paper:
  • SU Glossy White – One 4.25 x 5.5 sheet, and one 2.5 x 5.5 sheet
  • SU Confetti White 
  • SU Basic Black  - One 4.25 x 5.5 sheet, and one scored 8.5 x 5.5 sheet
Inks:
  • SU Classic Basic Black
  • SU Classic Creamy Caramel
  • SU Classic Going Grey
Tools & Embellishments: 
  • Candles
  • Matches/Lighter
  • SU Skeletal Leaves
  • Tortoise Colored small buttons
  • Krylon Clear Acrylic Sealer (we had moderate success with hairspray)
  • Black heritage photo corners
  • SU Sponges

Soot Stamping Technique Directions:
1.       Line your work surface with paper for protection

2.       Light candle and hold it completely horizontal so that the wax will drip down onto the scratch             paper rather than on your hand.

3.       Let the tip of the flame casually touch / burn the slick side of the glossy card stock. 
      Take care NOT to allow your glossy c/s

  • to be lowered to the middle of the flame height, else you will begin to burn your glossy c/s.  (and if it does, don’t panic.  Quickly blow it out, and try to use that burned edge artistically.  LOL)
  • to be lowered even further near the wick, else you will get wax on your glossy c/s.
See how I’m holding the candle and glossy paper here?

Image


This is a picture of how NOT to hold the candle.  For one, you’ll get hot wax dripping on your hand (see my wrist? LOL).  Plus you’ll get wax melted onto your project which ruins your background.    So your glossy paper CANNOT be parallel to the candle, but it should be perpendicular at some sort of an angle.

Image

4.       As the TIP of the flame touches your glossy cardstock, black soot will result and will stick to your cardstock.  Move the tip of the flame about your cardstock so that you don’t create black sooty patches on your cardstock. Instead you want swirly smoke from the soot to create your background on the glossy c/s. 

This is what the background is suppose to look like.  Its actually too light in this example, but you can see the swirly background.  You want it darker than this, but NOT completely black.

Image

5.       I purposely cut the glossy paper bigger to allow for handling because the newly sooted glossy c/s can be smeared/smudged/removed by your fingerprints, knuckles, jewelry, etc if is not sealed.  

      ( In my particular card design, I purposely only sooted ¾ of the left side of the glossy cardstock to allow for handling on the untreated right side.  Else you can handle the treated c/s by holding it carefully by the edges much like you would handle a music CD.)

      Treat both sizes of the Glossy White ( 4.25 x 5.5 sheet and 2.5 x 5.5 sheet) using soot technique.  

6.       Seal your stamped and sooted background with Krylon Clear Acrylic Sealer.  I found that you have to spray directly onto the project paper rather than mist above it.  Else it will not set, and your creation will still smear.  Unfortunately, hairspray (we used Aquanet) didn't work. 


Modified Kissing Stamping Technique Directions:

1.       Take a clean un-inked French Script background stamp, and "stamp it" on your sooted glossy 
       cardstock.  This will remove the black soot and leave a white french script image.  (We figured 
         this out b/c our fingerprints would remove the soot…alas the modified kissing technique.)

Voila! We love how oopsies turn into something super cool!  Modified Kissing Stamping it is!


Card Assembly Directions:

1.       Stamp images from Days Gone By set (shoe, fleur de lis and tassle) in classic basic black on the larger sooty glossy cardstock. (We used both classic (dye) and craft (pigment) and found that the image was more crisp when using dye on glossy cardstock)

2.       Stamp woman portrait from Days Gone By Set in classic basic black ink on the smaller sooty glossy cardstock.

3.       Seal your stamped and sooted background with Krylon Clear Acrylic Sealer.  Remember to spray directly onto the project paper rather than mist above it.

4.       Let both pieces (the big and small) dry. 

5.       In the meantime, stamp the word “thanks” from the Autumn set in classic basic black ink on a   2” x 5.5" linen fabric.

6.      Then sponge the linen fabric with Going Grey and Creamy Caramel to simulate aged look. 

7.       Return to sprayed glossy cardstock pieces which are now dry. 

8.    Freehand cut around the small piece stamped with the woman portrait leaving a 1/16th border.

9.    Mount this trimmed piece onto white confetti c/s and attach 4 black photo corners.

10.    Tear off about a quarter of the basic black cardstock on the left side so that the torn textured side  is on top.  Adhere this on top of the sooted, stamped, sealed glossy cardstock background. 

11.    Cut a large skeletel leaf in half, so that you can create the illusion of 2 leaves.  Arrange and  adhere them on to the middle of the black c/s so they will look artful.

12.    Adhere the woman portrait, that is matted with black photo corners on top of the arranged  skeletal leaves.  Eva likes tilting, so we tilted this.  LOL

13.    Adhere the strip of linen fabric that say’s “thanks” on the bottom of the card.  On the right side, I cut it so it flushed correctly with the straight edge.  On the left side, I tore it to match the torn basic black c/s underneath it. 

14.    Glue tortoise shell buttons randomly on the white confetti strip.  Silver/gold brads can be  substituted as well.  Else, hemp colored cross stitched “x’s” might be yet another alternative as  we did here. 
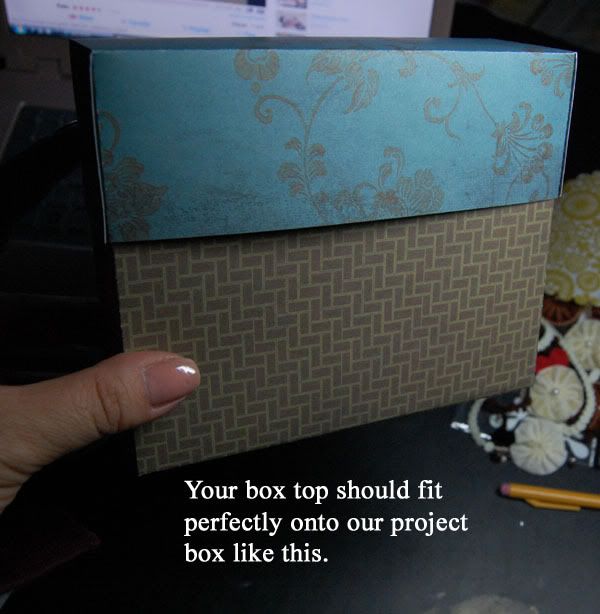

15.    Adhere the whole thing onto a folded basic black cardstock.  It should fit perfectly onto the top card front since I didn’t trim any of it.

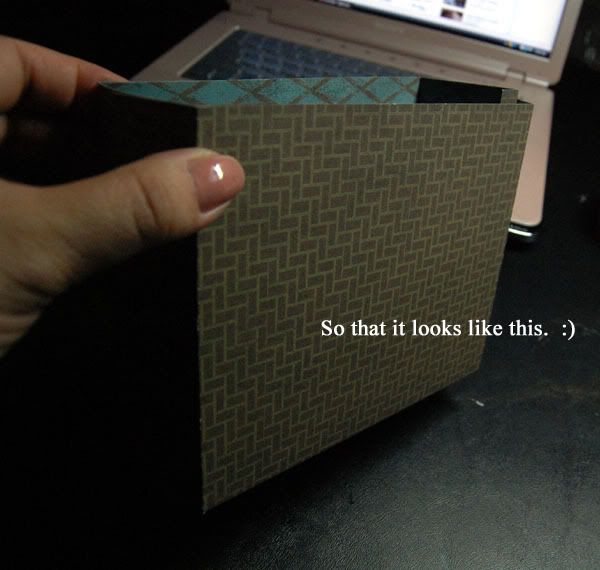
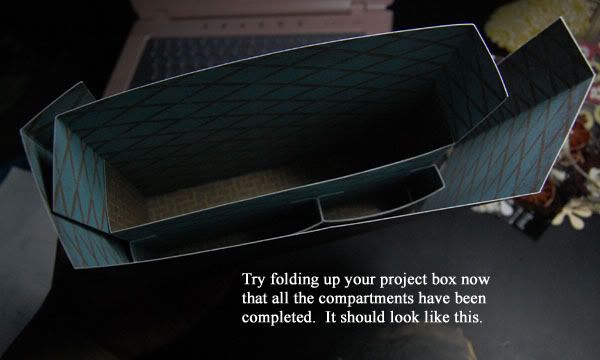
Here is the picture of the completed project again.  This project was for my intermediate/advanced group.  I had a few beginners and they followed along fine.  This technique would look fantastic for any upcoming Halloween projects.

Image


This last throwback card I'm sharing brings back another one of my strongest joyous memories of my SU Demo Days and of that incredibly fun afternoon of hanging out with my sweet friend Eva who's still my good friend to this day.  Paper crafting is how we met almost 15 years ago, and since then, we've experienced so much synchronicity in all that's happened to us, both good and bad. 

This card along with the original Soot card front I received at the long ago SU Regionals have been donated to our troops via For Our Hearts.


  Image

Heritage Days Gone By "Thanks" Soot Technique Card 
Paper: SU Glossy White CS; SU Confetti White; SU Basic Black CS
Stamps: SU Days Gone By; SU French Script; SU Autumn ("thanks")
Ink: Black SU Black, SU Creamy Caramel; SU Going Grey
Embellishments: SU Skeletal Leaves; Tortoise Colored  Small Buttons; Black Heritage Photo Corners; Linen Ribbon
Tools: Candles; Matches/Lighter; Krylon Clear Acrylic Sealer; SU Sponges
Size: 5.5" x 4.25" rectangular 


Sunday, November 28, 2010

I'm Back ...with a Video Tutorial on 2 Step Stamping

Yay! I'm feeling the mojo awakening in me to scrap again!! I've been going through all my stash in detail to get reacquainted with all "my pretties" and decided to purge a few things.

A relative of mine saw my listings and wanted this stamp set, so I decided to make a little video tutorial to show her how she could get the best out of this 2 Step Stamping set from Stampin' Up called "Terrific Tulips."

Bear with me, because this is my first video tutorial and I was holding the camera with my left hand - I'm right handed. This is the best I can do for now until I obtain the proper software for video editing.


Thanks for taking this set off my hands Sally. Enjoy!!

Image

Tuesday, May 19, 2009

One Page Layout Tutorial using the Nook's May Kit

ImageMy net was intermittent and mostly down this past weekend so I'm playing catchup with my bloggity blog tonight. I'm shooing away the janitorial staff here at work so that I can blog in peace!!!

It looks like the Nook's site is down due to some site upgrading work, so I'd like to share my Layout Page class here. (Whew! I had just posted my class on the message board, and then the board didnt' work anymore! lol...surely I didn't break it right?)

Image
Materials Needed: (from Nook's May Kit)
* Lily Bee Diagonal Striped PP
* Lily Bee Olive Green with Squiggly lines like clouds PP
* Bazzil Blue Embossed Cardstock
* Lily Bee Brown with white birds PP
* Lily Bee Frame Die Cuts
* Lily Bee Olive Green with trees PP (you will need 2x2 of this)
* Scallop Edge Scissors/Border Punch
* Maya Road (one each of tree and tree shrubs) chipboard
* A few pieces of blue Kaiser bling (I used 4 gems on my layout)
* 3 of the Puffy Velvet Maya Road flowers
* BG Chipboard alpha
* 2 blue or coordinating colored buttons
* Pencil (not included in kit)
* Creative Chaos Journalling Spots (not included in kit)
* Prima Flower Vine (not included in kit)

Step 1: Trim off the top portion of the "clouds" of the olive green pp by cutting along the squiggly lines

Image
Step 2: Prepare the other PP's by cutting them to size.

* Trim off 4 x 12 inches of the diagonal striped pp
* Trim off 1.5 x 12 inch of the diagonal striped PP
* Trim off 1.5 x 12 inch of the Bazzill embossed cardstock

ImageStep 3: Use a scalloped edge pair of scissors or border punch to create a scalloped border on the Bazzill embossed cardstock like this:

Image
Step 4: Glue the scalloped Blue embossed cardstock (with scallops facing towards bottom of the page) onto the diagonally striped 1.5 x 12 inches border, so that the straight edge of the blue cardstock is flush with the border of the diagonally striped pp.

Then glue the straight edge bottom of the Green Olive PP on top of this newly prepared blue cardstock/diagonally striped border like this:

Image
Step 5: Glue the larger piece of the olive green paper that now has a squiggly border on top of the 4 x 12 diagonal striped PP you cut out in Step #2 like this:

Image
Step 6: Pop out the Pink label shaped Frame die from the die cut paper.

Use the negative opening to trace a 2nd shape with your pencil onto the back side of the diagonally striped paper that you have left - the back side is the baby blue with white polka dots.

Trace it and cut it out.

Image
Step 7: Adhere your Blue with white polka dots and Pink label shaped frames onto your page like this (or however it better suits your pictures):

Image
Step 8: I thought for an extra oomp, I wanted to add another patterned paper and color to tie in the brown of the tree I'm going to add a bit later, so I trimmed off an "L" shape (its about 1.5 inches width) from the brown with white birds PP like this:

ImageStep 9: I trimmed about .5 inches from the left and top edges of my layout that was already put together so that I could attach this brown "L" shape for added interest like this:

ImageStep 10: Add pictures onto your page by playing up the label shaped photo frames you created:

ImageStep 11: Now add journalling spots (these were not included in the kit and came from my own stash)

ImageStep 12:Paint one of the Maya Road tree stumps brown with some brown acrylic paint. Cover one of the tree shrubbery "clouds" with that Lily Bee Olive Green pp with the trees on it.

TIP: I use UHU gluestick to adhere the pp's to the chipboard, and then use my BG file set to ensure clean edges of my covered chipboard.

Step 13: Now add your prepared tree, Maya Road fabric flowers, buttons, BG alphas to the layout like this to finish up your layout.

I also added a Prima viney flower from my own stash to the layout.

TIP: I added some blue Kaiser bling to cover the button holes for some added interest.

Voila! You're done!

ImageHope you enjoyed the class! If you enjoyed this kit featuring Lily Bee, please check out our May Kit at the Nook to get one for yourself! :) I'll be back with a few more projects from this really sweet and pretty May kit this week.

Image

"Doing Lunch (on a Friday Afternoon)"
Paper:
Lily Bee "Three Little Birds" PP; Bazzil Swiss Dots CS
Embellishments: Lily Bee "3 Little Birds" Frame Die Cuts; Maya Road Velvet Flowers & Chipboard; Misc Buttons; Kaiser Bling; MM Milk Chocolate "Piper" alpha Chipboard; Prima Vine Flowr; Creative Chaos "Perfect Little Labels" Journalling Spot
Accessories: SU Scalloped Border Punch

Friday, February 13, 2009

Cuttlebug Stationary Box Tutorial FEATURING Art Freckles "Ticket to Whoo-ville" Kit

Photobucket

As promised in my previous blog post, I have been really excited to share my pictorial tutorial with you that I created for our Fab Friday Tutorial at the Cuttlebug Challenge Blog. I'll admit, this is the most extensive tutorial I've ever done...lol...you'll see as you keep on scrolling.

I fell in love with this Stationary Box that was originally designed by Jackie Topa and I wanted to share with you my version that I created with the February Kit from Art Freckles called "Ticket to Whoo-ville."


Image

This is the outside......


Image

....and this is what the inside looks like.

Image

I created a pictorial tutorial for you if you'd like to make one for yourself. Go grab a cuppa cuz this is going to be a long one. :)

Supplies Needed: (for the stationary box holder and top only)
* 3 pieces of 12x12 cardstock and/or coordinating patterned paper. (In my example, I used only
patterned papers from the Art Freckles kit.)
* Paper Trimmer with trimming AND scoring blade
* Scoring bone to crease your folds
* Red sticky double sided tape
* Embellishments to decorate the outside of your Stationary Box. (In my example, all embellishments except for Prima flower are from the Art Freckles kit.)

Additional Supplies Needed: (for set of 4 tags, 4 qty 3x3 cards and 4 qty 4.25 x 5.5 cards)
* 3 sheets of 12x12 cardstock for card and tag bases.
* Additonal patterned papers and embellishments as required to create these items.
NOTE: The cards and tags will NOT be covered in this tutorial.


PART A: Making the Stationary Box Unit

Step #1: Take your first piece of 12 x 12 paper and SCORE IT @ 3 inches and 9 inches.

Step #2: Flip this same piece of 12 x 12 paper around, now SCORE IT @ 5 inches and 7 inches.

Step #3:
ImageStep 4:
ImageStep 5: fold and glue it down like this.

Image

Step 6:
Image

Step 7:
Image
Step 8:
Image
Step 9:
Image
Step 10:
Image

Whoohoo!! If you've gotten this far with me, you've just completed making the outside shell of the Stationary Box!

PART B: Stationary Box Shelves (there are 3 of them)

Step 1:
Image
Step 2:
Image
Step 3:
Image
Step 4:
Image
Step 5:
Image
Step 6:

Image
Step 7:
Image
Step 8:
Image
Step 9:
Image
Step 10:
Image
Step 11:
Image
Step 12:
Image

Step 13: I used the branch border from the Just My Type Cuttlebug folder set to emboss a long length of matching brown cardstock to decorate the front of my shorter "shelves."

(please disregard all the contents in my Stationary box for now.)

Image
Step 14:
Image

Whoohooo! We're almost there to the finish!!
Let's make our Stationary Box top now, shall we?


PART C: Stationary Box Top

Step 1:
Image
Step 2:
Image
Step 3:
Image
Step 4:
Image

Alrighty, we're at the last stretch. Let's make our inside flap doodads, i.e. post it note holder, stamp holder and pen loop.

Here's what the inside doodads look like to keep you motivated to continue on with our little project. :)

Image


PART D: Inside Doodads

Step 1: Cut into a coordinating piece of cardstock or patterned paper at 3.25 x 6.25 dimensions. Score it in the middle, and put a pad of 3x3 post it notes inside. I decorated the top of my post it note holder with some ribbon. Glue the covered pad onto the LEFT side of your inside flap opening of our stationary box.

Step 2:

Image

Step 3:

Image

The stamp pocket is glued to the RIGHT side of the flap and the pen loop is glued nearer the bottom of the flap (when open) as pictured.

Image

Yeeaahh!! We're done! Now, please go ahead and make a few 3x3 cards to insert in the LEFT smaller pocket shelf, some embellished tags for the RIGHT smaller pocket shelf, and some 4.25 x 5.5 cards for your larger pocket shelf in the back. You're on your own for these items as they are not a part of this tutorial.

If you loved the specific supplies I used for my Stationary Box, please visit Art Freckles to see their February "Ticket to Whoo-ville" monthly kit. Shannon, Renee, Linda, and Kimberly are the nicest gals around.

Art Freckles will also be hosting a Cyber Crop at the end of March! Be sure to join us then for lots of fun challenges and prizes!!

Image
Thank you for sitting in with me THIS long for this Stationary Box tutorial. Please join us NEXT Friday, and EVERY Friday, for our Cuttlebug Challenge Blog's Fab Friday series.

Image

Stationary Box (Most items are from Feb Art Freckles Kit)
Paper: Upsy Daisy "Man About Town" Patterned Papers
Embellishments:
Maya Road & May Arts Ribbon; Kaiser Pearl Bling; Rose Moca Tiny Alpha Stickers
Accessories: Cuttlebug Just My Type Embossing Folder; Scoring Blade; Red Double Sided Sticky Adhesive Tape
Size: various
 

Blog Template by BloggerCandy.com