Showing posts with label techniques. Show all posts

Sunday, 1 February 2026

Sunday Snippets - Criss Cross Technique


My snippets card for today (sorry, Christmas once again) uses a technique I hadn't come across before - perfect for using up patterned papers. It's called the 'Criss Cross' technique - and this is the link to the YouTube tutorial I followed, HERE:

Image

And to show there's no waste:

Image

used:

- 5.5" x 4.25" 'Silkweave 'Pale Ivory Linen' card blank - side opening

- added a layer of Tonic pearlescent 'Red Velvet' card to cover the whole of the card front to pick up the red in the patterned paper

- the papers, one patterned and one plain green are from the gorgeous Honey Bee Stamps 'Make It Merry' paper pad - a huge favourite of mine. 

- I followed the tutorial and 'sort of' managed to assemble the pieces evenly onto a snippet of 'Pale Ivory linen' card, using Collall All Purpose Glue for moveability. I used one patterned sheet and one plain green sheet - which actually gave me enough pieces for four cards in total - result! Double sided card such as SU card with one patterned and one plain side would work so well wth this clever idea!

- then adhered the 'criss cross' panel to the card front using narrow foam tape and a glue stick for moveability

- and now for the sentiment - I used a Penny Black 'song of peace' sentiment stamp and VersaFine Clair 'Shady Lane' ink pad to stamp the sentiment, using a 'jig' I made, as there were four to die cut/stamp identically

- the die I used is a Presscut 'Oval Stitch Hole' die - a huge set in many sizes!

No challenges this time. I'm Brenda's GD over at Allsorts right now - go me! And also I already used one stamp from the stamp set so it isn't totally NBUS for Darnell's challenge!

Dudley Pupdate: He's developed a habit of snuggling down all cosy between us in during the night, on what is thankfully a King sized bed. Even to the point of lying with his head snuggled into my neck. That's fine by me, but the other morning I was woken up by something gently stroking my hair. I thought it was Dudley at first but then, cracking me up, realised it was Len half asleep thinking he was stroking Dudley with his hand! Havanese pooches do have silky hair rather than fur BTW! It took all of my self control not to lick Len's hand in return - and give a loud 'WOOF'!!

Sarn has opened up Challenge #525 in the Snippets Playground HERE.

Do come and play with us in the Playground - numbers are back up after Christmas and we love seeing all of you - where the sun always shines! Goodness know - we need sunshine in our lives right now!

Love as always, Dudley and yours truly,


Image


Saturday, 31 January 2026

Allsorts Challenge #842 - 'Create your own background'

I'm happy as can be to be asked to be the Guest Designer over at Allsorts Challenge #842 HERE. The theme is to 'Create a background' and eventually I decided to go back to the background technique I love ................. 'Herringbone' using snippets! This is what I made:

Image

I used: 

- 5.5" x 4.25" cream Hunkydory  card blank - side opening

- a leftover snippet of the same sheet of Hunkydory cream card on which to assemble the herringbone background, covered with 'medium sticky' double sided adhesive sheet

- a selection of quarter inch wide paper strips, cut from snippets tucked in the back of LOTV's 'Country Gentleman' 8" x 8" paper pad - a variety of different colours/patterns

- spent a very contented time adding the strips to the sticky panel 

- the next step, once the herringbone was completed, was to snip off the overhanging ends of the strips - I'd done this after a fashion as I went along so as not to waste any small pieces but trimming the remaining ends from the back of the card panel evens it all up

- then I was faced with a panel which wasn't exactly equal on opposing sides where the chevrons finished - it's the nature of the beast and so I carefully trimmed the herringbone panel, a little bit at a time and ended up with a piece measuring 3.5" x 4.75" - which still kept the A2 card balance/proportions and evened up the pattern edges

- then layered the herringbone panel onto a larger rectangle of brown Hunkydory card as a frame add narrow frames

- glued the herringbone layer onto the card front, using Collall All Purpose Glue

-adhered the two layer front panel to the card blank using narrow foam tape for some lift

- then stamped the sentiment using a large stamp from a set by The Greetery called 'Opposites Attract' - and a Tsukeno Brilliant 'Pearlescent Poppy' ink stamp, onto  a snippet of the cream card I'd been using throughou

- made a cutting 'jig' and die cut the sentiment out, using a die from the same Greetery set

- then took a little snippet of the Hunkydory brown card and die cut it using a Lil'Inkers 'Stitched Rectangle' - tweaking it a little at each end by shuffling the die along by one stitch and re-cutting

- glued the sentiment together and then onto the brown rectangle - finally gluing it to the bottom right of the card 

- finished!

I loved making this card, especially the herringbone background. It's the selection and slicing of the snippets of  papers I found to be more onerous - actually building up the herringbone itself is very satisfying!

Do come and play in Allsorts - there's also an 'anything goes option', the challenge runs for two weeks - plus the prize is four background stamps from A&C. Go for it!

With love, good grief, I sound like Meghan Markle!!


Image


Sunday, 7 July 2024

Sunday Snippets - Fractured Christmas card

Reminded by Carol L's 'pick' last week. I revisited the Fractured Card 'technique' the other day:
Image

I used:

- 5.5" x 4.25" white card blank, side opening

- a snippet of white card covered with a piece of patterned paper from the really lovely Honey Bee 'Make It Merry' paper pad

- trimmed the panel to measure an eighth of an inch less than the card blank on all four sides as the base and set it to one side

- die cut a snippet of the same white card using a 2" Heffy Doodles 'Stitched Squares' die ready for the sentiment

- I die cut a 4" square 'jig' with a scrap of card and die cut the centre portion out using the same 2" stitched square die turned to sit with the points facing top. bottom and the two sides 

stamped 'MERRY and BRIGHT' using a sentiment from Penny Black's 'Yuletide Wishes' set of stamps and a VersaFine Clair 'Shady Lane' ink pad - and the mini Misti

- glued the sentiment die cut onto the front panel of patterned paper

- cut four quarter inch wide strips of a snippet of plain green paper from the same pad as the patterned paper came from - always a good way to match colours

- then, one at a time I used a glue pen to glue them from a corner of each side of the sentiment panel, right down to the edge patterned layer

- flipped the paper covered panel over and trimmed off the 'overhanging bits'

- adhered the completed panel onto the card blank using narrow foam strips - finished! Sorry, no photo of the white and green snippets I used 

I'd like to enter this card into the following challenges:

- Christmas Kickstart #88 - 'Festive Frames' (I hope the Fractured technique counts as forming a frame around the sentiment panel) 

- Allsorts Challenge Week 788 - under the 'Anything goes' option.

Dudley Pupdate: Dudley has been a proper little pickle this past week! We had a guy here doing some regular maintenance work and the little scamp decided that he would make a good Mum to his puppies if you get my drift. Oh the shame of it - so determined was Dudley that he even skipped away from a treat as I was trying to close him in the craft room with me! Luckily the chap could see the funny side of it. 

Then, I went to have my hair chopped and there was a sweet little dog in the salon so of course I made a fuss of him.  When I got home Dudley was very excited as always - practically breaking the front door down. But not long after my arrival he 'really' sniffed my leg and he probably picked up Teddy's whiff, froze, glared and stalked off to bury his head under Len's pillow .... showing his bottom to us - purely to demonstrate that he was in a 'strop'!!  I tell you - it's like having Kevin The Teenager living here!!

Remember, I've just kicked off a new challenge over in the Snippets Playground HERE

Hope to see you on the swings, the weather is up and down at the moment - so perhaps the seesaw would be a better choice? Corny, I know. 

Love as always, Dudley Dog and me


Image


Friday, 15 September 2023

Christmas cards and the 'Fractured Card' technique

Ages since i posted on here, other than on a Sunday - gotcha!

I revisited the Fractured Card ' technique the other day. Using just two pieces of patterned paper and one and a bit of 'almost minus a pattern' pieces of beige paper from the same pad - I made four cards. Two of each colour layout and here's a couple of them - the light caught the right hand card so the left hand one is the truer colours:
Image


I used:

- 5.5" x 4.25" cream card blank, side opening

- a snippet of white card measuring an eight of an inch less than the card blank on all four sides as the base for the patterned paper layer

-  whole sheets of 6" x 6" paper from the First Edition 'Perfect Christmas' paper pad

- die cut a piece of beige very lightly patterned card from the paper pad using a die from The Works 'Square Stitched' set of eight dies

- this time I used one of Ann Melvin's sticky pads in the mini Misti - I love it (thanks for the tip-off Val). And  stamped 'MERRY and BRIGHT' using a sentiment from Penny Black's 'Yuletide Wishes' set of stamps and a VersaFine Clair 'Shady Lane' ink pad (think I first spotted Kathy K using this gorgeous colour - love it!) 

- glued the sentiment die cut onto a further piece of the same paper, already die cut with the same die to make it into a double layer then glued it onto the 'base' piece of white card 

- cut four quarter inch wide strips of the beige lightly patterned paper 

- then, one at a time I used a glue pen to glue them from a corner of each side of the sentiment panel, right down to the edge of the white card layer

- flipped the paper over and trimmed off the 'overhanging bits'

- then used the two complimenting patterned papers to 'fill in the blank spaces'. It's very easy, so long as you always butt a 90 degree corner of the patterned paper into the 90 degree angles you've created with the strips

- and also remember to alternate the patterned papers!

- I just trimmed them by hand, first of all roughly so I could move onto the next area and then from the back, using a large pair of Fiskars dressmaking scissors - kept purely for card making. My dressmaking scissors are almost under lock and key key here

- glued the completed panel onto the card blank - finished!

Oh boy, what bliss to have the drop in temperatures here. We've all slept quite well for at least two nights now - not sure how long it will last but we do feel really refreshed!

I had a lovely Birthday on Tuesday - still trying to get round to thank everyone for the lovely cards and good wishes. You helped to make the day wonderful! Mwah!! x 


Image


Sunday, 20 August 2023

Sunday Snippets and the 'Fractured Card' technique

I spotted a 'new to me' technique the other day, perfect for using up a few snippets. and this was my first play, and the snippets I used:
Image


Image


I used:

- 5.5" x 4" white card blank, tent style

-  a snippet of black and white patterned paper, found in the back of my Studio Calico 'Snippets' paper pad - it was only 3.75 " wide, which is why my card blank is slightly narrower than a true A2 size. Trimmed the paper to 5.25" long and put it to one side

- then die cut a snippet of white card using a die from The Works 'Square Stitched' set of eight dies, one of my best bargains ever, but sadly no longer sold by them. The square measures just over 2" square BTW

- for the first time I used some Sizzix grid-lined sticky plastic in the mini Mistii to grip the square whilst I stamped the sentiment **

- stamped 'Happy Birthday' using a sentiment from Woodware's'Deco Sayings set and a VersaFine Clair 'Nocturne' ink pad onto the white square, twisted to a diamond shape

- glued the sentiment onto the piece of black and white patterned paper

- cut four quarter inch wide strips of reddish paper - from the same 'Snippets' paper pad

- then, one at a time I used a glue pen to glue them from a corner of each side of the sentiment panel, right down to the edge of the paper

- flipped the paper over and trimmed off the 'overhanging bits'

- glued the completed panel onto the card blank - finished!

** Another time I will probably stick the double sided Sizzix Sticky mat to a piece of appropriately trimmed thickish acetate to fit inside the Misti aperture. Less mess and curling IMHO. I do have the Misti Sticky mats as well - but the cost makes me shudder 

Here's the link to the best tutorial for making a 'Fractured Card' that I found on YouTube.  There are plenty around, some using mixed papers - even better for using snippets, but this one appealed to me the most, due to the clarity, speed and simplicity.

I might make a bunch of these using Christmas paper - they really are rather effective and so very easy and therapeutic to make, I made this particular card with one of Len's G. Nephews in mind. He will be 18 so I might add a die cut 18 in the lower right hand corner. Still plenty of time to decide though.

We now have our latest Challenge, run by Sarn, over in the Snippets Playground HERE - with a lovely prize made up of several goodies.

Dudley Pupdate: Not much to report about Dudley really, he's been feeling the heat lately, despite the rain and even though we've previously had higher temperatures. I think the 'muggy' atmosphere affects him much as it does us - we tend to turn into sloths! There again, perhaps he's almost ready for yet another 'puppy cut' - whisper that one! 

I thought he'd run away the other day - major panic stations - and a 'dog hunt' through the house and garden. Turns out, there he was quietly cooling off .................... tucked in between the cool porcelain toilet and the tiled walls in the shower room having a little snooze! It seems as if no place is 'off limits', once he makes his mind up. 😃 And the way he looked up, rather indignantly, when I disturbed his dream cracked me up!

Love from Dudley - and of course me,  


Image


Sunday, 14 May 2023

Sunday Snippets and a new technique

This is my snippets card to kick off challenge #454 over in the Snippets Playground. Go HERE to join in the fun!
Image

I used:

- 5.75" x 5.75" square cream hammered card blank - side opening

- panel of the same cream hammered card for the top panel and a slightly larger one for the gold 'frame' - Tonic Mirror card 'Inca Gold'  - that gold was a sizeable snippet, but still a snippet!

- dug out another fair sized snippet of 'vintage rose' patterned card then added double sided adhesive paper to the back 

- die cut the strips of rose patterned card, using two dies from a Lil' Inkers 'Slim Stripes' set of dies - taking care to keep them in the right order ready for 're-assembly'

- then, one by one, I stuck the strips on as neatly as possible onto a further snippet of Tonic Mirror 'Inca Gold' card - leaving narrow gaps of the gold mirri to show

- next die cut the sentiment from two layers of white snippet card and one layer of 'Inca Gold' mirri card and glued them together using a glue pen - this would help me with the final positioning of the main elements

- then die cut three circles, using Tonic dies, from the 'strips panel' - one large and two rather smaller than the main circle

- next, die cut two crescent/semi-circles into the largest circle, using the two smaller dies

- added all three circles to the card itself using thin sticky pads - making sure that the upright alignment of the strips of gold mirri was absolutely vertical (I hope!). NB, the mirri strips don't need to be in lines corresponding to the main circle - even I, with borderline OCD would draw the line at that!

- then added the sentiment die cut to the bottom left of the card

- final touch - two leftover strips of the rose patterned card were added to the inside of the card, to echo the outside

For a video explaining it - as well as showing the steps - visit Ann Melvin on YouTube HERE.

I'd like to enter this card into the following challenge:

Darnell's NBUS Challenge #50 HERE.

Dudley Pupdate -  oh he's a wily little chap and no mistake. It's often a bit of a battle to get him to 'ahem, perform his toilet routine' properly and at regular times. So, we always take turns to watch him when he's out in the back garden. Today Len discovered that he has a 'secret poop place' ..... behind our fairly recently installed log cabin! Had to laugh, all the ongoing encouragement from us 'hoomans' and there he was, secretly smiling, as he'd already left a 💩 or two - hidden out of sight! Dogs do pull you down to their basic level I must admit!

Yesterday afternoon it was sunny here and I was busy at a bedroom window when I spotted Len and Dudley down in the back garden. Dudley was doing absolutely crazy zoomies of pure doggie delight around the garden - an absolute joy to watch!

Love from both of us, Dudley Dog ('The Secret Pooper') and of course me

Image


Sunday, 7 May 2023

Sunday Snippets and a new Lattice card idea

I really like the very clever crafter Ann Melvin's YouTube channel and often watch her to pick up new ideas. This is the link to Ann's actual YouTube video showing the technique HERE - she has her own online store called 'Positively Papercraft'  HERE - well worth a visit if you're in the UK. 

And this is what I made:
Image

I used:

- card blank measuring approx. 6" (just under 6" in fact) x 4.25" - cut later to the same size as the finished card front panel

- two absolutely identical pieces of paper from the DCWV 12" paper pad called 'Quince & Blossom'  - I cut the two layers at once to be sure they were lined up and identical - they are foiled and so very pretty

- then 'outline' die cut the pieces together, only  using the outer frame from Ann's 'Positively Papercraft 'Cracked Glass' pair of dies

- then die cut just one of the resulting background pieces again, using the inner lattice part of the 'Cracked Glass' pair of dies

- suddenly realised that the paper would be too floppy for the top layer, so I die cut just the inner part of the panel from a snippet of white card, trimmed it down then added it behind the patterned layer using a glue pen. I had to do it that way as it would have been almost impossible to die cut exactly the same panel using both the dies, the alignment needed to be perfect with no over-hang

- and at that point I pushed it to one side as I'd done four similar panels from the same paper pad and felt they would all 'sag', despite the additional strengthening die cut lattice card layer

- went back to them and layered the other lattice layers onto the backgrounds using narrow foam tape, with glue stick on top for some slide - then pushed them to one side, yet again

- still convinced they would sag - even with the additional thickness of the white card snippet underneath the lattice panel - I fairly gently added a Pink Fresh pre-foiled die cut sentiment to the lower right corner of the card using a glue pen right around the back of the sentiment and being careful not to totally press it down onto the very back layer of patterned paper

- AND, it worked! No sagging to be worried about really

Well, knock me down with a feather - what a really lovely surprise! Love the sentiment itself - so positive. And good for a teen wearing braces on their teeth!

My snippet is well hidden, I used a left over piece of white card to back the lattice layer for added strength.

So, now I need to just make up the other three panels into cards - with a load more confidence than I had! Yay! I'd like to add this card into Darnell's NBUS Challenge #50 HERE. The Positively Papercraft ' Cracked Glass' die set was having its first outing.

The results of Challenge #452 are over on the Snippets Blog for you.

Dudley Pupdate: A good friend was here the other day and Dudley fell in love with her and wanted to go home with her when she left the house, but we all know he would he would have been squealing before she left our road. He absolutely flung himself at me this morning in affection - then I realised that he thought there might be a second 'morning treat' hidden about my person! Little monkey. Mind you, on reflection, he's the same with both of us where treats are concerned - albeit with just a tad more respect for his 'Dad'!

We watched quite a bit of the Coronation - history in the making. And it rained. 

Hope you all have a lovely week. 

Much love from Di and Dudley Dog


Image


Wednesday, 23 March 2022

Card for the Allsorts Challenge - and a new gadget

First of all, my goal is to enter as many Allsorts Challenges as possible, still bearing in mind that Christmas cards are also a priority - besides the Snippets Playground of course! It's been so heartwarming to read all your lovely comments about Sarn and I joining forces to run the Playground - happy times ahead!

The current challenge over at Allsorts Challenge #668 is 'Feminine' - and flowers sprang to mind here:

Image

I used:

- A6 white linen card blank, side opening

- piece of the same white linen card to die cut the frame with flowers - called 'Tatty Layers - Lily Rose Panel' by Lisa Horton. The frame can be used without the flowers as a backing for images etc. I know it was one of you lovely Playmates who pointed me in the direction of the Lisa Horton frames with flowers - thank you!

- then glued the frame, with the flower outlines attached, onto the card front, using a fine glue pen

- stamped the sentiment using the Misti, my 'new gadget' - see below, Memento 'Tuxedo Black' ink and a sentiment from the Hero Arts 'Live Life' set of stamps. Sadly, despite being properly stored, the stamps have a slightly yellow hue and are also becoming rather pliable. They're many years old and owe me nothing but I'd be sad if they do become unusable

- and then, as it so often does, the 'red mist of crafting madness' descended upon me and Dopey here decided to infill all the die cut flowers - piece by flipping teeny, tiny piece!

- used one piece of paper from the fabulous Craft Consortium 'Ink Drops - Vivid' set of papers - mostly pink shades on one side and mostly yellows and a touch of green on the reverse, just to add a bit of a varying shades element

- die cut and then pieced each little perisher in place - using a fine glue pen

- 24 hours later - no kidding - it was finally done! Possibly one of the most fiddly things I've ever tackled. The frame just as it is, or with only the inclusion of the die cut floral outlines, is far better for one's sanity, trust me!

I did show the result to Dudley and it was fascinating to see his reaction. His eyes flicked from one side to the other and up and down, repeatedly - taking in every little detail. I suspect he could actually detect stress vibes coming from the card -  he had been party to a few choice words whilst trying to sleep at my feet during much of the process! If he could talk human talk I bet he would say 'Bonkers, Mama, totally bonkers!'.

And the 'new gadget' shown in the main photo above is something that's interested me for a while, since seeing brief glimpses of Jennifer McGuire using one in her more recent videos. As I have arthritis in practically every moving part of my body (apart from my tongue - which does its best to compensate!) - even using the Misti when making a batch of several cards at once gives me wrist ache. So I hunted all over the place and eventually found this:

Image

Ignore the pot of gilding wax, used to prop the tool on its side for a better look (mind you, it's an absolutely gorgeous tone of gold!). Basically the new gadget is a 'Stamping Pressure Tool' - if you're interested in the link then just drop me an email, it took me a lot of searching to find this exact product - with a few blind alleys on the way. It was much cheaper than the one or two branded pressure tools I came across - so long as you can wait for 10 days or so  for it to arrive. It's 3" in diameter and comes with a black self-adhesive felt pad to attach to the base. You then just rub it over the lid of the Misti for a nice even print. And I already love it!

By the way, I've never played 'table top air hockey' but the tool basically seems to be a replacement 'pusher' - someone obviously was quite switched on!

I'd also like to enter this into Darnell's NBUS Challenge #36  for March HERE. The set of dies and the 'Pressure Stamping Tool' were both having a first outing.

If you need me, I can be found wandering around the shrubbery at the local 'Funny Farm'! Gently muttering 'Never again, teeny, tiny die cuts, never again'.

Image


Sunday, 29 November 2020

Pixie's Snippets Playground - Challenge #390 - results

Image

We're now heading into quite a strict 'Tier System' in yet another attempt to put a lid on COVID here in the UK. The converse of that is a five day easing of restrictions over Christmas to allow up to three households to meet up to meet up. It's worrying what will happen with the infection rate as a result - but it's obviously really important to a lot of people. And to be honest, if a ban had been left in place then you can bet many people would have rebelled and done what they wanted anyhow. We have one set of neighbours who mix people from five households in their home as a matter of course - and have done so right from the very beginning of this. That's what's known as 'taking the Mickey' IMHO.

Anyhow, let's dive straight in with my picks from the previous challenge - which was really tricky to whittle down - particularly as the challenge ran for three weeks:

Image

What a great way to use up loads of snippets as well as return to the really therapeutic 'iris folding' craft technique. Gail brought this card to share with us and I love it!

Image

I absolutely adore this white on white Christmas card, made by Lesley! It's so elegant as well as so clever to emboss the layers with different folders then add the twist of twine as a lovely finishing touch. 

Image

Alison rushed into the Playground, after a busy time nurturing her wonderful flower growing business, waving this card (without any gilding wax on her slippers so she could trample it everywhere - a memory that still makes me laugh, I'm sure it was Alison and if not then it was an equally scatty Playmate!). It uses snippets, even a piece of cut down A4 is a snippet of course and whilst I do look for using snippets imaginatively I often do this myself. What I don't do is use the stamping technique that Alison did - flippin' fabulous! Do go and check it out as it's just got to be tried - misting sprays at the ready girls!

So that's three picks, as is almost always the case. It's really busy here as I'm frantically trying to add inserts into my Christmas cards and get them ready to post off as soon as possible - certainly the ones for outside of the UK at least! Having said that - I really could have gone on with loads more picks.

We also had two new Playmates:

Image
Vivian Foo

Image
Faith

Welcome to the Playground girls - lovely entries and do please come back and play again soon.

Can I please add a gentle reminder here, We are a snippets challenge, not just 'anything goes' as some people seem to think. 'Throw it in and see if I can win a prize' - nope, doesn't work for me I'm afraid. So, if I don't know or can't even see or read what snippets you used in your post - here's the deal. I may comment, but I won't ask what snippets you used if I can't find them or see mention of them. I just won't add you to the 'Yes please for the prize' list. This happens every so often and perhaps it would be more fair if everyone actually says what they used as snippets. I don't think we have too many rules but using clearly defined and described snippets is certainly one of them. Jumps down from soap box!  x

We had 109 entries in total - perhaps the three week timespan, the rather nice prize(s) plus, for this time, being allowed to enter more than once. It might be the most entries we've ever had. I'm still struggling to reach the magical 500 followers on my RH side bar though, sigh. So near yet so far, although I've been astonished by how many folk follow by email.

Now for the prize draw, which is a set of Lavinia 'Whimsical Hares' stamps, an Inkylicious 'Mountain & Valley Sun/Moon' Stencil & Masks template plus a set of 10 lovely soft make-up brushes for blending inks. And the winner is:

Lesley G

 Image

Congratulations Lesley! I hadn't realised how much you were hoping to win this prize until I re-read your blog post just now - so I'm double delighted for you. It's been a bit of a rough ride for you this past couple of years which makes this sweeter! More so as you're already one of my top three picks as well! Whoop, whoop - go and buy a Lottery ticket as these things usually come along in threes!

And, I did say how much I wished I could offer a prize to all of you - well, a 'Secret Santa' stepped in and has added a further set of blending brushes to the prize pot, to be sent by me with love from Parsnip and Dudley! You know who you are dear Secret Santa so HUGE thanks and our love to you for such a lovely gesture. And the winner of the blending brushes extra prize is: 

Alison C

Image

Well done Alison! And you are also a top pick this time - how spooky is that then? Another one who should buy a Lottery ticket! I know you used to play very regularly and that life has been busy since you set up your wonderful fresh cut flowers business with funeral flowers, bouquets and allsorts - all grown by yourself. Perhaps this lovely set of brushes will encourage you to spend a bit more time crafting .................... when the flowers aren't calling for attention. ☺

Please send me your address(es), even if you know that I know it already, with your full name at the top as well so I can copy and paste for speed and ease. It's also confirmation that you still would like the prize of course and I'll do my best to post your prize(s) ASAP this coming week. Please put Playground Winner or similar in the subject line of your email in case it drops into my junk mail. Email address is on RH sidebar as always.

I did hesitate and wondered whether to change the top picks when two of them were then chosen as prize winners - but, I wanted you to see both of their cards as they're so lovely. And I don't like to mess around with how the chips fall. We have three really good and fun techniques, including Gail's 'iris folding' to try this time - if you take time to settle for a few minutes and read the girls' blog posts! It will be so worth it I promise.

Remember folks, there's still another week to run on Challenge #391 HERE. The prize is a Gemini Edge'ables 'Balloon Bouquet' die donated by Viv, plus a set of Britannia 'Happy Birthday' sentiment dies from me, which have arrived and are now tucked up in the Playground Toybox.

Dudley had us really amused this past week. He suddenly decided to hide some of his favourite toys under Len's pillow - first of all his Arabica coffee wood chew, then two nights later his Benjamin Bear toy - and the grand finale the following night was Benjamin Bear, Little Ted (a small bear) plus a fluffy toy hedgehog from his 'God/Dog mother Auntie SaRn that he's had from being a puppy! Thankfully we think the novelty of hiding toys has worn off as he hasn't done it for a few nights now. Len was beginning to worry that Stinky Monkey the Fifth might end up there - but that's one toy that goes everywhere with Dudley and he doesn't share it. Never a dull moment!

Love from Parsnip, a happy 'high-five' and woof from Dudley - and of course hugs as always from me. Stay safe, wear those masks, swipe sparkle on any body places still showing - and keep on crafting. 

Image


Sunday, 6 September 2020

Pixie's Snippets Playground - Challenge #386

What a miserable week for weather here in deepest Hampshire. One minute it was too hot and now it's too wet. We British are never happy with our weather I fear.

Thank you so much for all the lovely comments about the future of the Playground. Many of you made very good points, which sort of reassured me to keep going as I am. And we had a jump in the number of entries to challenge 385 as well, hooray. There won't be a switch to Instagram or Facebook if I can help it - it's probably just me but I find it an option I don't wish to embrace. I did giggle when one friend kindly suggested in an email that perhaps I could shorten my posts - nope, ain't gonna happen. Luckily I learned to touch type in some 'spare' lessons in the 6th Form at school and basically can fly along when I'm writing a post, So, what you read is often just me talking through my fingers (I HEARD that snigger!).

Good old blogger continues to evolve - at last they've now made the labels options easier to work with on the new interface - but this is 'end user' testing of something that should have been thoroughly tested prior to release. I guess we get it for free so should be grateful - and in fairness it does seem to be evolving with our issues being resolved.

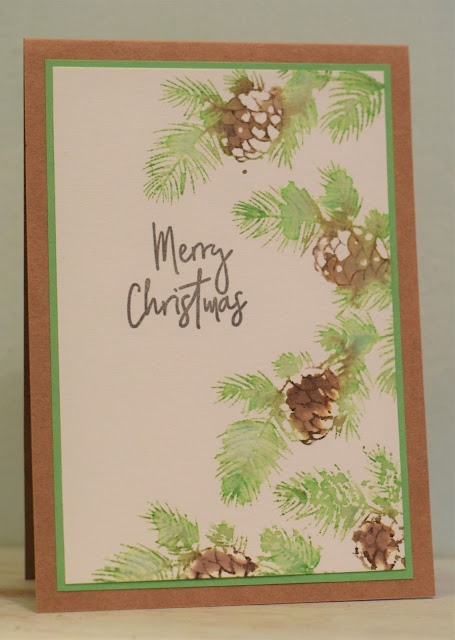
Anyhow, here's my snippets card for this fortnight. I was really stumped for a prize that wouldn't take ages making a 'sample' card. And was also a bit shocked at the fact I've been unconsciously letting the Playground toy box run low as well. I didn't have time for a very complicated card with masking, colouring etc so in the end, I opted for a card using a recent snippets strips technique - and when it was finished I cocked my head on one side and realised it's by no means as 'random' as it should be. The strip widths ought to vary more - oopsie. And, I need to put a fresh blade and/or channel mat in my trimmer as the cutting is a bit rough looking (picked up by the camera needless to say). No time to make another one though so here it is: 

Image
I used:

- 5" x 5" square white card blank
 
- snippet of pink card - SU 'Primrose' - as a backing for the strips, left bigger than I wanted as there's trimming to do at the end of the process 

- snippets of monochrome paper from a really ancient Papermania Capsule Collection 'Mono' paper pad - dating back to my very early days of card making

- I then trimmed a load of angled strips from the snippets - sadly making them too uniform (OCD strikes again!)

- then used a glue pen to adhere them to the piece of pink card - almost finished when I realised it was very uniform, sigh

- another snippet of the same pink card, trimmed to just quarter of an inch on two sides smaller than the white card blank (ie. it measures 4.75" square)
 
- then trimmed the striped panel down to 4.5" on both the top and side measurements

- glued the striped panel to the pink one and then glued that to the card front (all using Collall All Purpose glue as it's so moveable)

- used a snippet strip of the pink card to adhere a white on black sentiment to - from the Clarity Stamps 'Words Sticker' set of quite unusual sentiment strips 
 
- trimmed it at the ends, added thin strips of sticky pads and popped it onto the card front - finished in the shake of a lamb's tail
 
And, here's the prize for this fortnight - a smallish one for a change but also an interesting one if you like fairly 'to the point' sentiments:
 Image
Clarity Stamps 'Words Sticker Collection' - 460 stickers, 8 sheets with half in white and half black.

As always, the Snippets Challenge will run for two weeks and the Playground gates will close at 11am UK time on Saturday 19th September. The gates will open again at midnight UK time on the same day.

It's a maximum of ONE entry, please say in a comment if you wish to play and be a possible winner of the prize. Please also link back to the Playground in your blog post to be eligible for the draw.

Remember, if you link into the Playground and don't say clearly that you want to be in the draw in a comment on here, then you will be bypassed if your name comes out of Mr Linky. I'm sure you all know I ask for a positive 'yes' on the blog post itself - just in case you're only playing for fun - otherwise I don't add you to my little list.

As I used this particular set of Clarity sentiment stickers for the first time, it means I can join in with Darnell's NBUS #18 challenge HERE! To be honest though, if you decide to buy any, I do think the combined general and Christmas sentiments set is more versatile.
 
Latest news of Dudley - he's becoming a little tinker! His last trip out into the garden for a 'wee' is around 10:30 to 11:00 pm, before we 'batten down the hatches' for the night here. We may still be awake, but the house is ostensibly closed down - and he knows that ......... unless it was urgent. However, the little tinker has put the jigsaw together and worked out that he often has a sneaky treat when he comes in from the garden after doing 'the late evening biz'. Need I say more? The other night he did the usual and came in - then just TWO hours later was on the bed, and then lying on top of Len, wanting to 'go out' at almost 2am in the morning for goodness sakes! We didn't dare risk not letting him out in case of an accident - but the little monkey only did a tiny dribble then came indoors and pointedly stood where the treats are kept! Naughty, naughty ☺.

On the subject of dogs, in the UK right now there's a really worrying spate of dog thefts going on. I won't go into all the detail but a scarcity of dogs for would be owners to buy due to COVID, along with breeders asking up to three times as much for dogs now, makes it a bit of a lucrative market. Our back garden is now like Fort Knox - plus, although we'd have rarely done it previously, Dudley is never allowed out into the garden now without one or other of us being there at the same time. Dogs have even been stolen with their litters of puppies and some of the cases are utterly heartbreaking. We're pretty sure that Dudley would kick up a real stink if we had an intruder in the garden, when he was indoors let alone outside, but it's a risk we can't take. What a world!

Lots of love from us all - Parsnip, Dudley and of course me,

Image