Complete guide
Last updated:
Displaying Gravity Forms entries: A complete guide
Gravity Forms is excellent at collecting data, but what happens when you need to display that data on the front end of your website? This guide covers everything you need to know about displaying Gravity Forms entries, from layout options and customization features to real-world applications like directories, portals, and marketplaces.
Whether you want to build a simple table of submissions or a fully searchable business directory, you’ll find the right approach here. The primary tool for the job is GravityView, a plugin by GravityKit that turns your form entries into front-end displays and fully functioning web apps without any code.
Table of contents
- The Problem: Gravity Forms has no built-in front-end display options
- Getting started with GravityView
- View layouts for every use case
- Customizing how entries are displayed
- Front-end editing and interaction
- Advanced display features
- What you can build
- Other add-ons for displaying Gravity Forms entries
- GravityView vs other popular approaches
- Permissions and access control
- Frequently asked questions
The Problem: Gravity Forms has no built-in front-end display options
Gravity Forms does a great job collecting data, but entries live inside the WordPress admin. The built-in options for showing that data are limited:
- The Entries screen in
wp-adminlets you view and manage submissions, but only site administrators can access it. - The
{all_fields}merge tag displays entry data inside email notifications and confirmations, but it is not designed for front-end pages. - There is no built-in shortcode or Gutenberg block for displaying entries on your website.
You can write custom PHP using GFAPI::get_entries() to pull entries and render them in a template, but that approach requires ongoing development work. You’ll need to build your own search, filtering, pagination, and editing functionality from scratch—and maintain all of it through WordPress and Gravity Forms updates.
This is precisely why GravityView exists. It gives you a drag-and-drop interface for building front-end entry displays, with built-in search, filtering, sorting, editing, and access control. No code required!
Getting started with GravityView
GravityView connects directly to your Gravity Forms data and lets you create “Views” (front-end displays of your form entries). Here’s how the basic workflow works:
- Create a View and connect it to any Gravity Form.
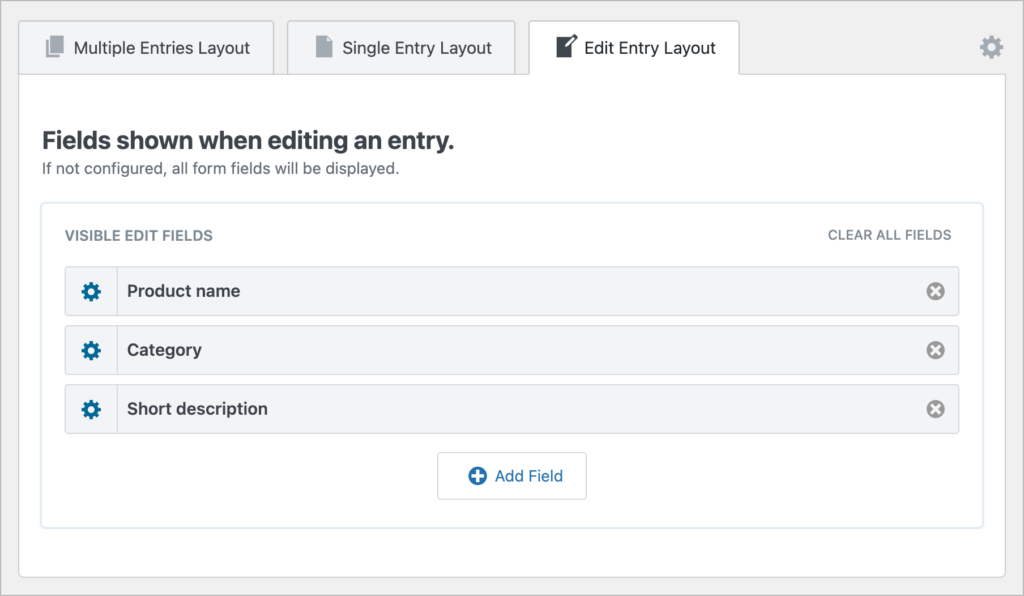
- Choose a layout (Table, List, Maps, and more).
- Drag and drop fields into three configurable pages: Multiple Entries (the listing), Single Entry (the detail page), and Edit Entry (the front-end edit form).
- Embed the View on any page or post.
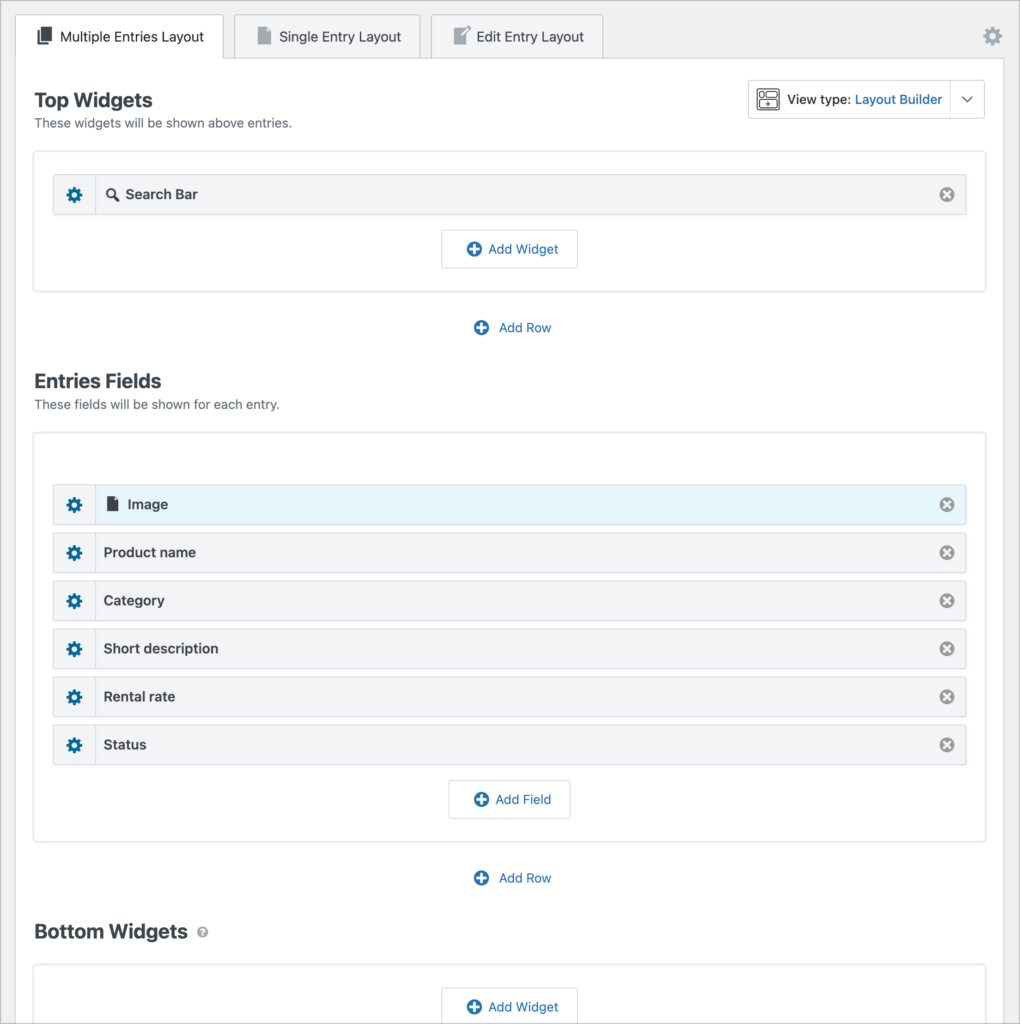
GravityView comes with form presets that create both a form and a matching View in one step, which is a fast way to get up and running. For step-by-step setup instructions, see the Getting Started guide.
View layouts for every use case
GravityView offers multiple layout options, each designed for different types of content. Choosing the right layout is one of the most important decisions you’ll make when setting up your View.
Table Layout
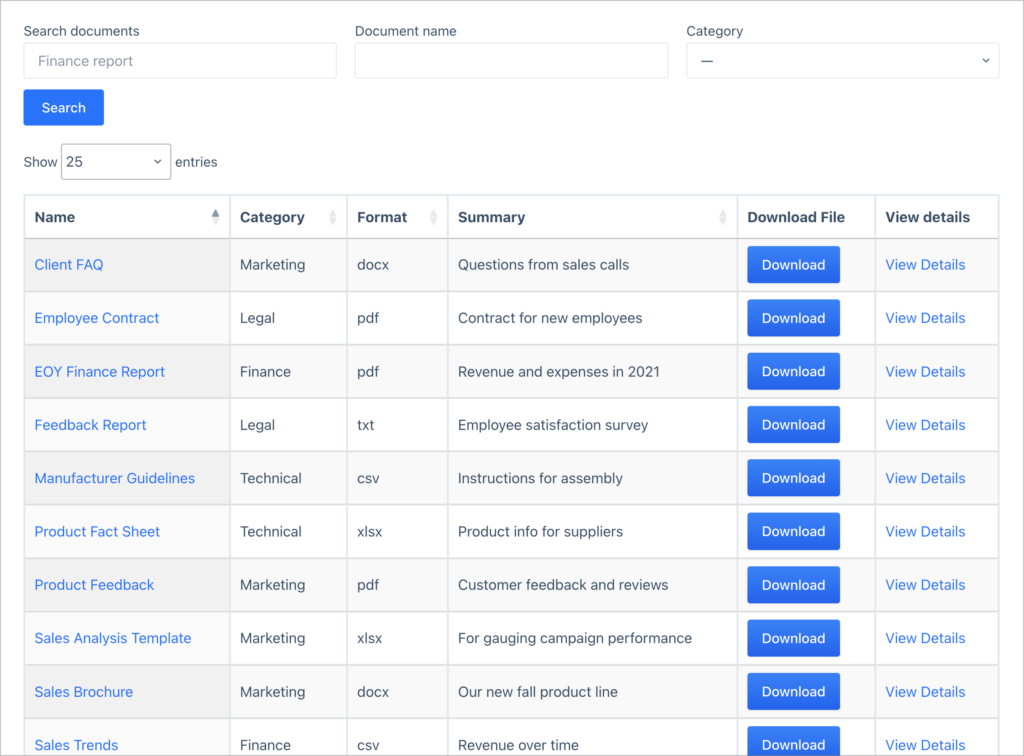
The Table layout displays entries in rows and columns, much like a spreadsheet. It is the best choice for dense, structured data where users need to scan and compare entries quickly. Common uses include databases, inventories, and data tables.
Go deeper with these tutorials:
- How to build an application review system using GravityView
- How to build a WordPress document library using GravityView
- Turn Gravity Forms into a powerful database solution
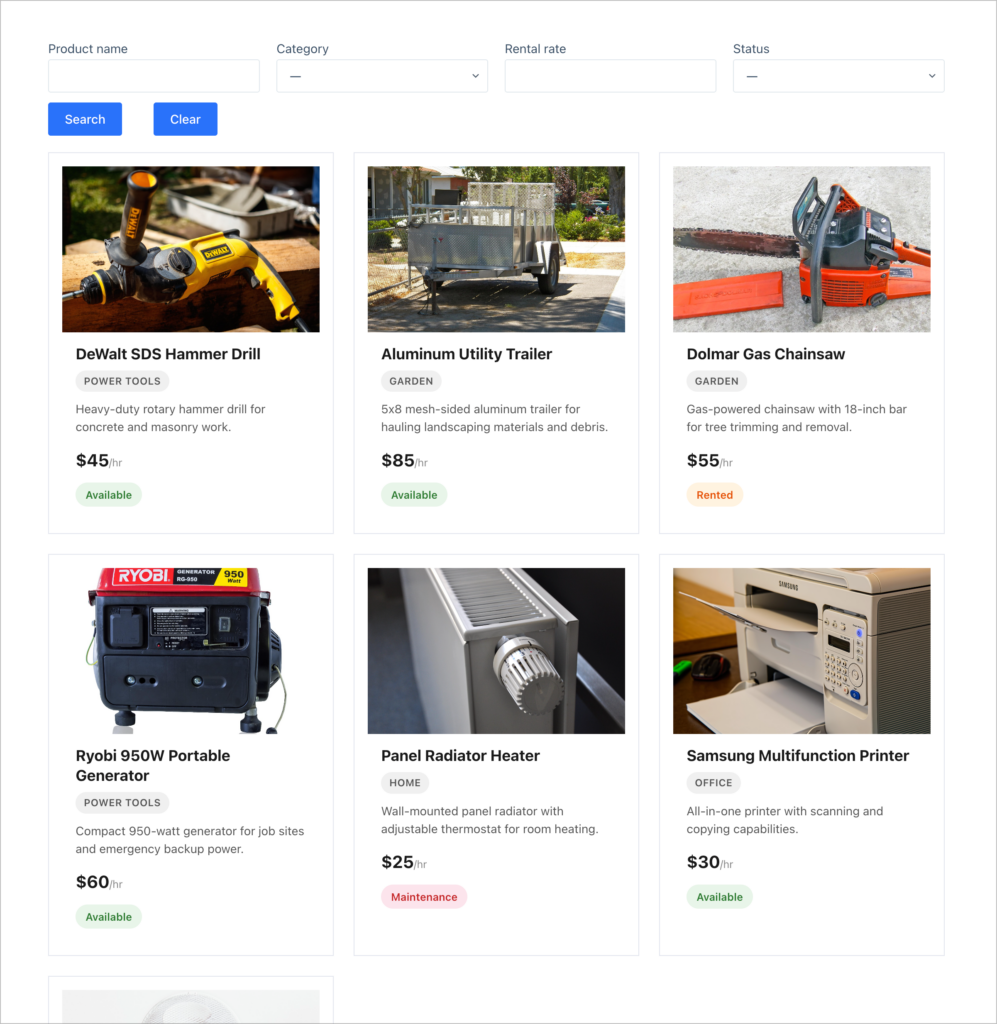
List Layout
The List layout gives each entry its own content block with dedicated spaces for images, titles, descriptions, and other fields. This layout works well for directories, profiles, and any listing where visual presentation matters.

Go deeper with these tutorials:
- How to build a business directory using GravityView
- How to build a member directory using GravityView
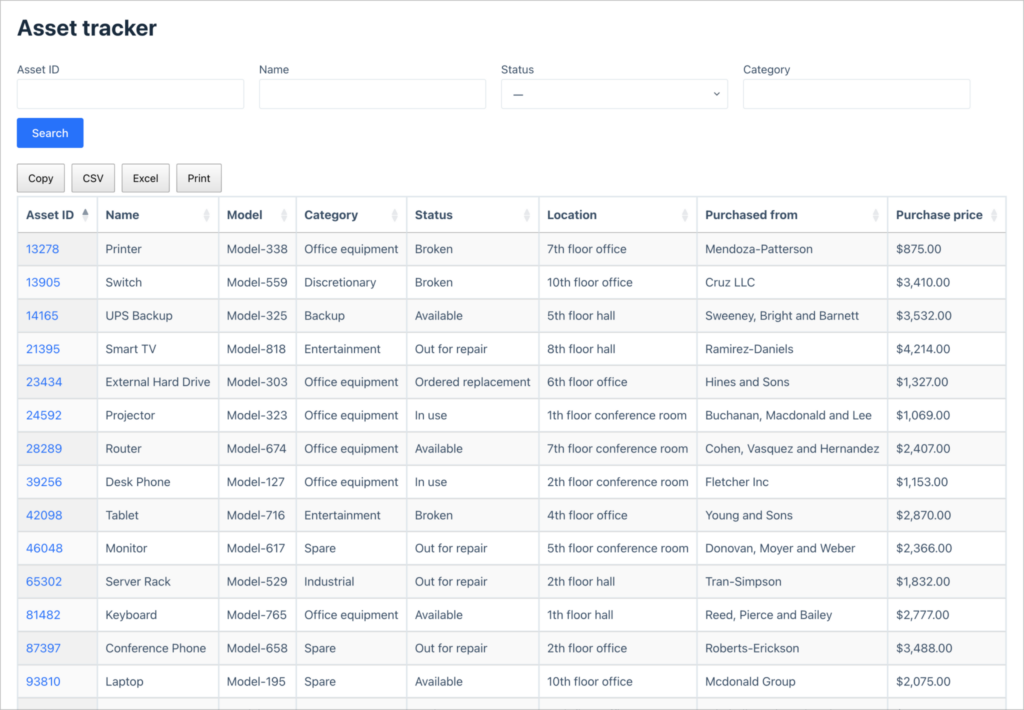
DataTables Layout
The DataTables layout extends the Table layout with interactive features: column-based sorting, live search, adjustable page lengths, and CSV/Excel/PDF export directly from the front end. It is ideal for data-heavy applications where users need to manipulate and export information.
Go deeper with these tutorials:
- How to build a rental property management system using GravityView
- How to build an asset tracker using GravityView
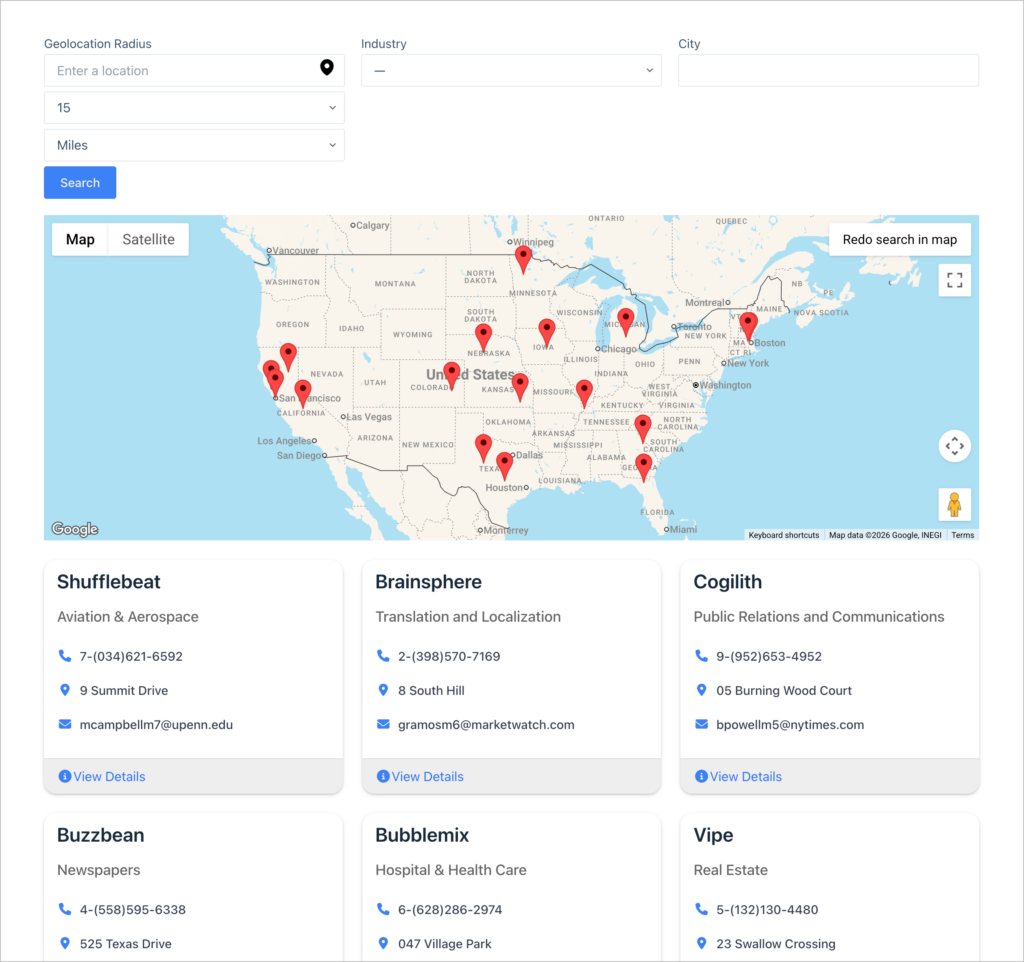
Maps Layout
The Maps layout plots entries as markers on a Google Map. You can customize marker icons, configure info boxes that appear on click, and combine the map with a list or table of entries below it. Store locators, real estate sites, and geolocation directories all benefit from this layout.
Go deeper with these tutorials:
- How to build a store locator using GravityView
- How to build a geolocation directory using GravityView
DIY Layout
The DIY layout gives you full control over your View’s HTML and CSS. Instead of using a predefined structure, you write your own markup and insert field values using merge tags. There are no PHP template files to modify as everything is configured inside the View editor.

Go deeper with these tutorials:
- How to create a beautiful testimonial page using GravityView
- How to build a photo contest site using GravityView
Layout Builder
The Layout Builder lets you create custom row-and-column designs using a visual drag-and-drop interface. It bridges the gap between the structured default layouts and the fully manual DIY layout, giving you design flexibility without writing code.
Go deeper with these tutorials:
Customizing how entries are displayed
Once you’ve chosen a layout, GravityView provides extensive options for controlling how entries appear and how users interact with them.
Sorting and filtering entries
You can set a default sort order for any View and allow users to sort by clicking column headers in table-based layouts. For more control, the Advanced Filtering extension lets you create conditional rules that determine which entries display based on field values, user roles, or other criteria.
For example, showing only entries created by the logged-in user, filtering a directory to a specific region, or hiding entries with an “Inactive” status.
Search
The built-in search widget lets visitors search and filter entries from the front end. You can configure which fields are searchable, use dropdowns or text inputs, and combine multiple search fields.
Learn more: Configuring the Search Bar widget.
Entry approval
Not every form submission should be publicly visible. GravityView’s entry approval system lets you approve, reject, or hold entries for review before they appear on the front end. You can also send email notifications when entries are approved or rejected.
Learn more: How to set up an entry approval workflow in Gravity Forms.
Custom content and media
You can add custom HTML, shortcodes, and merge tags to your Views using the Custom Content field. GravityView also supports embedded media, including videos, audio, and images from form submissions display directly in your Views.
Front-end editing and interaction
Displaying entries is only half the story. GravityView also lets users interact with their data directly from the front end.
Every GravityView View includes an optional Edit Entry page where users can update their own submissions. You control which fields are editable and who has permission to edit. For a full walkthrough, see How to edit Gravity Forms entries on the frontend.
For situations where users don’t have WordPress accounts, the Magic Links extension generates secure, one-time-use URLs that give entry creators access to edit their submissions without logging in.
Advanced display features
GravityKit’s add-on and extension ecosystem adds powerful capabilities beyond basic entry display:
- Displaying data from multiple forms – The Multiple Forms extension lets you combine entries from different Gravity Forms into a single View. This is useful when you collect related data across separate forms and need to display it together. See how to combine data from multiple forms for a walkthrough.
- Style front end displays using Elementor – With the Advanced Elementor Widget, you can visually design and style your GravityView layouts directly in Elementor.
- Dashboard Views – Dashboard Views brings GravityView into the WordPress admin, letting you display Views directly on the dashboard. This is useful for internal tools and admin-facing data displays that don’t need to be public.
- Calculations with GravityMath – GravityMath displays calculated values based on your entry data, including totals, averages, counts, and custom formulas. You can embed these calculations into your Views using shortcodes or merge tags.
- Charts and graphs with GravityCharts – GravityCharts turns your Gravity Forms data into visual charts and graphs. Choose from bar, line, pie, doughnut, and other chart types to present entry data in a format that’s easy to understand at a glance.
What you can build
GravityView’s flexibility means you can build a wide range of applications on top of Gravity Forms. Here are some of the most popular use cases, each with a detailed tutorial:
- Business directory – Build a searchable, filterable directory with categories, maps, and detailed listings.
- Member directory and user profiles – Collect and display profile information with front-end editing.
- Customer or client portal – Let customers track orders, view project status, or manage their account.
- Online marketplace – List products or services with search, filtering, and reviews.
- Real estate listing site – Property directories with maps, filtering, and detail pages.
- Store locator — Location-based search with the Maps layout.
- Student portal — Assignment submissions, grades, and student records.
- Careers page — Dynamic job listings managed through Gravity Forms.
- CRUD application — Full create, read, update, delete workflows without code.
- MVP for a startup — Prototype web applications quickly using WordPress and GravityKit.
For more ideas and step-by-step tutorials, see our full range of tutorials for things you can build with GravityKit.
Other add-ons for displaying Gravity Forms entries
Entry Blocks – a Gravity Wiz plugin that uses the WordPress block editor to display Gravity Forms entries on the front end.
wpDataTables – a general-purpose table and chart plugin with a paid Gravity Forms add-on. It maps each form field to a table column and each entry to a row, with interactive sorting, filtering, and search.
GravityCalendar – displays entries on interactive month, week, day, or agenda calendars. It is a separate plugin from GravityView, purpose-built for date-based data like events, bookings, deadlines, and schedules.
GravityBoard – displays Gravity Forms entries as cards on a drag-and-drop kanban board. Moving a card between columns updates the entry’s field value automatically, making it a natural fit for project management.
GravityCharts – turns Gravity Forms entries into interactive charts and graphs, including bar, column, line, area, pie, doughnut, and radar charts.
GravityView vs other popular approaches
If you’re evaluating options for displaying Gravity Forms entries, here’s how the main approaches compare.
| Feature | Gravity Forms alone | Custom PHP (GFAPI) | Entry Blocks (Gravity Wiz) | GravityView |
|---|---|---|---|---|
| Built for Gravity Forms? | N/A | Yes | Yes | Yes (Certified Developer) |
| Front-end display | No | Yes (manual) | Yes | Yes |
| Search and filtering | No | Build your own | Yes | Yes |
| Front-end editing | No | Build your own | Yes | Yes |
| Entry approval | No | Build your own | No | Yes |
| Drag-and-drop builder | No | No | No (block-based) | Yes |
| Layout templates | No | No | No | Yes (Table, List, Map, DataTables, DIY) |
| Extension ecosystem | No | No | No | Yes (Charts, Calendar, Export, Math, and more) |
| Maintenance | None | High | Low | Low |
Gravity Forms alone provides no front-end entry display. Entries are only accessible through the WordPress admin or via merge tags in notifications and confirmations.
Custom PHP code using GFAPI::get_entries() gives you full control, but you’ll need to build and maintain every feature yourself: HTML templates, search, filtering, pagination, access control, and editing. This approach makes sense for developers with very specific requirements, but the maintenance burden adds up quickly.
Entry Blocks by Gravity Wiz uses the WordPress block editor to display Gravity Forms entries on the front end. Its block-based approach also means layouts are tied to the block editor, restricting it’s flexibility and capabilities for creating functional applications.
GravityView is purpose-built for Gravity Forms by a Gravity Forms Certified Developer. It reads directly from your Gravity Forms data, provides a drag-and-drop View editor, and offers a library of extensions for advanced features.
For more comparisons, see:
- Ultimate guide to the top 8 WordPress business directory plugins
- Best WordPress CRUD plugins and solutions compared
- Best WordPress user profile plugins compared
- Top 6 WordPress plugins for creating the ultimate client portal
Permissions and access control
Most real-world applications require some level of access control. GravityView provides several ways to manage who sees what:
- Page-level access – Make a View accessible only via the page where it is embedded.
- Show users only their own entries – Add a filtering condition to ensure each user sees only the entries they submitted.
- Role-based field visibility – Show or hide specific fields based on the user’s WordPress role.
- Entry approval as moderation – Use the approval system to review submissions before they go live.
- Magic Links for guest access – Give entry creators secure, tokenized URLs to view or edit their entries without a WordPress account. Learn more about Magic Links.
Go deeper: How to restrict your Views by login status or user role.
Related guides
This guide is part of a series covering the most important Gravity Forms topics in depth. Explore the other guides in this set:
- How to use Gravity Forms: A complete guide
- Editing entries in Gravity Forms: A complete guide
- Importing entries to Gravity Forms: A complete guide
- Exporting data from Gravity Forms: A complete guide
- Gravity Forms conditional logic: A complete guide
- Gravity Forms calculations: A complete guide
Frequently asked questions
It depends which plugin you’re using. Most entry display plugins let you set up filtering rules to show or hide entries based on field values. For example, only displaying entries where a “Status” field is set to “Active” or hiding entries where a privacy checkbox is checked. GravityView also includes an entry approval system that lets you manually approve or reject entries before they appear on the front end, giving you full moderation control.
Yes, though this requires a plugin as Gravity Forms doesn’t offer this natively. With a front-end display plugin like GravityView, you can restrict a View so logged-in users only see entries they submitted and can update them directly from the front end. For users without WordPress accounts, extensions like Magic Links provide secure, tokenized URLs that grant edit access to specific entries without requiring a login.
Not necessarily. Gravity Forms doesn’t include a built-in way to display entries publicly, but several plugins provide no-code solutions. GravityView offers a drag-and-drop editor for building entry displays, and Gravity Wiz’ own Entry Blocks add-on lets you design layouts in the Gutenberg block editor. If you prefer full control, you can also use the Gravity Forms PHP API (GFAPI::get_entries()) to build a custom solution, though this does require code.
Yes, though this isn’t possible out of the box. By default, entry displays are tied to a single form. GravityView’s Multiple Forms extension lets you join entries from two or more forms using a shared field value like an email address or ID number and display the combined data in a single View. Alternatively, if you’re comfortable with code, you can query multiple forms using the Gravity Forms API and merge the results manually.
It depends on the approach. Rendering all entries on a single page will cause performance issues, which is why pagination is essential for large datasets. Most display plugins paginate results by default. For particularly large volumes, wpDataTables and the DataTables layout in GravityView use server-side processing, loading only the visible rows rather than the full dataset. Adding search and filter options also helps by reducing the number of entries loaded at any given time.
This depends on the plugin you use. More full-featured tools like GravityView let you add search fields (text, dropdowns, date pickers) tied to specific form fields, enable column sorting in table layouts, and filter results dynamically. These interactive features are especially useful for directories, member lists, and other displays where visitors need to find specific entries quickly.