Summary: in this tutorial, you will learn how to use the React Navigation library to navigate between different screens in your React Native app.
Introduction to the React Navigation #
To manage and navigate between different screens within a React Native app, you can use the React Navigation library.
The React Navigation library has the following main features:
- Stack Navigation manages screens like a stack, allowing you to navigate forward and backward screens.
- Bottom Tab Navigation displays a bar at the bottom of the screen. The bar includes items with icons and labels. When you touch each tabbar item, the tab navigation navigates between screens.
- Drawer Navigation shows a sidebar (or drawer menu) that you can swipe and toggle to reveal menu items.
In a React Native app, you can combine different navigations to create flexible navigation options. In this tutorial, we’ll focus on building a stack navigation.
Creating a React Native app with React Navigation #
In this section, you’ll explore how to set up and use the stack navigation in your app.
Requirements #
Before getting started, make sure that you have the following:
react-native>= 0.63.0expo>= 41 (if you use Expo Go)
Setting up a new project #
First, open your terminal and execute the following command to create a new React Native app:
npx create-expo-app nav --template blankThis command creates the nav directory and initializes the React Native app. It’ll take some time to complete.
Second, navigate to the project directory nav:
cd navThird, execute the following command to install the React Navigation library:
npm install @react-navigation/native @react-navigation/native-stackBasic React Navigation concepts #
Navigator #
A navigator is a component that allows you to manage navigation state and screens. React Navigation includes the following navigators:
StackNavigator– for managing stack navigation.TabNavigator– for managing bottom tab navigation.DrawerNavigator– for creating a drawer.
Screen #
A Screen is a React Native component that represents a screen in the navigator. The navigator associates each screen with a route.
Route #
A route is an object that defines the path and parameters for a screen.
Navigation prop #
The navigation prop is available in every screen component within the stack navigation. It allows you to access navigation methods like navigate, goBack, push, pop, etc.
Params #
Params are parameters that you pass from one screen to another.
For example, you can pass an object that includes id and name from the Home screen to the Profile screen. In the Profile screen, you can read the params for processing further.
Creating a native stack navigator #
Step 1. Create a new directory called screens within the project directory to store the screens. Each screen is a React Native component.
Step 2. Create a Home screen in the screens directory:
import { SafeAreaView, StyleSheet, Text, View } from 'react-native';
const Home = () => {
return (
<SafeAreaView style={styles.container}>
<View style={styles.screen}>
<Text>Home Screen</Text>
</View>
</SafeAreaView>
);
}
const styles = StyleSheet.create({
container: {
flex: 1,
},
screen: {
flex: 1,
justifyContent: 'center',
alignItems: 'center',
}
});
export default Home;Step 3. Create a Profile screen in the screens directory:
import { SafeAreaView, StyleSheet, Text, View } from 'react-native';
const Profile = () => {
return (
<SafeAreaView style={styles.container}>
<View style={styles.screen}>
<Text>Profile Screen</Text>
</View>
</SafeAreaView>
);
}
const styles = StyleSheet.create({
container: {
flex: 1,
},
screen: {
flex: 1,
justifyContent: 'center',
alignItems: 'center',
}
});
export default Profile;Step 4. Create an index.js in the screens directory, import the Home and Profile screens, and export them right away:
import Home from './Home.jsx';
import Profile from './Profile.jsx';
export { Home, Profile }By doing this, you can import all screens from the screens directory using a single import:
import { Home, Profile} from './screens/index';And you don’t have to import screens individually like this:
import Home from './screens/Home';
import Profile from './screens/Profile';Step 5. Import the Home and Profile screens into the App.js file and place the Home screen as the main component:
import { Home, Profile } from './screens/index';
export default function App() {
return (
<Home />
);
}Step 6. Open the terminal and run the app:
npm startStep 7. Modify the App.js to create a native stack navigator:
import { NavigationContainer } from '@react-navigation/native';
import { createNativeStackNavigator } from '@react-navigation/native-stack';
import { Home, Profile } from './screens/index';
const Stack = createNativeStackNavigator();
export default function App() {
return (
<NavigationContainer>
<Stack.Navigator>
<Stack.Screen name="Home" component={Home} />
<Stack.Screen name="Profile" component={Profile} />
</Stack.Navigator>
</NavigationContainer>
);
}How it works.
First, import NavigationContainer and createNativeStackNavigator from the React Navigation library:
import { NavigationContainer } from '@react-navigation/native';
import { createNativeStackNavigator } from '@react-navigation/native-stack';Second, create a stack navigator by calling the createNativeStackNavigator function:
const Stack = createNativeStackNavigator();Note that the variable name doesn’t have to be Stack.
The createNativeStackNavigator() function returns an object (Stack) that has two properties, both are React components for configuring the navigator:
ScreenNavigator
Third, use the NavigationContainer component as the root component of the app:
<NavigationContainer>
<Stack.Navigator initialRouteName="Home">
<Stack.Screen name="Home" component={Home} />
<Stack.Screen name="Profile" component={Profile} />
</Stack.Navigator>
</NavigationContainer>The Screen component includes the name and component props:
- The
nameprop specifies the route name used for navigation. - The
componentprop defines the React Native component or screen to render.
The stack navigator has two routes Home and Profile. The initial route is the Home route that displays the Home screen.
If you change the initialRouteName to Profile, you’ll see the Profile screen displaying instead of the Home screen.
Moving between screens #
Step 1. Modify the Home screen to include a button to navigate to the Profile screen:
import { SafeAreaView, StyleSheet, Text, View, Pressable } from 'react-native';
import React from 'react';
const Home = ({ navigation }) => {
const handlePress = () => {
navigation.navigate('Profile');
}
return (
<SafeAreaView style={styles.container}>
<View style={styles.screen}>
<Text>Home Screen</Text>
<Pressable onPress={handlePress} style={styles.button}>
<Text style={styles.buttonText}>Go to the Profile screen</Text>
</Pressable>
</View>
</SafeAreaView>
);
}
const styles = StyleSheet.create({
container: {
flex: 1,
},
screen: {
flex: 1,
justifyContent: 'center',
alignItems: 'center',
},
button: {
backgroundColor: '#FFD966',
paddingHorizontal: 20,
paddingVertical: 10,
borderRadius: 99,
alignItems: 'center',
marginVertical: 10,
},
buttonText: {
color: '#4B4942',
fontSize: 16,
},
});
export default Home;When you press the button, you’ll navigate to the Profile screen. If you tap the Back button on the header, you’ll go back to the Home screen.
How it works.
First, include the navigation prop in the Home component. Note that all screens included in the navigation stack will automatically have the navigation prop:
const Home = ({ navigation }) => {Second, navigate to the Profile screen in the handlePress callback by calling the navigate() method of the navigation object with the Profile route name:
const handlePress = () => {
navigation.navigate('Profile');
}If you want to go back to the Home screen from the Profile screen programmatically, you can use the goBack() method of the navigation object.
Step 2. Modify the Profile screen to include a button, when pressed, go back to the Home screen:
import { SafeAreaView, StyleSheet, Text, View, Pressable } from 'react-native';
const Profile = ({ navigation }) => {
const handlePress = () => {
navigation.goBack();
}
return (
<SafeAreaView style={styles.container}>
<View style={styles.screen}>
<Text>Profile Screen</Text>
<Pressable onPress={handlePress} style={styles.button}>
<Text style={styles.buttonText}>Go back to the Home screen</Text>
</Pressable>
</View>
</SafeAreaView>
);
}
const styles = StyleSheet.create({
container: {
flex: 1,
},
screen: {
flex: 1,
justifyContent: 'center',
alignItems: 'center',
},
button: {
backgroundColor: '#FFD966',
paddingHorizontal: 20,
paddingVertical: 10,
borderRadius: 99,
alignItems: 'center',
marginVertical: 10,
},
buttonText: {
color: '#4B4942',
fontSize: 16,
},
});
export default Profile;Passing data between screens #
To pass data between screens, you follow these steps:
First, pass an object as a second argument of the navigation.navigate() method:
navigation.navigate(routeName, {
id: 1,
name: 'John Doe'
});Second, read the data on another screen using the route.params object:
const data = route.params;Like the navigation prop, the route is a prop of the component, for example:
const Profile = ({ navigation, route }) => {
}You can also destructure the data from the route.params object:
const {id, message} = route.params;The following example shows how to pass data from the Home to the Profile screen:
Step 1. Modify the handlePress function to pass an object as the second argument of the navigation.navigate() method:
const handlePress = () => {
navigation.navigate('Profile', {
id: 1,
name: 'John Doe',
});
}Step 2. Modify the Profile screen to read data passed from the Home screen:
import { SafeAreaView, StyleSheet, Text, View, Pressable } from 'react-native';
const Profile = ({ navigation, route }) => {
const { id, name } = route.params;
const handlePress = () => {
navigation.goBack();
}
return (
<SafeAreaView style={styles.container}>
<View style={styles.screen}>
<Text>id: {id}</Text>
<Text>name: {name}</Text>
<Pressable onPress={handlePress} style={styles.button}>
<Text style={styles.buttonText}>Go back to the Home screen</Text>
</Pressable>
</View>
</SafeAreaView>
);
}
const styles = StyleSheet.create({
container: {
flex: 1,
},
screen: {
flex: 1,
justifyContent: 'center',
alignItems: 'center',
},
button: {
backgroundColor: '#FFD966',
paddingHorizontal: 20,
paddingVertical: 10,
borderRadius: 99,
alignItems: 'center',
marginVertical: 10,
},
buttonText: {
color: '#4B4942',
fontSize: 16,
},
});
export default Profile;How it works.
First, destructure the id and name from the route.params object:
const { id, name } = route.params;Second, display the id and name on the screen:
<Text>id: {id}</Text>
<Text>name: {name}</Text>Customizing the screen header #
Changing the header title #
The Screen component has an options prop that accepts an object or a function that returns an object used for configuring the screen header.
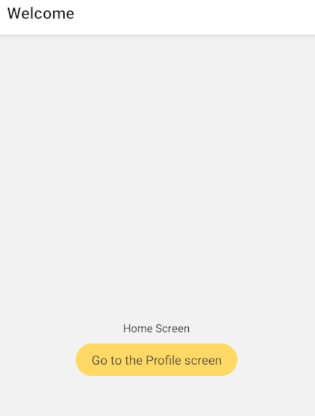
For example, you can change the Home title of the Home screen to Welcome as follows:
<Stack.Screen
name="Home"
component={Home}
options={{ title: 'Welcome' }}
/>In this example, we set the options prop of the Home screen to an object with the title 'Welcome'. The Home screen should look like the following picture on Android:
To use the params for the header title, you need to pass a function to the options prop and access the params via the route.
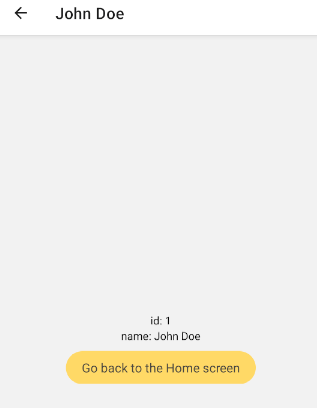
For example, the following illustrates how to use the name parameter as the header title of the Profile screen:
<Stack.Screen
name="Profile"
component={Profile}
options={({ route }) => ({ title: route.params.name })}
/>In this example, we pass an arrow function to the options prop. The function accesses the route prop and set the title of the header to the name parameter:
Additionally, you can also update the options for the active screen by calling the setOptions method of the navigation object:
navigation.setOptions({title: 'John Doe Profile'})Customizing header styles #
Besides changing the title dynamically, you customize the style of the screen header via the following properties
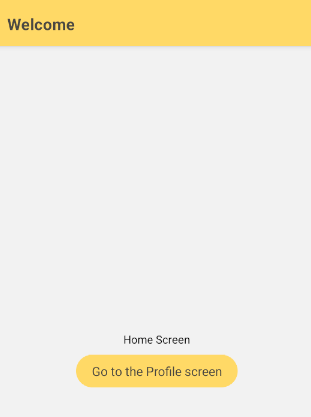
headerStyleproperty defines the styles applied to the View that wraps the header. For example, you can set the background color for the header.headerTintColorproperty defines the color of the Back button and title.headerTitleStyleproperty defines styles for the title likefontFamily,fontWeight, and other Text styles.
The following example changes the header style of the Home screen:
<Stack.Screen
name="Home"
component={Home}
options={{
title: 'Welcome',
headerStyle: {
backgroundColor: '#FFD966',
},
headerTintColor: '#4B4942',
headerTitleStyle: {
fontWeight: 'bold',
},
}}
/>
To share the same header style across the screens, you can move the configuration up to the native stack navigator under the prop screenOptions:
<Stack.Navigator
initialRouteName="Home"
screenOptions={{
headerStyle: {
backgroundColor: '#FFD966',
},
headerTintColor: '#4B4942',
headerTitleStyle: {
fontWeight: 'bold',
}
}}>
{/* ... */}
</Stack.Navigator>Now, all screens including the Home and Profile screens share the same header style:
Replacing the header with a custom component #
React Navigation allows you to replace the header title with a custom component. For example.
Step 1. Create a new directory components to store the React components.
Step 2. Create a new component called ProfileHeaderTitle within the components directory:
import { StyleSheet, Text, View } from 'react-native';
import Feather from 'react-native-vector-icons/Feather';
const ProfileHeaderTitle = ({ name }) => {
return (
<View style={styles.container}>
<Feather name="user" size={24} color="#4B4942" />
<Text style={styles.title}>{name}</Text>
</View>
)
}
const styles = StyleSheet.create({
container: {
flexDirection: 'row',
alignItems: 'center',
justifyContent: 'space-between',
gap: 10
},
title: {
fontSize: 16,
fontWeight: 'bold',
color: '#4B4942'
},
});
export default ProfileHeaderTitle;Step 3. Modify the App.js to use the ProfileHeaderTitle component for the header title of the Profile screen:
import { NavigationContainer } from '@react-navigation/native';
import { createNativeStackNavigator } from '@react-navigation/native-stack';
import { Home, Profile } from './screens/index';
import ProfileHeaderTitle from './components/ProfileHeaderTitle';
const Stack = createNativeStackNavigator();
export default function App() {
return (
<NavigationContainer>
<Stack.Navigator
initialRouteName="Home"
screenOptions={{
headerStyle: {
backgroundColor: '#FFD966',
},
headerTintColor: '#4B4942',
headerTitleStyle: {
fontWeight: 'bold',
}
}}>
<Stack.Screen
name="Home"
component={Home}
options={{
title: 'Welcome'
}}
/>
<Stack.Screen
name="Profile"
component={Profile}
options={({ route }) => ({
headerTitle: () => <ProfileHeaderTitle name={route.params.name} />,
})}
/>
</Stack.Navigator>
</NavigationContainer>
);
}Summary #
- Use the React Navigation library to manage and navigate between the screens.
Thank you for your feedback!
