
In this tutorial Naomi shares her creative idea for storing and displaying your craft supplies using custom built foam core shelves. The first time I saw these shelves in Naomi’s and Karol’s studios I thought what brilliant idea. Naomi wanted to be able to see all of her supplies; particularly her paints, inks, glitter, embossing powder etc. (basically anything with color). I know I’ve been frustrated in the past because I used one product and I could have used another, which was a better color match or maybe I forgot what I had. Unfortunately most of my supplies are in drawers. I’ve also purchased the same product twice because I didn’t realize I already had one. Not only is this a great idea, in that you can see what you have, it’s also a beautiful way to decorate with your supplies.

What You’ll Need
1. Cutting knife with a new blade (the key to cutting foam core is that the blade must be sharp. If the foam core starts to tear when cut, then the blade is too dull.)
2. Foam core board (the amount will depend on the shelves you plan to make)
3. Cutting board or surface that won’t be damaged by the cutting knife
4. Measuring tape
5. Paper & pencil
6. 3-in-1 glue
7. Long plastic or metal ruler for cutting (I use a quilting ruler)

Measure the inside width, depth and height of your available shelf space. The available space in my bookcase was 24” wide by 20 ½”high by 11” deep.

In this step you are going to figure out how many shelves to make and their size. Place your products in your space. Organized the products in rows that simulate how you would like them organized on the foam core shelves. In order to accommodate more products on your shelves you might want to stack smaller containers (like embossing powder) one on top of the other.

For each row of products, measure and write down the height of the products and the depth of the products. You will use these measurements to determine the width of each shelf and the step up between shelves (or the back of each shelf). Since I decided to stack three bottles high to save on shelf space, I measured all three together to determine the height. The height of the product or stacked products determines the height the back of the shelf. The depth of the product determines the depth of the top of the shelf. If the products on one shelf are different heights and depths use the largest measurement of each to determine the back and top shelf measurements.
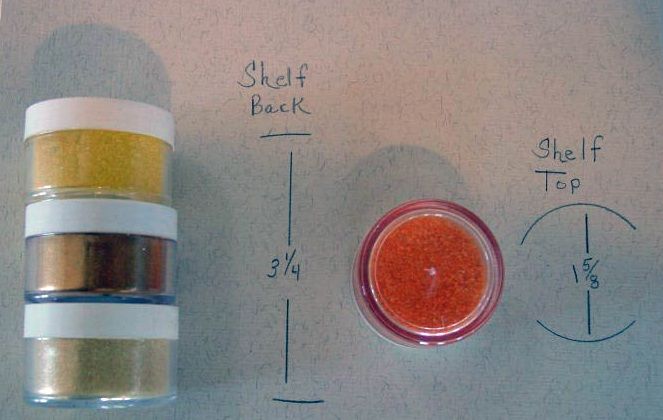 Using your measurements, create a drawing showing the height of each row of products and the depth. The total height should not add up to more than the height of your available space. The total depth should not add up to more than the depth of your space. The diagram below is for reference only and is not drawn to scale.
The circled areas on the diagram indicate how the backs and tops of the shelves fit together. The foam core board is usually ¼” thick. You can see in the diagram below that the top of the shelf glues on top of the back of the shelf. To insure that the tops and backs are flush you need to add ¼” to the measurement of the depth of each shelf. So for example, if your product measured 1” deep you need to use 1 ¼” as your depth measurement.

The circled areas on the diagram indicate how the backs and tops of the shelves fit together. The foam core board is usually ¼” thick. You can see in the diagram below that the top of the shelf glues on top of the back of the shelf. To insure that the tops and backs are flush you need to add ¼” to the measurement of the depth of each shelf. So for example, if your product measured 1” deep you need to use 1 ¼” as your depth measurement.

Cutting the Tops and Backs
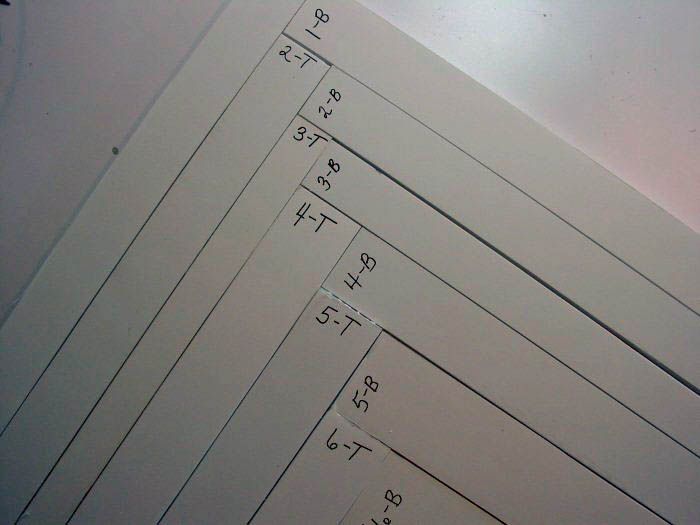
Using your chart, cut strips of foam core for the tops and backs of each shelf. All of the pieces you cut should be the same length (as in the width of your available space). The depth of the pieces might vary (as the products on each shelf are different depths). A good way to keep track of your pieces is to number them (you might want to number your chart as well). I used a system where “T” stood for top and “B” stood for back. The number stood for the order of the tops and backs (where “1” is the first shelf and “2” the second etc.)

Creating the Shelf Supports
You will be using the strips you cut for the backs and tops of the shelves to create a template for the two stair step end pieces that support the shelves.
On top of a large piece of foam core board layout the backs and tops in order as shown in the picture below. You can see that the tops are on the left side and the backs are on the right side. They are fitted together on one corner of the foam core board.
Next, pull away the back pieces making sure not to move the top pieces.

Draw a stair step line along the top of the strips and down the side of the last strip (in the image above the last strip is “6-T”). Finally, draw a line down the opposite end of all of the strips. On the end not pictured above all of the strips should be even. Cut the foam core along the lines as in the picture below.

Use the support piece you just cutout as the template for the second piece.

Sometimes my little Tuffy gets in the way. He likes to be in the thick of things.

Assembling the Shelves
Using 3-in-1 glue began attaching the pieces together. Be generous with the glue. Extra can be peeled off after it dries.
Start by attaching bottom back piece and the top back piece to the end support pieces (for this example it would be B1 and B6). See the picture below. If something doesn’t fit you can always make adjustments as you go by cutting away more of the foam core from the piece or re-cutting the piece. Anywhere, where foam core touches another piece of foam core it needs to be glued.

Continue gluing the rest of the back pieces to the side support pieces.

Glue the top pieces to the backs and side support pieces.

That’s it you’re finished!
In the picture below you can see the finished shelves in my bookcase.


Now all your products have their own space and are easy to find. Notice how my large products are setting on the bookcase in front of the foam core shelves. If you want the first row of products to sit directly on the bookcase shelf make sure to remove enough space from you depth measurement to accommodate these products.

Have fun! Naomi


