Image

Fixing A Dodgy Cheap Audio DAC

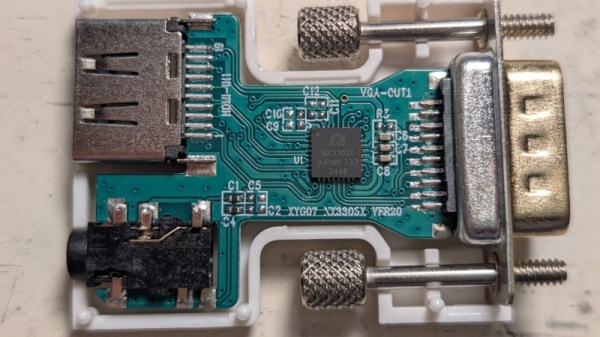
One of the attractions of buying at the bottom end of the electronics market by mail order from China is that you never quite know what will come your way. Sometimes it’s a diamond in the rough, while with others it’s a mess. Occasionally along comes something which should work but doesn’t, and that’s the moment when you wonder if you could fix it. [Nyanpasu64] had just such a device, an HDMI to VGA converter with audio that didn’t work. What could be wrong?

The HDMI to VGA chip has an onboard audio digital-to-analog converter (DAC), and it’s a delta-sigma design. This type of DAC is frequently used in audio applications because it works by shifting its switching frequency many times higher than the input sample rate, thus reducing considerably the distortion. This one wasn’t performing as advertised though, and the problem turned out to be that switching frequency being all over the output. Clearly the filter wasn’t working, which led to the design of a new filter. The write-up is therefore an extensive dive into filter design, and in part also a discovery of the effect of impedance on them.

For a super-cheap module to cause so much work, one might ask why not simply spend a few more dollars and get a better one. But had they done that we wouldn’t have seen this write-up, so we’re sticking with team cheap.

We’ve looked at audio DACs, in the past.
Image

Audio-Forward Case Mod Of Classic 90s Portable TV

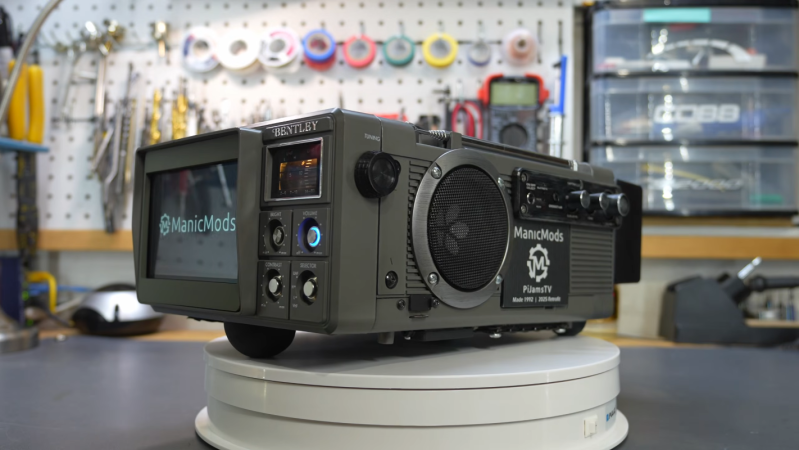
The humble cathode ray tube (CRT) was once the technology behind almost all of our televisions and computer displays. Its replacements, from LCD screens to OLED and others, are generally cheaper to make and better to look at. Old televisions were comparatively large as well, but their size can be an advantage for people like [ManicMods] aka [Jeff]. His latest build ditches the CRT from an old Bently portable TV and uses the huge space available in the case for a hi-fi audio system and some other parts that turn it into an impressive portable home theater system.

After removing most of the internals of the TV, the first part to go in is the stereo and subwoofer combo as it takes up the most amount of space. The subwoofer section points downward and the two stereo speakers are mounted to the sides. To free up the most space inside, the new display is mounted forward of the original bezel, with a new 3D printed one helping to hold it in place. Behind it goes a Raspberry Pi, loaded with the moOde audio player, a high quality DAC for audio output, and a 1 TB SSD with [Jeff]’s uncompressed audio library. Most of the ports are extended out to the case including the SD card slot so other operating systems can be loaded on the Pi, and there are a ton of options for hooking up external speakers and displays as well, making it an extremely modular and expandable portable media center.

Also added to the finished product are a few small game controllers, since the Pi is perfectly capable of playing retro games, as well as a small wireless keyboard and trackpad combo. Although the CRT’s demise will be felt harder by some than by others, the original look of the case is preserved somewhat by keeping the original tuning display and locations of the original control buttons and knobs. If preserving the CRTs are of upmost importance, though, this build used a pair of them in a VR headset.

Continue reading “Audio-Forward Case Mod Of Classic 90s Portable TV”

Image

Driving A DAC Real Fast With A Microcontroller

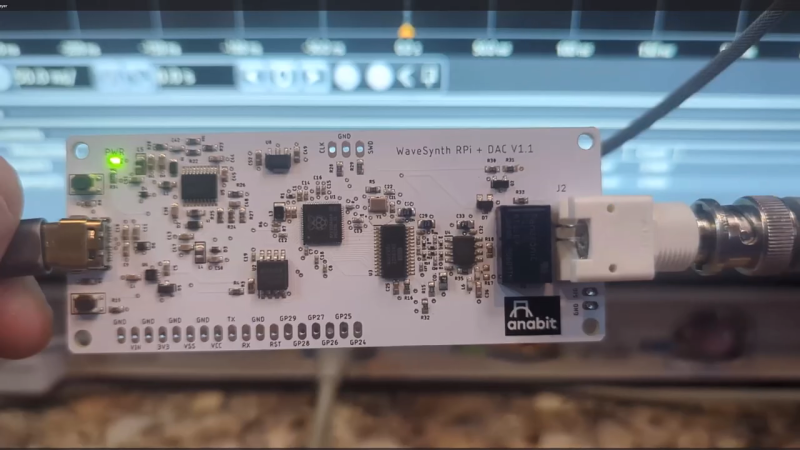
Normally, if you want to blast out samples to a DAC in a hurry, you’d rely on an FPGA, what with their penchant for doing things very quicky and in parallel. However, [Anabit] figured out a way to do the same thing with a microcontroller, thanks to the magic of the Raspberry Pi Pico 2.

The design in question is referred to as the PiWave 150 MS/s Bipolar DAC, and as the name suggests, it’s capable of delivering a full 150 million samples per second with 10, 12, or 14 bits of resolution. Achieving that with a microcontroller would normally be pretty difficult. In regular linear operation, it’s hard to clock bits out to GPIO pins at that sort of speed. However, the Raspberry Pi Pico 2 serves as a special case in this regard, thanks to its Programmable I/O (PIO) subsystem. It’s a state machine, able to be programmed to handle certain tasks entirely independently from the microcontroller’s main core itself, and can do simple parallel tasks very quickly. Since it can grab data from RAM and truck it out to a bank of GPIO pins in a single clock cycle, it’s perfect for trucking out data to a DAC in parallel at great speed. The Pi Pico 2’s clock rate tops out at 150 MHz, which delivers the impressive 150 MS/s sample rate.

The explainer video is a great primer on how this commodity microcontroller is set up to perform this feat in detail. If you’re trying for accuracy over speed, we’ve explored solutions for that as well. Video after the break.

Continue reading “Driving A DAC Real Fast With A Microcontroller”

Image

USB DAC Comes With Graphic EQ

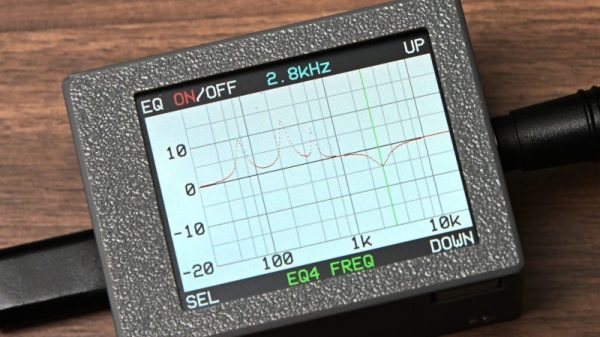
[shiura] had a problem — they wanted a nice high-quality audio output for their computer, but they didn’t fancy any of the DACs that were readily available on the market. They specifically wanted one that was affordable, capable, and included a graphic equalizer so they could simply hook it up to a regular amplifier and dial in the perfect sound. When they couldn’t find such a device, they decided to build their own.

The build is based around a Raspberry Pi Pico, chosen for its feature set that makes it easy to configure as a USB audio device. It’s paired with a Waveshare Pico Audio module, which is based on the PCM5101A stereo DAC and slots neatly on top of the microcontroller board. An SPI-controlled LCD screen was also fitted in order to display the graphic equalizer interface that [shiura] whipped up. The project write-up explains the code required to implement the equalizer in detail. A four-channel equalizer was possible on the original Pi Pico (RP2040), while upgrading to a more powerful Pi Pico 2 (RP2350) allowed implementing eight channels in total.

If you’re looking to build a digital audio system with the ability to do some equalization to suit your listening room, this might be a project of interest to you. We’ve featured other projects in this realm before, too.

Continue reading “USB DAC Comes With Graphic EQ”

Image

Hack On Self: Headphone Friend

In the last two articles, I talked about two systems relying on audio notifications. The first one is the Alt-Tab annihilator system – a system making use of my window monitoring code to angrily beep at me when I’m getting distracted. The other is the crash prevention system – a small script that helps me avoid an annoying failure mode where I run out of energy before getting myself comfortable for it.

I’ve been appreciating these two systems quite a bit – not only are they at my fingertips, they’re also pretty effective. To this day, I currently use these two systems to help me stay focused as I hack on my own projects or write articles, and they are definitely a mainstay in my self-hacking arsenal.

There is a particular thing I’ve noticed – audio notifications help a fair bit in a way that phone or desktop notifications never would, and, now I have a framework to produce them – in a way that calls for a purpose-tailored device. It’s just wireless headphones, Pi-powered, connected through WiFi, and a library to produce sounds on my computer, but it turns out I can squeeze out a lot out of this simple combination.

Here’s a pocketable device I’ve developed, using off-the-shelf hardware – an audio receiver/transmitter with extra IO, paired to my laptop. And, here’s how I make use of this device’s capabilities to the fullest.

Audio Output

In the “producing sound out of a Pi” article, I’ve mentioned USB-C 3.5mm soundcards. You can use them with a USB-C host port, and you don’t even need any sort of resistors for that – the soundcard doesn’t try and detect state of the CC pin, and why would it, anyway? Get VBUS, GND, D+, and D-, and you got yourself an audio card with high quality output.

Continue reading “Hack On Self: Headphone Friend”

Image

Building A Discrete 14-Bit String DAC

The discrete 14-bit DAC under test. (Credit: Sine Lab, YouTube)

How easy is it to build your own Digital to Analog Converter (DAC)? Although you can readily purchase a wide variety of DACs these days, building your own can be very instructive, as the [Sine Lab] on YouTube explores in a recent video with the construction of a discrete 14-bit DAC. First there are the different architectures you can pick for a DAC, which range from R-2R (resistor ladder) to delta-sigma versions, each having its own level of complexity and providing different response times, accuracy and other characteristics.

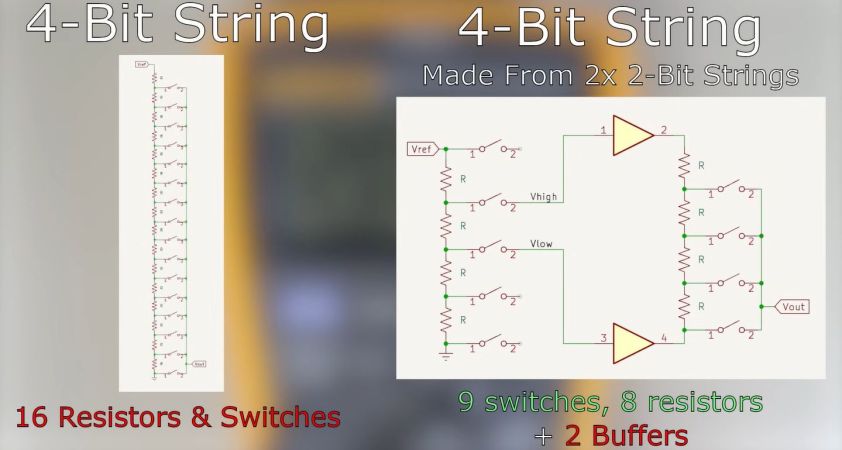
The architecture that the [Sine Lab] picked was a String DAC with interpolator. The String type DAC has the advantage of having inherently monotonic output voltage and better switching-induced glitch performance than the R-2R DAC. At its core it still uses resistors and switches (transistors), with the latter summing up the input digital value. This makes adding more bits to the DAC as easy as adding more of these same resistors and switches, the only question is how many. In the case of a String DAC that’d be 2N, which implies that you want to use multiple strings, as in the above graphic.

Scaling this up to 16-bit would thus entail 65,536 resistors/switches in the naive approach, or with 2 8-bit strings 513 switches, 512 resistors and 2 buffers. In the actual design in the video both MOSFETs and 74HCT4051 multiplexers were used, which also necessitated creating two buses per string to help with the input decoding. This is the part where things get serious in the video, but the reasoning for each change and addition is explained clearly as the full 6-bit DAC with interpolator is being designed and built.

One big issue with discrete DACs comes when you have to find matching MOSFETs and similar, which is where LSI DACs are generally significantly more precise. Even so, this discrete design came pretty close to a commercial offering, which is pretty impressive.

Continue reading “Building A Discrete 14-Bit String DAC”

A business card-sized synthesizer with capacitive touch pads.

2024 Business Card Challenge: The Gift Of Music

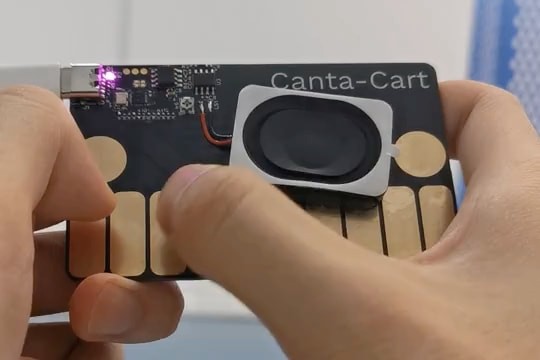
Has anyone ever told you that you just can’t carry a tune? If you were to be the lucky recipient of one of [Ayu]’s synthesizer business cards, well, then it really couldn’t be helped.

This tiny, go-anywhere instrument has quite a lot going for it. It’s easy for anyone to pick up and play something, but versatile enough that a more experienced musician can add complexity. While we do tend to see twelve keys in a small form-factor like this, the Canta-Cart uses them a bit differently. Only ten are tied to notes, and the other two are for transposition.

[Ayu] was able to keep the BOM cost way down by using the PY32, which is an ARM Cortex-M microcontroller made by Puya that costs as little as 10¢ each. In fact, the whole BOM clocks in around 60¢ total even with the audio DAC and amplifier ICs, which really makes these ideal to actually give away to people. Check it out in action after the break, or try it in the browser!

Continue reading “2024 Business Card Challenge: The Gift Of Music”