Systems are equipment that provides your ship with capabilities; they need reactor power to function. Each system occupies one predetermined room specific to the ship (the player cannot choose what room to put a purchasable system to nor cannot alter the position of any installed system). Subsystems are the same as systems, except they do not use power.
All player ships start with Piloting, Engines, Oxygen, and Weapon Control. Only one ship starts without Door System (Rock B), and only one starts without a medical system (Slug B). Stealth Cruisers do not have Shields system pre-installed. Several player ships have weak (level 1) systems, which require more scrap to upgrade them to level 2 than from level 2 to 3: few ships (Engi C, Fed C, Lanius B, Mantis A/B, Crystal B) have weak Weapon Control, one has weak Shields (Zoltan B), and another ship (Zoltan C) has weak Reactor (reactor power bars from 3 to 5 cost 30 scrap each).
Additional systems and subsystems can only be purchased at a store. All player ships have eight slots for systems, and four slots for subsystems. This means all four subsystems can be installed, but there is not enough space to install all systems. Clone bays and medbays are mutually exclusive: buying one replaces the other (upgrade levels are preserved). It is not possible to uninstall/remove or substitute/change an installed system (medical system swap being the only exception).
Some systems and subsystems can be manned by a crewmember, providing a bonus to their operation. While operating a system, crew can gain skill (if they do not already have it maxed) and eventually increase their manning bonus. Crew do not gain skills for manning doors or sensors; instead, manning these subsystems increases their level by one. Ionized, damaged, hacked or disabled (due to restrictions of the event or the user choice in some cases) systems cannot be manned; fires, breaches, and intruders prevent manning as well - the only exception to this are Auto-ships, which retain manning bonus for all their (sub-)systems unless the (sub-)systems are damaged.
Most systems can be protected from ion damage by ionproofing them with Zoltans (by putting them inside a system room, not necessarily standing), but subsystems cannot be protected like that in any capacity. However, 2 Reverse Ion Field augmentations will protect all ship systems and subsystems (and even a Zoltan Shield) from all sources of ion damage (except for self-ionizing effect of systems that have it).
Note: systems and subsystems below are listed in the order which they appear in the game GUI from left to right.
Main systems[]
| System | Maximum upgrade level |
Manning bonus |
Purchase cost |
|---|---|---|---|
| 8 | Yes | 125 | |
| 8 | Yes | - | |
| 3 | No | 50 | |
| 3 | No | 50 | |
| 3 | No | - | |
| 3 | No | 90 | |
| 3 | No | 150 | |
| 3 | No | 75 | |
| 4 | No | - | |
| 4 | No | - | |
| 3 | No | 80 | |
| 8 | Yes | - | |
| 8 | No | 75/85 |
 Shields[]

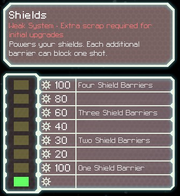
Powers your shields. Each additional barrier can block one shot.
- Sustains up to 4 damage-absorbing barriers around your ship.
- Some enemies can have level 9 or 10 shields (up to 5 shield layers).
- Each barrier blocks one shot regardless of the shot's damage. Lasers, flak, and asteroids will remove one layer of shields or damage the ship if shields are down.
- Beams cannot reduce shield layers by hitting them, but can damage ships through shields if they are strong enough.
- For example, the Glaive Beam does three damage to each room it hits, or two damage per room through one shield layer, or one damage per room though two shield layers.
- Missiles, bombs, and the Artillery Beam bypass all shields.
- Crew Teleporters, hacking and boarding drones ignore shields entirely.
- Crystal weapons and Heavy Pierce Laser bypass 1 layer of shields.
- Ion weapons apply full ion damage to shield system, and can stack; hence, ions can remove multiple barriers.
- Having shields up reduces number of fires and hull/system damage due to solar flares.
- Upgrading will increase your maximum barrier count by 1 for every 2 system levels.
- Shields system must be powered to support shields barriers.
- Shields base regeneration rate: 1 and 2 layers restore in 2 seconds, 3rd layer - in 1.72, 4th - in 1.5, 5th - in 1.33 seconds.
- Recharge time is the inverse of recharge rate.
- Manning increases shield recharge rate (10->20->30%, depending on the crew member's level of experience). Fully trained shields crew multiplies the recharge time by (1 / 1.3).
- Shield Charge Booster augmentation improves recharge rate by 15% each, and can stack additively - so three of them improve recharge by 45%. Three Shield Charge Boosters multiply the recharge time by (1 / 1.45).
- Shields crew skill and Shield Charge Boosters bonuses are calculated separately and then multiplied together. The maximum bonus is (1 / (1.3 * 1.45)) = 0.531 multiplier. (the 1st/2nd shield layer takes just over 1 second to recharge) (Shield layer recharge time calculator)
Engines[]

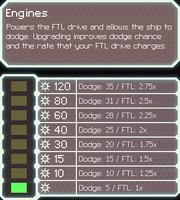
Powers the FTL drive and allows the ship to dodge. Upgrading improves dodge chance and the rate that your FTL drive charges.
- Evasion granted by engines requires the Piloting system to be operational with a crew inside the piloting room (manning the console is not required).
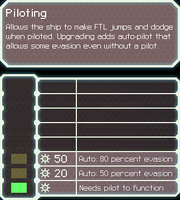
- However, upgraded Piloting system provides the auto-pilot functionality, which provides a portion of evasion (50% of available evasion for Piloting-2, or 80% of available evasion for Piloting-3) granted by Engines powered levels, Engines manning and Engines manning crew skill bonus. (Note: the FTL Drive will not charge if there is no crewmember in the Piloting room or if the crew is stunned)
- Manning the Engines increases evasion (by +5/+7/+10 %) and the FTL Drive charge rate, depending on the manning crewmember's engines skill level.
- FTL Recharge Booster augmentation multiplies charge time by 80%, two of them by 67%, and three of them by 57%.
- Manning the Piloting system adds to the overall ship evasion (Piloting manning crew skill bonus applies), but does not affect the FTL Drive charge rate.
- Upgrading Engines improves evasion and the FTL Drive charge rate. (allocating power is required to take advantage of the upgraded Engines)
- Upgraded Engines can be used as a blue option in some events.
- Can be upgraded (as a reward) in Confused Mantis event.
- In some events can be temporarily reduced to power level 1 (1, 2), halved (1), or damaged (1, 2, 3, 4, 5).
Medbay[]

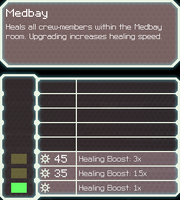
Heals all crew-members within the Medbay room. Upgrading increases healing speed.
- When powered, heals friendly crewmembers standing inside or moving through the room.
- Player ships have either 2 or 3 standing spots in a Medbay, while enemy ships have either 2 or 4 standing spots in a Medbay. (this depends on the ship design and cannot be altered)
- Any number of crew can be healed through over-filling the Medbay (by ordering additional crew to walk back and forth across the room). Notable exceptions: Medbay of Stealth Cruiser Layout B and Rock Cruiser Layout C (originally has 1-spot Clone Bay) is positioned in a dead-end corner and has 2 standing spots - it can heal only 3-4 crew by over-filling in total, usually requiring pausing and even micro-pausing, especially in case of the 4th crew.
- Your mind-controlled crew won't be healed, but a mind-controlled enemy can get healed.
- Engi Med-bot Dispersal augmentation allows healing outside of the Medbay at 25% speed rate of level 1 Medbay. This requires the Medbay to be powered on and the healing effect is limited to your ship's interior. The Medbay upgrades do not increase the healing rate.
- Lv 1 Medbay healing speed is equal to suffocation rate. However, Crystals (take only 50% suffocation damage) or crew with Emergency Respirators augmentation (halves suffocation damage) can slowly heal.
- Upgraded Medbay increases healing speed, thus allowing air-dependent crew to replenish their health in the airless Medbay room without Emergency Respirators augmentation.
- Alternative methods of healing crew:
- Healing Burst weapon; requires 1 missile ammunition, heals 150 HP of all friendly crew in the targeted room (can miss enemy ship room due to their evasion).
- Reconstructive Teleport augmentation; fully and instantly heals crew teleporting in either direction.
- Medbay and Hacking:
- Level-2 hack on a Medbay damages crew for 90 HP. Level-3 hack on a Medbay can kill crew of any race, except for full-health Rockmen.
- The crew damaging effect of an actively hacked Medbay persists even if the Medbay system gets destroyed during the hacking pulse duration (but if the system is broken prior to the disruption it is impossible to initiate the hacking pulse).
- Trapped enemies will immediately try to escape the actively hacked Medbay. Other enemy crew, in need of healing, will avoid the room till the hacking pulse lasts.
- Hacking Stun augmentation will prevent any crew from moving out of the actively hacked room; any crew coming in will be stunned too.
- Upgraded Medbay can be used as a blue option in some events.
- In Slug hacker (medical) event Medbay is disabled, unless countered with own Hacking (it will be completely disabled instead) or with Medbay-2+ (Medbay power level will be limited to 1).
- With Advanced Edition Content enabled, the Clone Bay is an alternative medical system. Buying a different medical system replaces your existing one, but you keep any upgrades.
Clone Bay[]

 |
This section describes content that only appears in Advanced Edition. |
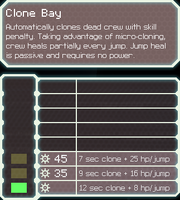
Automatically clones dead crew with skill penalty. Taking advantage of micro-cloning, crew heals partially every jump. Jump heal is passive and requires no power.
- Revives dead crewmembers after several seconds with a 20% skill penalty (but only 1 point of combat experience is lost).
- The cloning starts immediately after the crew dying animation is over. (animation duration: 2 seconds for Rock, Crystal, and Engi; 1.8 seconds for Humans, Slugs, and Lanius; 1.7 seconds for Mantis; 1.5 seconds for Zoltans)
- Multiple dead crewmembers can be queued for revival, one-by-one: whatever crew dies earlier is the first one to be in the beginning of the cloning queue. The crew order in the cloning queue cannot be altered.
- Portraits of the crew in the cloning queue are shown above the system icon. Up to 3 portraits are shown; if the crew quantity in the cloning queue exceeds 3, then only 2 portraits will be shown as the 3rd portrait is substituted by the "+number" of other crew in the queue. The crew whose portrait is closest to the Clone Bay system icon will be revived first.
- Clone Bay won't revive crew (i.e. a dead crewmember will be permanently lost), if:
- The Clone Bay is offline for 3 seconds, unless Backup DNA Bank augmentation (available for player only) is installed. The warning sound will notify you if the Clone Bay is offline and the crew clones are being erased. The crew clone loss progression is preserved between jumps. The crew clone, who entered the Clone Bay last (i.e. positioned farthest from the Clone Bay system icon), will be lost first.
- Clone Bay will not revive your crew left on the enemy ship, whether you or the enemy jumps away. (but your crew aboard the destroyed Flagship in phase 1 and 2 will be revived)
- Clone Bay does not need to be powered to activate the jump heal, but won't heal crew if it is fully ionized or destroyed. Waiting at a beacon applies the jump heal effect.
- Full-HP healing options for heavily damaged crew:
- Suffocate non-Lanius crew.
- Destroy the enemy ship while your crew is aboard it.
- Let the enemy crew kill your Lanius while it is moving.
- Bomb and fire-damage Lanius crew on your ship. (increase the oxygen supply to boost the fires spreading, preferably in a 4-tile room, or to prevent/postpone the O2 loss (fires start to die at less than 10% oxygen in a room))
- Fire-damage your Lanius aboard enemy ship engulfed with fires (oxygen supply is not shut off on enemy ships after a fight is over).
- Kill your Lanius with enemy Zoltans explosions (also works after the enemy surrenders, moreso the suffocating enemy crew will not move out of the room; enemy Clone Bay guarantees the desired result).
- Use Healing Burst. (requires 1 missile ammunition)
- Use Reconstructive Teleport augmentation. (the heal is applied for the teleporting crew only)
- Clone Bay in events:
- Revives crew in many events. (the revival works even if the system is completely destroyed)
- Can be used as a blue option in some events.
- Cannot prevent loss of crewmembers in certain events.
- Is disabled, unless countered with own Hacking, in Slug hacker (medical). (unlike Medbay-2+ there is no blue option for Clone Bay-2+ to mitigate the enemy hack)
- If the enemy ship's crew is dead, the battle will continue until their Clone Bay is destroyed.
- If the Clone Bay is destroyed while at least one enemy crew is alive, the crew dying animation must complete for the fight to be over. The fight will be over despite the enemy having an operational System Repair Drone being able to potentially repair the Clone Bay in time. (i.e. the enemy cloning queue is purged instantly when there are no live crew left and the Clone Bay is destroyed, contrary to a 3-second crew loss process applied to player's crew)
- If the Clone Bay is destroyed while all enemy crew are dead or are in the cloning queue, the fight ends immediately.
- Upgrading the system reduces the cloning time and increases the jump heal.
- You can have either a Clone Bay or Medbay installed, not both. But it is possible to switch between them at a store; switching will inherit the upgrade level of the other system.
- On playable ships: a 4-tile Clone Bay room, similarly to Medbay, can accommodate only up to 3 standing crew, while a 2-tile Clone Bay room can accommodate only 1 standing crew, unlike Medbay which can accommodate 2 crew, making them harder to repair in time and being vulnerable against fire. (enemy ships medical units have either 2 or 4 stationary positions)
- Medbay Engi Med-bot Dispersal augmentation doesn't work with Clone Bay, just like Clone Bay Backup DNA Bank augmentation doesn't work with Medbay.
Oxygen[]

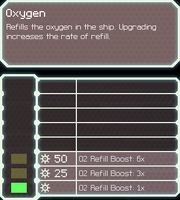
Refills the oxygen in the ship. Upgrading increases the rate of refill.
- Functioning Oxygen system replenishes the ship's oxygen (O2) supply.
- The color of the room indicates the current O2 level: white - maximum, pink/red - lower, red lines across the room - 5% or less O2.
- The "O2 LOW!" warning appears when the total O2 percentage on the ship drops below 25%.
- A room's O2 level decreases when: the room has fires (0.96% O2 every second per fire in the room); there is a breach or a Lanius in the room (both have the same O2 draining rate); a door to another room with lower O2 level is open; the Oxygen system is unpowered or hacked; there is an open airlock in a connected room with opened door (an airlock instantly drains the O2 in the room it is opened in, and quickly drains the O2 from the connected rooms with opened doors; more airlocks drain the O2 from farther rooms quicker; the drain speed surpasses that of several Lanius and breaches); the Oxygen system is unpowered.
- If the Oxygen system is unpowered, the ship's O2 level drops by 1.2% every second in every room.
- A functioning level 1 Oxygen system replenishes the O2 at 1.2% rate every second in every room.
- Crew suffocation occurs at 5% or less O2 in the room. Suffocating crewmembers take 6.4 HP damage per second.
- A functioning level 1 Medbay negates the suffocation damage in an airless Medbay. Level 2 Medbay will slowly heal the crew.
- Boarders and your mind-controlled crew will attempt to move out of O2-deprived rooms to reach rooms with 10% or more O2.
- Emergency Respirators (Advanced Edition content) augmentation halves the suffocation damage of your crew; also works when boarding the enemy ships.
- The Crystal race takes half of the suffocation damage. With Emergency Respirators they take only 25% of the suffocation damage.
- The Lanius race doesn't need O2, nor suffers from suffocation - they drain the O2 instead (at the rate of a breach).
- Fires begin to die out when a room has less than 10% O2. (see details)
- If a room is totally vented, opening a nearby room with some oxygen will speed up the O2 recovery; more opened rooms with higher O2 levels connected to the vented room will speed up the O2 recovery even more; a long pathway of rooms with O2 connected to the vented room has the biggest impact on the O2 recovery (the longer the pathway of consecutively connected opened-doors rooms with O2, the bigger the impact).
- When a room has a breach (or a Lanius), the O2 level drop in the room can be slowed down by opening doors of adjacent rooms with O2. Opening multiple rooms with O2 slows down the O2 level drop in the breached room more, at the expense of lowering their O2 levels. A long pathway of consecutively connected opened-doors rooms with O2 slows down the O2 level drop in the breached room the most (the longer, the better).
- During FTL Jump:
- The ship's oxygen level is not affected by the Oxygen system status (i.e. whether it is on or off) and the rooms' O2 levels are not being equalized.
- Opened airlocks, breaches/Lanius, and fires drain O2; though the ship's O2 level will be updated only after the Jump, the crew will be taking suffocation damage as usual.
- Fires can die out due to low O2 level in a room (and can also spread naturally).
- Upgrading the system increases the O2 refill rate.
- The refill multipliers for level-2 and level-3 Oxygen system in the ship upgrade menu are incorrect: Oxygen-2 refills O2 4x faster than Oxygen-1, and Oxygen-3 refills 7x faster.
- Oxygen-2 can counter the O2 loss due to a breach (or one Lanius) if enough adjacent rooms with O2 are opened or if there is a long enough pathway of consecutively connected opened-doors rooms with O2.
- Oxygen-2 refills the O2 level fast enough to counter the O2 drain even from Hacking-3 disruption pulse.
- Oxygen-2 prevents fires from dying out. (the O2 refill rate surpasses the O2 loss caused even by 4 fires)
- Oxygen-3 refill rate exceeds the O2 loss from a breach (or one Lanius) without requiring the room's doors being opened (although it might take a while to refill a fully-vented room).
- Upgraded Oxygen system can be used as a blue option in some events.
- Can be upgraded in Federation terraforming team C12 and Specialty work on your ship events.
Crew Teleporter[]

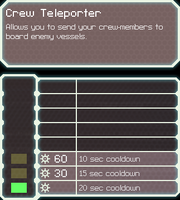
Allows you to send your crew-members to board enemy vessels.
- Teleporting basics:
- Can send as many crewmembers as teleporter pads are available.
- At least one crewmember must be standing on a teleport pad; other crew just need to be inside the room, but must be ordered to move to an unoccupied teleport pad. (crew that move through the room but were not assigned a position to a teleport pad won't be teleported)
- Can retrieve up to 4 crew from the enemy ship (have your crew, who don't fit the room, walk through it at the moment of teleportation).
- Retrieved crew that cannot fit in the teleporter room will be placed in adjacent room(s).
- Crew drones and boarding drones cannot be teleported.
- Crew being teleported (during the transition phase) can be damaged by hostile crew, but do not take suffocation or fire damage.
- During the transition phase the crew being teleported can damage the enemy system room if there are no enemy crew in that room, similarly to how the crew can damage the system during their dying animation if there are no opposing crew present in that room.
- Crew Teleporter system ionizes itself to produce a cooldown between uses. This cooldown takes between 20 and 10 seconds, depending on the system upgrade level. When your ship is not in danger, the cooldown is reset instantly.
- Enemy Crew Teleporter:
- The enemy ships will usually send their crew as boarders to the player ship, if the circumstances and the crew count allows, 2 times. The Rebel Flagship in phase 3 will send all its crew except for 1 or 2 crewmembers (however, there is a bug when the Flagship won't send its crew at all). The Rebel Elite ships can send their boarders 3 or 4 times.
- Unlike the player, the enemy waits till their crew is standing on the teleporter pads and only then sends them to the player ship.
- If the player has active Zoltan Shield (which prevents hostile teleportation), the enemy ship will not keep their crew standing on the teleporter pads. But as soon the Zoltan Shield is down and the circumstances allow, the enemy ship will order its crew to board the player ship.
- The enemy ship will recall its boarding party (or separate boarders, if they are not in the same room at the moment of recall) in several circumstances: (note that this does not apply, in part or at all, to the boarders carried over from previous beacons)
- When their crew is low on health (below 25% HP).
- When the enemy ship is running away and the remaining timer is less than 15 seconds.
- When the enemy ship has three or more completely broken systems.
- If you have boarders on your ship and you jump away before the enemy ship surrenders or explodes, and end up in a beacon with a neutral ship equipped with teleporter, the boarders will teleport away. On the contrary, if the enemy is no longer hostile, but their crew teleportation was blocked, the remaining enemy crew aboard your ship will continue to be hostile.
- Hacking pulse and Crew Teleporter:
- Forcibly recalls hostile boarders, putting the system on cooldown if anyone was successfully recalled.
- Does not retrieve crew from a cloaked ship.
- If one of your crew is mind-controlled on your ship, hacking the enemy teleporter will not send the affected crew to the enemy ship! Enemies will also not be recalled in this case, unless they enter the same room as your mind-controlled crew. The reverse is not true: when your teleporter is hacked, it will abduct enemy crew that you have mind-controlled on the enemy ship.
- Depowering a hacked Teleporter system will prevent sending your crew back by the enemy hacking pulse. However, if you remove power from a hacked system with Zoltans, have the system on cooldwon, and have spare reactor at the moment the hacking pulse occurs, it will redistribute the spare reactor back to the system and force the crew back to your ship (e.g. Teleporter-1 case).
- If you send enemy boarders from a previous fight to the enemy ship, the enemy with a Crew Teleporter will keep constantly teleporting them back to fight your ship. This crew, when low on health, is not recalled by the enemy ship for healing or keeping them alive (at low health), unless they incidentally happen to be in a room with this enemy regular boarders being teleported back (for healing). This crew, if cloned by the enemy, will keep indefinitely teleporting to your ship.
- If Crew Teleporter is disrupted, the system goes on a cooldown; the duration is based on the power allocated to the system at the start of the hacking pulse. However, the Hacking system does not enter its cooldown till the hacking pulse finishes (it lasts, based on the hacking system allocated power at the start of the pulse, 4-7-10 seconds). This means that Crew Teleporter, unlike Mind Control system, is not soft-locked from being used during the encounter.
- Mind Control and Crew Teleporter:
- Mind-controlled enemies can be teleported to your ship (but enemies can't do this to you!).
- Player cannot teleport own mind-controlled crew from the enemy ship, and the enemy cannot teleport their mind-controlled crew from the player's ship.
- Player can teleport enemy mind-controlled boarders back to the enemy ship by luring them in the teleporter room.
- Cloaking prevents hostile crew from teleporting onto or from the opposing ship (e.g. player's crew cannot teleport onto or from a cloaked enemy ship, enemy crew cannot teleport onto or from a cloaked player ship).
- Zoltan Shields block teleportation, unless you have the Zoltan Shield Bypass augmentation.
- If your crew is left aboard the enemy ship when you or the enemy makes FTL Jump, they will be permanently lost regardless of having Clone Bay. (a special warning appears if the player attempts to make FTL Jump)
- Ships can have only 2-tile Teleporter rooms, except for three playable ships with four-person teleporters: Mantis B, Mantis C, Crystal B.
- Crew Teleporter can be used as a blue option in many events. Most notable are:
- Legendary thief KazaaakplethKilik: Mantis Cruiser unlock (also requires upgraded Medbay/Clonebay).
- Friendly slaver: chance to receive a crewmember before the ship fight in addition to potentially gaining another crewmember as usual in the same fight. (requires upgraded Crew Teleporter)
Cloaking[]


Cloaks the ship, adding 60 to your evasion and preventing the enemy ship from locking on with their weapons.
- During an active cloak:
- The ship's evasion is increased by flat 60%. This increase is unaffected by any factors while the cloak lasts. The total evasion with functioning Engines and Piloting can reach or even exceed 100%.
- Weapons and artillery systems stop charging and cannot target a cloaked ship. However, if your crew or boarding drone or mind-controlled enemy crew is onboard the enemy ship, you will be able to target and fire your charged weapons. Targeting with weapons in advance can help circumvent this limitation: setting a beam trajectory prior to the cloak will make the beam weapon fire if the weapons charge time is <=20 seconds (e.g. Glaive Beam with fully trained crew, Artillery Beam at system level 4). (this limitation doesn't actually affect the enemy, because the AI fires weapons as soon as they are ready, except for occasionally storing up multiple shots for charge weapons or randomly holding up fire during their own cloak)
- Friendly crew cannot be teleported to or from an enemy ship.
- Hacking and Boarding drones hold their position in space. They will continue their move when the cloak is over.
- External combat drones move around the ship, attempting to attack but don't actually fire.
- When an enemy ship is cloaked, you lose vision of its interior unless your crew or boarding drone or mind-controlled enemy crew is aboard the enemy ship. (Upgraded) Sensors, Slug telepathy, Lifeform Scanner augmentation or attached and powered Hacking drone don't provide vision - and without vision you cannot use mind control (against enemy crew aboard enemy ship); however, this does not apply to enemies, who can use mind control against your ship even while you are cloaked (because they don't need vision). Nevertheless, with Sensors-2+ you can still track the enemy crew location and HP values by hovering over the enemy ship room tiles.
- Each system level of Cloaking provides 5 seconds of cloak time, up to a maximum of 15 seconds at level 3.
- When the cloak ends, the system takes 4 ion damage, so it cannot be used again for 20 seconds.
- Firing weapons disrupts cloak, except for beam weapons and artillery systems (both player's and the enemy's). Each non-beam weapon (and non-player artillery systems) fired during cloaking reduces the cloak time by 20% of the full amount of the powered Cloaking system. For example, firing a 5-shot Burst Lasers III will remove 2 seconds from a 10-second cloak (the de-cloaking effect is applied immediately upon firing the first projectile). There are exceptions:
- Ion Charger and Charger Laser I remove 20% of the cloak time with each shot.
- Laser Charger II removes 20% of the cloak time regardless of the number of shots and the de-cloaking effect takes places after the final shot of the charged up volley (e.g. after the 3rd shot of a 3-charge volley).
- Stealth Weapons augmentation completely removes this penalty.
- Cloaking duration can be increased or decreased by adding or removing Zoltan power to the system. (the maximum cloak duration cannot exceed the maximum system level duration, but the minimum duration can be as short as a fraction of a second)
- Your crew doesn't get piloting/engines evasion experience during cloak.
- Hacking and Cloaking systems interaction:
- Hacking pulse prevents a ship from entering cloak (the Cloaking system is locked and cannot be activated).
- Hacking pulse ends an active cloak and puts the Cloaking system on full (20 seconds) cooldown.
- When the hacking pulse disrupts the active cloak, the hacking pulse continues while the Cloaking system enters its cooldown immediately. The Hacking system only enters its (20 seconds) cooldown after the hacking pulse ends (i.e. in 4-7-10 seconds after Cloaking). Thus, the hacked and disrupted Cloaking will be ready earlier than the next hacking pulse. Ionizing (with Stun Bomb) or de-powering (with Zoltans) the active Hacking will allow to reduce the wait time (especially in case with stun bombing, due to a bug). Hacking pulse against non-active Cloaking does not force full cooldown of the Cloaking system; it doesn't halt, nor increases the cooldown either.
- When you kill all enemy crew and win the fight, the enemy cloaking may still be in effect: this will prevent you from retrieving your crew while the cloak lasts. (it is impossible to circumvent this due to inability to damage enemy systems, with weapons or sabotage, after the fight is over)
- Can be used as a blue option in some events.
Mind Control[]

|
This section describes content that only appears in Advanced Edition. |
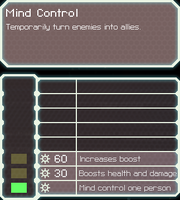
Temporarily turn enemies into allies.
- Turns one enemy crewmember into ally (whether on your ship or an enemy ship).
- Slugs cannot be mind controlled.
- Like with drones, you can't give them orders, rather they are under the AI control. But they can do anything your crew can: fight, man systems, repair, etc.
- Mind-controlled crew can freely pass through blast doors, including those of a hacked system room.
- Enemy Medbays will not heal them and Medbay hack will not hurt them.
- Mind-controlled crew, your own or enemy, can be healed with Healing Burst.
- Mind-controlled enemy crew can heal in your Medbay; your mind-controlled crew can heal in the enemy Medbay.
- They will be treated as an intruder by the enemy crew. Anti-Personnel drones and crew will attack them as the AI sees fit.
- Mind control requires view of enemy crew (Slug telepathy and Lifeform Scanners count).
- Vision can also be granted by manning Sensors, teleporting a bomb that doesn't miss a targeted room, hacking a system room.
- Enemies do not require vision to use Mind Control, and can use it even when you are cloaked.
- Mind control duration depends on the system power level: 14 seconds for Lv1, 20 seconds for Lv2, and 28 seconds for Lv3.
- Mind control duration can be manipulated by decreasing or removing power from the system with Zoltans.
- Mind-controlled crew can be healed with Lv 2-3 Mind Control by moving a Zoltan (or Zoltans) out of the room and back in.
- Combat damage bonus and health boost are removed if the system level is decreased.
- Mind Control's cooldown is immediately reset by an FTL jump.
- If all system levels of Mind Control get ionized, the system enters the maximum cooldown - 25 seconds.
- Mind Control and crew teleporting:
- Mind-controlled enemies can be teleported to your ship (but enemies can't do this to you!).
- A player cannot teleport own mind-controlled crew from the enemy ship, and the enemy cannot teleport their mind-controlled crew from the player's ship.
- Player can teleport enemy mind-controlled boarders back to the enemy ship by luring them in the teleporter room.
- Your crewmembers can be freed from enemy mind control (but enemies cannot cancel your mind control): level 1 is enough to cancel even a level 3 mind control.
- Player's mind control chooses a random target in the room: it can accidentally control an enemy boarder instead of removing the mind-control from player's crew.
- Mind control is blocked by Zoltan Shields, unless you have Zoltan Shield Bypass augmentation.
- Upgrades increase the mind-control duration, health and combat damage of the affected crew.
- Can be used as a blue option in some events.
Artillery Beam[]

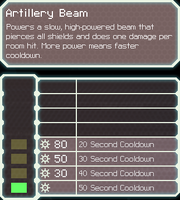
Powers a slow, high-powered beam that pierces all shields and does one damage per room hit. More power means faster cooldown.
- Pre-installed system available only on Federation A and Federation B.
- When fully charged, automatically fires a fast moving beam that pierces regular shields:
- Does 1 hull/system damage per room it hits.
- Has 10% chance to start a fire in each tile it passes.
- Deals 1 damage to Zoltan Shield per each of the 2 ticks.
- The beam swipe cannot be controlled.
- Does not disrupt cloaking.
- Charge time and interactions:
- Powering off drains charge quickly, whereas Hacking disruption reduces the charge progress only by 4-7-10 seconds.
- The system does not have a console and, hence, cannot be manned to reduce the charge time.
- Weapon Pre-igniter augmentation does not charge it.
- Automated Re-loaders augmentations work.
- A crewmember manning Weapon Control system gains 1 experience point when Artillery Beam fires.
- In events:
- The Artillery Beam is unaffected when the Weapon Control system is malfunctioning (1, 2, 3, 4).
- Can be used as a blue option equivalent of a beam weapon in Crushed pirate event.
- Upgrading means faster charge rate.
- Fully powered level 4 Artillery Beam is capable of firing before the enemy enters cloak (potentially damaging or even cancelling it).
Flak Artillery[]

|
This section describes content that only appears in Advanced Edition. |
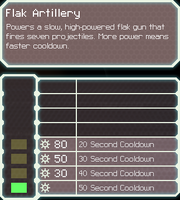
Powers a slow, high-powered flak gun that fires seven projectiles. More power means faster cooldown.
- Pre-installed system for Federation C only.
- Automatically fires a 7-flak burst when charge is complete. Each shot is targeted at a random room in a small area - about halfway between Swarm Missiles and Advanced Flak in size - and does one damage to room that it hits.
- Powering off drains charge quickly.
- The system cannot be manned.
- Weapon Pre-igniter does not charge it.
- Automated Re-loaders work.
- Firing the Flak Artillery does not disrupt cloaking.
- If the Weapons system is manned and the Artillery system fires, the crew member manning the Weapons system will gain 1 experience as if a normal weapon had been fired.
- Upgrading means faster charge rate.
Hacking[]

|
This section describes content that only appears in Advanced Edition. |
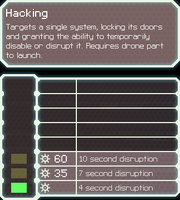
Targets a single system, locking its doors and granting the ability to temporarily disable or disrupt it. Requires drone part to launch.
- Launches a hacking drone that attaches to the enemy ship.
- Drone can be shot down in transit but can only be removed if destroyed by the hacking system being hacked (so you can't move it either, choose wisely).
- Drones hit by an ion shot are stunned for 5 seconds for each ion damage. Each second of stun after the first, it has a 15% chance to be destroyed.
- Hacking drone cannot be launched at a ship with a Zoltan Shield, even with the Zoltan Shield Bypass augmentation. A hacking drone launched prior to a Zoltan Shield being up (e.g. when created by a Shield Overcharger Drone) will be destroyed upon impact with the Zoltan Shield when it goes up.
- Passive effects on a system with attached hacking drone:
- Room vision and max-level Sensors information on the system.
- System cannot be manned, but automated ships still get their manning bonuses.
- Repair speed of the system is halved.
- Additional passive effects if the Hacking system is powered:
- If the targeted system is Piloting or Engines, the ship name on the top right corner is replaced with text that states the current Evasion of the enemy ship.
- Doors are locked for hostile crew, but friendly crew can pass through freely.
- Hacked doors are equivalent to level 3 blast doors; after being broken down they will "heal" and close automatically in 7 seconds. You cannot directly control these doors, but you can "open" them (for hostile crew) by removing all power from your hacking system.
- Doors previously broken open (on the enemy ship) become closed and at full health if power is removed from your hacking system, thus, obstructing your crew movement.
- Crystal Lockdown completely restores the doors health and protects it while the coating is present. However, if a room is locked down before a hacking drone attaches to the system, then the room's doors take only 4 hits to be broken after the coating disappears (instead of regular 10 hits, on Hard mode), but another lockdown will reset the doors health appropriately.
- Fires spread through a hacked system doors at the fastest pace (equivalent to the opened doors or no Door System).
- Hacking pulse:
- Hacking pulse lasts either 4, 7, or 10 seconds, depending on the amount of power in your hacking system.
- When the pulse finishes, the hacking system enters 20 seconds cooldown before activating the next pulse.
- Due to a bug, ionising an active hacking system will reset the system cooldown to the amount of ion damage applied, instead of 20 seconds.
- Hacking a system, which is a on cooldown, does not affect its cooldown. For example, hacking the cloaking system while it's on cooldown will not change the remaining cooldown time.
- Higher system level power for the hacking pulse increases chances to destroy drones (when disrupting Drone Control system) or an attached hacking drone (when disrupting Hacking system).
- The chance to destroy a drone is 39%, 62%, 77% with level 1, 2, 3 hacking (after a one-second delay, there's a 15% chance to destroy the drone every second).
- A destroyed system cannot be actively hacked, but a hacking pulse started prior to the system destruction will not be interrupted.
- Active effects during hacking pulse vary by system:
- Weapon Control: drains the charge of all weapons on the ship and prevents them from being fired; a near frame-perfect hack can split a burst laser volley (e.g. Burst Laser I will shoot only 1 laser on the hack start and another one - after the hack, upon charge completion).
- Draining speed is the same as speed as the base-level charging speed -- i.e. hacking "reverse charges" weapons.
- On multiple charge weapons, only the current charge will be drained (stored charges aren't affected).
- Chain weapons do not lose their warm-up progress.
- Ion Bomb, Breach Missiles, and Flak II can be prevented from firing before the 2nd hacking pulse start. (doesn't work vs Auto-ships with non-damaged weapons system - it retains manning bonus)
- Artillery Beam / Flak Artillery / Rebel Flagship weapons: drains charge (same effect as on weapons).
- Shields: discharges shields, requiring 2 seconds to remove 1 shield layer.
- Level 1 hacking lasts exactly 4 seconds, and will randomly remove 1 or 2 shield layers.
- If your frame rate is locked to 30 frames per second, level 1 hacking will always remove 2 shield layers.
- Hacking: ends an active hack, with a chance to destroy the hacking drone (higher chance with higher-level hacking).
- Backup Battery: disables bonus power, putting the system on cooldown if active, and temporarily removes two regular power bars from reactor.
- Drone Control: disables drones, with a chance to destroy them (higher chance with higher-level hacking).
- Door System: locks all doors, converting them into temporary enemy level 3 blast doors.
- Crew Teleporter: forcibly recalls hostile boarders, putting the system on cooldown if anyone was successfully recalled.
- Does not retrieve crew from a cloaked ship.
- If one of your crew is mind-controlled on your ship, hacking the enemy teleporter will not send the affected crew to the enemy ship!
- Enemies will also not be recalled in this case, unless they enter the same room as your mind-controlled crew.
- The reverse is not true: when your teleporter is hacked, it will abduct enemy crew that you have mind-controlled on the enemy ship.
- Depowering a hacked Teleporter system will prevent sending your crew back by the enemy hacking pulse. However, if you remove power from a hacked system with Zoltans, have the system on cooldwon, and have spare reactor at the moment the hacking pulse occurs, it will redistribute the spare reactor back to the system and force the crew back to your ship (e.g. Teleporter-1 case).
- Piloting/Engines: reduces base evasion to 0 and stops the FTL drive charging. Does not affect evasion gained from Cloak.
- Oxygen: drains O2 levels of ship at 6% per second.
- Mind Control: temporarily turns one random enemy into an ally, and removes enemy mind control from allies.
- Fails completely when used by automated ships.
- If the enemy mind-controlled crew dies during the disruption, then another enemy crew will be mind-controlled.
- Medbay: drains the health of hostile crew in the medbay at 13 health per second. Friendly crew are unaffected.
- Cloaking: ends an active cloak, and prevents the enemy from entering cloak.
- Clone Bay: disables the clone bay. (Backup DNA Bank augmentation protects your crew from being erased)
- Sensors: disable sensors.
- Weapon Control: drains the charge of all weapons on the ship and prevents them from being fired; a near frame-perfect hack can split a burst laser volley (e.g. Burst Laser I will shoot only 1 laser on the hack start and another one - after the hack, upon charge completion).
- Hacking specifics for enemy ships:
- Enemy hacking choice of a system is completely random each time they launch a hacking drone.
- Most enemy ships have a maximum of level 2 hacking. Enemy ships with level 3 hacking: Lanius Scouts, Engi Hackers, and the Flagship in phase 1.
- Hacking system can be used as a blue option in many events.
Weapon Control[]

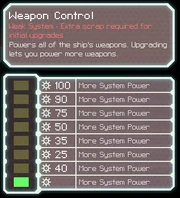
Powers all of the ship's weapons. Upgrading lets you power more weapons.
- Weapons are activated and begin charging by a left mouse click on a weapon slot or (default) keyboard keys 1 -- 4.
- Clicking and/or pressing again changes the cursor to a targeting mode. Then a target room is confirmed by a left mouse click. Targeting is cancelled by a right mouse button.
- Auto-fire can be enabled/disabled for all weapons or individually.
- Keyboard keys combo Ctrl + (1 -- 4) or Ctrl + left mouse click on a weapon slot reverses the setting for a specific weapon slot. (e.g. if auto-fire is disabled for all weapons, then Ctrl switching will enable it for a specific weapon slot)
- Weapons are depowered by a right mouse click or (default) keyboard keys combo Shift + (1 -- 4).
- Upgrading the system allows to allocate more power into weapons.
- Weapons order can be changed by dragging and dropping a selected weapon.
- When damaged or ionized, weapons go offline from the right-most slot to the left.
- A single ion damage is enough to force reactor power from any weapon. (e.g. a 4-power Glaive Beam will go offline if the system is hit by a single ion projectile with 1 ion damage; whereas, a 2 ion damage projectile will disable two 1-power weapons)
- When ionized or actively hacked, the weapons cannot be powered or depowered manually.
- When actively hacked (disrupted), the weapons cannot be fired even if they have accumulated charges (e.g. Ion Charger, Laser Charger, etc.), however, the stored charges cannot be removed by hacking disruptions.
- When ionized, the slot positions of the weapons can be changed (this allows a Zoltan or Zoltans to power the desired weapons; place a weapon closer/further to the enemy ship; snipe enemy drone, missile or an asteroid, etc).
- Zoltans add or replace 1 power bar each to Weapon Control system, and the weapons are powered by Zoltans starting from the left-most slots.
- If Zoltans' power is not enough to fully power the left-most weapons when there is no spare reactor power available, these weapons cannot be operational and must be swapped to another slot. (e.g. it is also possible to have maximum power in the Weapon Control system and not be able to use the weapons, which normally could be powered with reactor power, due to Zoltans only partially powering some of the weapons - not only the Zoltan power is wasted, but the system power levels are wasted)
- Zoltans leaving the room without enough spare reactor power to sustain the weapons will de-power these weapons.
- With Zoltans in the Weapon Control, weapons in the left-most slots can become depowered when other weapons get positioned in these slots if there is not enough cumulative power in the system or not enough spare reactor power for both of these weapons. (example: 1 zoltan and 2 reactor power are powering slot 1 Halberd in Weapon Control level 4 system, slot 2 Leto is unpowered due to lack of reactor; if slot 2 Leto is moved into slot 1, the Halberd goes offline)
- Normally reactor power cannot be added or removed from an ion-locked system, however, Zoltans replace the reactor power from ion-locked Weapon Control system with their zoltan power and remove the reactor power if they leave the room. Thus, it is possible to increase the total power supplied to the Weapon Control system if more Zoltans end up in the room than there was cumulative power in the system prior to the ion lock. (example: 1 zoltan and 3 reactor power are powering slot 1 Halberd and slot 2 Leto in Weapon Control level 4; the system gets Ion Bombed and both weapons go offline; if Leto is placed into slot 1, it gets powered by a Zoltan; if 2 more Zoltans come and stay in the room, slot 1 Halberd can be powered; 3 more Zoltans, for a total amount of 4, will power both weapons)
- A weapon charge can be stored if a weapon is fully charged and then put into a cargo slot.
- Manning the system reduces weapons' charge time by 10%/15%/20% for crewmember's skill level 0/1/2.
- Weapon charge time can be improved by Automated Re-loader augmentation(s).
- Weapons can get a full charge with Weapon Pre-Igniter augmentation, when player's ship arrives at the next beacon.
- Upgraded Weapon Control system can be used as a blue option in some events.
Drone Control[]

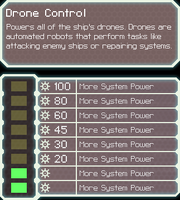
Powers all of the ship's drones. Drones are automated robots that perform tasks like attacking enemy ships or repairing systems.
- Powers all of the ship's drones.
- Drones are automated robots that each perform a different task.
- Activating a drone is done in a similar way as activating weapons, by clicking on the installed drone schematic or pressing the key (5-7).
- Activating a drone will power it and, if the drone is not already deployed, will spend one drone part to deploy the drone.
- The drone will stay active until it is destroyed, its system is too damaged to power it, or you deactivate it.
- External and boarding drones are lost when jumping to a new system and have to be redeployed at each new location or encounter, though a Drone Recovery Arm lets you recover the drone parts of your external drones.
- Crew drones stay on the ship and only need to be redeployed when destroyed.
- Upgrading lets you power more drones simultaneously (although you can have multiple deployed and only have one powered at a time, switching power as necessary).
- Most playable ships have 2 slots for Drone Schematics. All Engi ships and Stealth C have 3 slots. Enemies can have up to 4 active drones (Rebel Rigger, Rebel Disruptor, the Flagship, and Engi ships).
- Drones that fly around a ship can be shot down by enemy fire if they are in direct line of fire, or can be destroyed by colliding with asteroids. Your weapons cannot hit your own drones and your defense drones cannot shoot down each other with their weapons.
- Crew and boarding drones can be damaged and destroyed by hostile crew; however, they take halved damage from any weapons, asteroids, or Zoltan explosion.
- If a drone is destroyed, there is a 10 second delay before it can be deployed again (costing another part).
- The drone deployment delay is not reduced nor reset during FTL jump.
- If a Boarding Drone is left behind on the enemy ship (whether you kill the enemy crew or jump away from the fight), there is no 10 second cooldown before the drone can be deployed at the next beacon.
- Drone Control system can be used as a blue option equivalent in the Pirate ship selling drones event.
- Installed drones can be used as a blue option in some events.
- External drones hit by an ion shot are stunned for 5 seconds for each ion damage. Each second of stun after the first, they have a 15% chance to be destroyed.
Subsystems[]
These systems are always powered and don't take power from the reactor, but can be disabled which makes them temporarily inactive until you repair them.
| Subsystem | Maximum upgrade level |
Manning bonus |
Maximum system level |
Purchase cost |
|---|---|---|---|---|
| 3 | Yes | 3 | - | |
| 3 | Yes | 4 | 40 | |
| 3 | Yes | 4 | 60 | |
| 2 | No | 2 | 35 |
- ↑ Advanced Edition Content.
Piloting[]

Allows the ship to make FTL jumps and dodge when piloted. Upgrading adds auto-pilot that allows some evasion even without a pilot.
- Crew presence in the Piloting room and powered Engines are required for the system to be fully functional: enabling ship evasion, charging the FTL Drive and making an FTL Jump. Manning the Piloting console is not required, but it provides bonus evasion based on the manning crew's piloting skill level.
- Stunned or mind-controlled ship crew and crew drones do not count towards the crew presence in the Piloting.
- Evasion is gained from powered Engines levels, manning Engines and Piloting (+5% each), Engines and Piloting manning crew skill level bonus (up to +5% for each, at skill level 2; engines skill is relevant only for the crew manning the Engines and piloting skill is relevant only for the crew manning the Piloting).
- The FTL Drive charge rate depends on the Engines powered system levels, Engines manning and Engines manning crew skill level. (see FTL Drive charge time table)
- FTL Recharge Booster augmentation multiplies charge time by 80%, two of them by 67%, and three of them by 57%.
- The FTL Drive will not charge if there is no crew in the Piloting room (or if your crew is stunned or mind-controlled).
- Upgraded Piloting system provides auto-pilot functionality, which provides a portion of evasion granted by Engines and total Engines crew manning bonus (50% of the combined engines evasion for Piloting-2, 80% for Piloting-3).
- Active cloaking evasion bonus is flat +60% and is not affected by the absence of crew in the Piloting (or auto-pilot evasion reduction).
- Having >25% evasion, when playing on Hard difficulty, puts Piloting (and Engines too) on the enemy high-priority system targeting list. (see more details here and here)
- Upgraded Piloting can be used as a blue option in some events.
- Can be upgraded in Specialty work on your ship event.
Sensors[]

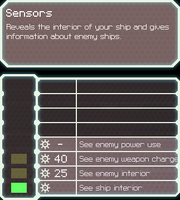
Reveals the interior of your ship and gives information about enemy ships.
- Sensors level 1 reveal the interior of your ship.
- Sensors level 2 additionally reveal the interior of the enemy ship.
- Sensors level 3 additionally display enemy weapons charge bars.
- Sensors level 4 additionally provide the information on enemy systems level, power usage, ion damage/cooldown, repair/sabotage progress.
- Level 4 Sensors 'limitation': they do not show the remaining duration time of active Hacking, Cloaking, Mind Control, or Clone Bay progress and crew quantity in the cloning queue.
- Manning the Sensors console makes the system work 1 level above its current upgrade level.
- The maximum, 4th, system level can be achieved only by manning the system.
- Functioning Level 2+ Sensors allow player to see the enemy crew name and HP value (in the tooltip text box), even when the enemy ship is cloaked. (also works while the game is paused) (see image)
- Sensors are temporarily disabled in nebulas and in the Human boarders jammed sensors event.
- Enemy ships do not have Sensors subsystem, but have all the information about your ship and crew.
- Upgraded Sensors can be used as a blue option in some events.
- The Rebel Flagship limits the Sensors functionality to level 2.
- Can be upgraded in Specialty work on your ship event.
Door System[]


Allows remote opening and closing of doors. Upgrades to Blast Doors that impede fire spread and intruder movement.
- Functioning Door System allows operating (opening and closing) doors by the player. This has many uses:
- Venting oxygen from a room to suffocate fires.
- Equalizing oxygen levels between rooms.
- Assisting in dealing with boarders. Boarders can be separated, stalled, or manipulated to change their direction and effectively suffocated. (requires level 2+ Door System)
- Disabled, broken or lack of the Door System - indicated by the doors having a red-orange color - prevents doors operations by the player (including using the "open/close all doors on the ship" GUI Door System buttons) of all doors and vents. Crew, drones, and boarders can freely move through such doors. Crew/drones presence in a room does not affect the player capability to open/close doors or vents.
- Ionizing effect completely disables operation of the Door System, regardless of the system level and the ion damage amount. Zoltans cannot ion-proof the Door System (or any other subsystems).
- Blast doors (level 2+ doors system) impede intruders movement.
- Closed doors with available Door System slow down fires spreading between rooms.[1]
- Blast doors significantly slow down the fires spreading to other rooms.
- Hacked doors are equivalent to opened doors (or lack of the Doors System).
- Boarders move freely through hacked doors.
- Fires spread at the fastest pace from such rooms to other rooms.
- Doors can be opened in specific patterns to slow down the oxygen loss in the room (and in the other connected rooms with opened doors) due to hull breaches/Lanius. Open only one door in a breached room and make the longest possible corridor of opened rooms with oxygen leading to the breached room, keep the O2 system functioning for best results.
- With this technique level 2 O2 system is capable of countering multiple breaches.
- The technique's ultimate effectiveness is, however, subject to the actual ship layout and, to some extent, the breach location.
- Replenishing oxygen in vented rooms can occur faster by opening as many rooms with higher oxygen levels as possible (when there are no breaches/Lanius).
- To vent a specific room on a ship in the fastest possible way, open all available airlocks or rooms with breaches/Lanius that lead to the room that needs venting. Turn off the O2 system to quicken the process.
- Manning the Door System console makes the system work 1 level above its current upgrade level.
- The maximum (4th) system level can be achieved only by manning the system.
- Door strength depends on the Door System level and the game difficulty. (see the door strength table)
- Having boarders or fires on your ship, when playing on Hard difficulty, puts Door System on the enemy high-priority system targeting list. (see more details here and here)
- Upgraded Door System can be used as a blue option in some events.
- Can be upgraded in Specialty work on your ship event.
- [bugged] Under certain circumstances the enemy crew can move through your unbroken blast doors, both on your ship and their ship (when their system is hacked)
Backup Battery[]

|
This section describes content that only appears in Advanced Edition. |
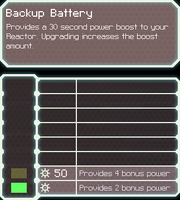
Provides a 30 second power boost to your Reactor. Upgrading increases the boost amount.
- When activated, Backup Battery provides 2 additional power bars for 30 seconds. Upgrading the subsystem provides 4 additional power bars in total upon activation.
- Bonus power is indicated by power bars with orange borders.
- Battery power bars are allocated after distributing all regular power bars.
- Once the Backup Battery work cycle is over, the system enters a 20 seconds cooldown before it can be used again. Battery Charger augmentation reduces the cooldown to 10 seconds. No reactor energy is required to recharge the battery.
- Additional power acts as normal power bars, and when Backup Battery enters its cooldown, the additional power bars are removed from reactor. This can cause activated systems such as Cloaking or Mind Control to deactivate or reduce their effect duration and begin their cooldown prematurely, for good or ill.
- Backup Battery can be effectively used for powering temporary systems such as Cloaking, Mind Control or additional levels of these or other systems: once these systems enter their cooldown, the reactor power is locked for the whole duration of the cooldown; additional power bars can be removed from those systems during their cooldown without repercussions when Backup Battery enters its cooldown.
- Additional power bars interact with Zoltan power just like regular power bars.
- Backup Battery's additional power bars are not affected by ion storms (which temporarily half the maximum reactor power).
- If you are not IN DANGER and Backup Battery runs out, it becomes instantly available again - it doesn't enter its cooldown (just like Cloaking or Mind Control). (Note: IN DANGER situation prevents accessing the ship info screen. It occurs during combat or while your ship is being boarded, at solar flares, pulsars, in asteroid fields, and due to hostile ASB presence)
- Backup Battery's cooldown is immediately reset by an FTL jump. However, Waiting (e.g. for Flagship or in out-fuel events) will not reset the cooldown.
- If all system levels of the Backup Battery subsystem get ionized (e.g. when a pulsar ionizes it), it will enter its maximum 25 seconds cooldown.
- However, 1 ion damage will not cause disruption to activated level 2 Backup Battery (there is also no ion damage indication in the GUI), but if 1 ion damage is applied from two ion sources simultaneously, the battery will enter its maximum cooldown. Note that if you continue (return to) the game from the main menu, the 1 ion damage will be registered properly.
- Backup Battery allows to exceed the maximum (25 power bars) reactor level.
- Hacking a Backup Battery will cause it to shut down and drain two regular power bars from the reactor. (only playable ships can have Backup Battery)
- Can be used to complete the Zoltan Cruiser Givin' her all she's got, Captain! achievement and is required (as one of the elements) to receive the Lanius Cruiser Advanced Mastery achievement.
- Activating the Backup Battery, when playing on Hard difficulty, puts it on the enemy high-priority system targeting list. (see more details here and here)
- Pre-installed and fully upgraded on Zoltan C.
Powering and upgrading systems[]
To power a main system, left click on it in the system bar. To unpower it, right click. You can also use the middle row of the keyboard (A, S, D, F, etc) which correspond to the systems in the order they are present. Pressing the key powers one bar of the system and Shift-<key> unpowers one bar. This can be done at any time. Subsystems are automatically powered.
Each system can be upgraded to support more power. This is done in the "Upgrades" tab in the "Ship" menu, at the top of the screen. Powering a system additional levels will make it more powerful.
Systems cooldown[]
Once a certain system has been activated and its effect worn off, the system self-ionizes and enters a cooldown, which usually last 20 seconds. The cooldown for Crew Teleporter depends on the system power level: 20 seconds for level 1, 15 seconds for level 2, and 10 seconds for level 3. Backup Battery's cooldown can be halved with Battery Charger augmentation: the cooldown duration is reduced from 20 seconds down to 10.
The maximum cooldown duration is 25 seconds. This can happen to self-ionizing systems by applying enough ion damage to force all power from them during their active state (or by applying additional ion damage after the start of their cooldown). However, ionizing the Hacking system during its active hacking pulse will set its cooldown to the ion damage it receives from any source (e.g. a Stun Bomb can reduce the cooldown down to 5 seconds) (this is, most likely, a bug).
Ion damage - from weapons, enemy ion intruders, pulsars - persists between FTL jumps (and is not reduced during an FTL jump), but is instantly reset at a safe beacon, except for the Clone Bay which continues to be ionized (and disabled) for the full duration. Self-ionizing systems reset their cooldown during an FTL jump, however, Crew Teleporter and Cloaking do not get a reset when the jump is made from a beacon in a danger state (at certain hazard beacons, during a ship fight or enemy boarding). Waiting at a beacon (when out of fuel, or in the last sector) doesn't reset the cooldown of the systems.
Damaged and destroyed systems[]
A system can take damage from weapons, offensive drones, fires, boarders, asteroids, and solar flare impacts.
Weapons, drones, asteroids, and solar flare impacts (when they specifically cause damage) instantly damage systems and the hull when they hit. For instance, if a weapon deals 2 damage to a system, the maximum power of this system is lowered by 2, until the system is repaired. A system with all its levels damaged is considered destroyed, i.e. completely unfunctional (till repaired).
Boarders and fires can damage and destroy systems. However, a system cannot be damaged or destroyed instantly, and this type of damage is called sabotage damage. It has a progress bar, shared with the system level bar, that gets steadily filled (similarly to the repair progress, but colored red), if not interrupted - by putting out fires and/or distracting or defeating boarders. Both types of sabotage damage fill in the same progress bar, thus, speeding up the eventual system damage. Interestingly, the repair progress is preserved while the crew stays in the room and is not cancelled by the sabotage (so you can continue and finish up the repairs sooner when there are no more live enemies or other system hazards in the room). Nevertheless, when a system gets destroyed due to sabotage, the ship's hull will receive 1 damage. However, such damage can also be prevented by bombing a system with a Small Bomb or, when desperate, with a Breach Bomb.
When a system is being sabotaged by boarders, it will have ![]() icon above it, and when a system is affected by fires (at least 1), it will have
icon above it, and when a system is affected by fires (at least 1), it will have ![]() icon above it. These icons are shown in the GUI even if the ship's sensors are absent/disabled/destroyed. Also, enemy units sabotaging your systems or punching down the doors can be distinctly heard, just like the burning fires make a distinct sound along the drop of overall ship oxygen level (especially when the ship initially had 100% O2). If a system is affected by a breach but is not damaged (e.g. a breach in Plasma storm incapacitated ships event or boarding drones infiltration), it cannot be manned till the breach is sealed. A breach has a distinct air loss sound, but there is no GUI icon indicating a breach. Note that repairing a system with a Repair Burst won't seal breaches, nor put out fires. Additionally, every room has a built-in hazard emergency indicator in case of a fire or a breach, a glowing lamp with recurring red light, but it is more of a cosmetic feature because it requires the room vision to be seen at all. Note that fires and breaches have different effect on Auto-ships (while none of these remove the manning bonus): a breach prevents the repairs, a fire resets and stalls the repair progress while it burns. A Repair Burst can be used to also repair an enemy ship system, but the practical use of this is extremely limited.
icon above it. These icons are shown in the GUI even if the ship's sensors are absent/disabled/destroyed. Also, enemy units sabotaging your systems or punching down the doors can be distinctly heard, just like the burning fires make a distinct sound along the drop of overall ship oxygen level (especially when the ship initially had 100% O2). If a system is affected by a breach but is not damaged (e.g. a breach in Plasma storm incapacitated ships event or boarding drones infiltration), it cannot be manned till the breach is sealed. A breach has a distinct air loss sound, but there is no GUI icon indicating a breach. Note that repairing a system with a Repair Burst won't seal breaches, nor put out fires. Additionally, every room has a built-in hazard emergency indicator in case of a fire or a breach, a glowing lamp with recurring red light, but it is more of a cosmetic feature because it requires the room vision to be seen at all. Note that fires and breaches have different effect on Auto-ships (while none of these remove the manning bonus): a breach prevents the repairs, a fire resets and stalls the repair progress while it burns. A Repair Burst can be used to also repair an enemy ship system, but the practical use of this is extremely limited.
Systems can be 'damaged' (ionized) by ion weapons and pulsars. That doesn't cause hull damage (crew isn't damaged either, but can be stunned with some weapons or by ion pulse of Ion Intruder Drone), but disables the system - partially or completely - by removing power and locking the system (the system will be ![]() "Locked by Ion"). Ionized systems cannot be activated even if they have enough power and are not on their standard cooldown. Some systems require just 1 ion damage to shutdown, while others can be shutdown only if enough ion damage is applied (i.e. when all power allocated to the system is removed). The ion damage of 1 removes 1 power and locks the system for 5 seconds. Any (sub-)system can be ionized up to a maximum of 5 ion points; the full 25 seconds lockdown can only be achieved when applying the corresponding amount of ion damage when the ion indicator circle is full, i.e. at mark 4/20 seconds, 3/15 seconds, etc (there is no overflow of ion damage beyond the whole ion lockdown indicator number - applying any amount of ion damage, even 4, to a system with 21 seconds lockdown won't increase the lockdown timer to 25 seconds). Nevertheless, the ship systems can be protected by Reverse Ion Field augmentation (especially, when 2 augmentations are stacked) or ion-proofed by Zoltans (which can protect and power systems, but not the subsystems; manning an ionized system is still not possible till all ion damage is removed naturally). Worth noting that any amount of ion damage to the Door System will prevent operating the doors by the player, either through the GUI buttons/hotkeys or selectively (with the mouse).
"Locked by Ion"). Ionized systems cannot be activated even if they have enough power and are not on their standard cooldown. Some systems require just 1 ion damage to shutdown, while others can be shutdown only if enough ion damage is applied (i.e. when all power allocated to the system is removed). The ion damage of 1 removes 1 power and locks the system for 5 seconds. Any (sub-)system can be ionized up to a maximum of 5 ion points; the full 25 seconds lockdown can only be achieved when applying the corresponding amount of ion damage when the ion indicator circle is full, i.e. at mark 4/20 seconds, 3/15 seconds, etc (there is no overflow of ion damage beyond the whole ion lockdown indicator number - applying any amount of ion damage, even 4, to a system with 21 seconds lockdown won't increase the lockdown timer to 25 seconds). Nevertheless, the ship systems can be protected by Reverse Ion Field augmentation (especially, when 2 augmentations are stacked) or ion-proofed by Zoltans (which can protect and power systems, but not the subsystems; manning an ionized system is still not possible till all ion damage is removed naturally). Worth noting that any amount of ion damage to the Door System will prevent operating the doors by the player, either through the GUI buttons/hotkeys or selectively (with the mouse).
System repair progress is instantly lost, if all friendly crew (including drones) leave the room or die. However, the sabotage progress continues during crew's dying animation or teleportation from a ship, if no hostile crew is present in the room (e.g. on Auto-ships).
Systems blue options[]
Artillery Beam[]
- Crushed pirate (equivalent of Beam weapon or Beam Drone)
Cloaking[]
- Auto-ship fight in plasma storm (equivalent of Engines 6-8)
- Auto-ship near small space-station (Lv 1 equivalent of Hacking-1; Lv 2-3 equivalent of Hacking 2-3)
- Auto-ship near storage vessel
- Malfunctioning defense system (Lv 3 equivalent of Ion weapon or Engi crew)
- Mantis ship doesn't see you
- Prepare to dock
- Stationed Rebel ship
Clone Bay[]
- Abandoned space station
- Legendary thief KazaaakplethKilik (Unlock Mantis Cruiser) (Lv 2-3 equivalent of Medbay 2-3)
- Nebula seen ships exchange fire (Lv 1-3 equivalent of Medbay 2-3)
- Single life form on moon (Lv 2-3 equivalent of Medbay 2-3 in one of scenarios)
- Space station under construction
Crew Teleporter[]
- Auto-ship near sensor station
- Crystalline cache (level 2+)
- Federation ship in need of aid (similar to Healing Burst in one of outcomes/rewards)
- Friendly slaver (level 2+)
- Heavily damaged Federation ship (superior to Long-Ranged Scanners)
- Legendary thief KazaaakplethKilik (Unlock Mantis Cruiser) (equivalent of Sensors-3)
- Merchant's request (negative crew loss option in one of scenarios in Merchant's Delivery, filler effect/no benefit in one of scenarios in Merchant's Investigation)
- Small asteroid belt distress beacon
- Small research station with no response (negative crew loss option in one of scenarios)
- Unencrypted communication channel (equivalent of Anti-Bio Beam or Fire Bomb)
- Zoltan trade hub
Door System[]
Drone Control[]
- Pirate ship selling drones [not a blue option per se, but serves the same purpose]
Engines[]
- Auto-ship fight in plasma storm (Lv 6-8 equivalent of Cloaking 1-3)
- Crystalline cache
- Pirate slaver
- Stationed Rebel ship
- Rock live mine
Hacking[]
- Auto-ship carrying shield virus
- Auto-ship near small space-station (Lv 1 equivalent of Cloaking-1, Lv 2-3 equivalent of Cloaking 2-3) (requires 1 drone part)
- Auto-ship sits dormant (requires 1 drone part)
- Dangerous-looking ship
- Human boarders jammed sensors
- Pirate engine hacker
- Pirate ship selling drones
- Slug disable door system
- Slug sabotage medical unit
- Slug sabotage oxygen system
- The Engi virus
Medbay[]
- Damaged space station (Lv 2-3 for crew safety in one of scenarios)
- Legendary thief KazaaakplethKilik (Unlock Mantis Cruiser) (Lv 2-3 equivalent of Clone Bay 2-3)
- Merchant's request (Lv 2 for crew safety and Lv 3 for crew reward in some scenarios in Merchant's Delivery)
- Nebula seen ships exchange fire (Lv 2-3 equivalent of Clone Bay 1-3)
- Single life form on moon (caveman encounter: Lv 1 for crew safety in one of scenarios and Lv 2-3 for crew reward in one of the other scenarios)
- Slug sabotage medical unit
- Small research station with no response (Lv 2 for crew safety in one of scenarios and Lv 3 for crew reward in one of the other scenarios)
- Unknown disease on mining colony (equivalent of Engi crew or Rockman crew)
- Zoltan research facility (Lv 3 for drone schematics reward)
Mind Control[]
- Black market weapons trader
- Confused Mantis (superior to Mantis crew blue option)
- Large trade station
- Merchant's request
- Zoltan security checkpoint (equivalent of Slug crew)
Oxygen[]
- Dangerous-looking ship [not a blue option per se, but serves the same purpose]
- Slug sabotage oxygen system
Piloting[]
Sensors[]
- Auto-ship near sensor station
- Brutal exchange between several ships
- Deactivated Auto-ship
- Destroyed cargo ship (equivalent of Long-Ranged Scanners)
- Encrypted federation signal (Lv 3 equivalent of Long-Ranged Scanners at Hidden Federation Base)
- Engi distress call (Lv 3 equivalent of Long-Ranged Scanners at Hidden Federation Base; Engi crew is a preliminary requirement)
- Engi research station (Lv 2-3 equivalent of Long-Ranged Scanners)
- Federation ship in need of aid (Lv 3 equivalent of Long-Ranged Scanners at Hidden Federation Base)
- Federation terraforming team C12 (equivalent of Zoltan crew)
- Legendary thief KazaaakplethKilik (Unlock Mantis Cruiser) (Lv 3 equivalent of Crew Teleporter 1-3)
- Prepare to dock (Lv 3 equivalent of Long-Ranged Scanners)
- Rebel ship in nebula (Lv 3 equivalent of Long-Ranged Scanners or Lifeform Scanners)
- Rebel ship nearby
- Refueling platform garbled broadcast
- Rock deserters (Lv 2-3 for crew reward)
- Slug Home Nebula surrender (Unlock Slug Cruiser) (Lv 2-3 equivalent of Slug crew at quest marker after ship surrender)
- Small asteroid belt distress beacon (Lv 3 equivalent of Long-Ranged Scanners at Hidden Federation Base)