Image

Continously Extruding 3D Printed Tubes With Compressed Air

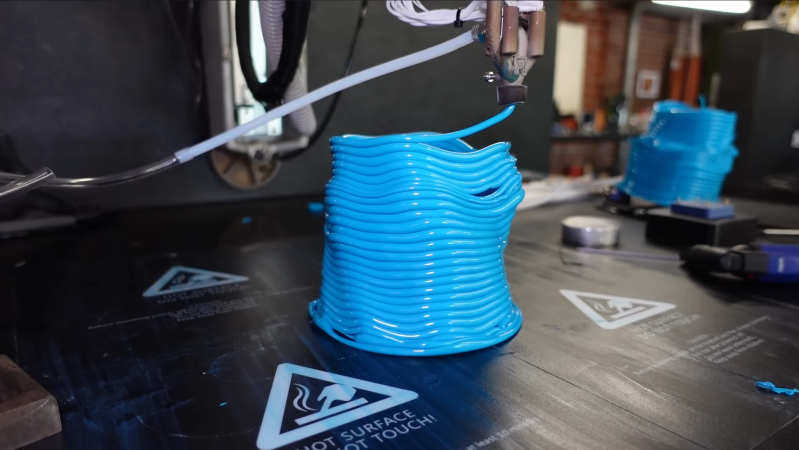
[Jan] of [Roetz 4.0] has a unique approach to multi-material 3D printing: he’s designed an extruder which takes two different materials and extrudes one as a shell around the other. This opens up some interesting possibilities, such as a conductive filament surrounded by an insulating shell; [Jan], however, didn’t have an immediate use for the process, so he moved on to a related technique: extruding plastic tubes with a compressed-air core.

The extruder he used for this was a variation on the dual-material extruder; it takes in two strands of filament, melts them, and extrudes them as a shell around the outlet of a compressed-air line, which was controlled by a high-precision pressure regulator. During testing with PLA, it seemed capable of extruding airtight tubes of filament, though it had a tendency to blow bubbles and form tubes with inconsistent diameters. The low thermal conductivity of the stainless steel extruder also proved problematic; coupled with the cooling effect of the compressed air, filament sometimes solidified inside the extruder.

[Jan] found it almost impossible to get consistent results using only pressure-based control; as the layer of molten plastic around the air gets thinner, it provides less resistance to further ballooning, leading to continuous expansion until the bubble bursts. Controlling the volume of air extruded provided much more consistent results, and in a second video, he built a peristaltic pump to do just that. He also switched to using TPU filament, which greatly improved layer adhesion. When inflated with compressed air, the finished TPU structures expanded slightly, though there were still air leaks. The results look promising, and TU Darmstadt has already carried out some research in this area.

In a separate research project, we’ve seen a similar multi-material co-extrusion approach used to print pneumatic channels. For more on the history of [Jan]’s multi-filament extruder, check out his Minuteman printer. Continue reading “Continously Extruding 3D Printed Tubes With Compressed Air”

Image

2025: As The Hardware World Turns

If you’re reading this, that means you’ve successfully made it through 2025! Allow us to be the first to congratulate you — that’s another twelve months of skills learned, projects started, and hacks….hacked. The average Hackaday reader has a thirst for knowledge and an insatiable appetite for new challenges, so we know you’re already eager to take on everything 2026 has to offer.

But before we step too far into the unknown, we’ve found that it helps to take a moment and reflect on where we’ve been. You know how the saying goes: those that don’t learn from history are doomed to repeat it. That whole impending doom bit obviously has a negative connotation, but we like to think the axiom applies for both the lows and highs in life. Sure you should avoid making the same mistake twice, but why not have another go at the stuff that worked? In fact, why not try to make it even better this time?

As such, it’s become a Hackaday tradition to rewind the clock and take a look at some of the most noteworthy stories and trends of the previous year, as seen from our rather unique viewpoint in the maker and hacker world. With a little luck, reviewing the lessons of 2025 can help us prosper in 2026 and beyond.

Continue reading “2025: As The Hardware World Turns”

Image

Origami-Inspired, Self-locking Structures With 3D Printing

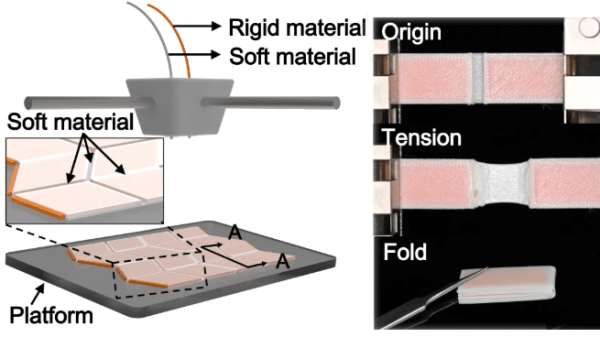
Researchers recently shared details on creating foldable, self-locking structures by using multi-material 3D printing. These origami-inspired designs can transition between flat and three-dimensional forms, locking into place without needing external support or fasteners.

The 3D structure of origami-inspired designs comes from mountain and valley fold lines in a flat material. Origami designs classically assume a material of zero thickness. Paper is fine, but as the material gets thicker things get less cooperative. This technique helps avoid such problems.

Image
An example of a load-bearing thick-film structure.

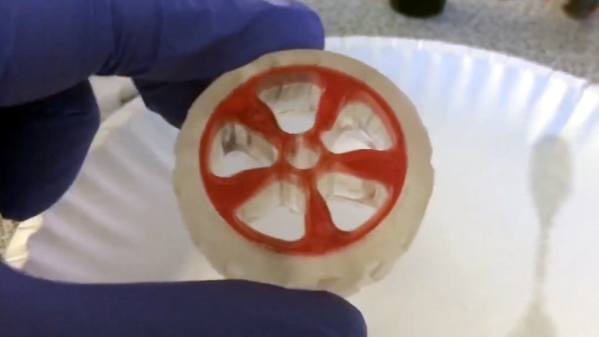
The research focuses on creating so-called “thick-panel origami” that wraps rigid panels in a softer, flexible material like TPU. This creates a soft hinge point between panels that has some compliance and elasticity, shifting the mechanics of the folds away from the panels themselves. These hinge areas can also be biased in different ways, depending on how they are made. For example, putting the material further to one side or the other will mechanically bias that hinge to fold into either a mountain, or a valley.

Thick-panel origami made in this way paves the way towards self-locking structures. The research paper describes several different load-bearing designs made by folding sheets and adding small rigid pieces (which are themselves 3D printed) to act as latches or stoppers. There are plenty of examples, so give them a peek and see if you get any ideas.

We recently saw a breakdown of what does (and doesn’t) stick to what when it comes to 3D printing, which seems worth keeping in mind if one wishes to do some of their own thick-panel experiments. Being able to produce a multi-material object as a single piece highlights the potential for 3D printing to create complex and functional structures that don’t need separate assembly. Especially since printing a flat structure that can transform into a 3D shape is significantly more efficient than printing the finished 3D shape.

Image

Printing In Multi-material? Use These Filament Combos

If one has a multi-material printer there are more options than simply printing in different colors of the same filament. [Thomas Sanladerer] explores combinations of different filaments in a fantastic article that covers not just which materials make good removable support interfaces, but also which ones stick to each other well enough together to make a multi-material print feasible. He tested an array of PLA, PETG, ASA, ABS, and Flex filaments with each in both top (printed object) and bottom (support) roles.

Image
A zero-clearance support where the object prints directly on the support structure can result in a very clean bottom surface. But only if the support can be removed easily.

People had already discovered that PETG and PLA make pretty good support for each other. [Thomas] expands on this to demonstrate that PLA doesn’t really stick very well to anything but itself, and PETG by contrast sticks really well to just about anything other than PLA.

One mild surprise was that flexible filament conforms very well to PLA, but doesn’t truly stick to it. Flex can be peeled away from PLA without too much trouble, leaving a very nice finish. That means using flex filament as a zero-clearance support interface — that is to say, the layer between the support structure and the PLA print — seems like it has potential.

Flex and PETG by contrast pretty much permanently weld themselves together, which means that making something like a box out of PETG with a little living hinge section out of flex would be doable without adhesives or fasteners. Ditto for giving a PETG object a grippy base. [Thomas] notes that flexible filaments all have different formulations, but broadly speaking they behave similarly enough in terms of what they stick to.

[Thomas] leaves us with some tips that are worth keeping in mind when it comes to supported models. One is that supports can leave tiny bits of material on the model, so try to use same or similar colors for both support and model so there’s no visual blemish. Another tip is that PLA softens slightly in hot water, so if PLA supports are clinging stubbornly to a model printed in a higher-temperature material like PETG or ABS/ASA, use some hot water to make the job a little easier. The PLA will soften first, giving you an edge. Give the video below a watch to see for yourself how the combinations act.

Continue reading “Printing In Multi-material? Use These Filament Combos”

Image

Make Multi-Material Resin Prints With A Syringe (And A Bit Of Patience)

Resin printing is a fantastic way to create parts, but multi-material printing isn’t really a possibility with resin. That is, unless you use [Cameron Coward]’s method for creating multi-material resin prints.

[Cameron]’s idea relies on the fact that handling and curing UV resin can easily be done outside of the printer itself. First, one prints what we’ll call the primary object. This object has empty spaces representing the secondary object. Once the primary object is printed and finished, these voids are carefully filled with a different resin, then cured with UV light. The end result is a single multi-material object that is, effectively, made from two different resins.

Continue reading “Make Multi-Material Resin Prints With A Syringe (And A Bit Of Patience)”

Image

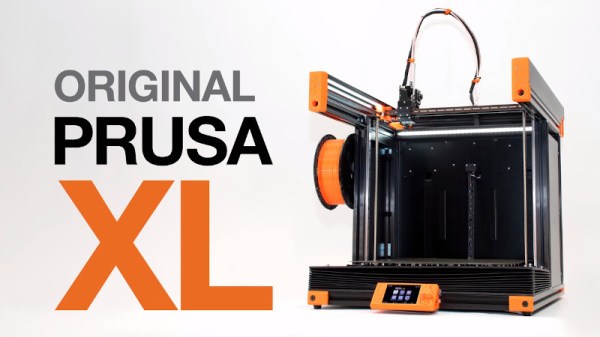
Prusa XL Goes Big, But That’s Only Half The Story

For a few years now it’s been an open secret that Prusa Research was working on a larger printer named, imaginatively enough, the Prusa XL. Positioned at the opposite end of their product spectrum from the wildly popular Prusa Mini, this upper-tier machine would be for serious hobbyists or small companies that need to print single-part objects that were too large for their flagship i3 MK3S+ printer. Unfortunately, the global COVID-19 pandemic made it difficult for the Czech company to focus on bringing a new product to market, to the point that some had begun to wonder if we’d ever see this mythical machine.

But now, finally, the wait is over. Or perhaps, it’s just beginning. That’s because while Prusa Research has officially announced their new XL model and opened preorders for the $1,999+ USD printer, it’s not expected to ship until at least the second quarter of 2022. That’s already a pretty substantial lead time, but given Prusa’s track record when it comes to product launches, we wouldn’t be surprised if early adopters don’t start seeing their machines until this time next year.

Image

So what do you get for your money? Well, not an over-sized Prusa i3, that’s for sure. While many had speculated the XL would simply be a larger version of the company’s popular open source printer with a few modern niceties like a 32-bit control board sprinkled in, the reality is something else entirely. While the high purchase price and ponderous dimensions of the new machine might make it a tough sell for many in the hacker and maker communities, there’s little question that the technical improvements and innovations built into the Prusa XL provide a glimpse of the future for the desktop 3D printer market as a whole.

Continue reading “Prusa XL Goes Big, But That’s Only Half The Story”

Image

Enraged Rabbit Project Is A Filament Cocktail Special

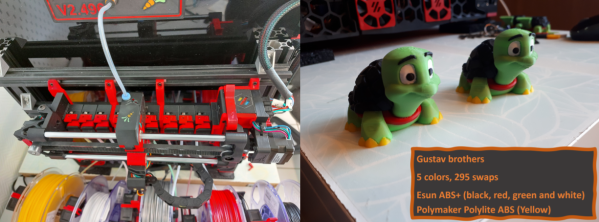
As long as 3D printers have been around, it seems as though many of us have dreamed about nozzle-sharing solutions for multicolor 3D prints. Just because Prusa’s MMU has had the spotlight for some time doesn’t mean that there’s no space to design something original. If you’re craving something new to feast your eyes upon, look no further than the EnragedRabbitProject by [EtteGit]. Built for Voron 3D printers, it’s a scalable filament changing solution designed from the ground up that expands to accommodate up to 9 filaments.

EnragedRabbitProject is broken into four main components. First comes the Enraged Rabbit Carrot Feeder (ERCF), the system that handles filament selection, retraction, and loading. Next, comes the Carrot Patch (ERCP), a spool holder/buffer combo that’s needed per spool. For those unfamiliar with filament changers, unspooling filament is easy, but rewinding it back onto the spool is hard. And since the nozzle will retract a significant length of filament when it switches between filaments, it’s important to manage all this extra loose filament to prevent tangles. A filament buffer is the solution; it’s a clever mechanical addition to the spool holder that will manage the extra filament that gets unwound during these filament changes. Beyond these two systems is the King’s Seat (ERKS) a Voron-2 setup that purges extra filament into beads instead of purge blocks, and finally, the filament sensor, which detects filament presence for filament changes.

It’s sometimes hard to appreciate the reliability of these sorts of CNC systems. On that note, keep in mind that the prints on the project’s landing page are the results of hundreds if not thousands of filament swaps — truly an astonishing feat. Beyond reliability is the project’s presentation. [EtteGit] has kindly posted STEP and STL files for all mechanical components, the Klipper configuration files, and a bill-of-materials that will scale according to the number of filaments you’re installing.

We’re thrilled to see folks continue to innovate on the concept of what it means to be a multi-color or multi-material 3D printer. For other takes on multi-filament setups, have a look at [Paul Paukstelis’] microscope-inspired head changer, and [MihaiDesigns’] removable tool head concept.

Continue reading “Enraged Rabbit Project Is A Filament Cocktail Special”