Image

MousePods Reverse Engineers Head Tracking Data From Stubborn AirPods

[Matteo Gaudioso] released MousePods, a Python tool which accesses the motion sensors in Apple AirPods on Linux, turning them into mouse input. No Apple host required. Doing this required reverse-engineering how the devices work and communicate, because it turns out the AirPods 3 do things differently than other models.

Image
Everything runs in a single Linux app, no Apple host involved.

Head tracking with AirPods has been around for years. Apple uses the motion data for spatial audio and gesture detection, and there are a number of open source tools to access that data. But there was always a blind spot: no one could figure out how to talk to the AirPods 3.

[Matteo] enlisted the help of Claude Code in digging out what was different, and found Claude pretty useful for running hundreds of probes and tests to the AirPods to eventually tease out what was going on, among other things. The findings are nicely summarized here. One interesting one is how the sensor data was indirectly hidden by the fact that on Linux the default MTU (Maximum Transmission Unit) is too small to hold the whole payload complete with motion sensors. Once the Linux MTU is increased to match the considerably larger iOS default, everything appears.

There’s one other feature we like: the ability to send the data to opentrack to use as head tracking input to things like flying or racing simulators. We’ve seen this done with flight sims using headphones for head tracking, which is a great way to use sensor data that already exists without impacting the audio functionality.

Some features are still experimental, but MousePods is confirmed to work with the Apple AirPods 3 and AirPods Pro 2. Check out the MousePods website for a bit more info if you’d like to give it a try.
Image

Translating An Old Display To A New One

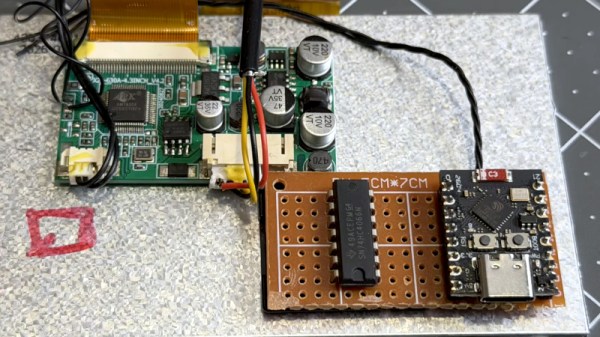
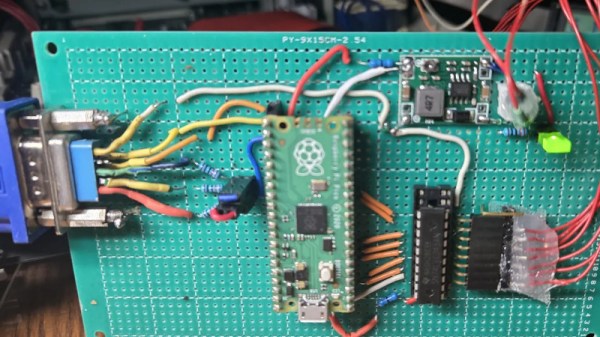
A quick search through AliExpress will find PCBs that take HDMI or VGA and translate them to DSI lanes for TFT panels, and even boards that translate DSI to HDMI in the other direction. Usually they need dedicated silicon or if you’re doing it yourself, an FPGA, but depending on the display that need not be the case. As an example, [Voltage Ventures] has replaced a defective STN display with a more modern one using nothing more complex than a Raspberry Pi Pico.

The display comes as part of a Samsung cash register that looks as though it comes from the 1990s, which is in keeping with it having a monochrome STN display. A replacement was going to cost a fortune, so some way of translating between the two was in order. It has a 4-bit data bus, so there’s a description of how they sampled the bus and identified the timing used. It’s hardly the highest resolution display by today’s standards, being a meager 320 by 240 pixels. Once the format is known it’s a case of transposing it to monochrome VGA in the microcontroller. Initial work was done with an STM series chip, later this was moved to the RP2040.

We like this project, and it’s a reminder that even something broken and old can still be rescued.

Image

A Ridiculous Journey To Set The Clock In A 2014 Renault

As difficult as it may be to believe, it’s not possible to adjust the time on a 2014 Renault Latitude’s in-dash navigation system unless you have an original SD card with valid map data on it. If you lose that card, or never had it in the first place because you’re not the original owner of the vehicle, you’re out of luck.

That is, unless you’re [Rasmus Moorats]. Not willing to pay for an original Renault SD card just for the privilege of adjusting the time on his vehicle’s dashboard, he set out to hack the navigation system so he could fiddle with its parameters manually.

You might think that the end result of this hack is really only interesting if you happen to own a Renault of a similar vintage, and to a point you’d be right. The part that’s worth sticking around for even if you don’t have an applicable vehicle is the fascinating process of poking and prodding at the car’s embedded Linux operating system which [Rasmus] was kind enough to document for us.

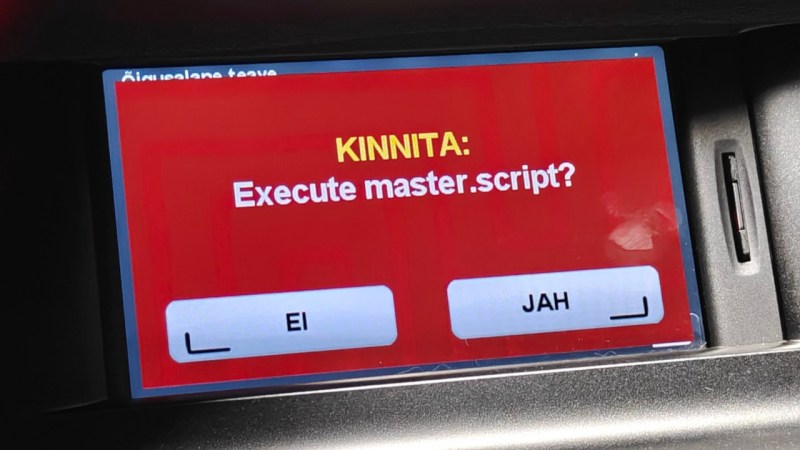
ImageThere’s a lot of ground covered in the write-up, but the short version is that while the navigation system has the ability to load scripts from the SD card, as designed there are pretty strict limits on what said scripts can actually do. The trick for [Rasmus] was to find a way to break out of the limited sandbox.

After a number of only partially successful attempts, he finally found the solution by using the script’s built-in logging functions to overwrite the operating system’s core_pattern string which is executed whenever a process crashes. By then using a different function of the scripting language to intentionally crash a binary, he was able to execute commands of his choosing, and in turn modify the configuration file that held the time data.

If you’ve ever found yourself trying to hack your way through a locked down embedded Linux system, we’re willing to bet at least a few of the tricks [Rasmus] outlines here could come in handy. As for hacking obstinate in-dash navigation and entertainment systems, it gets even harder on more modern vehicles.

Image

Floating-Point Addition And Subtraction On Intel’s 8087

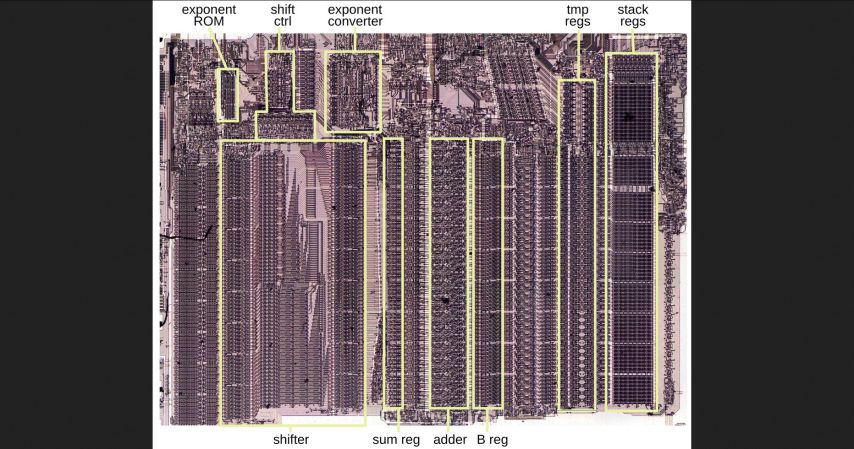
Although you can do basic floating point format operations like addition and subtraction just fine on any CPU, having specialized hardware for it can provide a significant speed boost. Here Intel’s 8087 was the first mainstream floating-point coprocessor to provide this option to a wide audience, with [Ken Shirriff] recently reverse-engineering using an 8087 die how these basic operations were implemented.

The real-world speed-up of even simple operations like adding two floating point numbers compared to the 8086 CPU was on the order of a hundred times, which is very relevant the moment you start doing interesting things with spreadsheets, not to mention rendering 3D scenes in CAD software or even games.

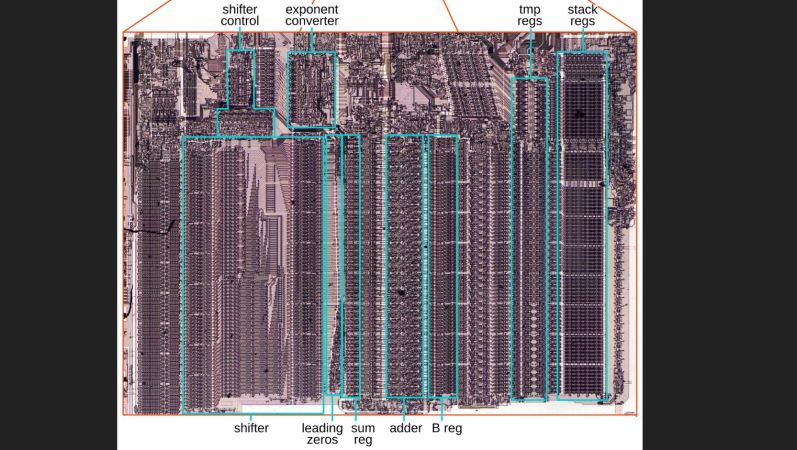
As always, the devil is in the details, with sneaky infinities and edge cases also providing the biggest potential for speed-ups in dedicated silicon, along with the large circuitry spent on the shifter. With floating point values being very much about aligning values with shifting by a number of bits, this circuitry along with the detecting of over- and underflows is the key element why the 8087 and its successors were so crucial in making floating-point operations at all feasible in PC applications.

How this shifting works in theory is detailed in the article by [Ken], along with how the 8087 implements this in its circuits. Naturally, a large part of this is implemented in microcode, the listing for which is also provided. From this it’s quite clear how what seems like a simple set of operations is actually quite complex, making even the now much maligned x87 ISA an improvement over doing it all in integer-based software.

Image

Own The OSD Chip In Your Cheap Composite Monitor

[Ogrinz Labs] has built a Robbie the Robot suit, which is super-cool, but has a huge flaw. When inside the suit, he’s too tall to do what the original Robbie actor did, which was to look through the “mouth” grille. He solved this with an inexpensive automotive reversing camera, but then realised its monitor had a built-in on-screen-display chip. After a lot of work, he’s published a GitHub repository that allows access to this thing for custom on-screen graphics.

The chip in question is an AMT630A, which contains video switching hardware, a graphics system for the on-screen-display, and an 8052 microcontroller core. He didn’t manage to get into the 8052’s brain, but the video below details the long path towards controlling it through an I2C port with an ESP32. The software is available as an Arduino library. His intention is to use it as a display for navigational sensor data to aid in maneuvering Robbie.

Given the status of Robbie as a sci-fi movie icon, it should come as no surprise that we’ve featured this suit before,

Continue reading “Own The OSD Chip In Your Cheap Composite Monitor” →

Image

Teardown Of A USB-C Cable With Integrated LCD

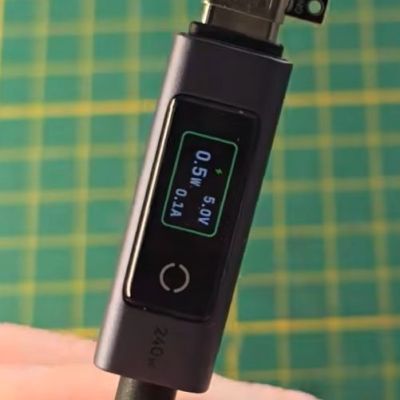
The past years we have been seeing screens pop up in many new places, but seeing them in USB-C cables is still a bit of a novel thing. Out of sheer curiosity [Aaron Christophel] recently took apart one of these, to see what’s inside and what else you can do with them beyond fondling its single touch control and watch reported voltages and current.

Image

Naturally, these devices aren’t exactly meant to be serviced by anyone, so the biggest challenge is to get into them without too much violence. Risking a blood sacrifice to the Hardware Gods, [Aaron] first attacks the display cover of this €15, 240 Watt-rated UGreen cable with sharp utensils before just taking apart the aluminium case, which ultimately gets him inside.

After this it’s clear that attacking the display cover was the right way, just requiring knowing where to apply pressure in order to invert the assembly process. Following that it’s less clear how it was assembled, though it may have involved liberal amounts of glue after sliding in the components. Rather than bothering with applying heat, instead some side-cutters quickly take care of that pesky aluminium shell.

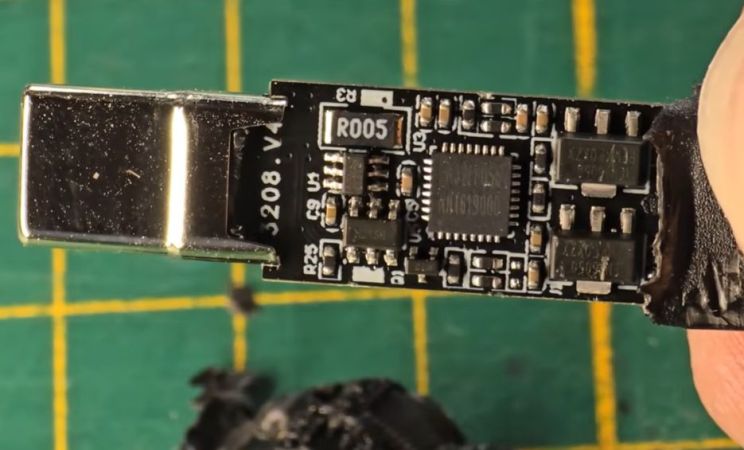
The tiny IPS LC display is attached via a flat flex cable to the PCB with a connector, with the PCB featuring multiple voltage regulators, a MOSFET for the backlight and other parts in addition to the EN32LF056 marked MCU. After some prodding on the exposed SWD interface, it was confirmed to be a Cortex-M0+-based MCU with 64 kB of Flash and 4 kB of SRAM, which made it easy enough to use the little display to display some video frames of everyone’s favorite artist.

Since this MCU is only wired up to measure currents and voltages it cannot use the USB interface, but with some knowledge of how to non-destructively disassemble one of these connectors at least to the point of accessing the SWD pads underneath the display it could be a fun party trick to reflash the firmware with something custom.

Continue reading “Teardown Of A USB-C Cable With Integrated LCD” →

Image

Going On A Tangent With The Intel 8087’s Hybrid CORDIC Algorithm

Continuing their reverse-engineering of Intel’s 8087 FPU, [Ken Shirriff] and friends took a look at one of the trigonometric functions, specifically FPTAN.  The most exciting part with such reverse-engineering is probably figuring out which algorithm was used in the implementation, while trying to determine the reasoning behind the final hardware design.

If you’re running a simple MCU or MPU like the 6502 or Z80 without hardware functions you’d likely use an algorithm such as CORDIC or similar, as this requires only basic hardware features like addition, subtraction, bitshift, and look-up tables. One can also use polynomial approximation if there’s hardware support for a potential speed-up, or as is the case in the 8087, create a hybrid approach that targets speed and accuracy.

In the article the exact implementation to get to 64 bits of accuracy is detailed, starting with the 16 bits calculated using CORDIC before switching to the Padé approximant technique involving the ratio of two polynomials. Since after calculating the brunt of the final value with CORDIC the remainder is a fairly small value, this polynomial approximation is not just very accurate but also fast.

This approach allows the FPTAN and similar trigonometric functions in this FPU to hit a very high level of accuracy and not require the look-up table sizes and additional time required to work through the remaining bits with CORDIC. For those who want to see the full algorithm Intel’s engineers used, [Ken] has the full microcode listing with comments in the article as well.

As for the exact speed-up from this approach, [Ken] calculates for one value that FPTAN would spend 33% on CORDIC pseudo-division, 47% on CORDIC pseudo-multiplication and a mere 15% on the polynomial approximation along with about 5% overhead.

With the Pentium series of CPUs Intel moved completely away from CORDIC, as it’s clear that as accurate as it may be, it’s hard to scale to a significant number of bits without incurring significant time penalties. With the introduction of SIMD instructions the x87 ISA has further seen its functionality reduced, but this analysis shows once again why the 8087 made such an impact when it was released.