Turbocharge your Python prompt and Django shell with IPython Notebook

IPython is an enhanced Python shell, the shell being the prompt which appears when you start python command in your terminal. IPython comes with notebook flavour, where IPython Notebook presents the modern HTML-based shell for Python.

[toc]

Introduction

Python is so-called dynamic programming language where much can be achieved by piloting your code in an interactive interpreter or tuning your production server from the shell. Basing the read-evaluate-print-loop (REPL) to web browser technology, instead of terminal technology, brings shell usability to the modern age, boosting your working efficiency considerably.

IPython notebook, as being based on HTML, can also output graphics and dynamic clickable and navigable graphics. For graphics, diagrams and plotting, check out Bokeh and Pandas libraries.


IPython

Installation

First create a virtualenv. Then continue in the activated virtualenv.

Install IPython with IPython Notebook extensions:

pip install "ipython[notebook]"

Starting IPython in terminal:

ipython

Developers like their terminals either white-on-black or black-on-white. Try switching the color scheme:

ipython --colors=linux

Screen Shot 2014-08-13 at 13.51.45

Enter the HTML

Now comes the big one. Start IPython notebook for a web browser based shells:

ipython notebook

This will start IPython kernel running in the port localhost:8888 and automatically connects your default web browser into it.

Screen Shot 2014-08-13 at 13.49.03

Yay! Finally you can

  • Use shift and arrows to select your text, unlike in most of the terminals
  • Copy-paste that works 100%
  • Click things with mouse and place your edit cursor
  • Save and replay your shell sessions
  • Output graphics directly from the shell

Django integration

First, you need to a have running Django project. If you are new to Django I highly recommend reading DjangoGirls’s Django tutorial – one of the best tutorials to modern web development covering HTTP, Python, databases, HTML, CSS and JavaScript.

Install Django Extensions package. Django Extensions, with many other features, gives you the ability to automatically import all of your application models on the start up to have quicker access to them. We do the example below using DjangoGirls website checkout.

pip install django_extensions

Add django_extensions to Django settings INSTALLED_APPS list:

INSTALLED_APPS = (
     ....
    'django_extensions'
)

Start IPython-enabled Django shell through Django extensions command:

python manage.py shell_plus

And you can straight away play with your Django models:

Screen Shot 2014-08-13 at 14.12.25

Now, try entering to the Notebook Django shell:

python manage.py shell_plus --notebook

… and you get the same, but with all IPython Notebook goodies:

IPython

Running IPython Notebook on your server

IPython Notebook uses, by default, uses localhost TCP/IP sockets to allow web browsers to connect to IPython Notebook kernel.

If you want to run IPython Notebook on a non-local computer you can use SSH tunnels. Please first read SSH basics for developers, then proceed to how to build SSH tunnels for port forwarding.

\"\" Subscribe to RSS feed Image Follow me on Twitter Image Follow me on Facebook Image Follow me Google+

Linux server ghetto duplication

This blog post is about how to duplicate your Linux services and configuration from one server to another. We use simple and hackable SSH, rsync and shell scripting to copy the necessary files to make a cold spare from your existing server installation.

Screen Shot 2014-03-26 at 00.17.09

[toc]

Preface

The method describes here is quite crude and most suitable for making a spare installation of your existing server. In the case you lose your production server, you can boot your cold spare, point your (fail-over) IP address to the spare server and keep business going – something you might want to do if you run mom’n’pop web hosting business. Because of the simplicity of the method it works on default Linux installations, bare metal servers and old-fashioned file systems like Ext4.

The instructions here have been tested with Ubuntu Linux 12.04, but should work with other versions with minor modifications. I have used this method successfully  with Heztner hosting (highly recommended for all the cheapskates out there) by having one production machine and one spare machine. The spare is mirrored weekly. Daily Duplicity backups can be restored on the spare if week is too long data loss period. Though in my case the servers are bare metal, the method works for VPSes as well.

The duplication script might be also useful for setting up a staging server from your production server for software developer and testing.

More powerful duplication tools

More fail safe, more engineer-oriented duplication approaches exist, but usually require additional preparation and tuning on the top of the default Linux installation. Applying these to existing running Linux installation might be tricky.

Building and running the duplication script

This script is run on the target server (cold spare) and it will clone the content of the source server (actual production machine) on itself. It uses SSH keys and SSH agent to create the initial connection, so make sure you are familiar with them.

Assumptions

  • The target server must be clean Linux installation, the same exact version as on your source server.
  • Your server has standard /etc/passwd user account management. This is copied first so that we correctly preserve file ownership (related ServerFault discussion).
  • Services you run (PHP, Django, Plone, Node.js, you-name-it) are under /srv as recommended by Linux filesystem hierarchy standard
  • Source and target MySQL servers must have initialy same password for the root. Set this when the script runs apt-get install mysql-server for the first time.

Limitations

  • The first run is interactive, as apt-get install asks bunch of stuff for packages like MySQL and Postfix.
  • MySQL dumping and loading the dump does not guarantee all of your data survives intact, especially when skip-lock option is used for the performance reason. For ordinary CMS operations this isn’t a big issue.
  • If you other services beside MySQL needing special flush or lock handling follow the related instructions.

For MySQL duplication make sure you have the following /root/.my.cnf file on the source server, as it allows you to interact with MySQL:

[mysqldump]
user=root
password=YOUR PASSWORD HERE

[client]
user=root
password=YOUR PASSWORD HERE

Run the script inside a screen, because the duplication process may take a while and you do not want to risk losing the process because your local internet connectivity issue.

scp mirror-ubuntu.bash targetserver:/tmp
ssh targetserver
screen 
cd /tmp
bash mirror-ubuntu.bash

Testing the spare server

After the duplication script has successfully finished mirroring the server you want to check if the services can be successful started and interacted on the cold spare.

Change internet-facing IP addresses in the related services to be the public IP address of the spare server. E.g. the following files might need changes:

  • /etc/default/varnish
  • /etc/apache2/ports.conf
  • /etc/apache2/sites-available/*

Spoof your local DNS to point the spare server on the tested sites. Edit your local /etc/hosts and add spoofed IP addresses like:

1.2.3.4 www.service1.example.com www.service2.example.com opensourcehacker.com

Access the sites from your web browser, see that database interaction works (login) and file interaction works (upload and download files).

mirror-ubuntu.bash

#!/bin/bash
#
# Linux server ghetto duplication script
# Copyright 2014 Mikko Ohtamaa http://opensourcehacker.com
# Licensed under MIT
#

# Everything is copied from this server
SOURCE=root@myserv.example.com

# Our network-traffic and speed optimized rsync command
RSYNC="rsync -a --inplace --delete --compress-level=9"

# Which marker string we use to detect custom init.d scripts
INIT_SCRIPT_MARKER="### BEGIN INIT INFO"

# As we will run in screen we need to detach
# from the forwarded SSH agent session and we use a local
# SSH key to perform the operations.
# Also overriding /root destroys our key.
# Create a key we use for the remaining operations.
TEMP_SSH_KEY=/tmp/mirror_rsa

# The software stack might have touched the following places.
# This list is compliled through trial-and-error,
# sweat and cursing.
# We cannot take /etc as a whole, because it contains
# some computer specific stuff (hard disk ids, etc.)
# and copying it as a whole leads to unbootable system.
CHERRYPICKED_ETC_TARGETS=(\
    "/etc/default" \
    "/etc/varnish" \
    "/etc/apache2" \
    "/etc/ssl" \
    "/etc/nginx" \
    "/etc/postfix" \
    "/etc/php5" \
    "/etc/cron.d" \
    "/etc/cron.daily" \
    "/etc/cron.monthly" \
    "/etc/cron.weekly" \
    "/etc/init.d")

# Create a key without a passphrase
# and put the public key on the source server
rm $TEMP_SSH_KEY 2>&1 > /dev/null
ssh-keygen -N '' -f $TEMP_SSH_KEY
ssh-copy-id -i $TEMP_SSH_KEY $SOURCE
# Detach from the currently used SSH agent
# by starting a session specific to this shell
eval `ssh-agent`
ssh-add $TEMP_SSH_KEY

# Assume the system have same Ubuntu base installation and no extra repositories configured.
# Bring target system up to date.
apt-get update -y
apt-get upgrade -y

# TODO: check that the kernel uname is same
# on the source and the target systems

# This is somewhat crude method to try to install all the packages on the source server.
# If the package is missing or replaced this command will happily churn over it
# (apt-get may fail). This MAY cause user interaction with packages
# like Postfix and MySQL which prompt for initial password. Not sure
# what would be the best way to handle this?
ssh $SOURCE dpkg --get-selections|grep --invert-match deinstall|cut -f 1|while read pkg
do
    apt-get install -y $pkg
done

# As some packages might have changed due to version upgrades and
# deb renames the following step needs interaction
ssh $SOURCE dpkg --get-selections|grep --invert-match deinstall|cut -f 1

# Copy user credentials first to make sure we
# get the user permissions and ownership correctly.
# http://serverfault.com/a/583336/74975
echo "Copying users"
$RSYNC $SOURCE:/etc/passwd /etc
$RSYNC $SOURCE:/etc/shadow /etc
$RSYNC $SOURCE:/etc/group /etc
$RSYNC $SOURCE:/etc/gshadow /etc

# Copy home so we have user home folders available
# Skip duplicity backup signatures
echo "Copying root"
$RSYNC $SOURCE:/root / --exclude=/root/.cache
# lost+found content is generated by fsck, uninteresting
echo "Copying home"
$RSYNC $SOURCE:/home / --exclude=/home/lost+found

echo "Copying /etc targets"
for i in "${CHERRYPICKED_ETC_TARGETS[@]}"
do
   $RSYNC $SOURCE:$i /etc
done

# Most of your service specific stuff should come here
echo "Copying /srv"
$RSYNC $SOURCE:/srv /

# Make sure stuff which went to /etc/init.d gets correctly reflecte across runlevels,
# as our /srv stuff has placed its own init scripts
for i in  /etc/init.d/*
do
    service=`basename $i`
    # Separate from upstart etc. jobs
    if grep --quiet "$INIT_SCRIPT_MARKER" $i ; then
        update-rc.d $service defaults
    fi
done

# Copy MySQL databases.
# Assume source and target root can connect to MySQL without a password.
# You need to set up /root/.my.cnf file on the source server first
# for the passwordless action.
# http://stackoverflow.com/a/9293090/315168
echo "Copying MySQL databases"
ssh -C $SOURCE mysqldump \
    --skip-lock-tables \
    --add-drop-table \
    --add-drop-database \
    --compact \
    --all-databases \
    > /root/all-mysql.sql

# MySQL dump restore woes
# http://stackoverflow.com/a/21087946/315168
mysql -u root -e "SET FOREIGN_KEY_CHECKS = 0; source /root/all-mysql.sql ; SET FOREIGN_KEY_CHECKS = 1;"

# Remove the key we used for the duplication
rm $TEMP_SSH_KEY

\"\" Subscribe to RSS feed Image Follow me on Twitter Image Follow me on Facebook Image Follow me Google+

SSH key and passwordless login basics for developers

SSH keys are useful to login over ssh (secure shell) without typing a password. They are also used by Github and other version control systems for passwordless authentication. Here is some basic information from the software developer point of view how to use SSH keys for maximum comfort and security.

These instructions apply for OSX and Linux (tested on Ubuntu).

SSH keys are not used only by shell sessions, but also by remote file copy (rsync, scp) version control system authentication (Git, Subversion).

[toc]

Creating your first key

SSH keys are created using ssh-keygen command.

You should (really must!) add a passphrase on your key when asked. You don’t need to be typing this, but it prevents someone using your keys from a cold storage like stolen hard-disk. See more information below how SSH keys are integrated to your desktop computer login for avoiding passphrase typing.

Storing the server (UNIX) passwords

On the first login to a new server change your UNIX / SSH password to something random using passwd command. You are going to need this password for sudoing, but not for login. You can use software like KeePassX (OSX, Linux, Windows, Android, others) to generate and manage passwords for you in an encrypted file and then sync the file to Dropbox for back-up.

Private and public key file

SSH keys consist of two parts. You have SSH private keys only on your personal computer. You place the public key file on a remote server, in a home directory in plain-text file ~/.ssh/authorized_keys. In this file, one line represents one allowed public key for this user to login.

You can add the keys to this file by hand editing the file or using ssh-copy-id command (Ubuntu has it by default, download for OSX).

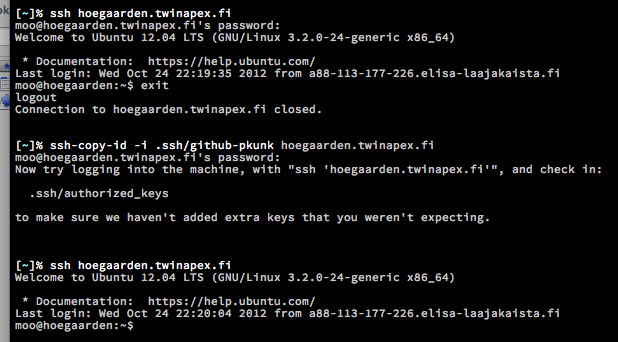
Example of login on the server with password for a test, placing a key (github-pkunk is the private key file name) on the server (you need to create it first using ssh-keygen) and then doing a passwordless login:
Image

Managing and using keys with passphrases

You can have multiple keys. For example I have one for Github and one for corporate servers.

After each local computer boot you add the private keys to your running SSH agent (a local daemon application) using command ssh-add .ssh/my-private-key-name This will ask you to type the passphrase of the key.

After this you can login to any server where you have placed the corresponding public key without a password.

You can add / change passphrases to they private keys like this:

                                                                                                                                                                                                                                                    [moo@Kohr-Ah][23:23]
[~/.ssh]% ssh-keygen -p -f github-pkunk
Key has comment 'github-pkunk'
Enter new passphrase (empty for no passphrase): 
Enter same passphrase again: 
Your identification has been saved with the new passphrase.

(More info)

Desktop and login integration

On OSX, adding keys to the SSH agent can done automatically by OSX Keychain on login. OSX Keychain stores the passphrase of the key on an encrypted storage unlocked by your login on the computer. The default key ~/.ssh/id_rsa is added automatically by OS, but you can add more keys to Keychain like this:

[~/.ssh]% ssh-add -K github-pkunk
Enter passphrase for github-pkunk: 
Passphrase stored in keychain: github-pkunk
Identity added: github-pkunk (github-pkunk)

The latest Ubuntu / Gnome keyring seems to be able to do this also, but I am not sure about the details whether the process is the same.

(More info)

SSH agenting and passwordless git and svn

Never copy your private key anywhere else besides 1) your own computer 2) back-up. You should never place your private key on a server controlled by a third party. If you need to access SSH keys on a remote server, for example when you need to do a git pull from Github, use SSH agent forwarding option.

SSH agent forwarding allows the remote server shell session to use keys from your local computer. It is enabled with ssh -A command line switch or in an option in the configuration file (see below). When enabled, all keys registered with ssh-add will be available on the remote server.

Subversion supports SSH. This means that, when enabled, you can do svn up on a remote server without need to give or store your SVN password on the server. The svn+ssh protocol support for Subversion must be enabled and it may not provide per-user repository access control, as oppose to https protocol with Apache.

Online compression of the SSH traffic

Enable compression when working with servers far-away with low bandwidth. See below how to enable this in the ~/.ssh/config file.

This will somewhat increase the speed of long command output like ls.

Configuration files

Store the servers you access often in .ssh/config file. You can store per-server options like enable agent forwarding, server alias (shorter to type) and  default username. Here is an example snippet from my config:

Host xapsi 
Hostname lakka.xapsi.fi
User miohtama # This is my username on the server
LocalForward 8889 localhost:8889 # Build tunner for Quassel IRC core
Compression yes # Enable compression
CompressionLevel 9
IdentityFile=/Users/moo/.ssh/foobar # Always use this key

The configuration file also enables the tab competion on some shells (zsh examples). With the above snippet in the config I could do:

ssh kap[TAB][ENTER]

Login with 6 letters – no passwords or usernames asked!

Tunneling

SSH key can forward TCP/IP ports between the server and your local computer. This is useful e.g. testing firewalled servers from a local computer or give a public IP / port for your local development server.

More info about SSH tunneling.

Freeing yourself typing password for sudo

For the state of the art UNIX system the direct root SSH account is disabled for the security reasons. Instead you ssh in as a normal user and then elevate your privileges using sudo command.

Normally sudo is configured to ask password for every time sans sudo grace period. However if you primarily use SSH keys as your security measure it is recommended that

  • You randomize and store the real UNIX passwords in an encrypted safe as described above
  • You put sudo users to a specific UNIX system group (on Ubuntu this is group admin, but also wheel is used on some systems)
  • Give passwordless sudo access for this group and this group only

Example how to add an account to a specific group on Ubuntu Linux:

usermod -a -G admin moo

Then you can whitelist this group in /etc/sudoers file:

%admin ALL=(ALL) NOPASSWD: ALL

The recommended safe way to edit /etc/sudoers file is visudo command. Example:

 export EDITOR=nano && sudo visudo

Please note that you MUST use only passphrase protected private keys or otherwise anyone getting access to a private key file can get root on your server.

Please note that you should give passwordless sudo only on specific users on your server. Otherwise in the case of a compromised web server (PHP anyone?) the attacker could get root access through www-data or other UNIX system account.

Please share your own tips in the blog comments.


\"\" Subscribe to RSS feed Image Follow me on Twitter Image Follow me on Facebook Image Follow me Google+

Automatically colorize terminal tabs based on the server you are logged into

Behold:

Image

OSX’s iTerm 2, and maybe some other terminal applications, support ANSI control sequence extensions which allow shell to set the color of the terminal tab.

Below is a Python script which

  • Randomizes a color based on the server host name. The same hostname always results to the same color.
  • The color is randomized in HSL color space, so that only the hue component varies and saturation and lightness are locked. This prevents the creation of ugly color combinations like black text on black tab background.

Note: The effect can be also applied on terminal windows  – for those who don’t use tabs.

The effective result is that

  • You learn to identify terminal tabs by the color
  • You can much more faster to switch between tabs, because you can visually pick up the terminal without needing to be able to read the text on it or remember its location in the list

Note: If your puny terminal does not support setting the color of window decorations, you can always set the terminal background color. This is useful e.g. if you want to red background for danger zone ™ when you are logged in as root on the production server 23:00 Friday night.

Note: Naturally you also need to have the script installed on the servers you are ssh’ing into

precmd() hook

You can run the script once and the tab color is set. However, if you SSH from the computer to another  and then exit back, the color of the latest server would remain in this case.

This can be avoided by

  1. Calculating the OSC control code sequence needed to set the terminal tab color when the shell starts
  2. Have a precmd() hook (zsh terminology, not sure what other shells use) to reset the tab color every time the shell prompt is displayd

We, me with my friend, are maintaining (yet another) zsh toolkit called ztanesh (github). There  you can find precmd() example codes in 1) 98-server-color and 2) 80-statusbar.

rainbow-parade.py

The script code lives on Github. Currently it supports iTerm 2 only and we plan to expand support to Konsole. Patches for other terminals are welcome.

(This probably could be done in pure shell code too, but Python is just so much more fun…)

#!/usr/bin/env python
"""

       Set terminal tab / decoration color by the server name.

       Get a random colour which matches the server name and use it for the tab colour:
       the benefit is that each server gets a distinct color which you do not need
       to configure beforehand.

"""

import socket
import random
import colorsys
import sys

# http://stackoverflow.com/questions/1523427/python-what-is-the-common-header-format
__copyright__ = "Copyright 2012 Mikko Ohtamaa - http://opensourcehacker.com"
__author__ = "Mikko Ohtamaa <mikko@opensourcehacker.com>"
__licence__ = "WTFPL"
__credits__ = ["Antti Haapala"]

USAGE = """
Colorize terminal tab based on the current host name.

Usage: rainbow-parade.py [0-1.0] [0-1.0] # Lightness and saturation values

An iTerm 2 example (recolorize dark grey background and black text):

    rainbow-parade.py 0.7 0.4
"""

def get_random_by_string(s):
    """
    Get always the same 0...1 random number based on an arbitrary string
    """

    # Initialize random gen by server name hash
    random.seed(s)
    return random.random()

def decorate_terminal(color):
    """
    Set terminal tab / decoration color.

    Please note that iTerm 2 / Konsole have different control codes over this.
    Note sure what other terminals support this behavior.

    :param color: tuple of (r, g, b)
    """

    r, g, b = color

    # iTerm 2
    # http://www.iterm2.com/#/section/documentation/escape_codes"
    sys.stdout.write("\033]6;1;bg;red;brightness;%d\a" % int(r * 255))
    sys.stdout.write("\033]6;1;bg;green;brightness;%d\a" % int(g * 255))
    sys.stdout.write("\033]6;1;bg;blue;brightness;%d\a" % int(b * 255))
    sys.stdout.flush()

    # Konsole
    # TODO
    # http://meta.ath0.com/2006/05/24/unix-shell-games-with-kde/

def rainbow_unicorn(lightness, saturation):
    """
    Colorize terminal tab by your server name.

    Create a color in HSL space where lightness and saturation is locked, tune only hue by the server.

    http://games.adultswim.com/robot-unicorn-attack-twitchy-online-game.html
    """

    name = socket.gethostname()

    hue = get_random_by_string(name)

    color = colorsys.hls_to_rgb(hue, lightness, saturation)

    decorate_terminal(color)

def main():
    """
    From Toholampi with love http://www.toholampi.fi/tiedostot/119_yleisesite_englanti_naytto.pdf
    """
    if(len(sys.argv) < 3):
        sys.exit(USAGE)

    lightness = float(sys.argv[1])
    saturation = float(sys.argv[2])

    rainbow_unicorn(lightness, saturation)

if __name__ == "__main__":
    main()

\"\" Subscribe to RSS feed Image Follow me on Twitter Image Follow me on Facebook Image Follow me Google+