
[toc]

Sublime Text is a very powerful programmer’s text editor and popular among web and dynamic language developers (Python, Ruby, JavaScript). The editor is commercial (59 USD), though this is enforced through a nagging dialog only. Plenty of Sublime Text’s power comes from the fact that Sublime has vibrant community-maintained plugin ecosystem.
This blog post is revised from an old Sublime Text 2 blog post how to tune your Sublime Text to be a powerful platform. As the writing of this (March 2014) Sublime Text 3 is in public beta and the plugin development for the older Sublime Text 2 is slowly stalling. The most popular plugins have been ported to Sublime Text 3, so if you are a ST2 user should start considering migration to the new version. Sublime Text 3 final release should be out on the first half of 2014.
The position of Sublime Text on the programmer’s editor markets
Sublime Text does not try to be full-fledged IDE. It’s strengths include speed (native code + OpenGL acceleration), plugin ecosystem, cross-platform and better usability over hardcore editor choice like Vim and Emacs. You can find support for any programming language in Sublime Text. However, some deep language specific integration features like static analysis and refactoring, though available through plugins, are not that polished.
If you need more heavy tools and you are not well-versed on the command-prompt, you can find PyCharm (Python) and WebStorm (JavaScript) IDEs – both are Java-based. From the more recent alternatives there are Brackets (open source HTML-based) and GitHub’s recent Atom (also built based on HTML technologies). If the two latter alternatives prove that V8 Javascript engine can crank out enough speed to run the editor for large projects, I can see a lot of potential to switch there from Sublime Text. The feature set is in-par, but using open web technologies in the core makes the editor even more extendable.
Docs and manuals
There exist a community maintained manual for Sublime Text. You can contribute to it on Github. Check especially customization and settings section. Also sparse official documentation exists. Pop in to ##sublime IRC channel on irc.freenode.net to chat with the community.Packages, ecosystem and installation
In Sublime Text, extensions and plugins are called packages. The package is simply a folder on your hard disk and may contain everything from .tmLanguage TextMate syntax highlight files to functional Python code. In ST3 also zip packed extensions are supported with .sublime-package file extension.
Install Sublime Package Control. Sublime Package Control is a third party plug-in to install and maintain your packages. It enables Install packages command in the command palette.

After Package Control has been installed you can add new packages with CMD + SHIFT + P, search for Package Install in the command palette autocomplete.
Recommended packages
Here is my shortlist for packages which I highly recommend for anybody doing Python, JavaScript, web and related development.
Installing native dependencies
Some of the packages listed below require native binaries and libraries. Here is how to install native dependencies for SublimeLinter and SublimePythonIDE using OSX Homebrew package management.
# XXX: Not sure if the following is needed on
# clean OSX Maverick + XCode install - try
# first without these
brew tap homebrew/dupes
brew install apple-gcc42

# Install Python 3, NPM and Cabal (Haskell pkg manager)
brew install python3 npm cabal-install
/usr/local/bin/pip3 install pep257 flake8
/usr/local/bin/pip-2.7 install flake8 pep257
/usr/local/bin/npm install -g jshint csslint
cabal update && cabal install shellcheck
SublimePythonIDE
SublimePythonIDE gives you Python source code linting, refactoring and static analysis capabilities. It is based on Rope – Python refactoring library. It offers e.g.
- Go to definition
- Show documentation (shows the function doctstring in Sublime Text console)
Install from Package Control: SublimePythonIDE

To get the Pytrhon autocompletion and refactoring working for your project
- Autocompletion settings are per project
- Open your working folder as a project (Project > Add Folder to Project, Project > Save Project As)
- Add Python interpreter used to the project settings (Project > Edit Project). In my example I use a virtualenv’ed Python interpreter. Example project settings:
{
    "folders":
    [
        {
            "follow_symlinks": true,
            "path": "."
        }
    ],

    // SublimeLinter-flake8
    "SublimeLinter":
    {
        "@python": 2.7
    },

    // SublimePythonIDE
    "settings": {
        "python_interpreter": "/Users/moo/code/foobar/venv/bin/python"
    }
}
SublimeLinter
SublimeLinter 3 is a rewrite of original SublimeLinter package. SublimeLinter highlights errors in the source code as you type them. Unlike with the original SublimeLinter, for SublimeLinter 3 you need to install each programming language as a separate package. Recommended packages to be installed from Package Control:
- sublimelinter (base package)
- sublimelinter-jshint (javascript, jshint)
- sublimelinter-csslint (CSS)
- sublimelinter-shellcheck (shell scripting, needs separate Haskell source command, OSX Homebrew binaries available)
- sublimelinter-flake8 (standardized Python coding conventions, combines pep8 and flake packages)
- sublimelinter-pep257 (Python docstring conventions, needs separate binary). PEP 257 reference. pep257 command on PyPi.
- …find your favorite language from SublimeLinter Github project

For Python developers, you can switch the Python linting version on the project level. See the project settings example in above SublimePythonIDE section.
Below is a sample configuration for SublimeLinter where linting binaries have been installed using HomeBrew. To edit the right config file dive into the menu entry Sublime Text > Preferences > Package Settings > SublimeLinter > Settings – User.
{
    "user": {
        "debug": true,
        "delay": 0.25,
        "error_color": "D02000",
        "gutter_theme": "Packages/SublimeLinter/gutter-themes/Default/Default.gutter-theme",
        "gutter_theme_excludes": [],
        "lint_mode": "background",
        "linters": {
            "csslint": {
                "@disable": false,
                "args": [],
                "errors": "",
                "excludes": [],
                "ignore": "",
                "warnings": ""
            },
            "flake8": {
                "@disable": false,
                "args": [],
                "excludes": [],
                "max-line-length": 512,
                "max-complexity": 10,
                // 501: line length < 80 chars
                // E128: visual indent of continuation line
                "ignore": "E501, E128",
                "select": ""
            },
            "jshint": {
                "@disable": false,
                "args": [],
                "excludes": []
            },
            // pep257 is too nazi by default
            // and you cannot tune it down,
            // thus disabled
            "pep257": {
                "@disable": true,
                "args": [],
                "excludes": []
            },
            "shellcheck": {
                "@disable": false,
                "args": [],
                "exclude": "",
                "excludes": []
            }
        },
        "mark_style": "outline",
        "no_column_highlights_line": false,
        // Include linter paths
        "paths": {
            "linux": [],
            "osx": [
                // HomeBrew installed packages
                "/usr/local/bin",
                // Haskel cabal package manager
                "~/.cabal/bin"
            ],
            "windows": []
        },

        // Use HomeBrew Python runtime
        // instead of system default
        "python_paths": {
            "osx": [
               "/usr/local/bin"
            ]
        },

        "rc_search_limit": 3,
        "shell_timeout": 10,
        "show_errors_on_save": false,
        "show_marks_in_minimap": true,
        "syntax_map": {
            "html (django)": "html",
            "html (rails)": "html",
            "html 5": "html",
            "php": "html"
        },
        "warning_color": "DDB700",
        "wrap_find": true
    }
}
Theme – Soda
Soda is an improved theme for Sublime Text. It features e.g. more compact tabs. I also recommend using Adobe’s free Source Code Pro font, designed specially for source code editing, on OSX.
Package Control: Soda – Theme

Emmet
Emmet is a swiss army knife for HTML editing. Sublime Text is one of the editors with emmet integration. Some of super useful HTML commands it provides are Go to matching pair and Remove tag.
Install from package control: Emmet.

DocBlockr
DocBlockr makes writing C-style /* */ and // comments easier by automatically keeping comment block closed when pressing enter. Type /** and press enter to start comment block in JavaScript or CSS.
Install from package control: DocBlockr

Sidebar Enhancements
Sidebar Enhancements adds file explorer style actions to Sublime Text project navigator: Copy, Cut, Paste, Remove, Rename files.
Install from package control: SideBarEnhancements

Djaneiro
Django is one of the more popular Python web frameworks. Djaneiro package adds syntax highlighting to Django templates, plus many useful snippets like template basic commands block, load and static and internationalization trans and blocktrans.
To activate Django template syntax highlighting on a HTML file choose View > Syntax > Djaneiro > Django (HTML) on an open HTML file. After this try macros. Type block[tab key] and Djaneiro should create Django template {% block %}… {% endblock %} for you.
Install from package control: Djaneiro

TernJS – JavaScript autocompletion
TernJS is a cross-editor JavaScript language service which provides JavaScript autocompletion.
Note that TernJS needs Sublime Text project-specific configuration for full potential to provide context-sensitive autocompletion and inline help for browser and jQuery functions. Note Some more info about TernJS on Sublime Text. Also your Sublime Text may crash if you have a lot of JavaScript source code without project specific exclude lists (NPM installed packages), as TernJS wants to scan everything by default.
TODO: I could not get sublime-tern to work with ST3 and my project. Either JavaScript scan freezes the editor or the plugin crashes on startup, probably due to high amount of .js files in the project.
Other interesting packages
- PythonTidy: Beautify Python code for PEP-8 compliance. Note: Package Control install might not work.
- Gettext .po file syntax highlighter (not in package control)
- MarkdownPreview, for all of those Github users
- Prefixr: Automatically insert CSS3 prefixes
- JsFormat: Beautify Javascript Code
Configuring tabs, indentation, other
Never save your files with hard tabs characters in them. The same goes for trailing whitespaces which are against policy of many programming language style guides. (If you don’t believe you should indent with spaces, please check the general opinion regarding this matter).
Drop my recommended ST configuration In the menu Sublime Text > Preferences > File Settings – User:
{
    "auto_complete_delay": 500,
    "color_scheme": "Packages/User/Espresso Libre (SL).tmTheme",
    "detect_indentation": false,
    "detect_slow_plugins": false,
    "file_exclude_patterns":
    [
        ".*",
        "*.pyc",
        "*.pyo",
        "*.exe",
        "*.dll",
        "*.obj",
        "*.o",
        "*.a",
        "*.lib",
        "*.so",
        "*.dylib",
        "*.ncb",
        "*.sdf",
        "*.suo",
        "*.pdb",
        "*.idb",
        ".DS_Store",
        "*.class",
        "*.psd",
        "*.db"
    ],
    "font_face": "Source Code Pro",
    "ignored_packages":
    [
        "Vintage",
    ],
    "tab_size": 4,
    "theme": "Soda Dark.sublime-theme",
    "translate_tabs_to_spaces": true,
    "trim_automatic_white_space": true,
    "trim_trailing_white_space_on_save": true
}
Custom keyboard shortcuts
Let’s bind Show/Hide Console to an easy-to-access key (§) as the default console key binding is cumbersome and does not work on international keyboards. Drop the following to Preferences > Key Bindings – User.
[
    { "keys": ["§"], "command": "show_panel", "args": {"panel": "console", "toggle": true} }
]
Sublime Text power and shell usage
Open files from command-line
The official documentation contains instructions how to make Sublime Text to be available on the command prompt, so that you can open files directly in it.
The recommended way to bind Sublime Text to a command prompt is using alias in your shell configuration file (.bashrc), as this is the least intrusive for your core OS.
Open folders as projects from command-line
You can also open folders in Sublime Text.
Just type e.g.
subl src
… and the whole src/ folder is opened in the Sublime Text project explorer (right hand).

Note: One folder = one project = one window? I am not sure if there are ways to have multiple projects in the same window.
Searching multiple files
First open a folder as a project in Sublime Text 2. You can do this from the command line, as instructed above, or from File > Open menu.
Then right click the folder in the sidebar to search it:

You can also specify a file extension mask as a comma separated in the Where: field.

Converting existing files to use spaces instead of tabs
Do View > Indentation > Convert Indentation to Spaces and make sure Indent using spaces is turned on in the same menu. The new versions of Sublime should remember this setting on file type basis.
Map file formats to syntax highlighting
If you a have a file format you want to recognize under a certain highlighter e.g. map ZCML files to XML highlighter.
Open any file of the format.
Then: View > Syntax > Open all with current extension as… ->[your syntax choice].
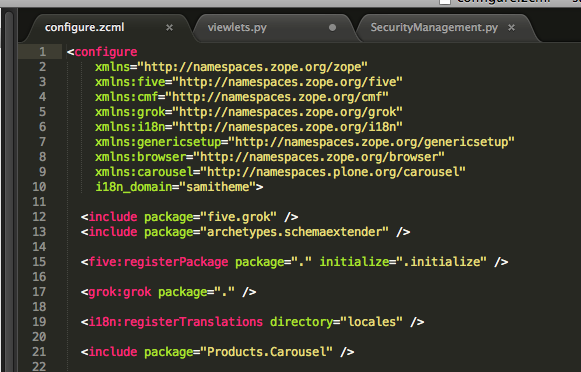
- Example of XML-based ZCML configuration language, colorized correctly with XML syntax.

Go to anywhere shortcut
CMD + P. Type in a part of a filename and a part of a function / rule name. You are there. Very powerful, yet so simple feature.

Go to line number shortcut
Use Go To Line functionality CTRL+G for more traditional jumps.
Context sensitive in-file search shortcut
Handy for Javascript, CSS, Python, etc. CMD + R. Type your method or rule name and Sublime automatically jumps into its declaration.

… or in Python …

Edit multiple words or lines simultaneously using multi cursor
This trick is handy if you need to wrap / unwrap stuff in quotes, add commas, add parenthesis etc. on multiple lines or items simulatenously.
First select lines or items. You can select multiple individual words by holding down CMD and double clicking words. For lines you can do just the normal SHIFT selection.
Press SHIFT + CMD + L to activate the multi cursor mode.

Then edit all the entries simultaneously. Use CMD + left and CMD + right etc. to move al the cursors to the beginning or the end of the linen and so on.
Open OS file browser for the currently opened file or any of its parent directories
CTRL + mouse click filename in the title bar of the edit window to show the full path to the file and open any of its parent folder. Note: This is OSX’s Finder file browser standard behavior and might not work on other platforms.

Syncing and back-uping Sublime Text settings and plug-ins with Dropbox
Here are instructions for syncing and saving Sublime Text settings with Dropbox. The instructions were written for ST2, but should apply to ST3 as well if you correct the folder names.
Troubleshooting (especially when installing new packages)
Many packages require separate binaries installed on your system. Sublime Text has a console (View > Console menu) where diagnostics output is procuded on Sublime Text startup and when you open a file for the first time.
Example of failed SublimeLinter-pep257 plugin load crash in Console (had to install script on the system first):

That’s all this time. Please leave your favorite Sublime Text tips in the comments 🙂
 Subscribe to RSS feed
 Follow me on Twitter
 Follow me on Facebook
 Follow me Google+