PyCharm vs. Sublime Text

This blog post is about comparing two popular development tools and text editors, Sublime Text and PyCharm to each other. This blog post is written from the perspective of professional software development or if the programming is what you do for living.

1. Preface: meet the contenders

I have been developing Python for a decade now in various environments. Few weeks ago, I decided to make a shift from Sublime Text 3 to PyCharm as my primary tool for typing in code on OSX. I tried PyCharm long time ago and I was dissatisfied – PyCharm is built on Java software stack and UI issues, alongside “Java software bloat”, were major turn off for me by the time. But the times change, hardware gets more powerful and it was time for me to reconsider my decision.

Sublime Text is a commercial programmer’s text editor being in development since 2008. Its major selling points are speed, powerful code text editing features (multicursor), cross platform support, customizations and plugin ecosystem. Currently Sublime Text version 3 is in beta. Though the development slowed down in one point, as Sublime Text has been mostly one man show, new Sublime Text builds roll out now regularly. Sublime Text costs 70 USD. Unless you purchase a license you’ll be notified by a nagging dialog.

PyCharm is a child of JetBrains IntelliJ IDEA family of editors. First PyCharm was released 2010, but the IDE codebase goes all way back to IntelliJ IDEA which was released as far back as 2001 – I remember doing Java development on IntelliJ in 2004. PyCharm is developed by Czech company JetBrains, having over 400 employees. PyCharm shares most of the features with other IDEA family IDEs, which means it has robust HTML, JavaScript and CSS support. PyCharm license costs 199 EUR / year (professional), 99 EUR / year (individual) and there is also free community edition. The community edition is 100% open source.

Though Sublime Text is not an IDE per se, many Python and JavaScript developers I know use it as “development platform”. This is possible because active Sublime Text community provides tools to optimize your development workflow – namely to support autocomplete, syntax highlighting and background linting and various programming languages.

There are also other well know options for Python development, including PyDev (LiClipse), Komodo IDE and WingWare IDE.

2. Feature highlights both in Sublime Text and PyCharm

Sublime Text and PyCharm have integrated plugin manager. Sublime Text Package Control is not built in, making the initial adoption more hassle. On the other hand I found PyCharm’s plugin installer to be more cumbersome to use – more clicks. Reminds me of those Windows EXE installers.

packagecontrol

Installing a new plugin in Sublime Text is only few keystrokes

Screen Shot 2015-05-02 at 14.30.05

PyCharm Plugins dialog is a lot of buttons

Sublime text has been famous for its multicursor feature. With the release of PyCharm 4.0 it gained the multicursor support. It does not work exactly as in Sublime Text, but close enough.

The editors enjoy plenty of themes available and both support my favorite Twilight theme. Also to further make the text more readable Source Code Pro font renders out nicely on OSX.

The text editors are good for Python editing and have e.g. indention guidelines and fast toggle soft text wrap options.

Screen Shot 2015-05-02 at 14.35.08

3. Sublime Text pros

Sublime Text beats PyCharm in few points and I miss these features in PyCharm, though some of them can be replaced using PyCharm alternatives.

Sublime Text’s Go To Anywhere is more powerful. Press CMD+T and type in few letters of  package and module name.  Go To Anywhere finds the suitable match. PyCharm Navigate -> File or Navigate -> Symbol are not as powerful as their heuristics seem to need more typing to get where you want.

gotoanywhere

Jumping to cryptoassets.core.backend.base in Sublime Text

Whereas PyCharm has a scrollbar with color hints to highlight next TODO / warning / error place, Sublime Text has a minimap. Scrolling around with the minimap is more powerful as your eyes see the structure of the file unfolding.

Screen Shot 2015-05-02 at 14.45.03

Sublime Text minimap shows outline of the file in visual

Sublime Text user interface is OpenGL accelerated and it runs smoothly 60 FPS all the time, making it pleasant for the eye and for typing. PyCharm is slower, though the difference is not so noticeable anymore after you pour in enough money to your hardware.

The Sublime Text plugin community is more vibrant. There are more plugins available, they get more support. For example if you need to do polyglot programming in rare languages, like R, Erlang or Haskell, there is guaranteed to be good Sublime Text support. Also if you write documentation in Restructured Text or Markdown PyCharm did not have such good plugins as one gets for Sublime Text.

Restructured Text syntax highlighting in Sublime Text

Restructured Text syntax highlighting in Sublime Text

As this blog post is mostly about Python development, one cannot dismiss the fact that Sublime Text plugins are self-contained Python modules – not cumbersome Java projects. It is very easy to write them, though Sublime Text plugin API is somewhat limited. There is even a menu entry New plugin. This might be one of the fact explaining why the Sublime Text plugin ecosystem is so healthy.

Screen Shot 2015-05-02 at 14.55.48

Creating Sublime Text plugin

4. PyCharm pros

PyCharm is big. The editor has history since 2001, it comes tons of features out of the box. It is very polished and it does most of the features very well – after all selling IDEs is the main business for JetBrains – for example compared IBM’s Eclipse whereas IBM’s main business is sell IBM services. With PyCharm you need to spent little time to tune up your programming environment or hunt plugins for your basic development needs (Python, JavaScript, HTML, CSS).

PyCharm comes with an integrated debugger. You can double click to set breakpoints in your editor and then run your application to stop on the line. But you still don’t lose the ability of drop into an interactive IPython shell when hit to the breakpoint:

pydev debugger

Dropping into IPython session after PyCharm stops in a Python breakpoint

Though I did find the PyCharm debugger slowing down the application too much. For example, when running a Pyramid website application inside the debugger the automatic restart cycle became too slow. You had to wait each restart more than ten seconds. This kills the basic web development flow: edit – save – refresh. Maybe there is a way to speed up the debugger for large projects – please somebody tell me?

Then the major reason why I switched over – due to limitations in Sublime Text plugin API one simply could not get run output where one can click Python traceback and is taken where the error happened.

pydev traceback

Click Python traceback to navigate around the codebase and find the error root cause

I found this lovely navigation bar a quick fix to navigate around to related modules – partially compensates the lack of powerful Go To Anywhere as in Sublime Text:

navbar

PyCharm shows the path to the current file as interactive navigation bar

Autocomplete, autoimport and other code intel and refactoring tools work better in PyCharm. With Sublime Text you need to play around with a lot of plugins to get decent autocomplete. Sublime Text plugins have their own, incompatible settings and need a lot of manual package installation (pip install flake8, etc). In PyCharm I just hit alt+enter on a missing symbol and it got added as the import at the beginning of the file. Though I could not change it to format the import as I want – one import statement per one line.

PyCharm does background spellchecking of written text and Python docstrings. It’s very handy if you want to write high quality software with meaningful comments and API descriptions.

PyCharm has more robust integrated version control support (Git, SVN). Though Sublime Text has plugins for this, Sublime Text plugin API offers only very limited UI interaction and you cannot, for example, color files in the project explorer based on their edit status.

PyCharm has Power save mode. It disables background tasks like code intel which are  CPU drainage for large projects. This makes digital nomading much more fun when you are fighting over the single available power plug in a hostel on a remote island.

PyCharm has integrated terminal and run window, though it has shortcomings and doesn’t seem to behave like a real terminal.

PyCharm has integrated unit test runner. But it did not work for my py.test and splinter browser tests, as it seems to behave differently than virtualenv’ed tests launched from command line.

5. Conclusion and the future

After few weeks I found myself using PyCharm for the most of my programming needs. The key pain points PyCharm solved for me where robust code intel tools, better Python application run and debug support, with traceback clicking. The development efficiency gained from these features is enough to migrate over, even though there are features I miss in Sublime Text. However, these editors sync files perfectly and I can always alt+tab switch to Sublime Text when I need to write some Restructured Text or Markdown.

I am looking forward for the upcoming contender Github’s atom.io editor which has the ease and flexibility of Sublime Text plugin system, but with better features, UI integration and big development-oriented company backing it up. Atom team is still working on getting the basic architecture together, so it might be few years until we see robust Python tools on Atom. I’d guess HTML, CSS and JavaScript support get there sooner, as they are building the Atom itself on CoffeeScript.

\"\" Subscribe to RSS feed Image Follow me on Twitter Image Follow me on Facebook Image Follow me Google+

Turbocharge your Python prompt and Django shell with IPython Notebook

IPython is an enhanced Python shell, the shell being the prompt which appears when you start python command in your terminal. IPython comes with notebook flavour, where IPython Notebook presents the modern HTML-based shell for Python.

1. Introduction

Python is so-called dynamic programming language where much can be achieved by piloting your code in an interactive interpreter or tuning your production server from the shell. Basing the read-evaluate-print-loop (REPL) to web browser technology, instead of terminal technology, brings shell usability to the modern age, boosting your working efficiency considerably.

IPython notebook, as being based on HTML, can also output graphics and dynamic clickable and navigable graphics. For graphics, diagrams and plotting, check out Bokeh and Pandas libraries.


IPython

2. Installation

First create a virtualenv. Then continue in the activated virtualenv.

Install IPython with IPython Notebook extensions:

pip install "ipython[notebook]"

Starting IPython in terminal:

ipython

Developers like their terminals either white-on-black or black-on-white. Try switching the color scheme:

ipython --colors=linux

Screen Shot 2014-08-13 at 13.51.45

3. Enter the HTML

Now comes the big one. Start IPython notebook for a web browser based shells:

ipython notebook

This will start IPython kernel running in the port localhost:8888 and automatically connects your default web browser into it.

Screen Shot 2014-08-13 at 13.49.03

Yay! Finally you can

  • Use shift and arrows to select your text, unlike in most of the terminals
  • Copy-paste that works 100%
  • Click things with mouse and place your edit cursor
  • Save and replay your shell sessions
  • Output graphics directly from the shell

4. Django integration

First, you need to a have running Django project. If you are new to Django I highly recommend reading DjangoGirls’s Django tutorial – one of the best tutorials to modern web development covering HTTP, Python, databases, HTML, CSS and JavaScript.

Install Django Extensions package. Django Extensions, with many other features, gives you the ability to automatically import all of your application models on the start up to have quicker access to them. We do the example below using DjangoGirls website checkout.

pip install django_extensions

Add django_extensions to Django settings INSTALLED_APPS list:

INSTALLED_APPS = (
     ....
    'django_extensions'
)

Start IPython-enabled Django shell through Django extensions command:

python manage.py shell_plus

And you can straight away play with your Django models:

Screen Shot 2014-08-13 at 14.12.25

Now, try entering to the Notebook Django shell:

python manage.py shell_plus --notebook

… and you get the same, but with all IPython Notebook goodies:

IPython

5. Running IPython Notebook on your server

IPython Notebook uses, by default, uses localhost TCP/IP sockets to allow web browsers to connect to IPython Notebook kernel.

If you want to run IPython Notebook on a non-local computer you can use SSH tunnels. Please first read SSH basics for developers, then proceed to how to build SSH tunnels for port forwarding.

\"\" Subscribe to RSS feed Image Follow me on Twitter Image Follow me on Facebook Image Follow me Google+

Accepting and spending bitcoins in a Django application

This tutorial shows how to use django-bitcoin to receive and send money in your Python + Django application. The walkthrough guides how to create a bitcoin wallet in your Django application, buy bitcoins, transfers bitcoins into your application and then spend them. This all is done interactively from the command, Django shell and Python prompt.The tutorial was tested on OSX. It should work on Linux unmodified. On Windows you are on your own.

django-bitcoin is a proven open source solution for handling bitcoins in your service. However, it might be rough on the edges, it is being actively developed and lacks satisfying documentation. If you need a helping hand to set it up please pop up on #localbitcoins-chat on irc.freenode.net or poke me by email.

The tutorial Django application code is available on Github. It was originally presented in PythonBrazil 2013. The tutorial code is MIT licensed and uses my personal fork of django-bitcoin. Disclaimer: I work with the related projects.

LocalBitcoins is hiring. LocalBitcoins is currently looking for fraud analyst, growth hacker, international support people and software developers.

1. Why accept bitcoin in your online service

Prerequisites

In order to understand this tutorial, you need to have basic understanding of

  • Python 2.7
  • virtualenv
  • memcached
  • bitcoind
  • Django basics: how to configure Django project, MySQL, models, South migrations, using interactive Python shell.
  • How to consume piles of open source code from Github

Installation

Setup and configure memcached first.

Installation (virtualenv based):

git clone git@github.com:miohtama/django-bitcoin-example.git
cd django-bitcoin-example
virtualenv venv   # Create virtualenv folder caller venv
. venv/bin/activate  # Active virtualenv

Install Python dependencies using pip:

pip install -r requirements.txt

Tutorial walkthrough

django-bitcoin creates a so called bitcoin web wallet in your Django project.

  • You need to have a bitcoind installed on your desktop / server where you run the tutorial.
  • django-bitcoin reads transactions from bitcoind and duplicates them as Django data with convenient models to handle them in your application
  • django-bitcoin can send bitcoins from the system by calling bitcoind interfaces

2. Configuring bitcoind

Install bitcoind.

Note that the bitcoind installation takes hefty 10-20 GB disk space for the block chain data. Blockchain contains all transaction history of bitcoin ever. bitcoind downloads this data from the bitcoin network and it may take a while.

  • django-bitcoin communites with bitcoind over JSON-RPC protocol. You set the bitcoind address in settings.py
  • bitcoind transaction handling is done as polling, using Django management commands

Configure your bitcoind to accept connection with username and password.

Create file example/localsettings.py and let’s put there in confidential settings (not stored on Github):

BITCOIND_CONNECTION_STRING = "http://miguel:passwor@example.com:8332"

# How many bitcoin network confirmations are required until django-bitcoin considers the transaction
# as received
BITCOIN_MINIMUM_CONFIRMATIONS = 1

# Use Django signals to tell the system when new money has arrived to your wallets
BITCOIN_TRANSACTION_SIGNALING = True

3. Initializing database

django-bitcoin uses South for its schema management. Create a database (sqlite test.db file by default):

python manage.py syncdb
python manage.pt migrate django_bitcoin

4. Do a test run

Let’s open the development web server and see that the Django admin is up with django-bitcoin:

python manage.py runserver_plus

Visit http://localhost:8000/admin to see the Django admin interface having addresses, wallets and such:

https://raw.github.com/miohtama/django-bitcoin-example/master/images/admin.png

5. Creating a wallet

A wallet, django_bitcoin.models.Wallet, is a combination of receiving and sending bitcoin addresses and stores the bitcoin value associated with these addresses. A wallet can have infinite number of sending and receiving bitcoin addresses.

Bitcoin addresses can be created and used on demand. The sending and receiving addresses do not have relationship between them. When you receive bitcoins to your system they do not leave out from the same address. This is who most bitcoin web wallets behave.

Let’s start interactive IPython prompt:

python manage.py shell_plus

Then we create a wallet with an label. Usually if the application has only one wallet (not per user wallets) you call this wallet instance to master wallet:

master_wallet, created = Wallet.objects.get_or_create(label="master_wallet")

Then we need to have an receiving bitcoin address where this wallet can receive bitcoins and then print it out for us:

recv_address = master_wallet.receiving_address(fresh_addr=False)
print recv_address

Write down the bitcoin address you got as we are later sending bitcoins into it.

https://raw.github.com/miohtama/django-bitcoin-example/master/images/wallet.png

6. Purchase some test bitcoins

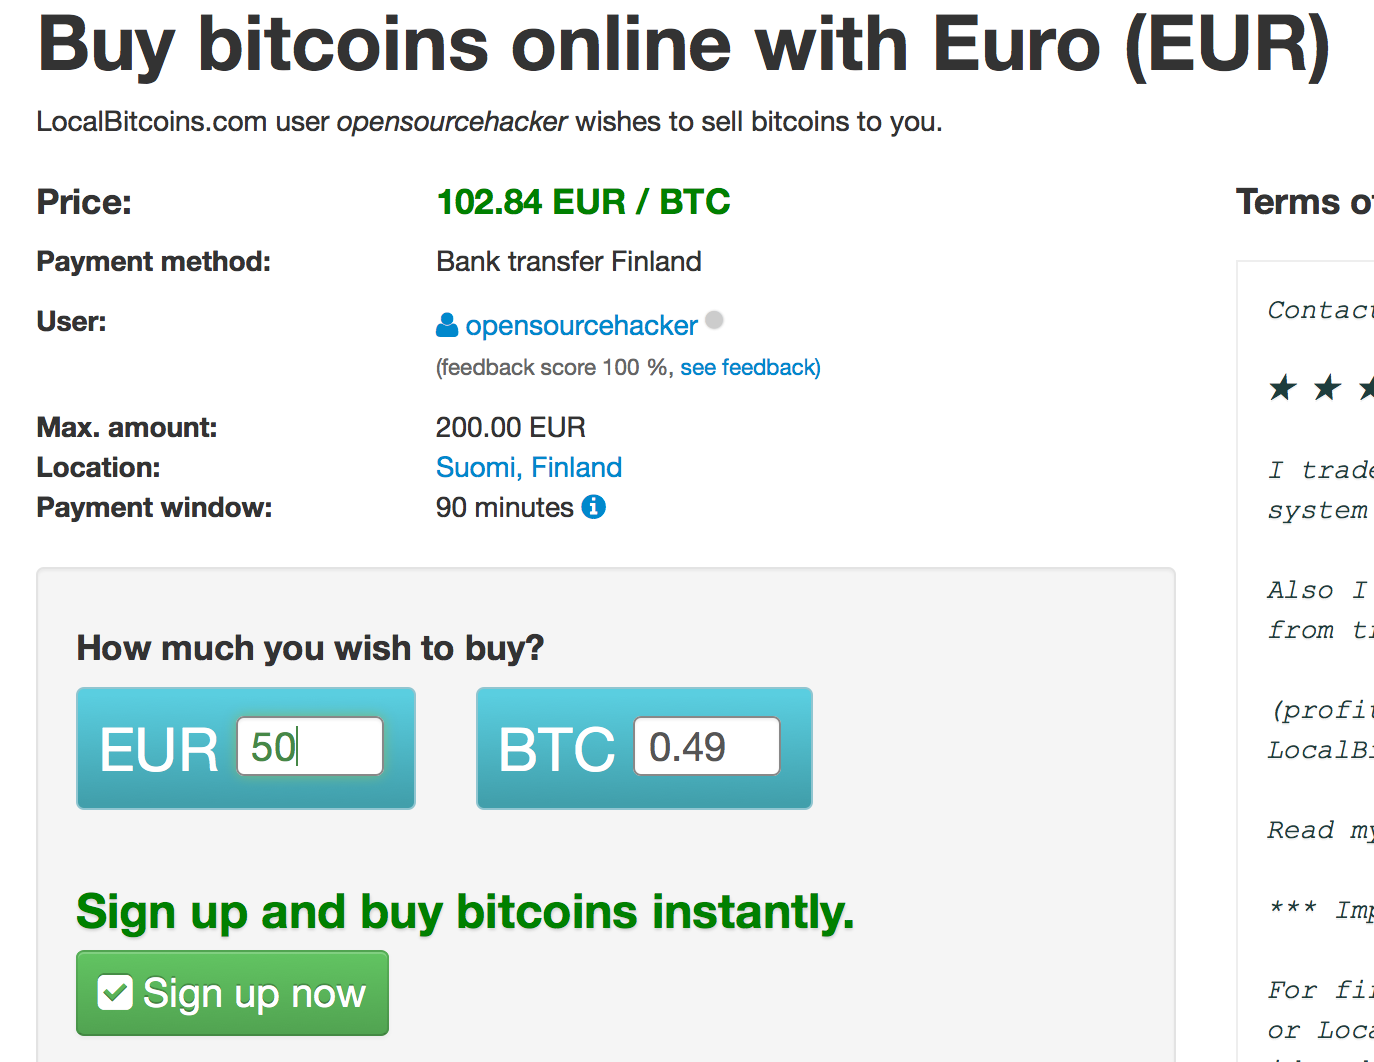
Go to LocalBitcoins.com and buy some bitcoins. LocalBitcoins.com is a person-to-person bitcoin exchange where you are not buying bitcoins from an organization, but from other users. This is easy and fast way to obtain your first bitcoins, as there is no cumbersome verification processes you need to undergo in centralized bitcoin exchanges. Think LocalBitcoins as eBay of bitcoins.

LocalBitcoins.com provides different online payment methods. The recommended methods are:

  • Cash deposit (popular in US)
  • National bank transfer

If you are living a big city you can also try cash trade.

You can buy small amounts of bitcoins from me. I can also sell bitcoins on PayPal on a request.

https://raw.github.com/miohtama/django-bitcoin-example/master/images/buy.png

7. Accepting incoming transaction

We have the receiving bitcoin address of our master wallet from before. Now we are going to send the bitcoins there from LocalBitcoins:

https://raw.github.com/miohtama/django-bitcoin-example/master/images/send.pngWhen you hit the Send on LocalBitcoins.com, the site submits the transaction to the bitcoin network. Bitcoin network consists of nodes which will confirm your transaction. After the certain transaction confirmation threshold is exceeded you can assume the transaction was safe and not double spent attempt. Usually this confirmation threshold is six confirmations, but you can set it lower if you want to have faster customer experience. It takes 5-30 minutes to process a transaction with six confirmations.

Now, in our own example application polls bitcoind which listens to bitcoin network. bitcoind exposes a bunch of commands over JSON-RPC protocol. You can call these commands even from the UNIX command line.

We have a Django management command for polling bitcoind. On each poll, we check the incoming transaction for receiving bitcoin addresses we have in our database. When the bitcoin network keeps confirming our transaction, the confirmation count of the transaction increases. When the threshold is exceeded, django-bitcoin writes down the transaction to the database as DepositTransaction and the amount of bitcoins in the wallet is increased.

For this example we run the polling command by hand. Usually this is a task delegated to Celery task scheduler:

python manage.py CheckTransactions

https://raw.github.com/miohtama/django-bitcoin-example/master/images/poll.png

8. Checking the balance

CheckTransactions fires the Django signal handlers notifying the Django project for incoming transactions. For the simplicity, we do not use Django signalling in this example. Instead, we manually run CheckTransactions and after 20 minutes and see that the bitcoins have been received in our wallet:

python manage.py shell_plus
master_wallet = Wallet.objects.get(label="master_wallet")
print master_wallet.total_balance()

https://raw.github.com/miohtama/django-bitcoin-example/master/images/balance.png

9. Spending the bitcoins

Now, we got the coins! Time to make some purchases. We go to an online shop selling high quality Brazilian music.

Then we’ll send the bitcoins from our wallet to buy this wonderful piece of art (the screenshot below is a mockup and not an actual store).

https://raw.github.com/miohtama/django-bitcoin-example/master/images/spend.png

All bitcoin amounts are stored in Python decimal.Decimal instead of floats to avoid floating point rounding errors.

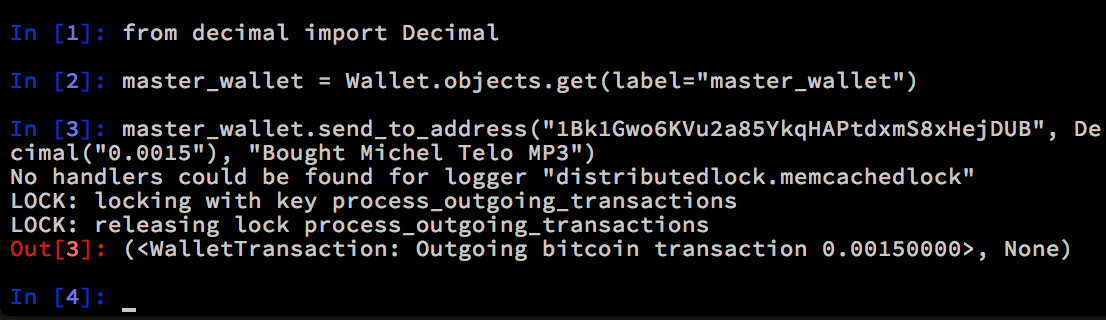
We fire up the Python shell again and send the bitcoins to the target address:

python manage.py shell_plus
from decimal import Decimal
master_wallet = Wallet.objects.get(label="master_wallet")
master_wallet.send_to_address("1Bk1Gwo6KVu2a85YkqHAPtdxmS8xHejDUB", Decimal("0.0505"), "Bought Michel Telo MP3")

Note that for every outgoing transaction there is a bitcoin network fee to compensate the bitcoin miners for confirming your transaction. The network fee is configured to be 0.0005 BTC in django_bitcoind by default. So the total amount to be send is the checkout price + network fee. Higher the paid network fee, faster the transaction is processed by bitcoin network.

https://raw.github.com/miohtama/django-bitcoin-example/master/images/outgoing.png

10. Checking outgoing and past transactions

We can check the outgoing transactions from our wallet:

for t in WalletTransaction.objects.filter(from_wallet=master_wallet):
   print t, t.to_bitcoinaddress

https://raw.github.com/miohtama/django-bitcoin-example/master/images/history.png

If you enter the receiving address to blockchain.info you can see your transaction statuses in the bitcoin network.

https://raw.github.com/miohtama/django-bitcoin-example/master/images/blockchain.pngAnd that’s it!

\"\" Subscribe to RSS feed Image Follow me on Twitter Image Follow me on Facebook Image Follow me Google+