
Accepting and spending bitcoins in a Django application

This tutorial shows how to use django-bitcoin to receive and send money in your Python + Django application. The walkthrough guides how to create a bitcoin wallet in your Django application, buy bitcoins, transfers bitcoins into your application and then spend them. This all is done interactively from the command, Django shell and Python prompt.The tutorial was tested on OSX. It should work on Linux unmodified. On Windows you are on your own.

django-bitcoin is a proven open source solution for handling bitcoins in your service. However, it might be rough on the edges, it is being actively developed and lacks satisfying documentation. If you need a helping hand to set it up please pop up on #localbitcoins-chat on irc.freenode.net or poke me by email.

The tutorial Django application code is available on Github. It was originally presented in PythonBrazil 2013. The tutorial code is MIT licensed and uses my personal fork of django-bitcoin. Disclaimer: I work with the related projects.

LocalBitcoins is hiring. LocalBitcoins is currently looking for fraud analyst, growth hacker, international support people and software developers.

1. Why accept bitcoin in your online service

Prerequisites

In order to understand this tutorial, you need to have basic understanding of

  • Python 2.7
  • virtualenv
  • memcached
  • bitcoind
  • Django basics: how to configure Django project, MySQL, models, South migrations, using interactive Python shell.
  • How to consume piles of open source code from Github

Installation

Setup and configure memcached first.

Installation (virtualenv based):

git clone git@github.com:miohtama/django-bitcoin-example.git
cd django-bitcoin-example
virtualenv venv   # Create virtualenv folder caller venv
. venv/bin/activate  # Active virtualenv

Install Python dependencies using pip:

pip install -r requirements.txt

Tutorial walkthrough

django-bitcoin creates a so called bitcoin web wallet in your Django project.

  • You need to have a bitcoind installed on your desktop / server where you run the tutorial.
  • django-bitcoin reads transactions from bitcoind and duplicates them as Django data with convenient models to handle them in your application
  • django-bitcoin can send bitcoins from the system by calling bitcoind interfaces

2. Configuring bitcoind

Install bitcoind.

Note that the bitcoind installation takes hefty 10-20 GB disk space for the block chain data. Blockchain contains all transaction history of bitcoin ever. bitcoind downloads this data from the bitcoin network and it may take a while.

  • django-bitcoin communites with bitcoind over JSON-RPC protocol. You set the bitcoind address in settings.py
  • bitcoind transaction handling is done as polling, using Django management commands

Configure your bitcoind to accept connection with username and password.

Create file example/localsettings.py and let’s put there in confidential settings (not stored on Github):

BITCOIND_CONNECTION_STRING = "http://miguel:passwor@example.com:8332"

# How many bitcoin network confirmations are required until django-bitcoin considers the transaction
# as received
BITCOIN_MINIMUM_CONFIRMATIONS = 1

# Use Django signals to tell the system when new money has arrived to your wallets
BITCOIN_TRANSACTION_SIGNALING = True

3. Initializing database

django-bitcoin uses South for its schema management. Create a database (sqlite test.db file by default):

python manage.py syncdb
python manage.pt migrate django_bitcoin

4. Do a test run

Let’s open the development web server and see that the Django admin is up with django-bitcoin:

python manage.py runserver_plus

Visit http://localhost:8000/admin to see the Django admin interface having addresses, wallets and such:

https://raw.github.com/miohtama/django-bitcoin-example/master/images/admin.png

5. Creating a wallet

A wallet, django_bitcoin.models.Wallet, is a combination of receiving and sending bitcoin addresses and stores the bitcoin value associated with these addresses. A wallet can have infinite number of sending and receiving bitcoin addresses.

Bitcoin addresses can be created and used on demand. The sending and receiving addresses do not have relationship between them. When you receive bitcoins to your system they do not leave out from the same address. This is who most bitcoin web wallets behave.

Let’s start interactive IPython prompt:

python manage.py shell_plus

Then we create a wallet with an label. Usually if the application has only one wallet (not per user wallets) you call this wallet instance to master wallet:

master_wallet, created = Wallet.objects.get_or_create(label="master_wallet")

Then we need to have an receiving bitcoin address where this wallet can receive bitcoins and then print it out for us:

recv_address = master_wallet.receiving_address(fresh_addr=False)
print recv_address

Write down the bitcoin address you got as we are later sending bitcoins into it.

https://raw.github.com/miohtama/django-bitcoin-example/master/images/wallet.png

6. Purchase some test bitcoins

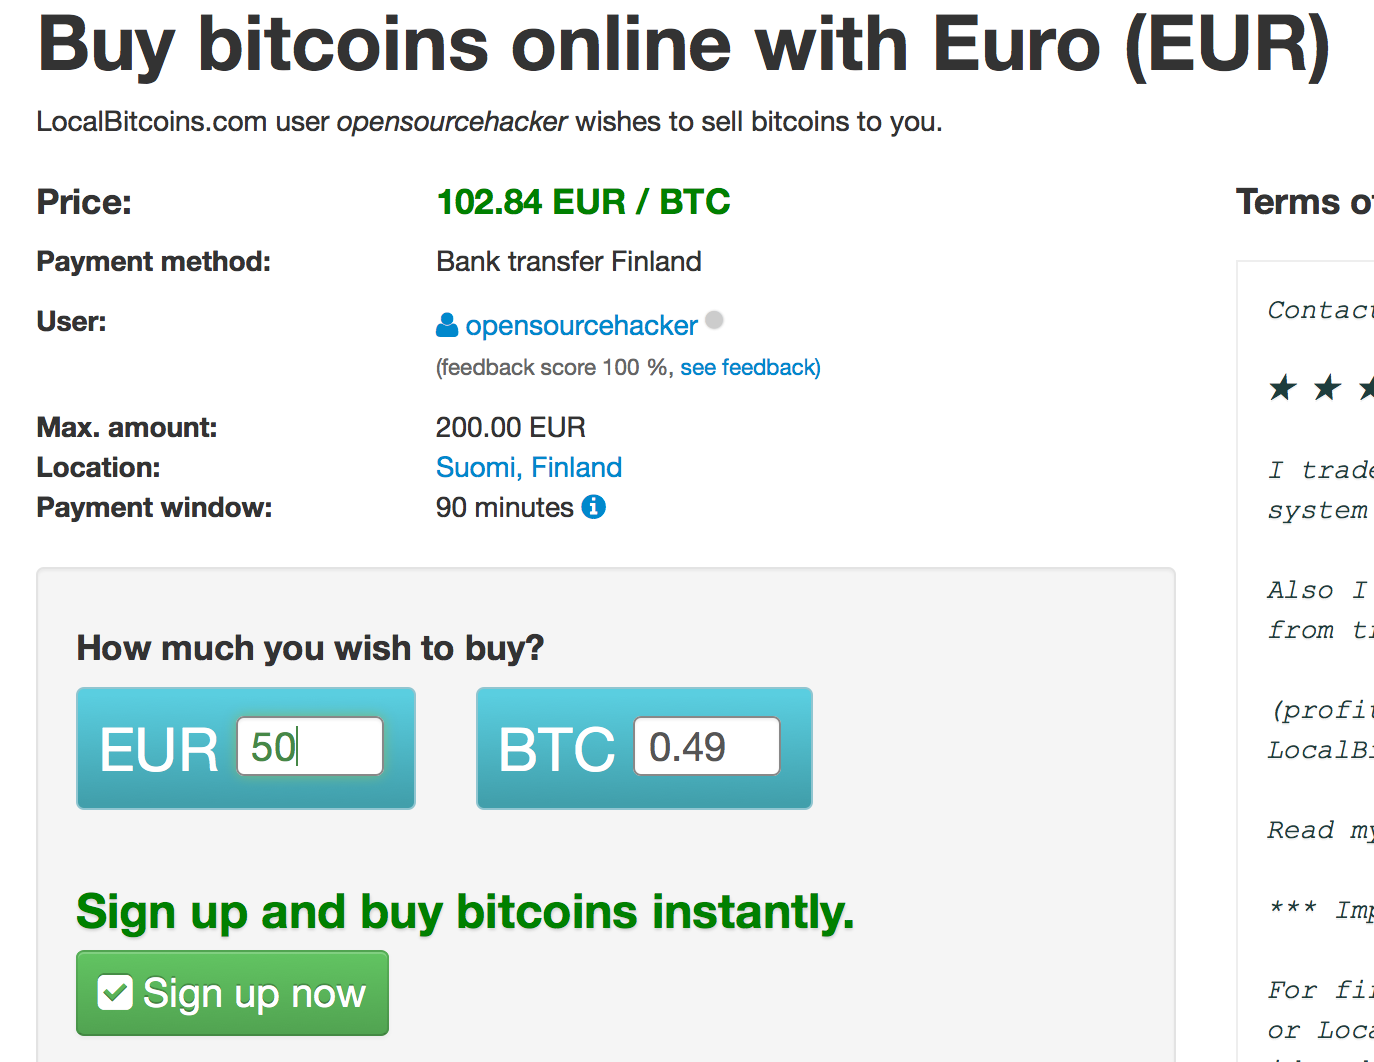
Go to LocalBitcoins.com and buy some bitcoins. LocalBitcoins.com is a person-to-person bitcoin exchange where you are not buying bitcoins from an organization, but from other users. This is easy and fast way to obtain your first bitcoins, as there is no cumbersome verification processes you need to undergo in centralized bitcoin exchanges. Think LocalBitcoins as eBay of bitcoins.

LocalBitcoins.com provides different online payment methods. The recommended methods are:

  • Cash deposit (popular in US)
  • National bank transfer

If you are living a big city you can also try cash trade.

You can buy small amounts of bitcoins from me. I can also sell bitcoins on PayPal on a request.
https://raw.github.com/miohtama/django-bitcoin-example/master/images/buy.png

7. Accepting incoming transaction

We have the receiving bitcoin address of our master wallet from before. Now we are going to send the bitcoins there from LocalBitcoins:

https://raw.github.com/miohtama/django-bitcoin-example/master/images/send.pngWhen you hit the Send on LocalBitcoins.com, the site submits the transaction to the bitcoin network. Bitcoin network consists of nodes which will confirm your transaction. After the certain transaction confirmation threshold is exceeded you can assume the transaction was safe and not double spent attempt. Usually this confirmation threshold is six confirmations, but you can set it lower if you want to have faster customer experience. It takes 5-30 minutes to process a transaction with six confirmations.

Now, in our own example application polls bitcoind which listens to bitcoin network. bitcoind exposes a bunch of commands over JSON-RPC protocol. You can call these commands even from the UNIX command line.

We have a Django management command for polling bitcoind. On each poll, we check the incoming transaction for receiving bitcoin addresses we have in our database. When the bitcoin network keeps confirming our transaction, the confirmation count of the transaction increases. When the threshold is exceeded, django-bitcoin writes down the transaction to the database as DepositTransaction and the amount of bitcoins in the wallet is increased.

For this example we run the polling command by hand. Usually this is a task delegated to Celery task scheduler:

python manage.py CheckTransactions

https://raw.github.com/miohtama/django-bitcoin-example/master/images/poll.png

8. Checking the balance

CheckTransactions fires the Django signal handlers notifying the Django project for incoming transactions. For the simplicity, we do not use Django signalling in this example. Instead, we manually run CheckTransactions and after 20 minutes and see that the bitcoins have been received in our wallet:

python manage.py shell_plus
master_wallet = Wallet.objects.get(label="master_wallet")
print master_wallet.total_balance()

https://raw.github.com/miohtama/django-bitcoin-example/master/images/balance.png

9. Spending the bitcoins

Now, we got the coins! Time to make some purchases. We go to an online shop selling high quality Brazilian music.

Then we’ll send the bitcoins from our wallet to buy this wonderful piece of art (the screenshot below is a mockup and not an actual store).

https://raw.github.com/miohtama/django-bitcoin-example/master/images/spend.png

All bitcoin amounts are stored in Python decimal.Decimal instead of floats to avoid floating point rounding errors.

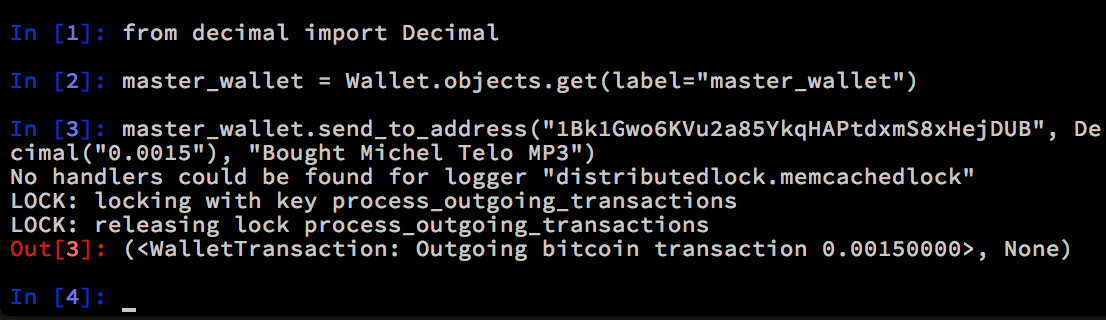
We fire up the Python shell again and send the bitcoins to the target address:

python manage.py shell_plus
from decimal import Decimal
master_wallet = Wallet.objects.get(label="master_wallet")
master_wallet.send_to_address("1Bk1Gwo6KVu2a85YkqHAPtdxmS8xHejDUB", Decimal("0.0505"), "Bought Michel Telo MP3")

Note that for every outgoing transaction there is a bitcoin network fee to compensate the bitcoin miners for confirming your transaction. The network fee is configured to be 0.0005 BTC in django_bitcoind by default. So the total amount to be send is the checkout price + network fee. Higher the paid network fee, faster the transaction is processed by bitcoin network.
https://raw.github.com/miohtama/django-bitcoin-example/master/images/outgoing.png

10. Checking outgoing and past transactions

We can check the outgoing transactions from our wallet:

for t in WalletTransaction.objects.filter(from_wallet=master_wallet):
   print t, t.to_bitcoinaddress

https://raw.github.com/miohtama/django-bitcoin-example/master/images/history.png

If you enter the receiving address to blockchain.info you can see your transaction statuses in the bitcoin network.

https://raw.github.com/miohtama/django-bitcoin-example/master/images/blockchain.pngAnd that’s it!

\"\" Subscribe to RSS feed Image Follow me on Twitter Image Follow me on Facebook Image Follow me Google+

Recommended way for sudo-free installation of Python software with virtualenv

When installing Python software, sudo easy_install and sudo pip are something you should do very seldom. sudo means you are messing with your operating system files. easy_install means that it is easy to install, but impossible to uninstall. You most likely step on the toes your operating system package manager and make your Python installation damaged – damaged in a way you cannot reliably use OS package manager to install or upgrade the software in the future. There is also a high chance that two software depends on the different version of a library X and easy_install will happily overwrite anything with different version in your system.

Even though being badly broken, still plenty of Python software documentation recommends sudo easy_install as an installation method.

virtualenv is a Python tool for creating an isolated Python environment for a normal user. They are isolated in a sense, that only the software you install there will see and mess with the environment. When you are running virtualenv’ed python, pip and easy_install can freely pull in any libraries from pypi without the worry that you break some other software on your computer.

Here is a recipe for installing virtualenv’ed Python software which should across UNIXes and Windows. It will totally run as your normal user privileges, no sudo or admin needed. Only an installed Python interpreter and a working python command are the requirements.

So fire up your console, go the folder where you wish to perform the installation and type the following (some commenting added to explain the process):

# First create the folder where you wish to install the software
# with mkdir command. Then go to this folder with cd command.

# Windows users: Please manually download virtualenv.py
# to the target folder  ith your web browser. UNIX users
# can use curl command line downloader as below.

# Note: Don't rely on operating system virtualenv command.
# It might be hassle to instruct virtualenv package installation
# due to distribution flavours.
# Old Ubuntus ship really old virtualenv.py and it has not worked
# on all cases.
# Github virtualenv.py is the msot reliable method.
curl -L -o virtualenv.py https://raw.github.com/pypa/virtualenv/master/virtualenv.py

# Create a virtualenv environment
# where the software and its dependencies
# will be pulled from PyPi. In our case
# we call the created virtualenv folder "venv"
python virtualenv.py venv

# Activate the virtualenv environment.
# This will set your PATH environment
# variable so that following "python"
# command executes from under the virtualenv,
# not from your global system setup.
#

# Windows equivalent: .\venv\Scripts\activate
. venv/bin/activate

# Now when virtualenv is activated,
# pip and easy_install will install any software
# under this virtualenv environment, not on your operating system files
pip install YOUR_PACKAGE_NAME_ON_PYPI.PYTHON.ORG

# Usually, if you install Python command line software,
# new launcher scripts get created in venv/bin
# folder. When venv environment is active,
# this folder takes precedence in PATH environment
# variable. Meaning, when you have virtualenv activated
# you can simply type in the installed command name
# without full path to execute it.

And again with a real life example:

curl -L -o virtualenv.py https://raw.github.com/pypa/virtualenv/master/virtualenv.py
python virtualenv.py vvv-venv
. vvv-venv/bin/activate
pip install vvv

I have tested this recipe with vvv and Skype sevabot and have found it working. However, I wish to get some feedback and ideas how this could be further enhanced, so please send in your ideas.

Some notes

\"\" Subscribe to RSS feed Image Follow me on Twitter Image Follow me on Facebook Image Follow me Google+

Continuous integration server, ghetto style

What it is

Ghetto-CI is a Python script in 145 statements fulfilling your dirty continuous integration needs.

Source code (one file, only 145 statements) is hosted on Github and for your convenience the script is bundled in VVV linting and validation tool package on PyPi. I’d love to see if any other programming language can go more compact from this and still maintain code readability.

What it does

  1. The script must be run on your server periodically
  2. Runs svn update on a source folder (VCS backend easy to customize)
  3. Checks if there are new commits since the last run
  4. Run tests if the source code in fact was changed
  5. See if the tests status since the last run has changed from success to failure or vice versa
  6. Send email notifications to the team that now fecal matter impacts the rotary ventlidation device

Why to use

To improve the quality and cost effectiveness of your little software project, you want to detect code changes breaking your project [automated tests].

You might want to do this without installing 48 MB of Java software on your server. On the other hand, very good SaaS oriented alternatives are tied to public Github repositories. Homebrew shell scripts for tasks like this are nice, but no one wants to read or touch shell scripts written by others.

Ghetto-CI script is mostly self-contained, easy to understand, easy to hack into pieces, for your very own need. It is a solution that scales down. Just toss it on a corner of a server and it will churn happily and keep its owners proud. Ghetto-CI does not you give fancy web interface, statistics, bling bling or even a pony. However, it tells when someone breaks something and it is time for team building via blanket party.

Installation

As a prerequisitement you need a working Python 3 command installed on your operating system with virtualenv package. For more detailed instructions see VVV installation manual. Read these instructions especially if you get “SyntaxError: invalid syntax” when running virtualenv command – older Ubuntus ship with virtualenv which is not compatible with Python 3.

If you don’t feel eggy you can just grab the self-contained source file as long as you have plac package also installed for your Python.

Create Python 3 virtualenv and run Ghetto-CI script using Python interpreter configured under this virtualenv:

# We install GhettoCI directly under our UNIX user home folder
cd ~
virtualenv -p python3 vvv-venv
source vvv-venv/bin/activate
pip install vvv

# ghetto-ci now lives in vvv-venv/bin/ghetto-ci

# Running the script, using the Python environment prepared
# to see that everything works (source command above
# has added this to PATH)
ghetto-ci -h

Usage

You need to prepare

  • A software repository folder. This must be pre-checked out Subversion repository where ghetto-ci can run svn up command.
  • A command to execute unit tests and such. This command must return process exit code 0 on success. If you don’t bother writing tests, low end alternative is just lint and validate your source code.
  • A file storing the test status. Ghetto-CI status file keeps track whether the last round or tests succeeded or failed. You’ll get email reports only when the test status changed – there is little need to get “tests succeeded” email for every commit.
  • Email server details to send out notifications. Gmail works perfectly if you are in short of SMTP servers.

Example of a command for running continuous integration against /my/svn/repo checkout where bin/test command is used to run the unit tests:

# Will print output to console because email notification details are not given
ghetto-ci /my/svn/repo /tmp/status-file.ci "cd /my/svn/repo && bin/test"

If the tests status have changed since the last run, or the running fails due to internal error, the command outputs the result. The status file keeps log of the last run.  Exit code 0 indicates that test succeeded.

After Ghetto-CI has been succefully run once by hand you want make it poll the repository regularly. This is can be easily achieved using UNIX cron clock daemon. Create a dummy UNIX user which can checkout and pull updates on the source code. Then create a file /etc/cron.hourly/continuous-integration-tests which will hourly run the tests (Ubuntu example):

#/bin/sh
sudo -i -u yourunixuser "source vvv-venv/bin/activate && \
  ghetto-ci /my/svn/repo /tmp/status-file.ci 'cd /my/svn/repo && bin/test'"

Naturally the command to launch the tests is specific to your software project.

On Windows you can accomplish this using any automator provided by your operating system vendor.

Tips

You might to use -force -alwaysoutput arguments when doing test runs to see what tests do regardless of software repository timestamp.

You can also evaluate against UNIX command true and false to e.g. test email output:

ghetto-ci -force -alwaysoutput ...email settings here... /repo /tmp/status-file.ci true

Complex usage example

Below is a real life example , again triggered by Cron job, to poll several SVN repositories which have different test sets to run. We use GMail user to send out the email notifications. This is convenient, as we do not need to care about SMTP environment and we can easily drop this code on any server.

continuous-integration.sh:

#!/bin/sh
#
# Example ghetto-ci integration for Plone buildout and custom add-ons.
# Using dummy gmail account for outgoing messages.
#
# Install VVV under buildout
#
# Run this file in buildout main folder:
#
# cd ~/mybuildoutfolder
# src/my-repo/continuos-integration.sh
#
#

# The list of persons who will receive resports of test status changes
RECEIVERS="person@asdf.com, person2@asdf.com, person3@example.com"

# Ghetto-CI template command which is run against multiple repos / multiple test commands
# We use localhost 25 as the SMTP server -> assume your UNIX server has postfix
# or something configured... could be gmail.com servers also here
GHETTOCI="vvv-venv/bin/ghetto-ci \
    -smtpserver smtp.gmail.com \
    -smtpport 465 \
    -smtpuser mailer@gmail.com \
    -smtppassword OMGITISFULLofKITT3NS \
    -receivers \"$RECEIVERS\" \
    -envelopefrom \"Continuous integration service <mailer@gmail.com>\" \
    -smtpfrom mailer@gmail.com"

# Note that SVN revision info is folding down in the folders
# so you can target tests to a specific SVN repo subfolder

# Note: eval needs to be used due to shell script quotation mark fuzz

# See that buildout completes (no changes in the external environment, like someone accidentally
# publishing broken packages on PyPI). We actually place buildout.cfg under this SVN repo
# and then just symlink it
eval $GHETTOCI src/my-repo buildout.ci 'bin/buildout'

# Run tests against hospital product
eval $GHETTOCI src/my-repo/Products.Hospital hospital.ci \"bin/test -s Products.Hospital\"

# Run tests against patient product
eval $GHETTOCI src/my-repo/Products.Patient patient.ci \"bin/test -s Products.Patient\"

Internals

plac rocks for command line parsing, especially with Python 3.

The code is pylint valid – and beautiful, Pythonic.

Future tasks

To make this script even more awesome, the following can be considered

  • Using some Python library as the abstraction layer over different version control systems
  • Using more intelligent Python library for the notifications: have email, IRC and Skype notifications (How Skype bots are built nowadays?)
  • Use a proper emailing library. I still believe it is easier to configure one GMail account for SMTP purposes instead of Postfix or Exim. Also GMail nicely collects outgoing messages to log even if email delivery has temporary problems.
  • I would be happy if someone told how to change -smtpport styles options to –smtp-port with plac
  • I would be also happy if someone shows how to tame shell script quotation marks properly
  • All tips to make Python source even more beautiful welcome

The code

__author__ = "Mikko Ohtamaa <mikko@opensourcehacker.com>"
__license__ = "WTFPL"

# pylint complains about abstract Python 3 members and ABCMeta, this will be fixed in the future
# pylint: disable=R0201, W0611

# Python imports
from abc import ABCMeta, abstractmethod
from email.mime.text import MIMEText
import pickle
import os
import sys
import subprocess
from smtplib import SMTP_SSL, SMTP 

#: Template used in email notifications
NOTIFICATION_BODY_TEMPLATE = """
Last commit %(commit)s by %(author)s:

%(commit_message)s

Test output:

%(test_output)s
"""

def split_first(line, separator):
    """
    Split a string to (first part, remainder)
    """
    parts = line.split(separator)
    return parts[0], separator.join(parts[1:])

def shell(cmdline):
    """
    Execute a shell command.

    :returns: (exitcode, stdout / stderr output as string) tuple
    """

    process = subprocess.Popen(cmdline, stdout=subprocess.PIPE, stderr=subprocess.PIPE, shell=True)

    # XXX: Support stderr interleaving
    out, err = process.communicate()

    # :E1103: *%s %r has no %r member (but some types could not be inferred)*
    # pylint: disable=E1103
    out = out.decode("utf-8")
    err = err.decode("utf-8")

    return (process.returncode, out + err)    

class Status:
    """
    Stored pickled CI status of a test run.

    Use Python pickling serialization for making status info persistent.
    """

    def __init__(self):

        #: Set to True of False by automation,
        # but we have a special value for the first run
        # to get output always
        self.test_success = "xxx"
        self.last_commit_id = None

    @classmethod
    def read(cls, path):
        """
        Read status file.

        Return fresh status if file does not exist.
        """    

        if not os.path.exists(path):
            # Status file do not exist, get default status
            return Status()

        f = open(path, "rb")

        try:
            return pickle.load(f)
        finally:
            f.close()

    @classmethod
    def write(cls, path, status):
        """
        Write status file
        """        
        f = open(path, "wb")
        pickle.dump(status, f)
        f.close()

class Repo(metaclass=ABCMeta):
    """
    Define interface for presenting one monitored software repository in ghetto-ci.
    """
    def __init__(self, path):
        """
        :param path: Abs FS path to monitored repository
        """
        self.path = path

    @abstractmethod
    def update(self):
        """ Update repo from version control """
        pass

    @abstractmethod
    def get_last_commit_info(self):
        """
        Get the last commit status.

        :return tuple(commit id, commiter, message, raw_output) or (None, None, None, raw_output) on error
        """
        return (None, None, None)

class SVNRepo(Repo):
    """ Handle Subversion repository update and last commit info extraction """

    def update(self):
        """
        Run repo update in a source folder
        """
        exitcode, output = shell("svn up %s" % self.path)
        return exitcode == 0, output

    def get_last_commit_info(self):
        """
        Get the last commit status.
        """

        # Get output from svn info
        info, output = self.get_svn_info()

        if not info:
            return (None, None, None, output)

        # Get output from svn log
        log_success, author, log = self.get_svn_log()
        if not log_success:
            return (None, None, None, log)

        return (info["Last Changed Rev"], author, log, output)

    def get_svn_log(self):
        """
        Extract the last commit author and message.

        :return: tuple (success, last commiter, output / last commit message)
        """
        exit_code, output = shell("svn log -l 1 %s" % self.path)

        if exit_code != 0:
            return (False, None, output)

        # ------------------------------------------------------------------------
        # r6101 | xxx | 2012-04-28 15:57:14 +0300 (Sat, 28 Apr 2012) | 1 line

        lines = output.split("\n")
        author_line = lines[1]
        author = author_line.split("|")[1].strip()

        return  (True, author, output)

    def get_svn_info(self):
        """
        Get svn info output parsed to dict
        """
        exit_code, output = shell("svn info %s" % self.path)
        if exit_code != 0:
            return None, output

        data = {}
        for line in output.split("\n"):
            key, value = split_first(line, ":")
            data[key] = value

        return data, output

class Notifier:
    """
    Intelligent spam being. Print messages to stdout and send emai if
    SMTP server details are available.
    """

    def __init__(self, server, port, username, password, receivers, from_address, envelope_from):
        """
        :param server: SMTP server

        :param port: SMTP port, autodetects SSL

        :param username: SMTP credentials 

        :param password: SMTP password

        :param receivers: String, comma separated list of receivers

        :param from_email: Sender's email address
        """

        self.server = server
        self.port = port
        self.username = username
        self.password = password
        self.receivers = receivers
        self.from_address = from_address
        self.envelope_from = envelope_from

    def send_email_notification(self, subject, output):
        """

        Further info:

        * http://docs.python.org/py3k/library/email-examples.html

        :param receivers: list of email addresses

        :param subject: Email subject

        :param output: Email payload
        """

        if not self.receivers:
            raise RuntimeError("Cannot send email - no receivers given")

        if self.port == 465:
            # SSL encryption from the start
            smtp = SMTP_SSL(self.server, self.port)
        else:
            # Plain-text SMTP, or opt-in to SSL using starttls() command
            smtp = SMTP(self.server, self.port)

        msg = MIMEText(output, "text/plain")
        msg['Subject'] = subject

        if self.envelope_from:
            msg['From'] = self.envelope_from
        else:
            msg['From'] = self.from_address

        # Add visible receivers header
        msg["To"] = self.receivers

        # SMTP never works on the first attempt...
        smtp.set_debuglevel(False)

        # SMTP authentication is optional
        if self.username and self.password:
            smtp.login(self.username, self.password)

        # Convert comma-separated sl
        receivers = [email.strip() for email in self.receivers.split(",")]

        try:
            smtp.sendmail(self.from_address, receivers, msg.as_string())
        finally:
            smtp.close()

    def print_notification(self, subject, output):
        """
        Dump the notification to stdout
        """
        print(subject)
        print("-" * len(subject))
        print(output) 

    def notify(self, subject, output):
        """
        Notify about the tests status.
        """
        if self.server:
            self.send_email_notification(subject, output)

        self.print_notification(subject, output)

def run_tests(test_command):
    """
    Run testing command.

    Assume exit code = 0 -> test success
    """
    exitcode, output = shell(test_command)
    return (exitcode == 0, output)

# Parsing command line with plac rocks
# http://plac.googlecode.com/hg/doc/plac.html
def main(smtpserver : ("SMTP server address for mail out. Required if you indent to use email notifications.", "option"),
         smtpport : ("SMTP server port for mail out", "option", None, int),
         smtpuser : ("SMTP server username", "option"),
         smtppassword : ("SMTP server password", "option"),
         smtpfrom : ("Notification email From address", "option"),
         envelopefrom : ("Verbose Name <from@site.com> sender address in outgoing email", "option"),
         receivers : ("Notification email receives as comma separated string", "option"),
         force : ("Run tests regardless if there have been any repository updates", "flag"),
         alwaysoutput : ("Print test run output regardless whether test status has changed since the last run", "flag"),

         repository : ("Monitored source control repository (SVN)", "positional"),
         statusfile : ("Status file to hold CI history of tests", "positional"),
         testcommand : ("Command to run tests. Exit code 0 indicates test success", "positional"),
         ):
    """
    Ghetto-CI

    A simple continuous integration server.

    Ghetto-CI will monitor the software repository.
    Give a (Subversion) software repository and a test command run test against it.
    Make this command run regularly e.g. using UNIX cron service.    
    You will get email notification when test command status changes from exit code 0.

    For more information see http://pypi.python.org/pypi/vvv
    """

    notifier = Notifier(server=smtpserver, port=smtpport,
                      username=smtpuser, password=smtppassword, from_address=smtpfrom,
                      receivers=receivers, envelope_from=envelopefrom)

    repo = SVNRepo(repository)    
    status = Status.read(statusfile)

    success, output = repo.update()

    # Handle repo update failure
    if not success:
        notifier.notify("Could not update repository: %s. Probably not valid SVN repo?\n" % repository, output)
        return 1

    commit_id, commit_author, commit_message, output = repo.get_last_commit_info()

    # Handle repo info failure
    if not commit_id:
        notifier.notify("Could not get commit info: %s\n%s" % (repository, output), "Check svn info by hand")
        return 1

    # See if repository status has changed
    if commit_id  != status.last_commit_id or force:
        test_success, output = run_tests(testcommand)
    else:
        # No new commits, nothing to do
        print("No changes in repo %s" % repository)
        return 0

    # Test run status have changed since last run
    if (test_success != status.test_success) or alwaysoutput:

        notification_body = NOTIFICATION_BODY_TEMPLATE % dict(commit = commit_id, author=commit_author,
            commit_message=commit_message, test_output=output)

        if test_success:
            subject = "Test now succeed for %s" % testcommand
        else:
            subject = "Test now fail for %s" % testcommand

        notifier.notify(subject, notification_body)

    # Update persistent test status
    new_status = Status()
    new_status.last_commit_id = commit_id
    new_status.test_success = test_success
    Status.write(statusfile, new_status)

    if test_success:
        return 0
    else:
        return 1

def entry_point():
    """
    Enter the via setup.py entry_point declaration.

    Handle UNIX style application exit values
    """
    import plac
    exitcode = plac.call(main)
    sys.exit(exitcode)

if __name__ == "__main__":
    entry_point()
Happy weekend! 🙂

\"\" Subscribe to RSS feed Image Follow me on Twitter Image Follow me on Facebook Image Follow me Google+

Easily install all Python versions under Linux and OSX using collective.buildout.python

Note: This information is old. Please head to Github collective/buildout.python for recent information.

Here are short instructions how to install all versions (2.4, 2.5, 2.6, 2.7 and 3.1) of Python interpreters on UNIX system. The instructions were tested on Ubuntu 10.04 Lucid Lynx Linux but should work on other systems as is. The installation is based of downloading, compiling and installing different Pythons and their libraries using buildout tool. A buildout configuration for doing this is maintained by a Plone community.

This buildout is especially useful to get Python 2.4 properly running under the latest Ubuntu 10.04 Lucid Lynx. This is because Ubuntu repositories won’t ship with Python 2.4 packages anymore.

The installation will also include static compilation of some very popular libraries. These are dependencies for other Python packages including, but not limited, to

  • libjpeg
  • Python imaging library
  • readline

1. Prerequisites

  • Some Python version is installed (OS default)
  • GCC compiler is installed (sudo apt-get install build-essential)
  • Subversion tool is installed (sudo apt-get install subversion)

2. Running it

svn co http://svn.plone.org/svn/collective/buildout/python/
cd python
python bootstrap.py
bin/buildout

3. Using it

All Pythons are under virtualenv installations. This means that you can activate one Python configuration for your shell once easily (python command will run under different Python versions).

Activating Python 2.4

source python/python-2.4/bin/activate
(python-2.4)moo@murskaamo:~/code$ python -V
Python 2.4.6

Check that Python Imaging Library works

python
Python 2.4.6 (#1, Jul 16 2010, 10:31:46)
[GCC 4.4.3] on linux2
Type "help", "copyright", "credits" or "license" for more information.
>>> import PIL

(No exceptions raised, Python Imaging Library works well).

\"\" Subscribe to RSS feed Image Follow me on Twitter Image Follow me on Facebook Image Follow me Google+