Image

MicroPython Is This Summer’s Hottest Title For The SNES, Thanks To Claude Fable

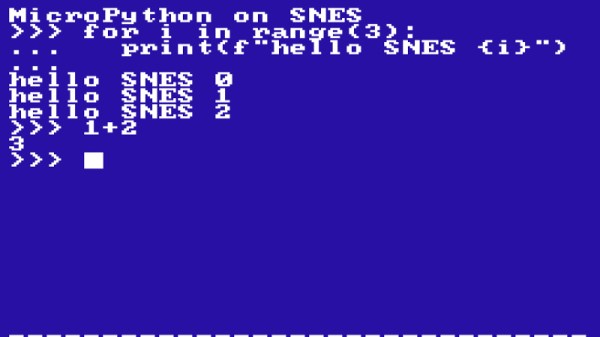
MicroPython, for the uninitiated, is a pared-down version of python meant to run on today’s powerful microcontollers. As impressive as it was for its day, the SNES is not quite in their league in terms of computing power. Time marches on, and so while there may be other indie releases worth mentioning, we’re declaring the hottest SNES game this season to be [Fabian Kübler]’s port of MicroPython.

Well, except he didn’t exactly do the porting himself: the Antrhopic LLM Claude generated the code, and performed most of the testing, as [Fabian]’s test of its new Fable 5 model. A brief pause during an export ban showed that Opus would crash and burn on the same task, but Fable was able to get things quickly back on track. It might be “AI slop” by some definitions, but the port scales 430 out of 468 on MicroPython’s core test/basics, which makes it usable to play some simple python games… slowly.

As you can see for yourself in an embedded emulator if you check out [Fabian]’s blog, spooling up MicroPython takes about twenty seconds at 3.58 MHz, and after that you can watch some sprites bouncing around at a blistering 0.8 FPS. [Fabian] seems satisfied with that performance, and impressed with Fable’s efforts at optimization. What to you think? Does the hardware have much more to give, or is that about it, given the nature of the Pythonic beast? Perhaps some plucky human could become a digital John Henry by producing a better, faster port — if you do, please let us know. If you’d rather just to see what Fable can do, the project is available on GitHub, so you can judge for yourself how sloppy the code is or test out the ROM.

Putting Python onto limited hardware may not to be to everyone’s taste, but there’s a good case to be made for it. The SNES may actually be too limited, though. It makes sense — the kind of micros you run MicroPython on can emulate the SNES.

Image

Python Comes To The Arduino Uno Q

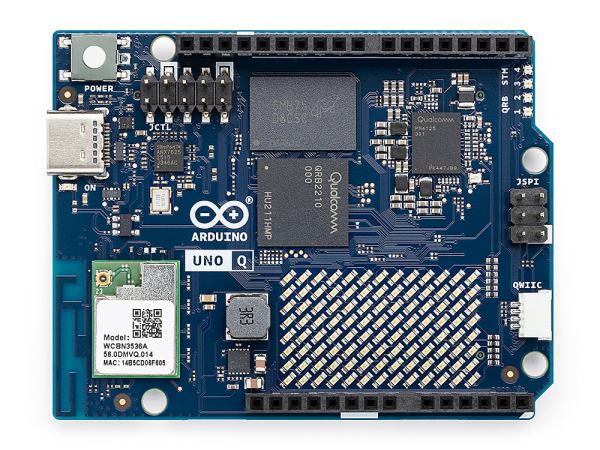
MicroPython is a well-known and easy-to-use way to program microcontrollers in Python. If you’re using an Arduino Uno Q, though, you’re stuck without it. [Natasha] saves the day by bringing us a a subset reimplementation of machine for the Arduino Uno Q.

In the past, microcontrollers were primarily programmed in C, but since MicroPython’s popularity increased over the years, it has become more and more common for introductory microcontroller programming to be in Python. Python, of course, is generally considered more beginner-friendly than C. [Natasha] presumably wanted to teach this way using an Uno Q, but the usual MicroPython APIs weren’t available. And so, in true hacker fashion, they simply made their own library to implement the most important bits of the familiar API. It currently implements a subset of the machine module: Pin, PWM, ADC, I2C, SPI and UART. While not complete, this certainly has potential to make the Uno Q easier to use for those familir with MicroPython.

Image

Real-Time ISS Tracker Shows Off The Goods

What hardware hacker doesn’t have a soft spot for transparent cases? While they may have fallen out of mainstream favor, they have an undeniable appeal to anyone with an interest in electronic or mechanical devices. Which is why the Orbigator built by [wyojustin] stands out among similar desktop orbital trackers we’ve seen.

Conceptually, it’s very similar to the International Space Station tracking lamp that [Will Dana] built in 2025. In fact, [wyojustin] cites it specifically as one of the inspirations for this project. But unlike that build, which saw a small model of the ISS moving across the surface of the globe, a transparent globe is rotated around the internal mechanism. This not only looks gorgeous, but solves a key problem in [Will]’s design — that is, there’s no trailing servo wiring that needs to be kept track of.

ImageFor anyone who wants an Orbigator of their own, [wyojustin] has done a fantastic job of documenting the hardware and software aspects of the build, and all the relevant files are available in the project’s GitHub repository.

The 3D printable components have been created with OpenSCAD, the firmware responsible for calculating the current position of the ISS on the Raspberry Pi Pico 2 is written in MicroPython, and the PCB was designed in KiCad. Incidentally, we noticed that Hackaday alum [Anool Mahidharia] appears to have been lending a hand with the board design.

As much as we love these polished orbital trackers, we’ve seen far more approachable builds if you don’t need something so elaborate. If you’re more interested in keeping an eye out for planes and can get your hands on a pan-and-tilt security camera, it’s even easier.

Interconnected circuits for controlling the clock

Tick, Tock, Train Station Clock

We’ve seen a few H-bridge circuits around these parts before, and here’s another application. This time we have an Old Train Station Clock which has been refurbished after being picked up for cheap at the flea market. These are big analog clocks which used to be common at railway stations around the world.

This build uses an ESP32 C3-mini microcontroller (PDF) in combination with an A4988 Microstepping Motor Driver (PDF). The logic is handled with MicroPython code. The A4988 provides two H-bridge circuits, one for each of two stepper motors, only one of which is used in this build.

The controller for this clock needs to send an alternating positive then negative DC pulse every minute to register that a minute has passed so the clock can update its hour hand and minute hand as appropriate. The ESP32 and the A4988 H-bridge cooperate to make that happen. The wifi on the ESP32 C3-mini is put to good use by facilitating the fetching of the current time from the internet. On an hourly basis the clock gets the current time with a HTTP call to a time server API, for whatever is suitable for your time zone.

Thanks to [PiotrTopa] for writing in to let us know about his project. If you’re interested in learning more about H-bridge applications be sure to check out Introduction To The H-bridge Motor Controller and A H-Bridge Motor Controller Tutorial Makes It Simple To Understand.

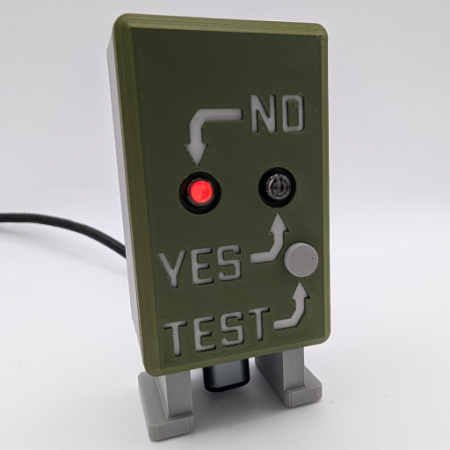
A green box with the answer to if a nuke has gone off with red neon lights

Has A Nuke Gone Off? Indicator

Look out of a window, ask yourself the question, “Has a nuke gone off?”. Maybe, maybe not, and all of us here at Hackaday need to know the answer to these important questions! Introducing the hasanukegoneoff.com Indicator from [bigcrimping] to answer our cries.

An ESP32 running a MicroPython script handles the critical checks from hasanukegoneoff.com for any notification of nuclear mayhem. This will either power the INS-1 neon bulb, indicating “no” or “yes” in the unfortunate case of a blast. Of course, there is also the button required for testing the notification lights; no chance of failure can be left. All of this is fitted onto a custom dual-sided PCB and placed inside a custom 3D-printed enclosure.

Hasanukegoneoff.com’s detection system, covered before here, relies on an HSN-1000L Nuclear Event Detector to check for neutrons coming from the blast zone. [bigcrimping] also provides the project plans for your own blast detector to answer the critical question of “has a nuke gone off” from anywhere other than the website’s Chippenham, England location.

This entire project is open sourced, so keep sure to check out [bigcrimping]’s GitHub for both portions of this project on the detector and receiver. While this project provides some needed dark humor, nukes are still scary and especially so when disarming them with nothing but a hacksaw and testing equipment.

Thanks to [Daniel Gooch] for the tip.

Image

ESP32 Dashboard Is A Great Way To Stay Informed

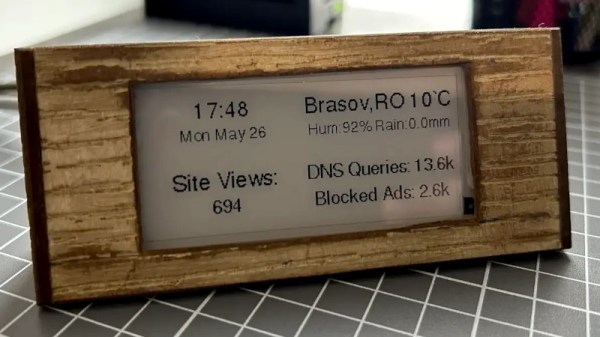
The original ESP32 may be a little long in the tooth by now, but it remains a potent tool for connected devices. We were drawn to [Max Pflaum]’s ESP32 Dashboard as a great example, it’s an ESP32 hooked up to an e-paper display. The hardware is simple enough, but the software is what makes it interesting.

This is deigned as a configurable notification tool, so to make it bend to the user’s will a series of widgets can be loaded onto it. The device runs MicroPython, making it easy enough to write more than the ones already on place. The screen is divided into four zones, allowing for a range of widgets to be used at once. All the details can be found in a GitHub repository.

We like it for its configurability and ease of programming, and because it delivers well on the promise of a useful device. An ESP32 and e-ink combination with MicroPython apps is something we’ve seen before in the world of badges.

Screenshot of the REPL running on the Flipper, importing the flipper API library and calling infrared receive function out of it with help of autocomplete

A MicroPython Interpreter For Flipper Zero

Got a Flipper Zero? Ever wanted to use a high-level but powerful scripting language on it? Thanks to [Oliver] we now have a MicroPython application for the Flipper, complete with a library for hardware and software feature support. Load it up, start it up, connect over USB, and you’ve got the ever-so-convenient REPL at your disposal. Or, upload a Python script to your Flipper and run them directly from Flipper’s UI at your convenience!

In the API docs, we’re seeing support for every single primitive you could want – GPIO (including the headers at the top, of course), a healthy library for LCD and LCD backlight control, button handling, SD card support, speaker library for producing tones, ADC and PWM, vibromotor, logging, and even infrared transmit/receive support. Hopefully, we get support for Flipper’s wireless capabilities at some point, too!

Check out the code examples, get the latest release from the Flipper app portal or GitHub, load it up, and play! Mp-flipper has existed for the better half of a year now, so it’s a pretty mature application, and it adds quite a bit to Flipper’s use cases in our world of hardware hacking. Want to develop an app for the Flipper in Python or otherwise? Check out this small-screen UI design toolkit or this editor we’ve featured recently!