Search the Community
Showing results for tags 'tracker'.
Found 6 results
-
Version 1.6.2
102 downloads
What is Owned Livestock Tracker? Made with the help of AI Owned Livestock Tracker is the ultimate administrative and performance-control utility for Rust server owners who want to manage player-owned livestock, ranching loops, and animal farms. Large-scale animal farms are notorious for causing server-side entity lag and frame drops; this plugin acts as an automated custodian to protect your server's performance while keeping players fully informed. Key Capabilities Automated Population Control: It continuously tracks animal densities around Tool Cupboard (TC) zones. If a player’s farm exceeds your configured threshold, the plugin automatically culls the excess down to a stable line, intelligently targeting the oldest entities first. Performance Protection: Instead of constantly draining server resources by scanning the map, it uses an optimized, event-driven framework that only triggers when animals are spawned or killed. Admin Dashboard HUD: Admins gain access to a sleek, fully interactive, native in-game UI menu. From this menu, you can see a paginated list of every farm on the server, who owns it, what grid it is in, and exactly how many animals are there. Targeted Moderation: Within the UI, admins can "inspect" any specific TC zone, view a list of every animal inside it, instantly kill individual animals by network ID, or wipe an entire problematic lag-source using a "Purge All" button. Discreet Admin Slaughter Logs: To prevent offline griefing or unmonitored animal slaughter, the plugin broadcasts a real-time message to active administrators and authorized moderators when an animal is killed, logging who did it and the exact map grid where it happened—completely hidden from regular players. Player-Friendly Notifications: When the automated system culls an overcrowded farm, it displays a professional, immersive full-screen warning UI to the base owner when they are online, explaining the server limit so they understand exactly why it happened without needing to open an admin support ticket. Command Directory Chat Commands /ol Permission: ownedlivestocktracker.admin / Server Admin Description: Launches the main overview administration matrix dashboard. This maps out active zones, showing coordinates, current ownership links, and aggregated livestock entities grouped under Tool Cupboards. Console Commands ownedtracker.ui.testwarning Permission: Admin Only Description: Instantly fires a sandbox version of the LivestockWarningUI modal onto your screen, simulating a population threshold violation in Grid A1 so you can inspect the design layout. ownedtracker.ui.close Description: Safely terminates the root dashboard UI and flushes active navigation state references from server memory. ownedtracker.ui.closewarning Description: Destroys the automated population overflow warning notification wrapper on the target player's screen. ownedtracker.ui.page <1 / -1> Description: Handles grid pagination navigation by shifting your dashboard list view index offset forward or backward. ownedtracker.ui.inspect <tcId> Description: Swaps view perspectives from global server zones into a localized inspection window targeting a specific Tool Cupboard's network asset ID. ownedtracker.ui.delete <netId> Description: Issues a direct server invocation to instantly cull and kill a specific tracked livestock entity by its Network ID. ownedtracker.ui.purgeuser <tcId> Description: Runs an iterative filter scan on active server entities to slaughter every matching livestock animal currently bound to that specific Tool Cupboard radius zone. Configuration & Customization Guide Upon your first launch, a configuration file will automatically be generated in your server files under oxide/config/OwnedLivestockTracker.json. Open this file to easily scale limits, adjust colors, or fine-tune entity definitions to match your server's needs: { "MaxPopulationCap": 50, "TargetCullCount": 35, "WarningPanelColor": "0.15 0.05 0.05 0.98", "MainPanelColor": "0.08 0.08 0.1 0.98", "TrackedPrefabs": [ "cow", "bull", "calf", "sheep", "lamb", "chicken", "horse", "scarecrowrowsheep", "chicken.population.item" ] } Use code with caution. Property Explanations: MaxPopulationCap (int) — The maximum number of allowed tracked animals inside a single Tool Cupboard radius zone before an automated server cleanup triggers. TargetCullCount (int) — The safe baseline target the system drops the animal population down to during an intervention. WarningPanelColor (string) — The RGBA background color format used to render the full-screen limit warning popup for players. MainPanelColor (string) — The RGBA background color layout configuration used to render the administrative overview dashboard grid. TrackedPrefabs (List) — A customized collection of lowercase prefab string targets monitored by the tracking engine. You can seamlessly add or remove custom animal mod prefabs here.Free-
- 1
-

-
- #admin
- #livestock
- (and 2 more)
-

Version 1.0.1
32 downloads
Why This Plugin is a Game-Changer Transform your Rust server with Monument Loot Notifier, the essential tool to revolutionize gameplay for PVE and PVP alike! This plugin isn’t just functional—it’s a must-have for creating thrilling, efficient, and dynamic interactions on your server. On PVE Servers: Keep the action flowing and eliminate wasted time. With real-time notifications, players can focus on what matters most: exploration, teamwork, and thriving in the environment. No more looting empty monuments—this plugin boosts efficiency and keeps your players engaged. On PVP Servers: Turn up the heat! Notifications amplify the tension as players race to claim loot or ambush their rivals. Every notification becomes a high-stakes moment, transforming your server into a battleground of strategy and adrenaline. Support for Custom Monuments: Do you have unique, hand-crafted monuments on your server? No problem! Monument Loot Notifier fully supports custom monuments, which can be added manually through an integrated system. With just a few simple commands, you can define the boundaries of your custom creations and make them part of the action. This feature ensures your custom content gets the recognition and integration it deserves. Discord Support: Keep your community informed even when they're not in-game! Monument Loot Notifier can send notifications directly to your Discord server through a webhook. Monument activity, airdrop looting, and locked crate hacks can be shared with your Discord community in real time, keeping everyone connected to the action wherever they are. Whether you’re fostering collaboration in PVE or creating heart-pounding moments in PVP, Monument Loot Notifier adds life and energy to your server! Documentation Commands /monument_add <name> Start creating a new custom monument by providing a name. Example: /monument_add CustomPowerPlant /add_point Add points to define the bounding box of the custom monument. Requires three points to complete. How have to start the session first by typing /monument_add NameOfYourMonument /monument_cancel Cancel the current monument creation session. No changes will be saved. /monuments_list Display a list of all custom monuments, including their name, position, and size. /monuments_show Visualize the bounding boxes of all custom monuments on the map for verification. Bounding Box System The bounding box system allows admins to define and manage custom monuments precisely. Here’s how it works: Begin by setting three points: top-left, top-right, and bottom-right corners. The plugin automatically calculates the bounding box and the center point. Bounding boxes are visually represented using spheres and lines, ensuring easy verification. This feature ensures accurate monument management for any monument size or layout, including custom monuments created by your team. Configuration File The configuration file empowers you to tailor the plugin to your server’s unique needs. Key options include: LootThreshold: Determines the number of loots required to trigger a notification. Example: Set it to 3 to notify players after three containers are looted. Default: 3. TrackLockedCrates: Enables or disables notifications for locked crate hacks. Default: true. TrackAirdrops: Enables or disables notifications for airdrop loots. Default: true. MapPreset: A critical setting that determines which custom monument configuration file to load. If your map is a regular procedural map with a seed, leave this blank, otherwise, add the preset name and the plugin will load the file with the same name to get the monument layout configuration. Example: Setting MapPreset to "CustomMap1" will load CustomMap1.json from the data folder. This makes managing multiple map setups seamless, especially for servers with unique content. EnableDiscord: Enables or disables Discord notifications. When enabled, plugin notifications are also sent to the configured Discord webhook. *Default: false.* - DiscordWebhookUrl: The Discord webhook URL used to send notifications to your Discord server. Create a webhook for the desired Discord channel and paste its URL here. This option is only used when **EnableDiscord** is set to `true`. *Default: empty.* To edit the configuration, navigate to the oxide/config folder and find the MonumentLootNotifier.json file. Make your changes and reload the plugin to apply them. Installation Copy MonumentLootNotifier.cs into your oxyde/plugins folder Copy Frostland.json into your oxyde/data/MonumentLootNotifier folder Permissions Control access to the plugin’s features with these permissions: • monumentlootnotifier.exclude.monuments: Exclude a player from monument-related notifications. • monumentlootnotifier.exclude.drops: Exclude a player from airdrop notifications. • monumentlootnotifier.exclude.lockedcrates: Exclude a player from locked crate hack notifications. • monumentlootnotifier.custommonument.create: Allow a player to create custom monuments using admin commands. Custom map preset included Map preset included in the ZIP file : - Frostland (map from gruber) Why Wait? Install Monument Loot Notifier Now! Whether you’re optimizing gameplay on your PVE server, cranking up the pressure in PVP, or showcasing your custom monuments, this plugin is the ultimate solution to transform your server into an unforgettable experience. Boost efficiency, increase adrenaline, and let your players thrive in the dynamic world of Rust. What are you waiting for?$7.00 -
Version 1.1.6
908 downloads
Team Tracker is your is the best admin tool for monitoring player associations and enforce team size rules. Whether you need to ban an entire team or track players abusing the system, Team Tracker has you covered. It offers live logging, team queries, and auto-banning—all in one customizable and performant package. Dynamic identification of player teams Live discord logging Query a player team at any time Automatic custom ban system Battlemetrics integration High Performance clearplayerdata - deletes a players team data/history teamcheck - Sends a discord embed with a report of group data, warnings and current team players to discord. Note: All chat commands are universal meaning they can be used via the console, rcon(for import commands) and can be customized via the configuration. teamtracker.whitelist - Whitelists a player from being included in any team alerts (Admins and Developers are automatically whitelisted) teamtracker.admin - allows the use of the checkteam and whitelist commands Proximity - configurable distance between players Sleeping bag placement - bags given or placed within building Codelock authorization - authorized players on a codelock Turret authorization - authorized players on a turret Toolcupboard authorization - authorized players on a toolcupboard Healing - healing and reviving of other players Vehicle mounting - mounting of the same vehicle at the same time Team-members - history of team members PVP - players breaking team limits when pvping/roaming Raiding - players raiding together Looting - looting other players together Alerts: All alert types can be customized via the plugin config. Options include: Enable - this toggles any usage of the alert type to enable or disable the alert type Log to discord - Enables discord logs Warn Players - Sends an ingame warning to a player up to 30 seconds after the offense Weighting - configures how important the alert type is. This contributes to the ban by association score value. Warnings: Warnings are logged as a type of violation. This provides discord logs and the optional in game warning display to the violator. Display Warnings to Players - option to disable in game warnings Length of time to display warning - optional length of time to display warnings Warning Text - customizable warning text Bans: Team-Tracker allows for customizable automatic bans of players, who go over the group limits. Enable Bans - allows toggeling of the ban system Ban text - text to display as the reason for a player ban Log Bans to Discord - optionally log bans to discord. Logging Only Mode: Set Enable Bans & Log Bans to Discord to true and set Local Bans and Battlemetrics Bans to False Enable Ban by Max Association - enables banning a player or a team by summing all association values to create a total weighting. Example: if the team limit is 5 players and the Max Association Weighting is 10, if a player has more than 5 players with an association weighting of more than 10 this will apply a ban. Max Association Weighting - set the max association weighting per player in a group Ban Duration - length of time to ban for Ban Team - ban all team members of a banned player Ban Associations - bans all players over Max Association Weighting in relation to a banned player Local Bans - apply bans locally An API token for your battlemetrics org is required to use the battlemetrics ban features. A token can be acquired by visiting: https://www.battlemetrics.com/developers Server ID - set the BM server ID Go to https://www.battlemetrics.com/rcon, click into the select server. Check the address bar in your browser, the address will be ending with the Server Id, for example: https://www.battlemetrics.com/rcon/servers/123456 means 123456 is the Server Id. Org ID - set an organisation ID Go to https://www.battlemetrics.com/rcon/orgs, click into the org. Check the address bar in your browser, the address will be ending with the Organization Id, for example: https://www.battlemetrics.com/rcon/orgs/edit/123456 means 123456 is the Organization Id. BanList ID - adds a ban to a specific ban list Go to https://www.battlemetrics.com/rcon/ban-lists, click "View Bans". Check the address bar in your browser, the address will be ending with the Banlist Id, for example: https://www.battlemetrics.com/rcon/bans/?filter[banList]=abcdef-123456-example-banlist-example91011 means abcdef-123456-example-banlist-example91011 is the Banlist Id. Org Wide Ban - true if the ban should be applied to all servers in your organization Auto Add - true if the ban should automatically ban new identifiers after kicking a matching player. Native Enabled - true if native bans should be issued for this ban$24.99- 22 comments
- 5 reviews
-
- 4
-

-
-
- #teamalerts
- #team
- (and 28 more)
-

Version 1.2.5
1,822 downloads
Very simple, extremely dynamic stats plugin with an amazing UI! Offers tons of customizability, change UI colors, and select between 2 pre-made UI options. Support's Welcome Controller UI so you can have your stats cleanly integrated into your info menu. Enable and disable stats from showing on whatever you want. Category filters that also show you what place you are within each category! FEATURES - Supports Welcome UI Controller by Amino - Includes new scrolling UI! - Select what stats you want to show on the main screen - Select what stats you want to show on the personal screen - Disable and enable whatever stats you want - Display user currency and playtime - Kills - Deaths - KDR - Suicides - Headshots - Bullets hit - Animals killed - PVE Stats - Raid Stats - ETC* CONFIG SNIPPET FOR STAT OPTIONS "PlayerKills": { "Enabled": true, "DisplayOnMainUI": true, "DisplayOnPersonalUI": true, "IsMainPersonalStat": true, "PointsChange": 1.0, "ItemID for stat image": 0, "IMG Link for stat image (takes priority over ItemID)": "", "Category (PVP, PVE, RAID)": "PVP" }, Need support or want updates about what is coming to the plugin? Join the support discord here https://discord.gg/RVePam7pd7$19.99 -

Version 1.0.3
130 downloads
A small, zero-dependency admin team tracker for your servers. TeamId prints clean team info on demand and stays read-only with near-zero overhead. This lists all teams and team members in the console fast and easy for any of the many many reasons you would want to know who is teamed up with who. Chat Commands /ti.team <teamId> — Show a specific team by Steamid. /ti.all — Full server team report (every team). Permissions: oxide.grant user <steamid> teamid.use Works with chat/console/RCON . Console commands : ti.team, ti.all, add ("/") for chat Tiny & fast: no hooks, timers, or data files—runs only when called. Read-only: safe for moderation staff. Install Drop TeamId.cs into oxide/plugins/ oxide.grant user <steamid> teamid.use to grant permissionFree -
Version 1.1.4
232 downloads
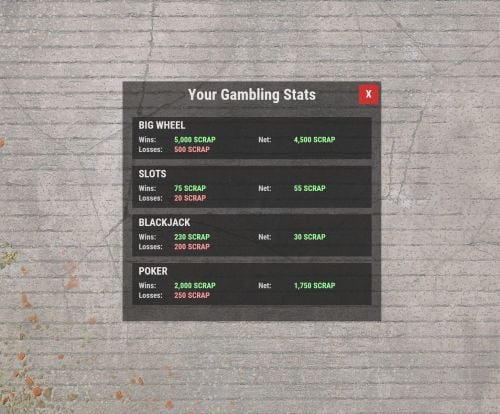
Track player wins and losses at Big Wheel, Slot Machines, and Poker Table with ease. Simple JSON file storage, modern UI, permission system, and lightweight efficiency. Open stats GUI with chat commands. Features Automatically tracks player wins and losses at the Big Wheel, Slot Machines, and Poker Table. Saves all data to a simple JSON file for easy viewing or integration with websites. A clean, modern UI for players to view their own stats. A permission system to control who can access the stats GUI. Lightweight and efficient, using Harmony patches for reliable stat tracking. Permissions This plugin uses the permission system. To assign a permission, use oxide.grant <user or group> <name or steam id> <permission>. To remove a permission, use oxide.revoke <user or group> <name or steam id> <permission>. gamblingstats.use - Required for players to use the chat commands to open the stats GUI. Commands This plugin provides both chat and console commands using the same syntax. When using a command in chat, prefix it with a forward slash: `/`. This plugin provides the following chat commands for players with the required permission: /gamblingstats - Opens the main stats GUI. /gs - A shorter alias for the same command. Data File This plugin stores all player data in a single file located at:carbon/data/GamblingStats.json This file is created automatically. Deleting this file will permanently reset all player gambling statistics. There is no configuration file for this version. Installation Download the GamblingStats.cs file. Place the file into your server's carbon/plugins/ directory. The plugin will load automatically. Grant the gamblingstats.use permission to the desired groups or players (see Permissions section).Free