

How to add a waitlist to Bubble
Put a LaunchList signup form in a Bubble app with an HTML element, capture signups from your own Bubble form through the API Connector, or link to your hosted page.
Bubble gives you three ways in. Pick by how much of the form you want to own.
| You want | Use | Code |
|---|---|---|
| Our form, in the design you pick | An HTML element | 2 lines |
| Your own Bubble inputs and button | The API Connector | One API call |
| No form in the app at all | A link to your hosted page | None |
Add the form with an HTML element#
- In LaunchList, open Embed & API → Your website, choose Bubble under What is your site built with?, pick your form if you have more than one, and copy the Inline snippet it shows.
- In the Bubble editor, drag an HTML element onto the page where the form should appear.
- Paste the snippet into the element.
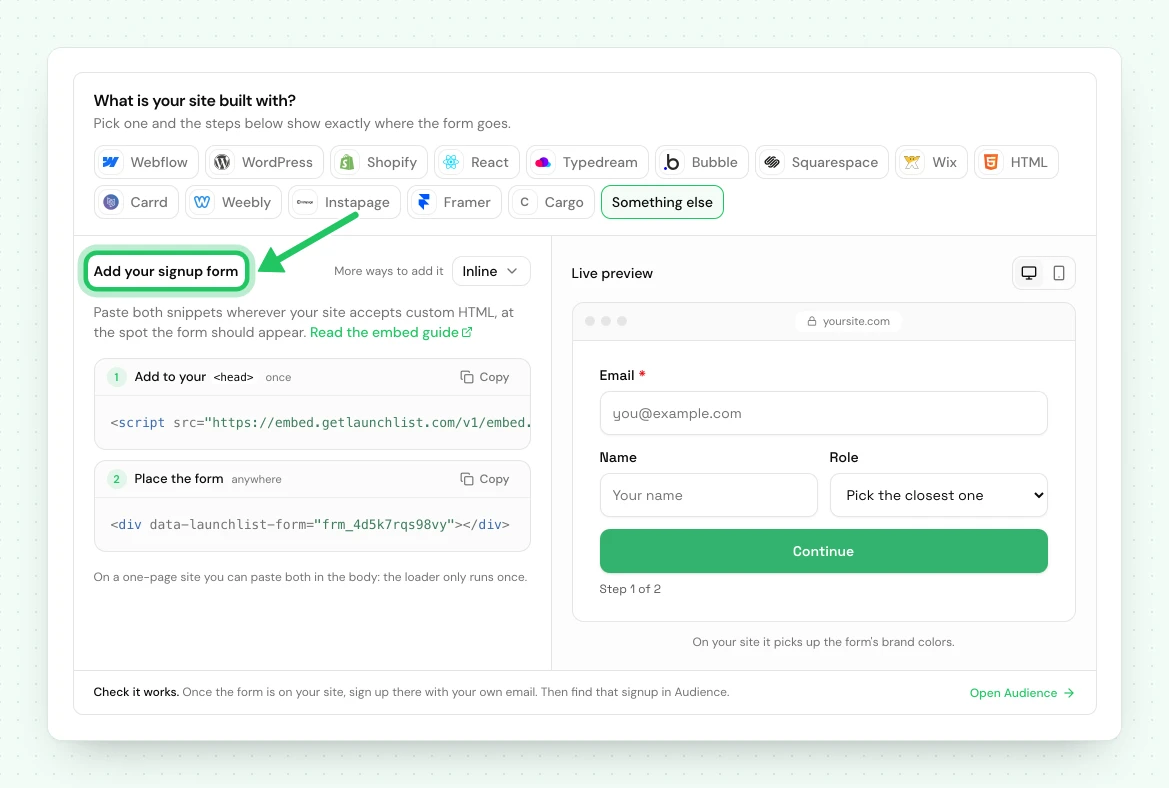
<!-- frm_8Kd2Qm4Rp9 is an example ID; use your own from Embed & API → Your website -->
<div data-launchlist-form="frm_8Kd2Qm4Rp9"></div>
<script src="https://embed.getlaunchlist.com/v1/embed.js" async></script>
- Leave Display as an iFrame unchecked, and check Stretch to fit content so the element grows with the form and pushes what sits below it down.
- Click Preview and submit a test signup. It appears in Audience in LaunchList.
The form renders inside a shadow root, so your Bubble styles cannot break it and its styles cannot leak into your app. Change the form's fields in LaunchList later and the live form updates itself, with nothing to re-paste.
Why not "Display as an iFrame"#
That option runs the HTML as if it were an independent web page. Our form then reads the address of
that frame rather than your app's page, so the ?ref= on a referral link never reaches it and the
referral does not credit. Without the option the form sits in your page and picks the code up
itself.
Forms on several pages, or inside groups that appear later#
Load the script once for the whole app instead of in every HTML element. Go to Settings → SEO / metatags and paste it into Script/meta tags in header, which Bubble adds to the head of every page:
<script src="https://embed.getlaunchlist.com/v1/embed.js" async></script>
Every HTML element after that only needs the target:
<div data-launchlist-form="frm_8Kd2Qm4Rp9"></div>
The script watches the page, so a form inside a group or popup that Bubble shows later, or on a page reached without a reload, mounts the moment it appears.
Use your own Bubble form with the API#
Keep your own inputs and button, and send each signup to LaunchList from a workflow. It runs the same pipeline as our form: deduplication, referral credit, trust scoring, the verification email, webhooks and automations.
1. Create a key#
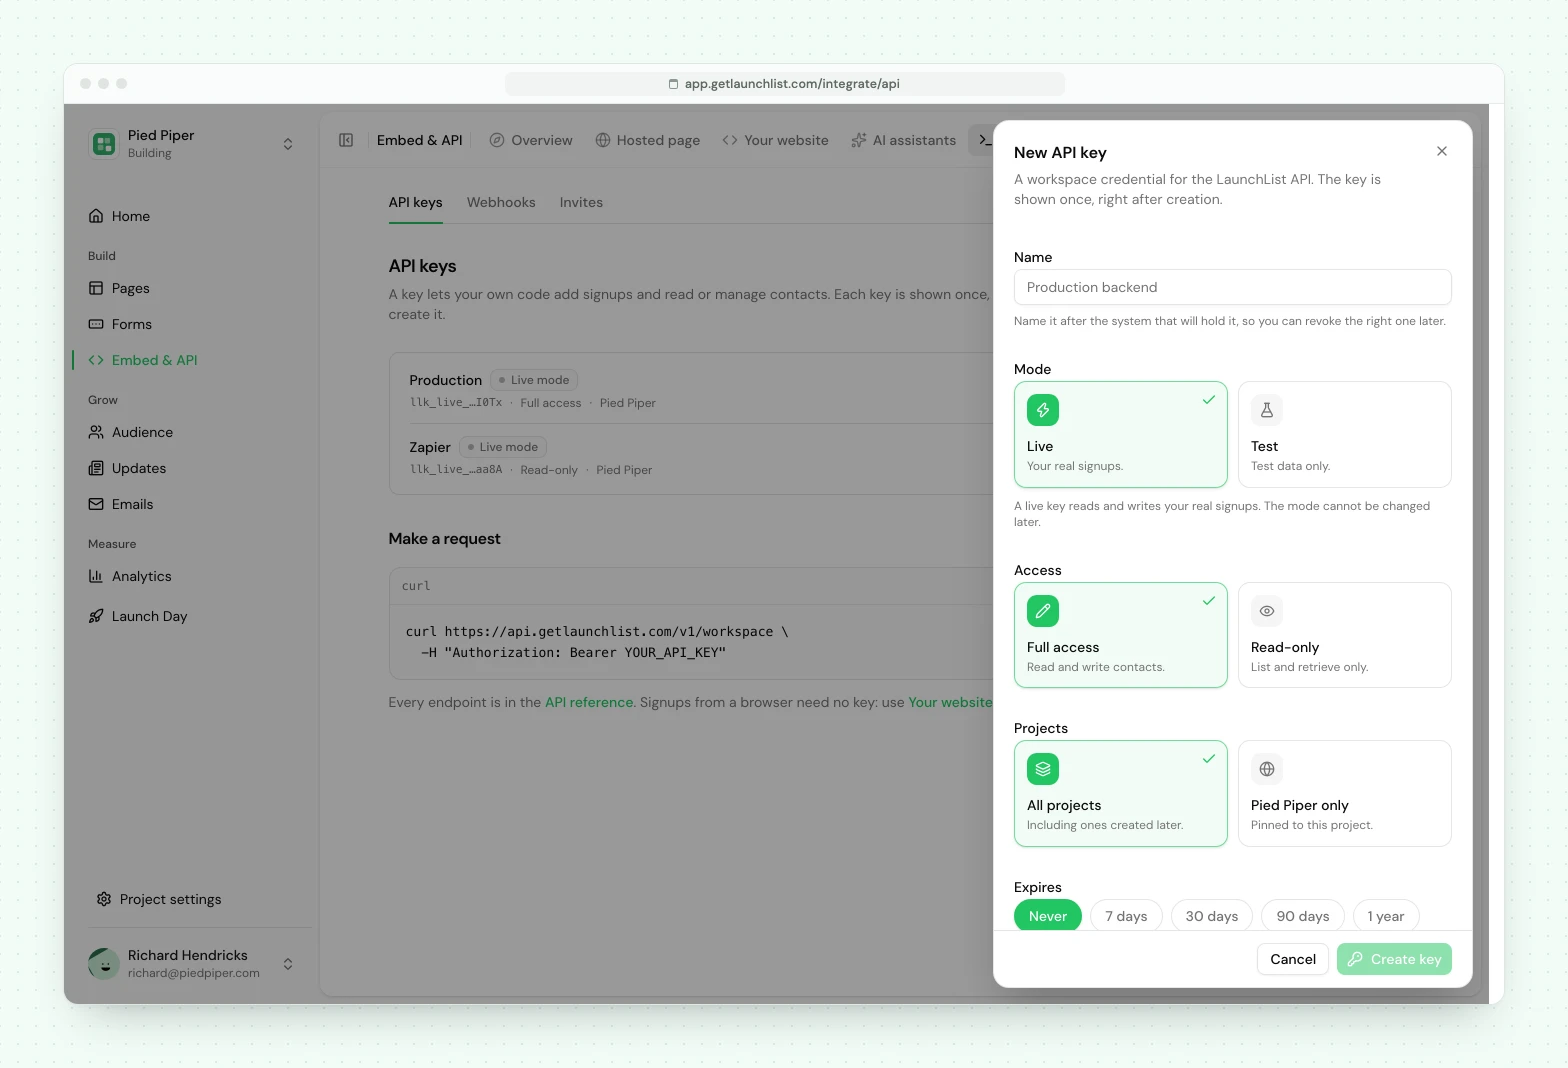
In LaunchList, open Embed & API → Developers → API keys, press New API key, choose Full
access, pin it to the project this waitlist belongs to, and press Create key. Copy the key now:
it is shown once. Copy the project's prj_ handle too. Details: authentication.
2. Add LaunchList to the API Connector#
- In Bubble, install the API Connector plugin if it is not already in your app, and add a new API.
- Name it
LaunchListand set Authentication to Private key in header. - Set Key name to
Authorizationand Private key toBearerfollowed by a space and your key (Bubble manual: authentication). - Add a call named
Create contact, set Use as to Action, the method to POST and the URL to:
https://api.getlaunchlist.com/v1/contacts
- Add a header
Content-Typewith the valueapplication/json, and set the body to:
{
    "project": "prj_7Qk2mN4pR8",
    "email": "<email>",
    "referred_by": "<ref>"
}
Replace prj_7Qk2mN4pR8 with your own handle. Bubble turns <email> and <ref> into parameters
you fill from the workflow. Leave Client-safe unchecked on both.
- Click Initialize call. Bubble makes a real request, so give it a test address you then delete
from Audience, and leave
<ref>empty.
API Connector calls run through Bubble's server and a private header stays there (Bubble manual: API Connector security), so the key never reaches the browser.
3. Call it from a workflow#
The safest place for the call is a backend workflow, which runs on Bubble's server:
- On the Backend workflows page (in the application menu above the palette), create an API
workflow named
join_waitlistwith two text parameters,emailandref. - Add the action Plugins → LaunchList - Create contact, with
emailandreffrom the workflow's parameters. - On your page, in the workflow for your button's click, add Schedule API workflow, choose
join_waitlist, set Scheduled date to Current date/time, and pass your input's value asemailand Get data from page URL (parameter nameref) asref(Bubble manual: backend workflow actions).
Passing ref matters: a form you build does not read a referral link's ?ref= by itself, so without
it referrals never credit. The full request and its responses are in
create a contact.
Link to your hosted page#
Every LaunchList project has a hosted launch page at your-slug.launchlist.page. Add a Link
element, or a Button whose workflow opens an external website, pointing at that address. Nothing
to install, and it works whatever your Bubble plan. See the launch page.
If something is not working#
| What you see | What to do |
|---|---|
| An empty HTML element in the editor | Expected. Bubble runs scripts only in run mode. Click Preview. |
| The form is cut off | Check Stretch to fit content on the HTML element, or make the element taller. |
| Nothing renders in Preview | Check the snippet is complete and the form ID is yours. If the script is only in the header field, put it back in the HTML element. |
| Referrals never credit | Uncheck Display as an iFrame. On the API route, pass Get data from page URL (ref) as ref. |
The call fails with 401 |
The Private key must read Bearer followed by a space and the full key. A revoked or mistyped key also returns 401. |
The call fails with 403 insufficient_scope |
The key is Read-only. Create a Full access key, which carries contacts:write. |
The call fails with 404 |
The project handle is wrong, or the key is pinned to a different project. |
The call fails with 429 |
Your plan's per-minute API limit was reached. See rate limits. |
| A test signup during initialization is in Audience | Bubble's initialization makes a real request. Delete that contact. |
Using the classic LaunchList dashboard#
A waitlist made in the classic LaunchList dashboard has its own snippet: a <div class="launchlist-widget"> with widget.js in an HTML element. That snippet
keeps working for now and sends signups to the classic dashboard's waitlist, not to a project here.
A classic form key does not work with the snippet on this page.
To bring that waitlist here, import it into a project, then replace the classic snippet on your Bubble site with the one from Embed & API → Your website. Your signups are copied, and the classic waitlist is not changed.
Next: every way to integrate · the REST API
Common questions
How do I add a waitlist form to a Bubble app?
Drag an HTML element onto the page and paste the LaunchList inline snippet into it: one div and one script tag. Bubble runs scripts in an HTML element only in run mode, so the form appears in Preview and on the live app, not in the editor.
Can I keep my own Bubble inputs and send signups to LaunchList?
Yes. Add LaunchList to the API Connector with your API key in a private header, then call it as an action from a workflow. The call runs through Bubble's server, so the key never reaches the visitor's browser.
Does LaunchList work on Bubble's Free plan?
You can build and test it in Preview, but Bubble's Free plan cannot deploy a live version of your app, so visitors cannot reach it there. Until you deploy, link people to your LaunchList hosted page, which needs no Bubble plan at all.
